How to create a certificate in OnBoard™ IoT Security
This article will guide you through the following operations in OnBoard™ IoT Security (OBIS):
- Create a certificate chain
- Create a custom certificate
- Create a certificate based on the Matter template
- Create a certificate based on the Google Cast template
Prerequisites
Before getting started, please ensure that you have OBIS role permissions as a System Manager or Resource Manager.
Create a certificate chain
-
Sign in to OBIS.
-
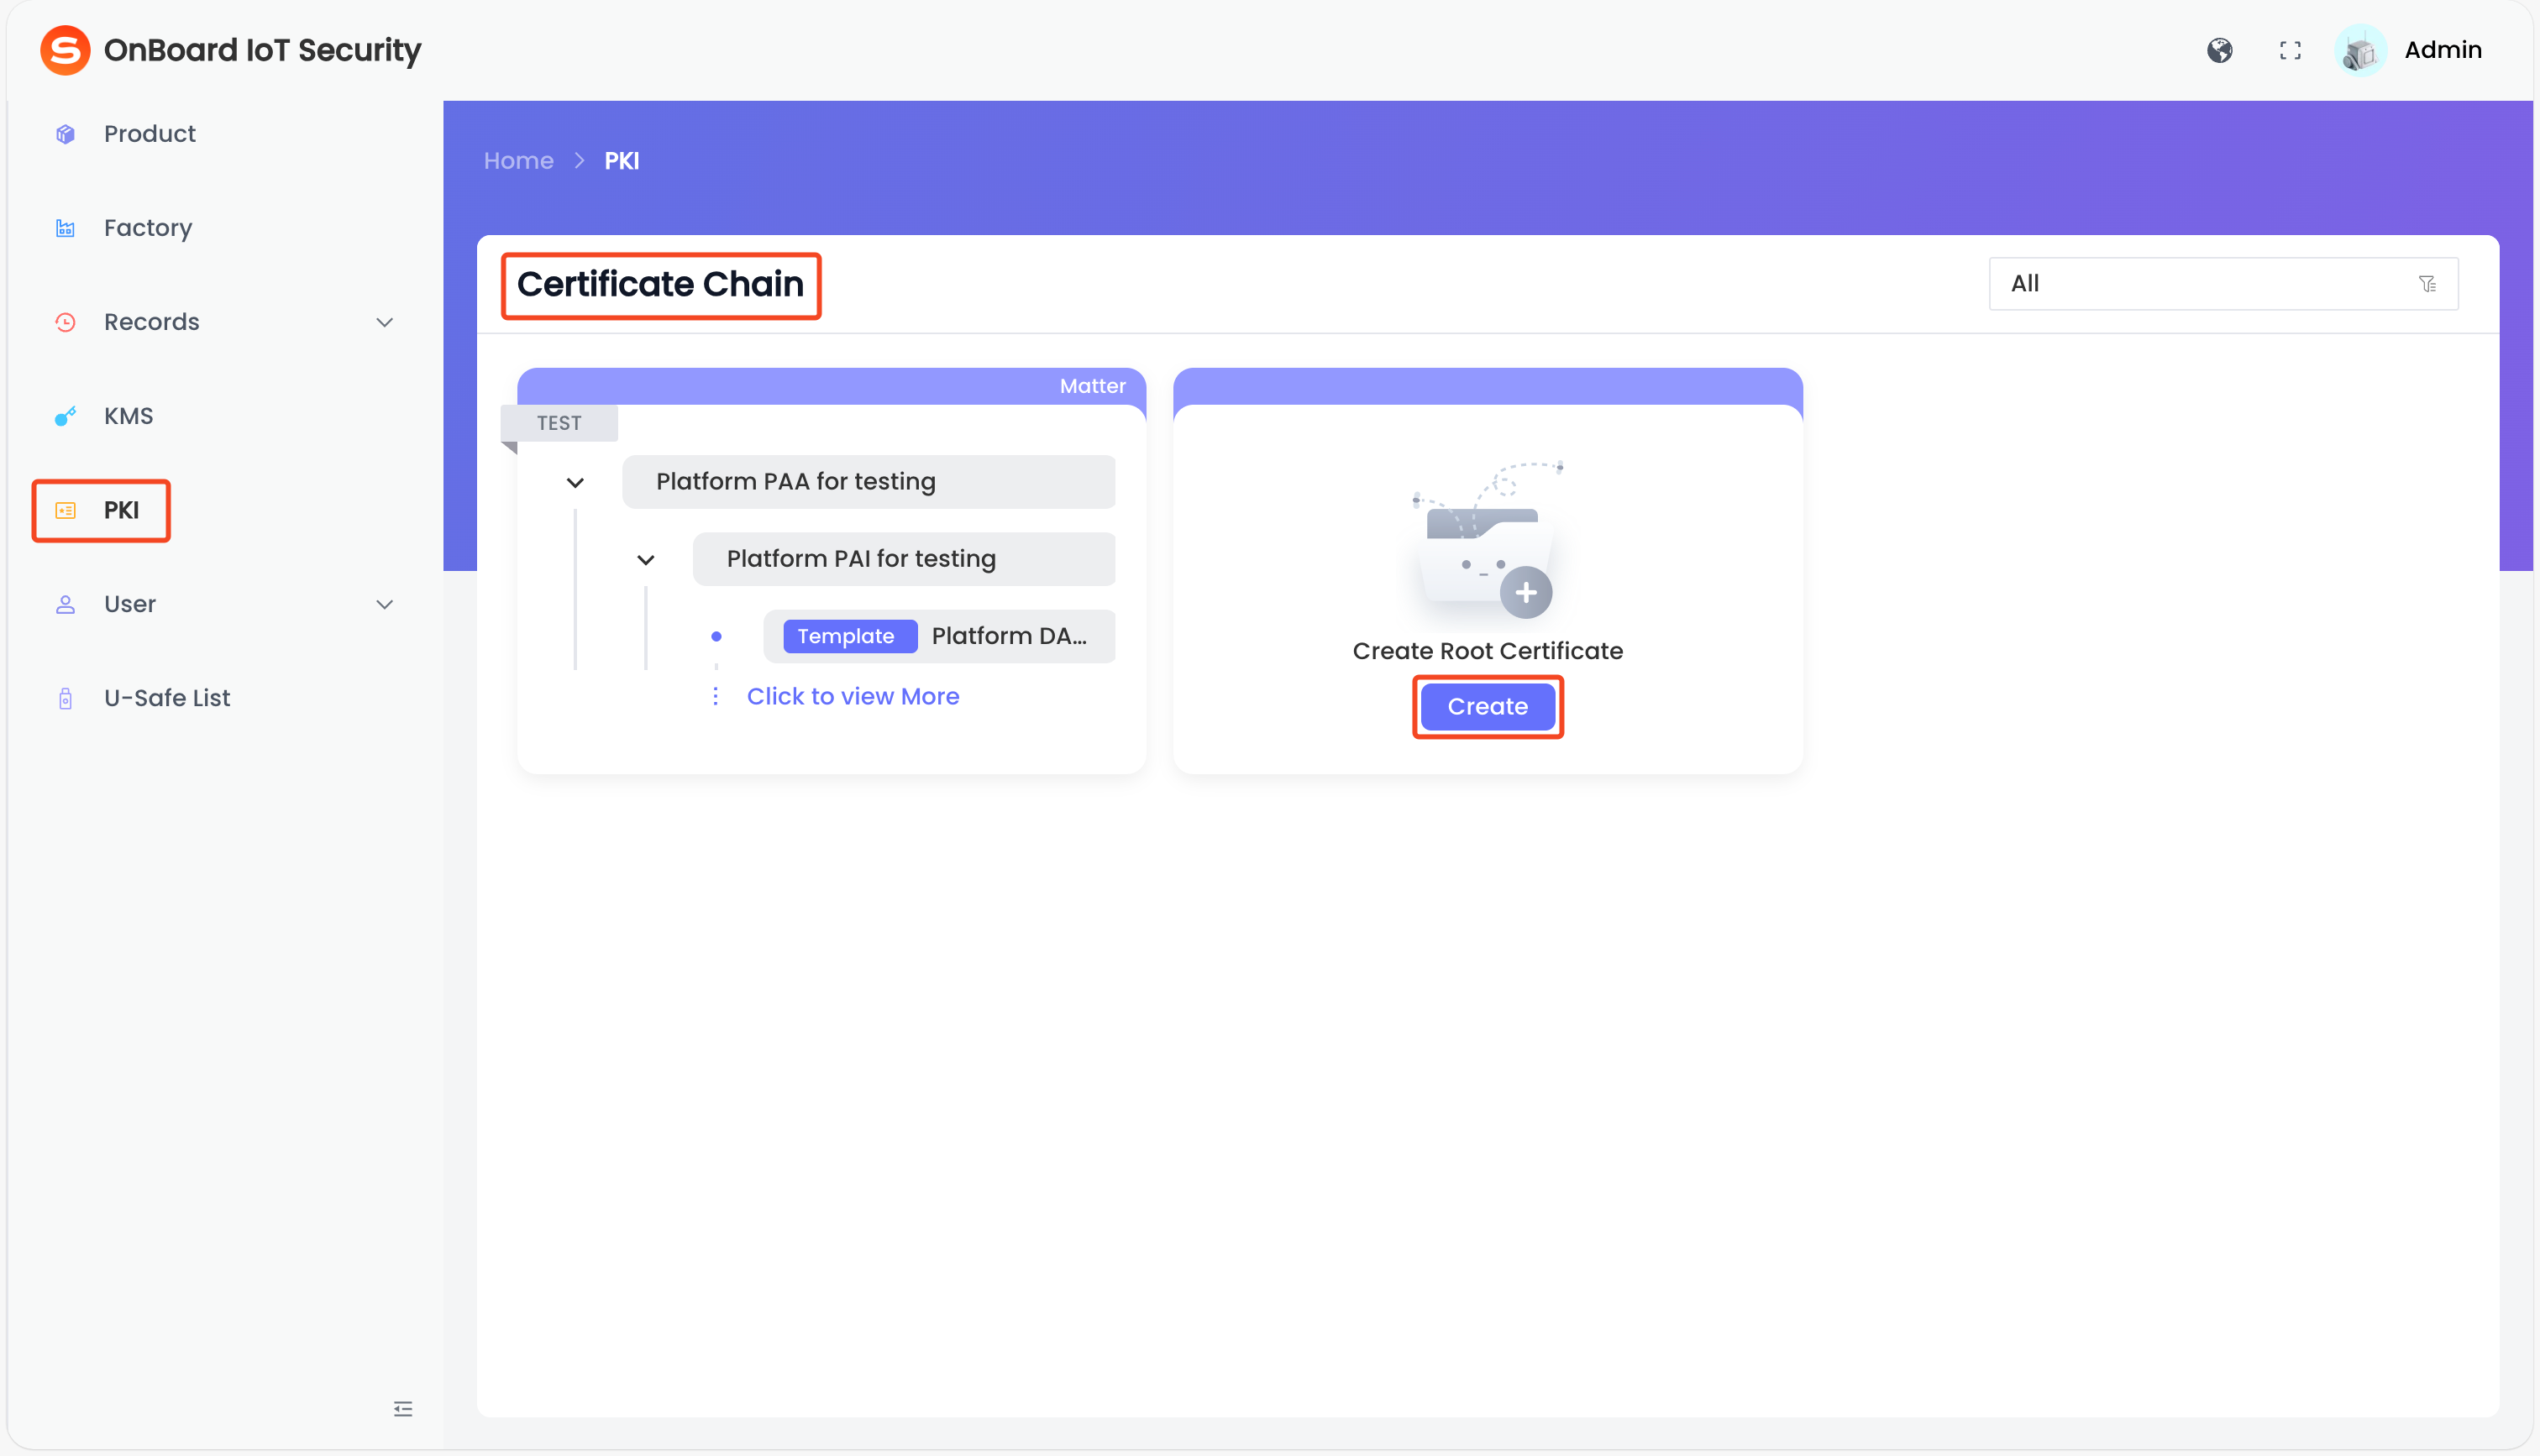
In the left menu, click PKI, and then click Create on the Certificate Chain page.
-
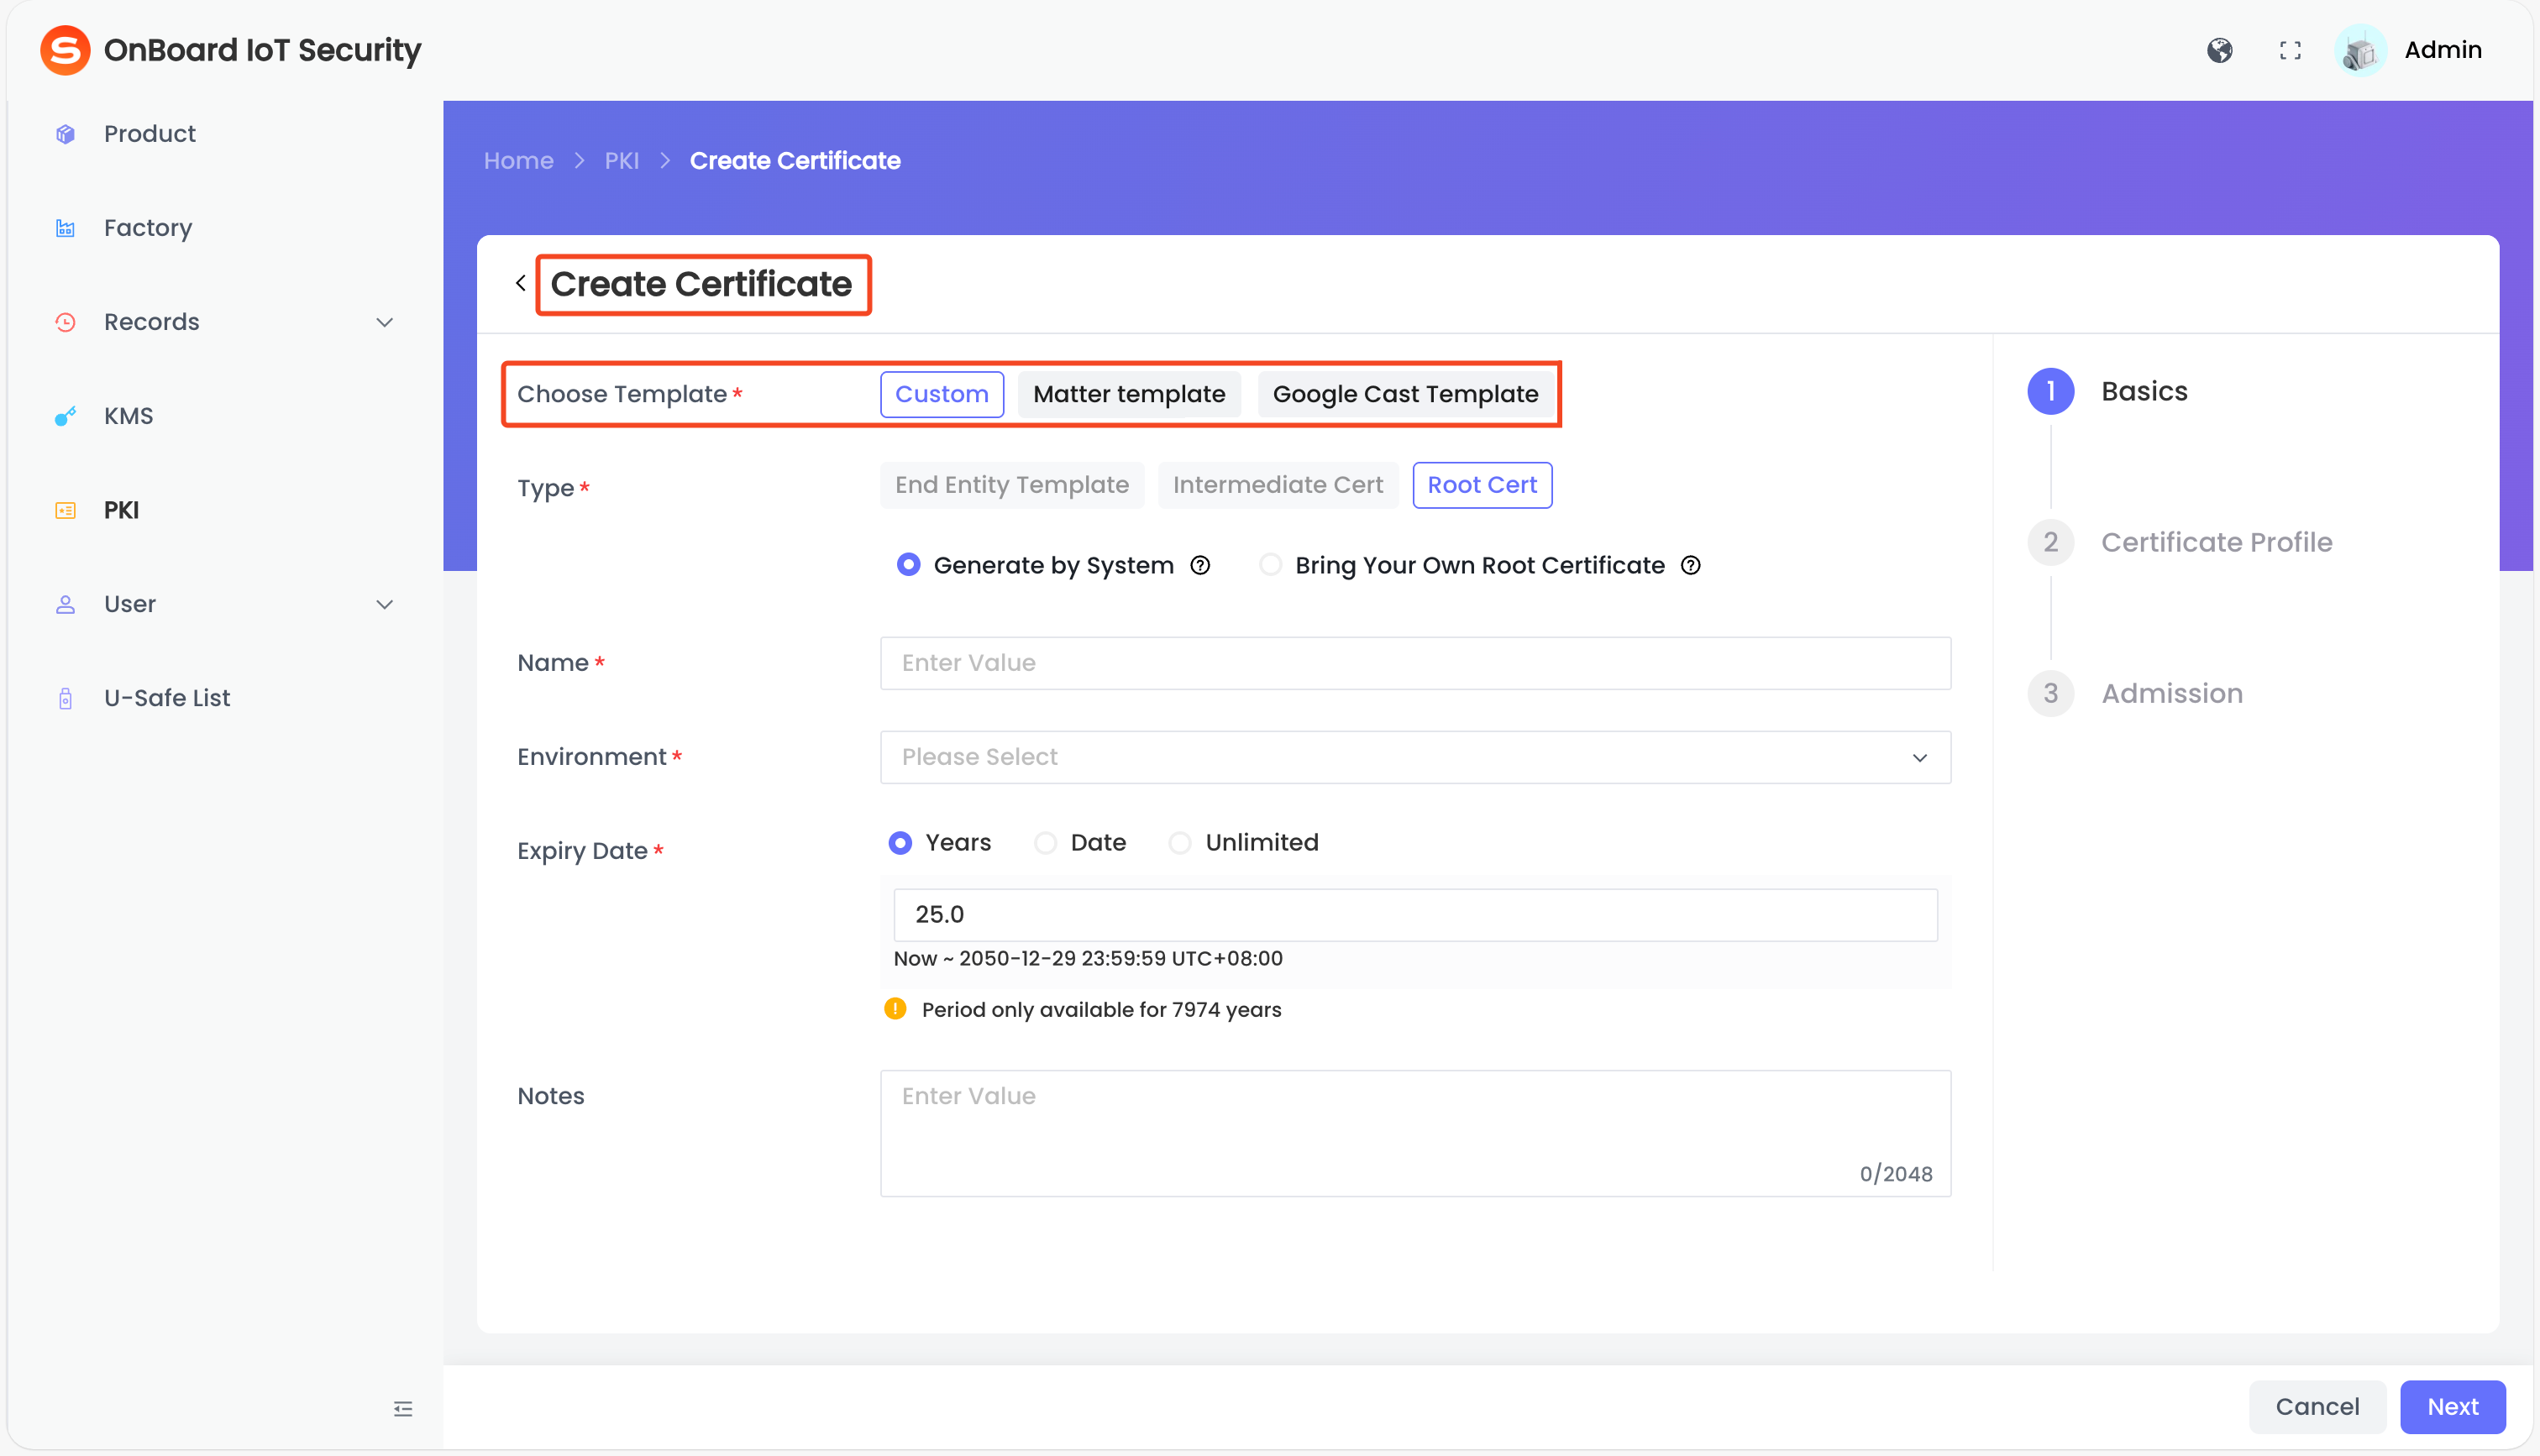
On the Create Certificate page, you can create a certificate by using the Custom, Matter template, or Google Cast Template format as needed.
Create a custom certificate
After a custom certificate or certificate template is created, it can be selected when configuring Certificate for a product.
- Create a root certificate
- Create an intermediate certificate
- Create an end entity template
-
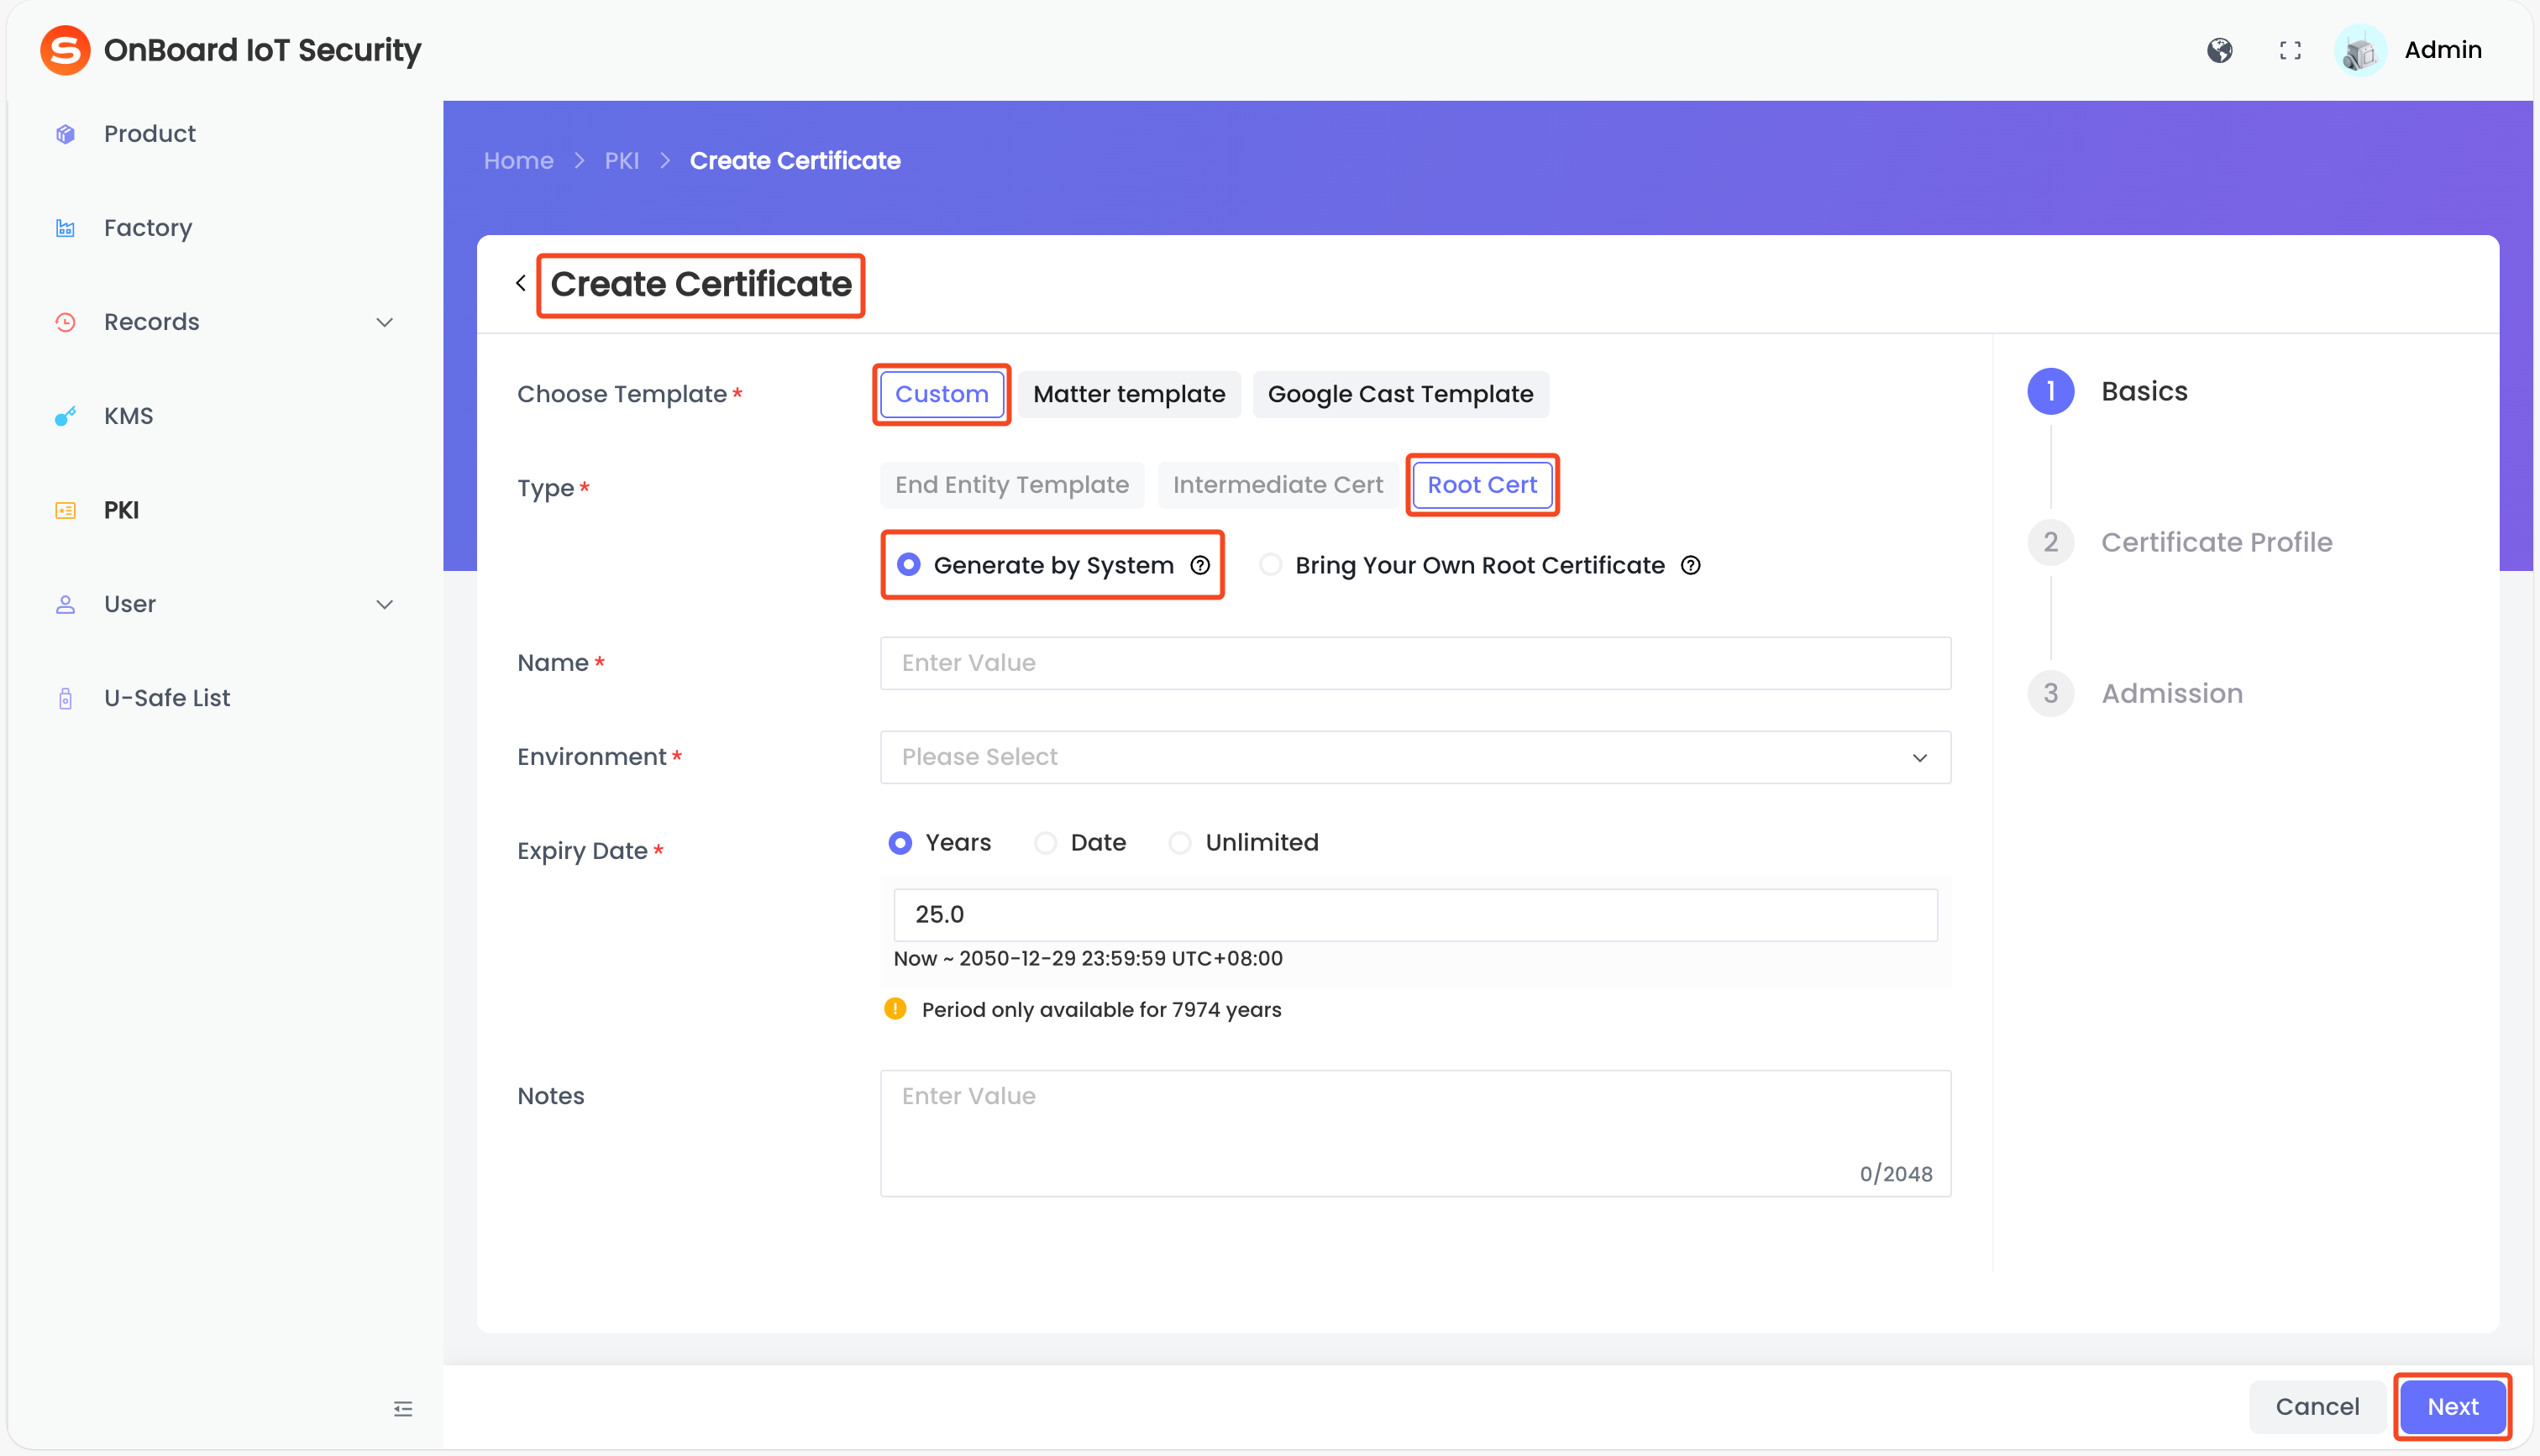
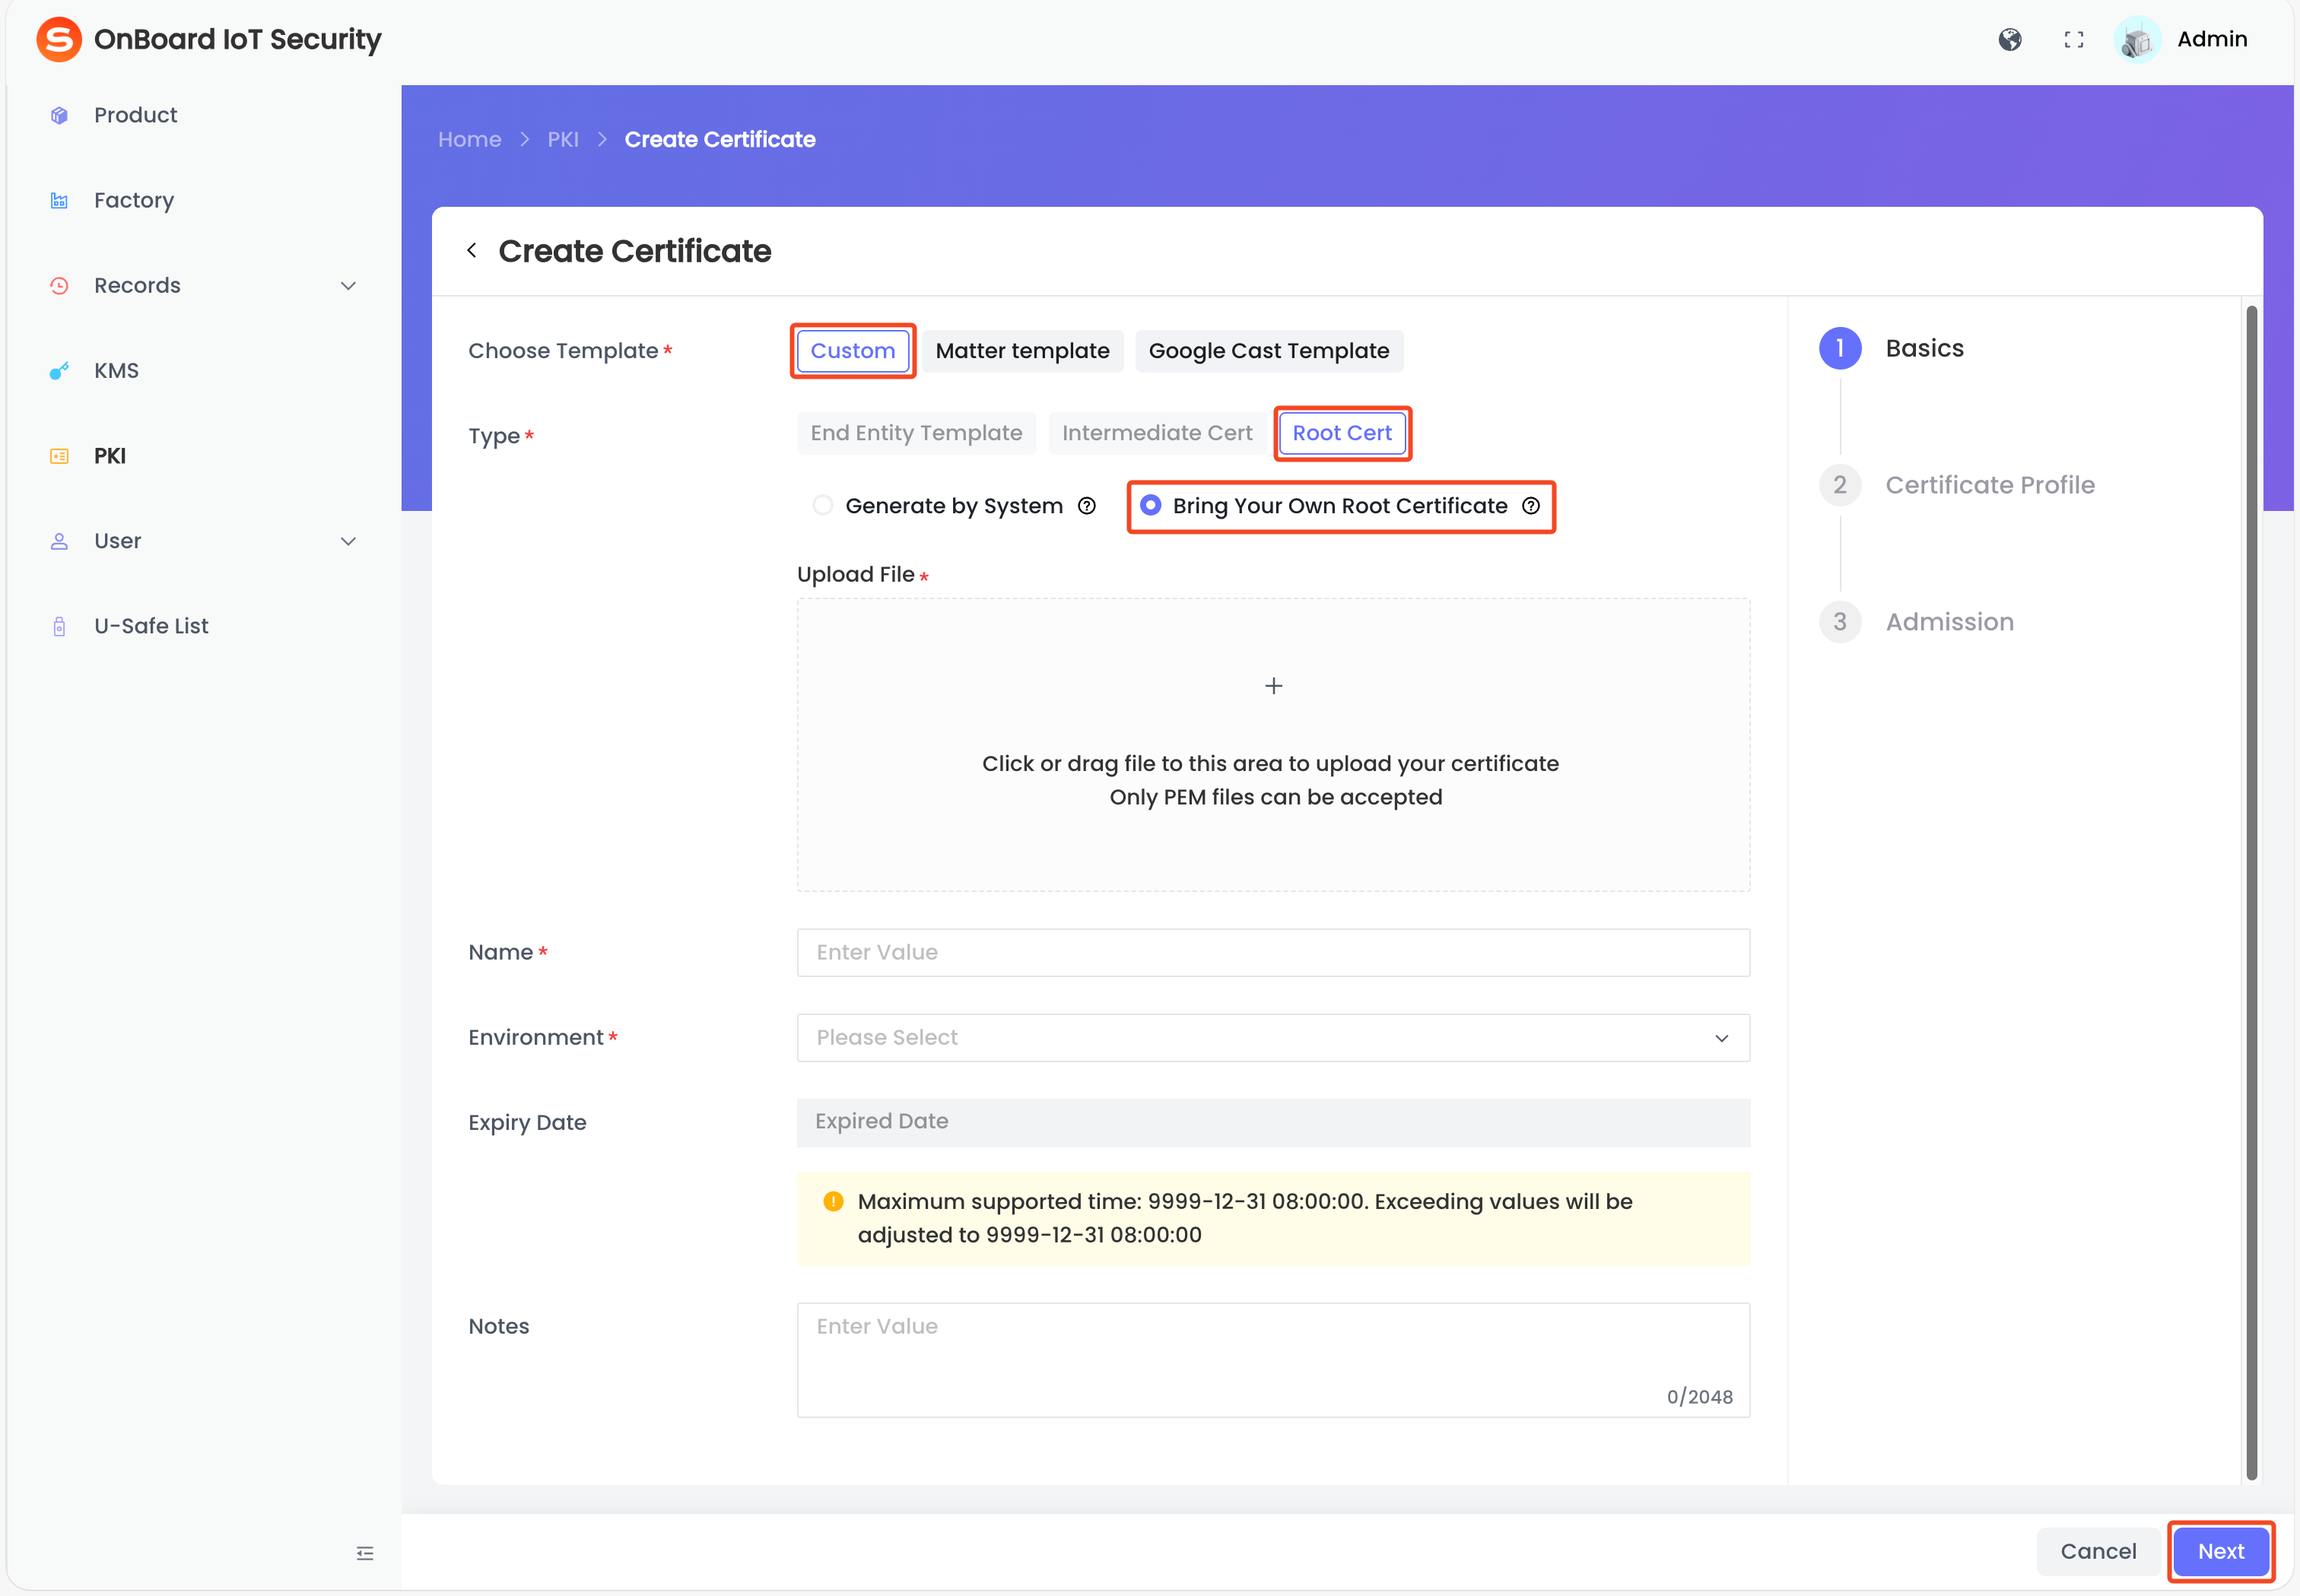
On the Create Certificate page, select the Custom for the format and the Root Cert for the type.
-
Select Generate by System or Bring Your Own Root Certificate as needed.
-
If you are not using your own root certificate, select Generate by System, then select and enter the basic information.
tipThe system securely generates a random key pair in the HSM and self-signs the Root Certificate. The Root Certificate (public part only) can be exported.
-
If you are using your own root certificate, select Bring Your Own Root Certificate, then select and enter the basic information.
tipManually upload your own root certificate (with public key only) generated outside the system for verifying signature.
Description of root certificate basic information:
-
-
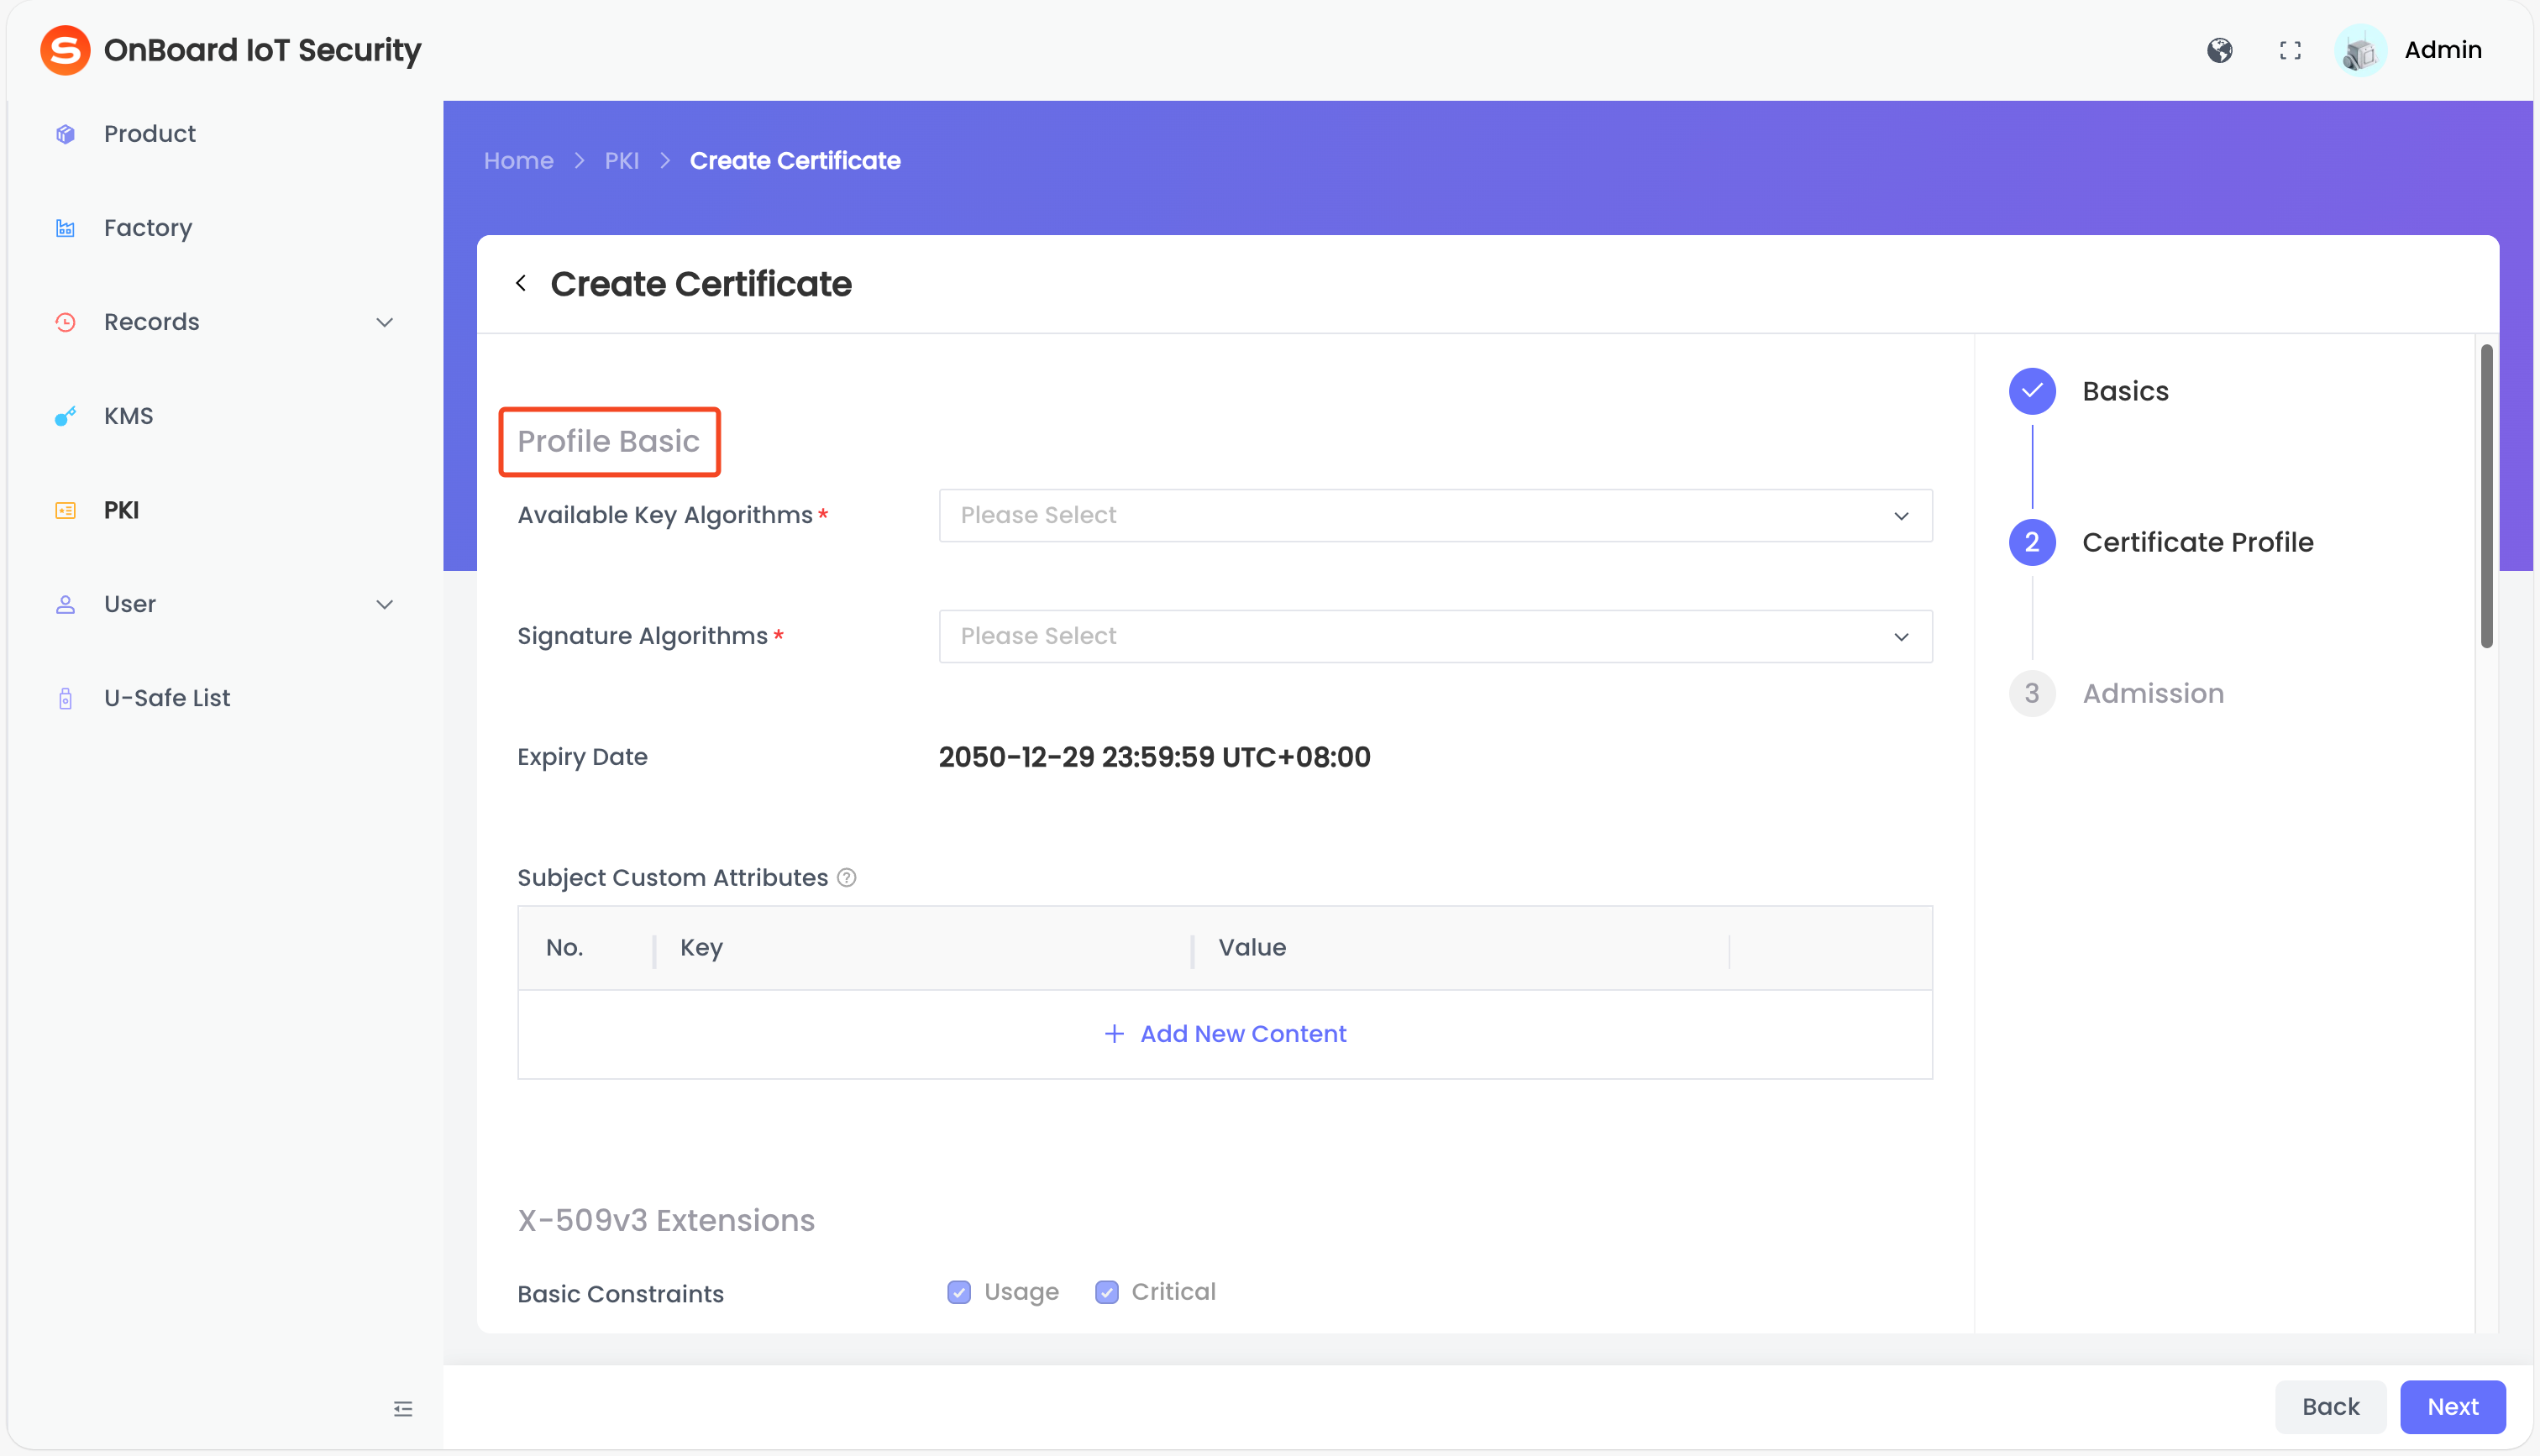
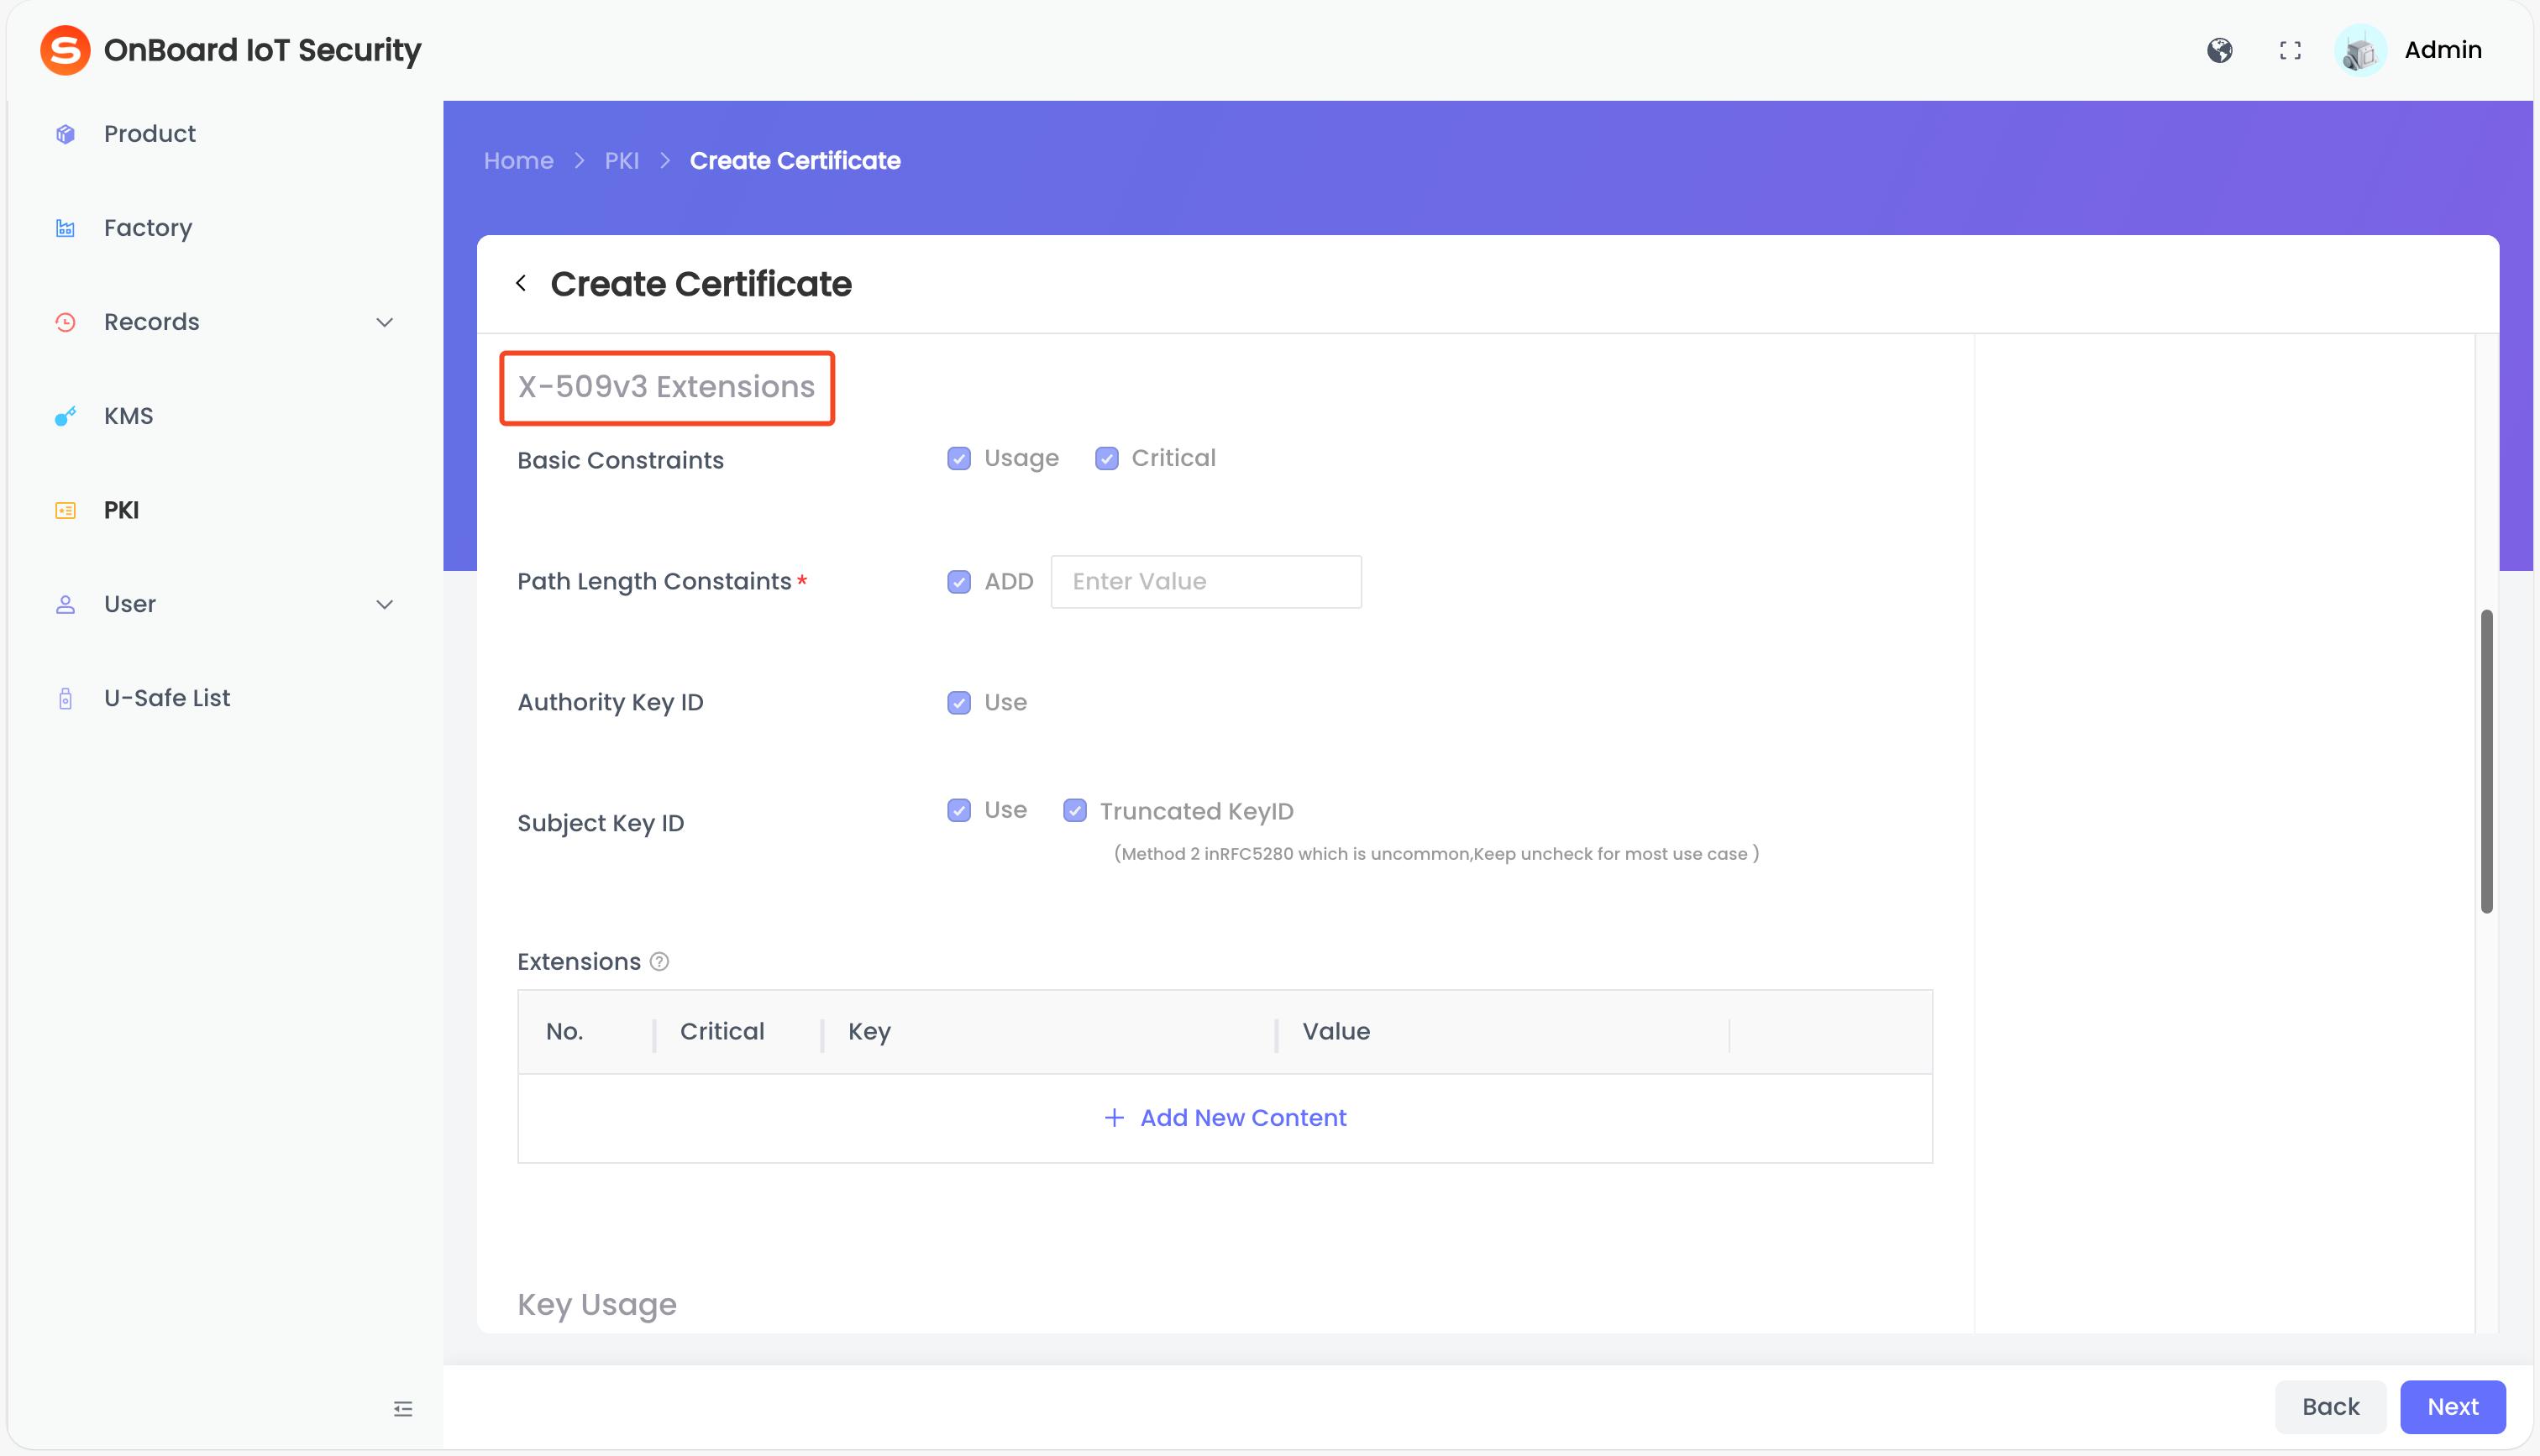
After verifying that the information is correct, click Next and configure according to the following information.
tipIf you are using your own root certificate, the related configuration will be automatically parsed and generated based on the certificate content.
Description of Profile Basic information
 Description of Profile Basic information
Description of X-509v3 Extensions information
Description of X-509v3 Extensions informationDescription of Key Usage information
Description of Key Usage informationDescription of Names information
Description of Names informationDescription of Validation Data information
Description of Validation Data information -
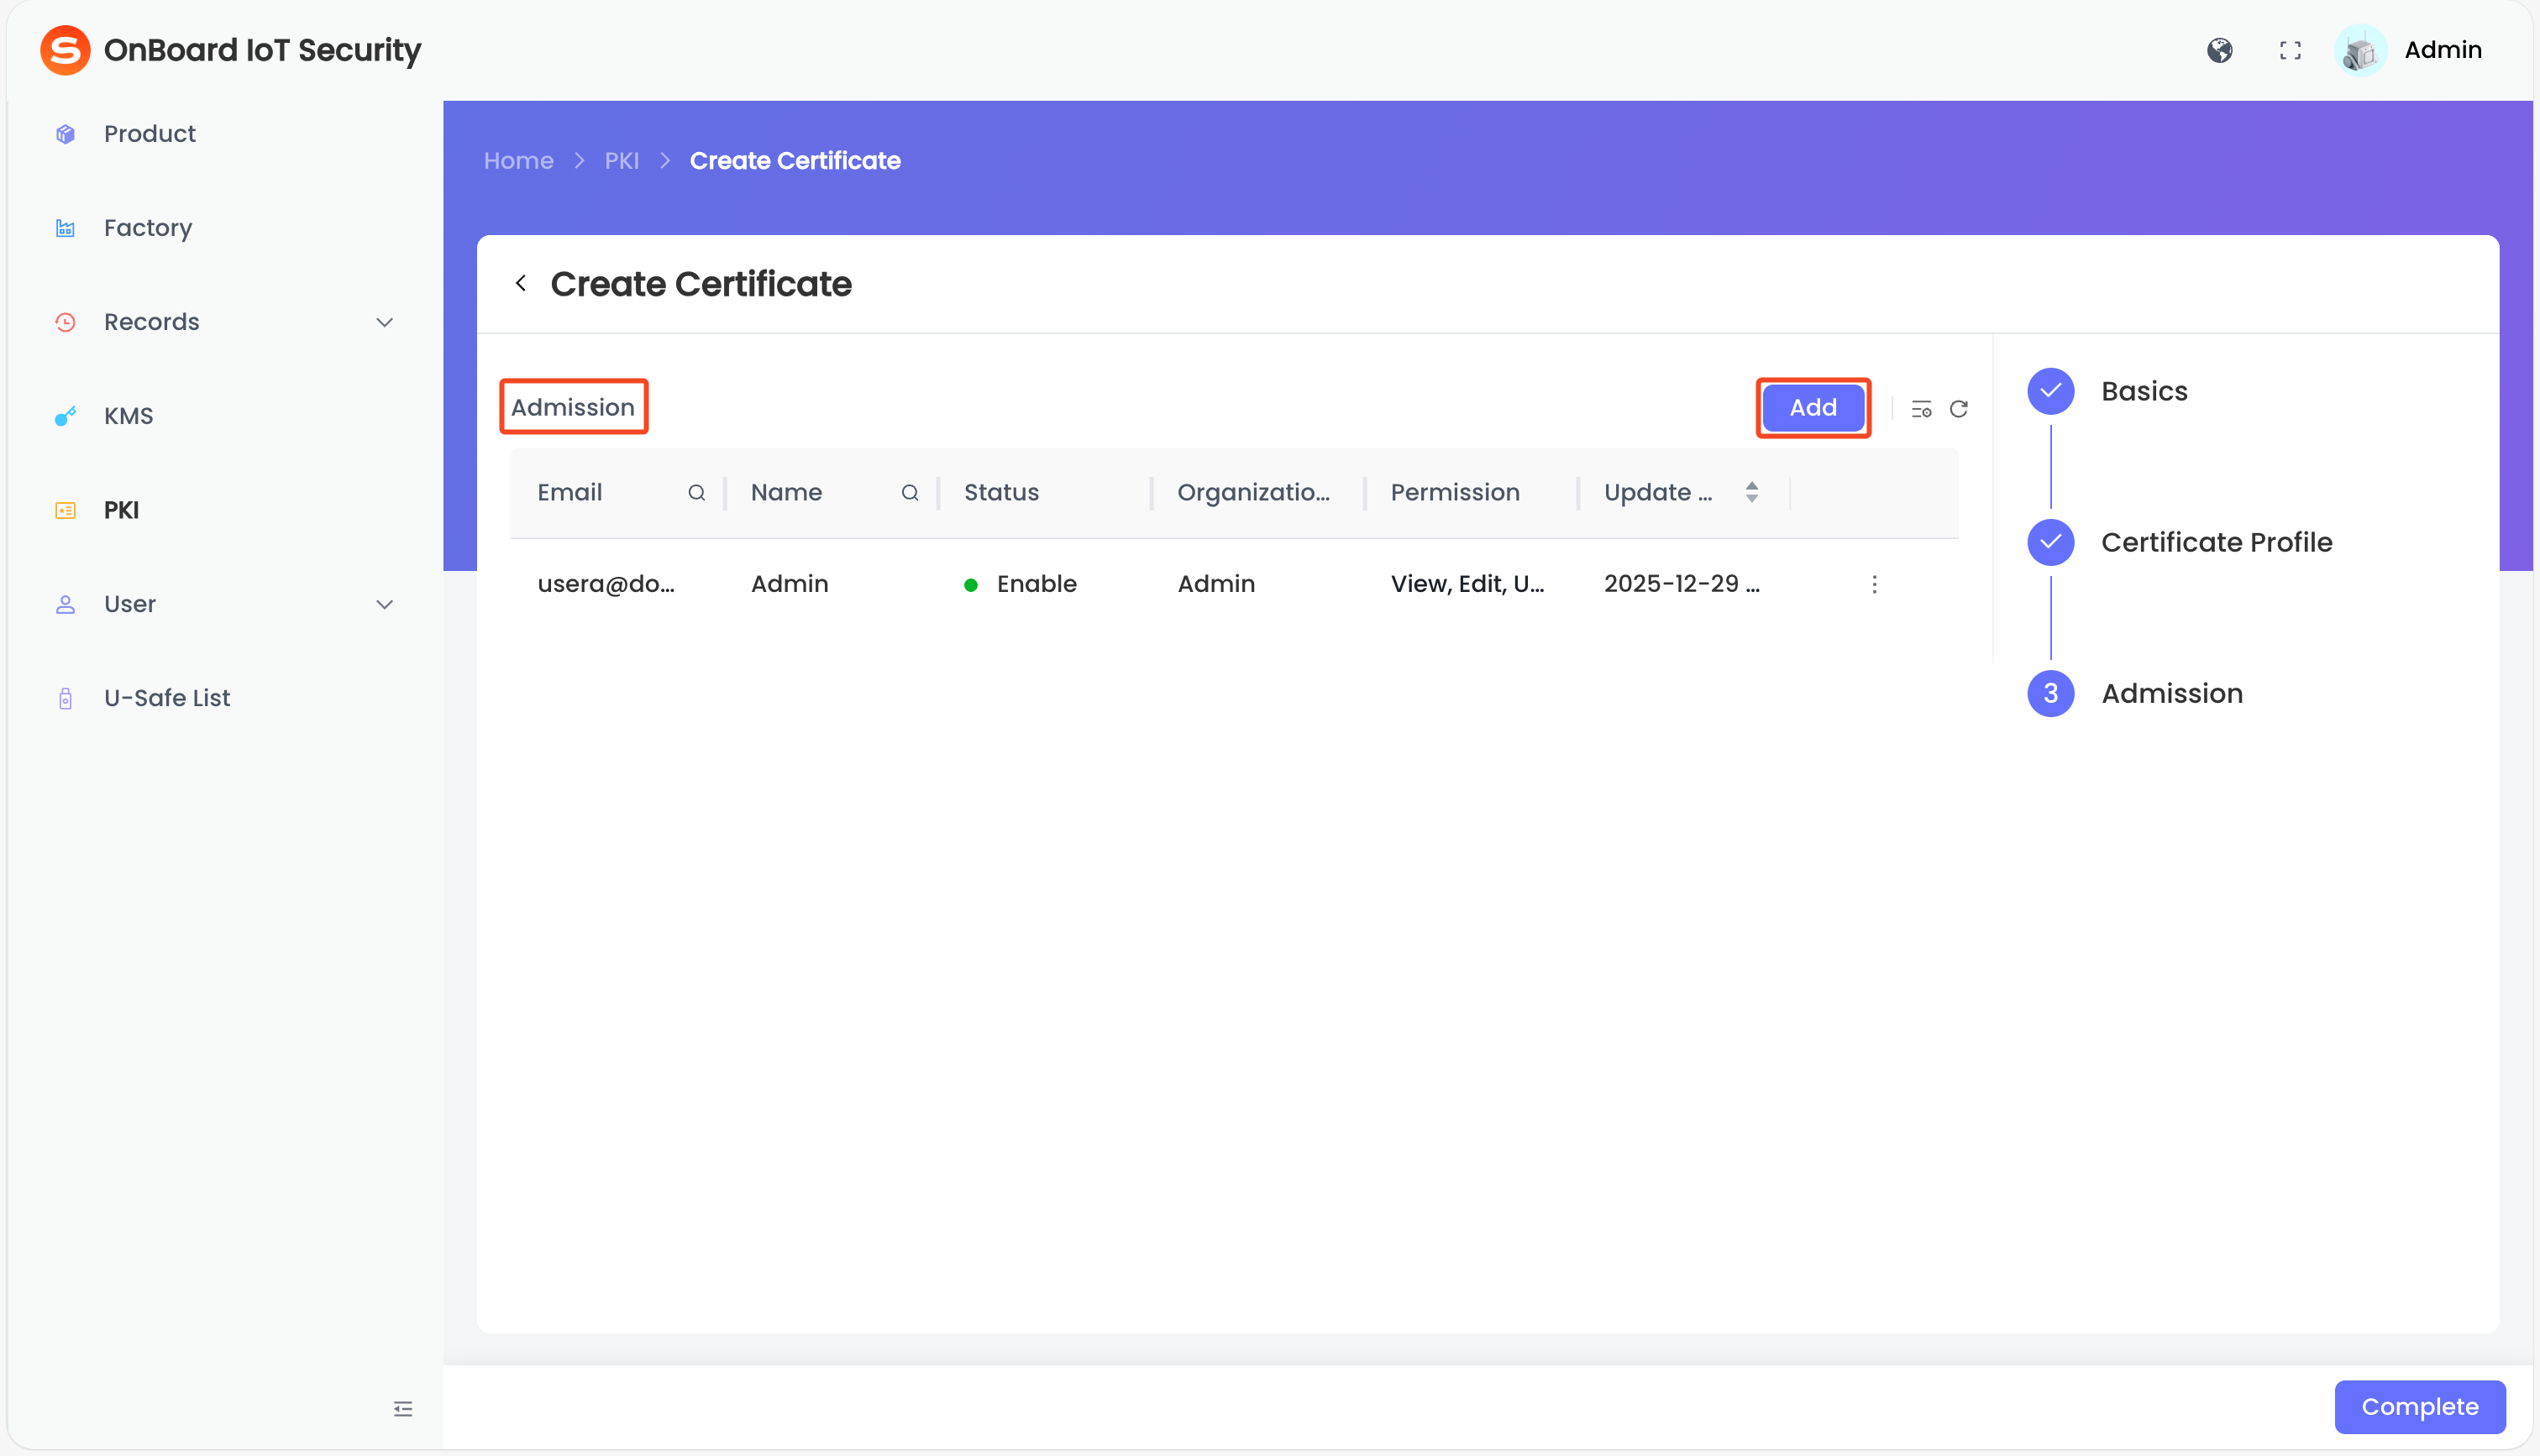
After verifying that the information is correct, click Next, and then click Add on the Admission page.
-
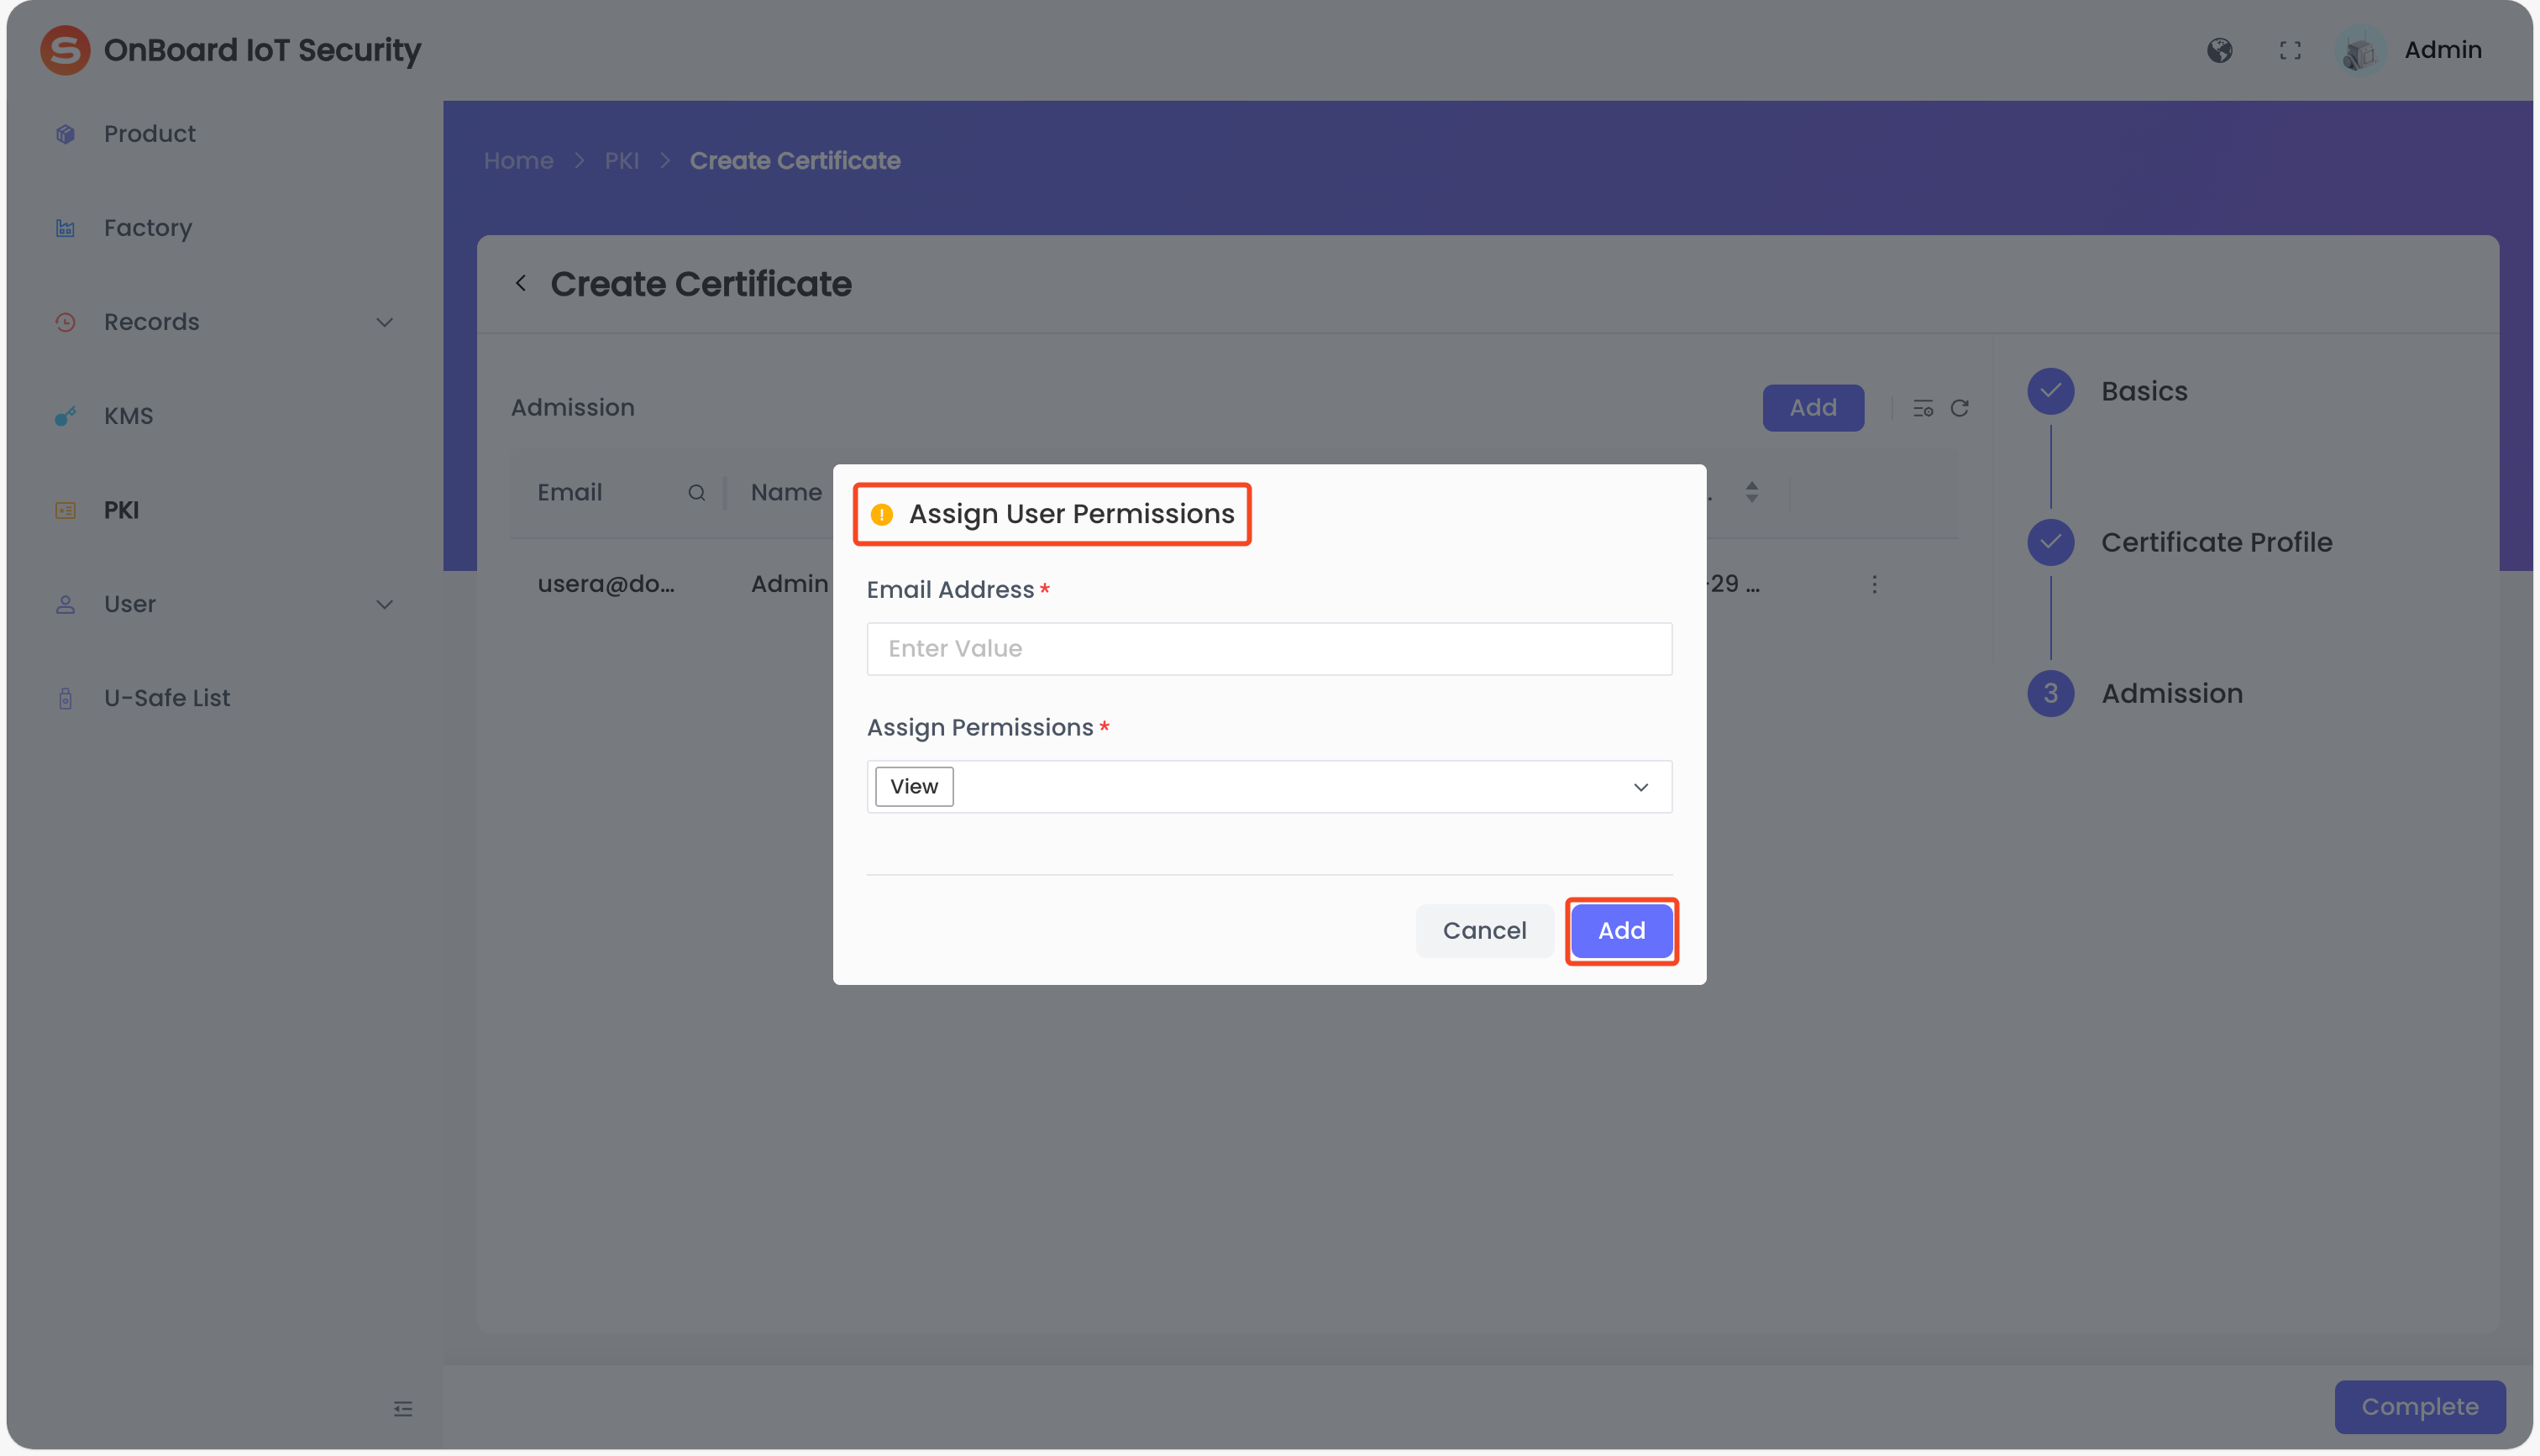
In the Assign User Permissions window, enter the email address and assign the corresponding permission (View, Edit, Use, Revoke, Grant, and Delete). Then, click Add.
-
Click Complete to complete the root certificate creation.
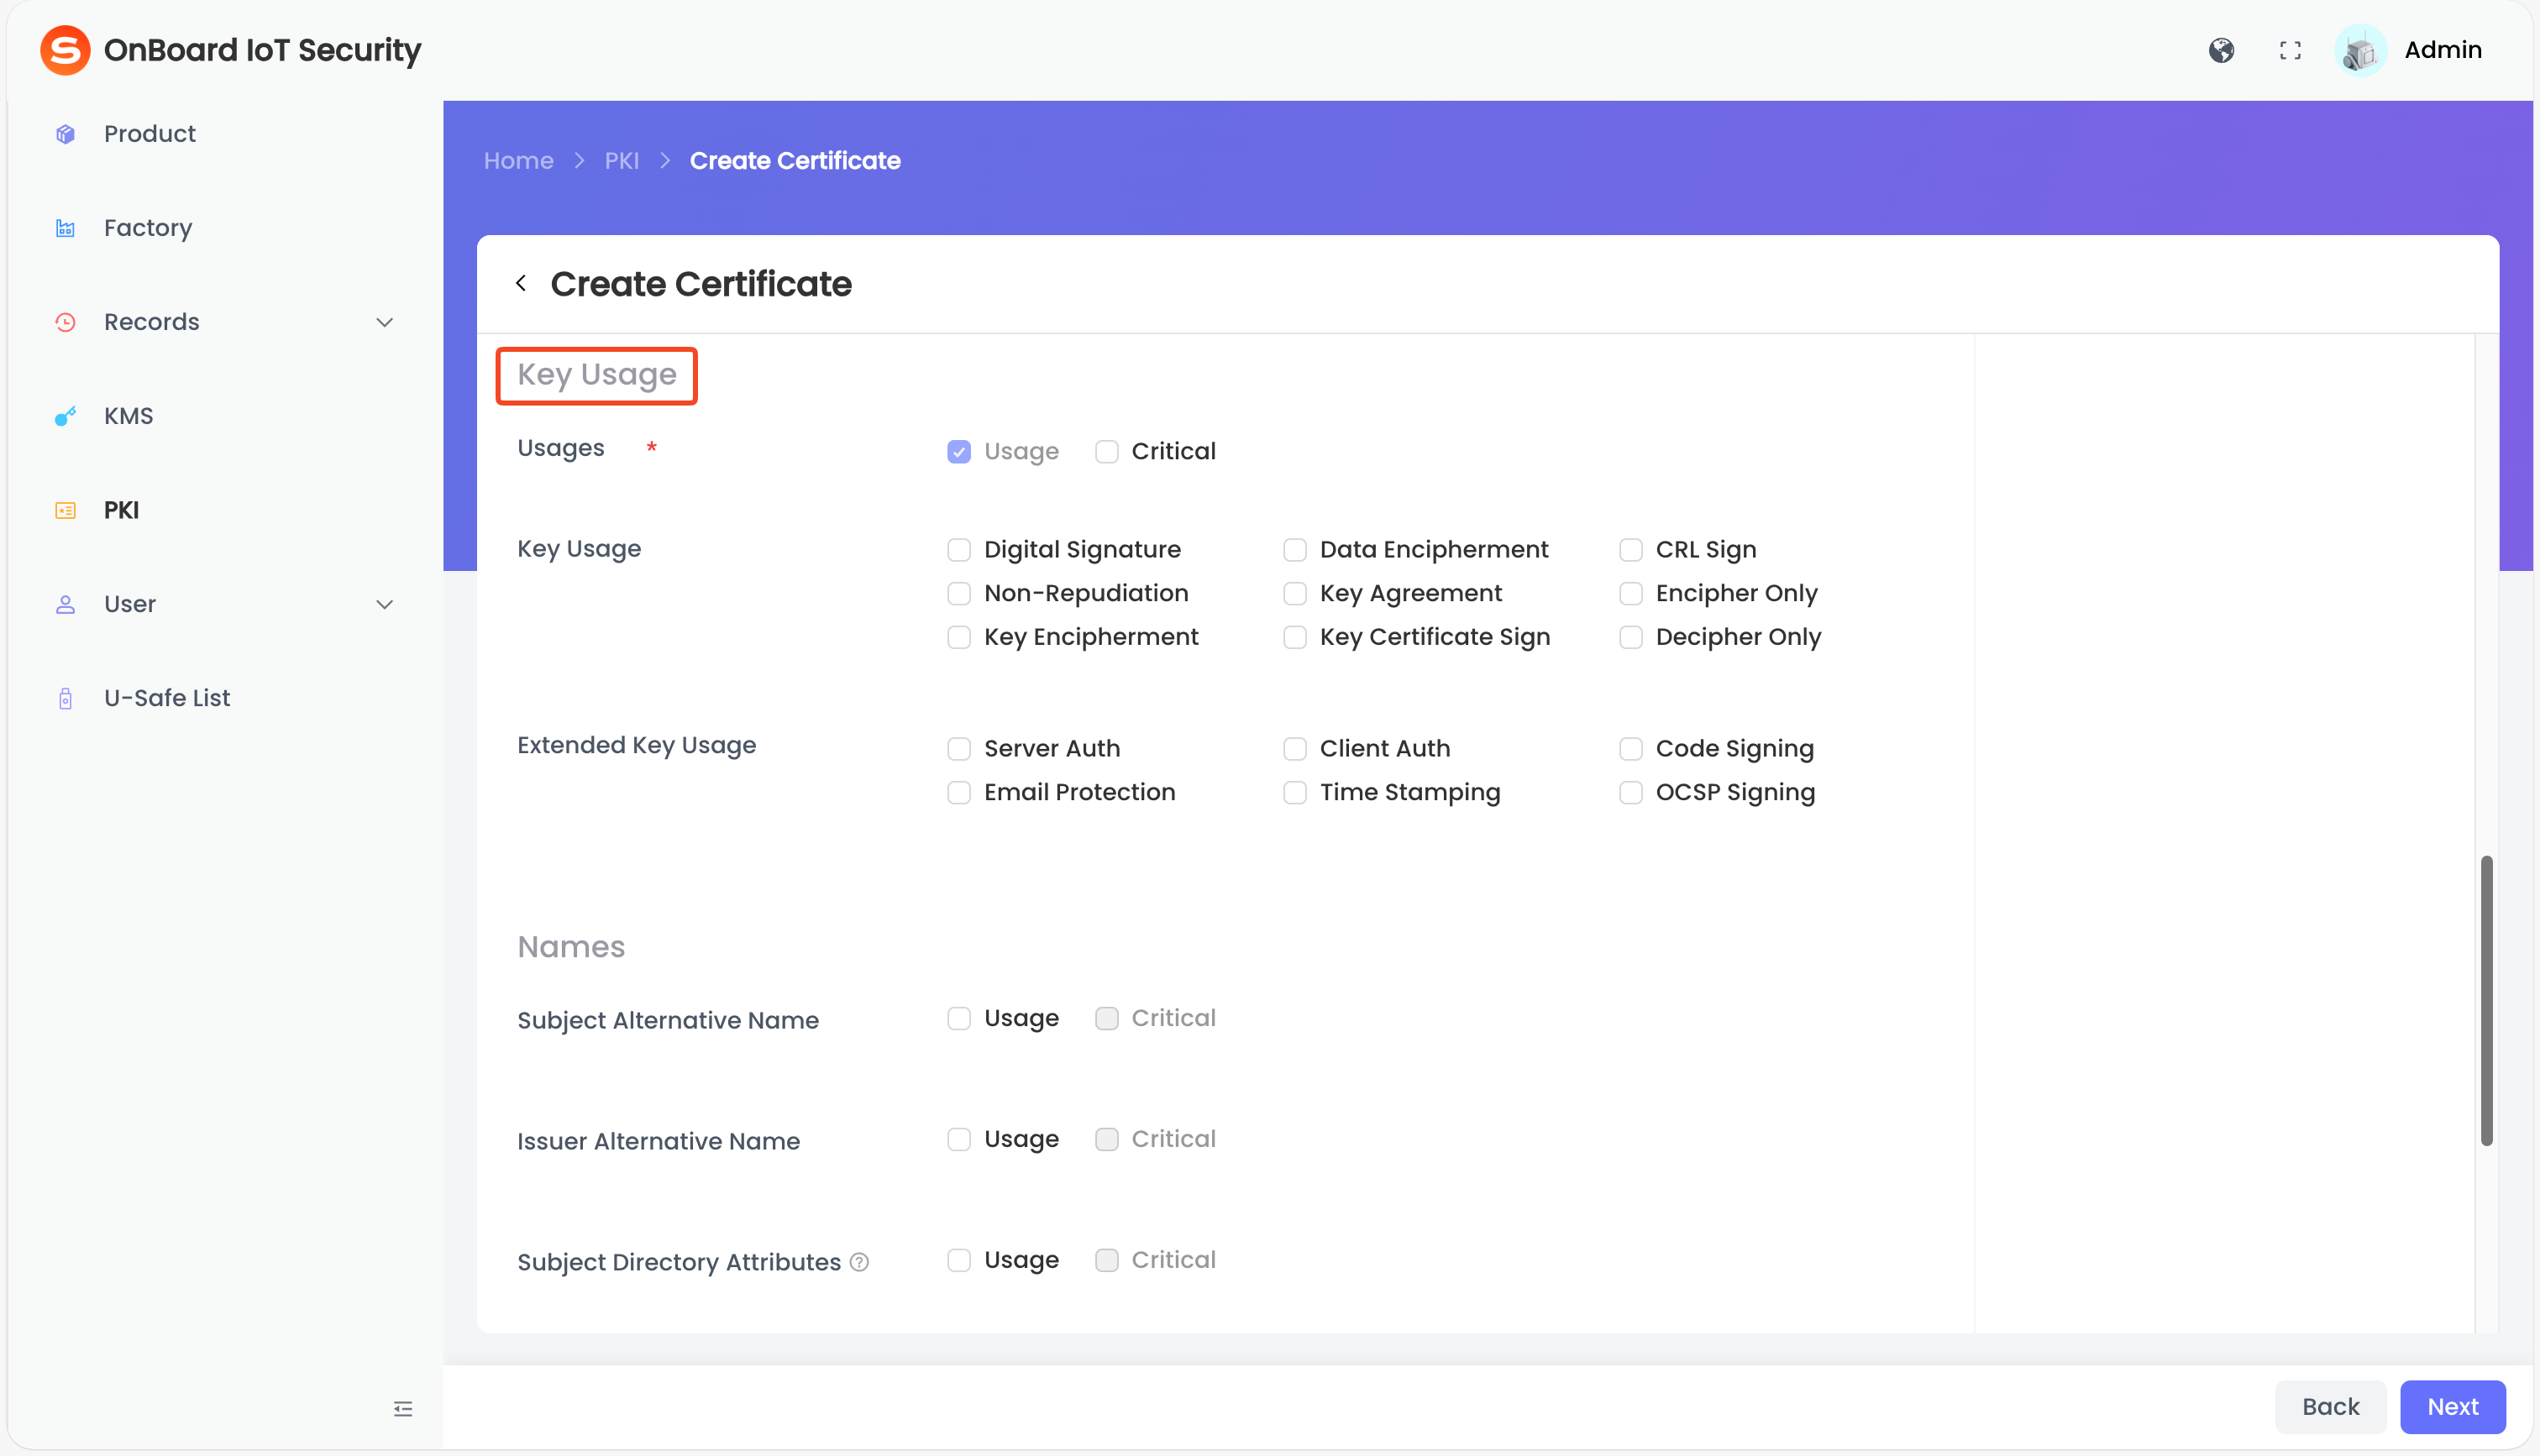
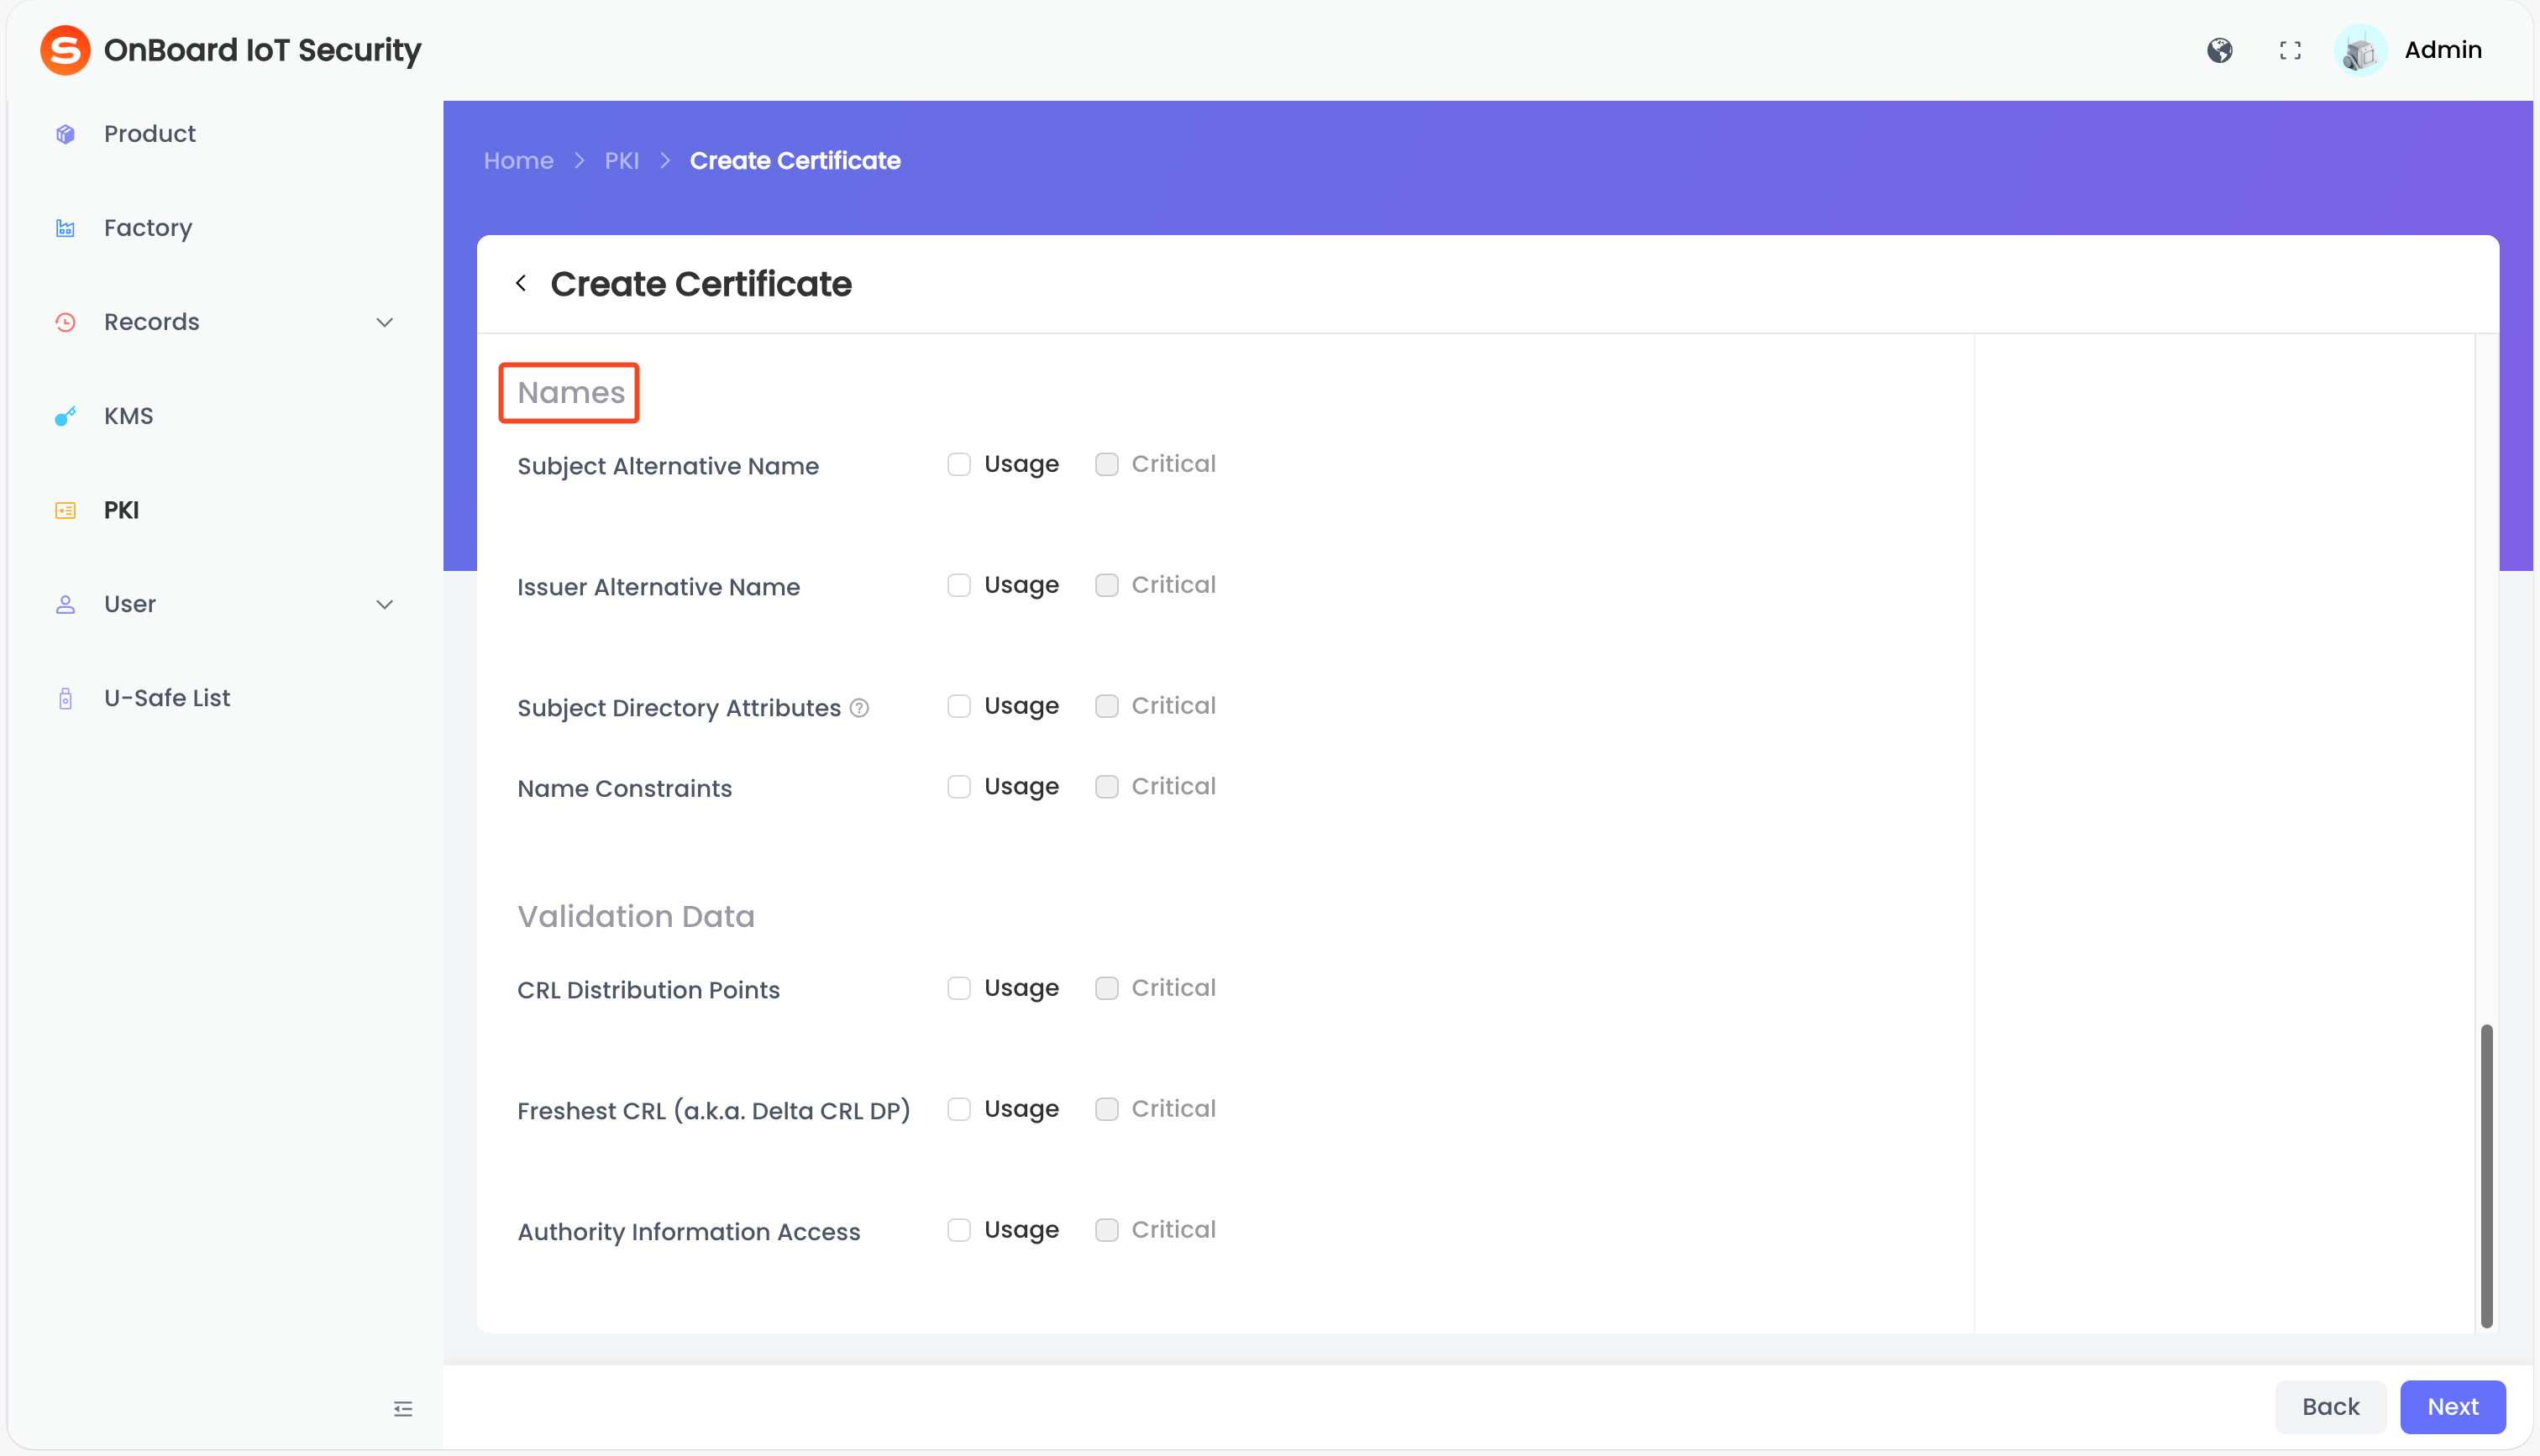
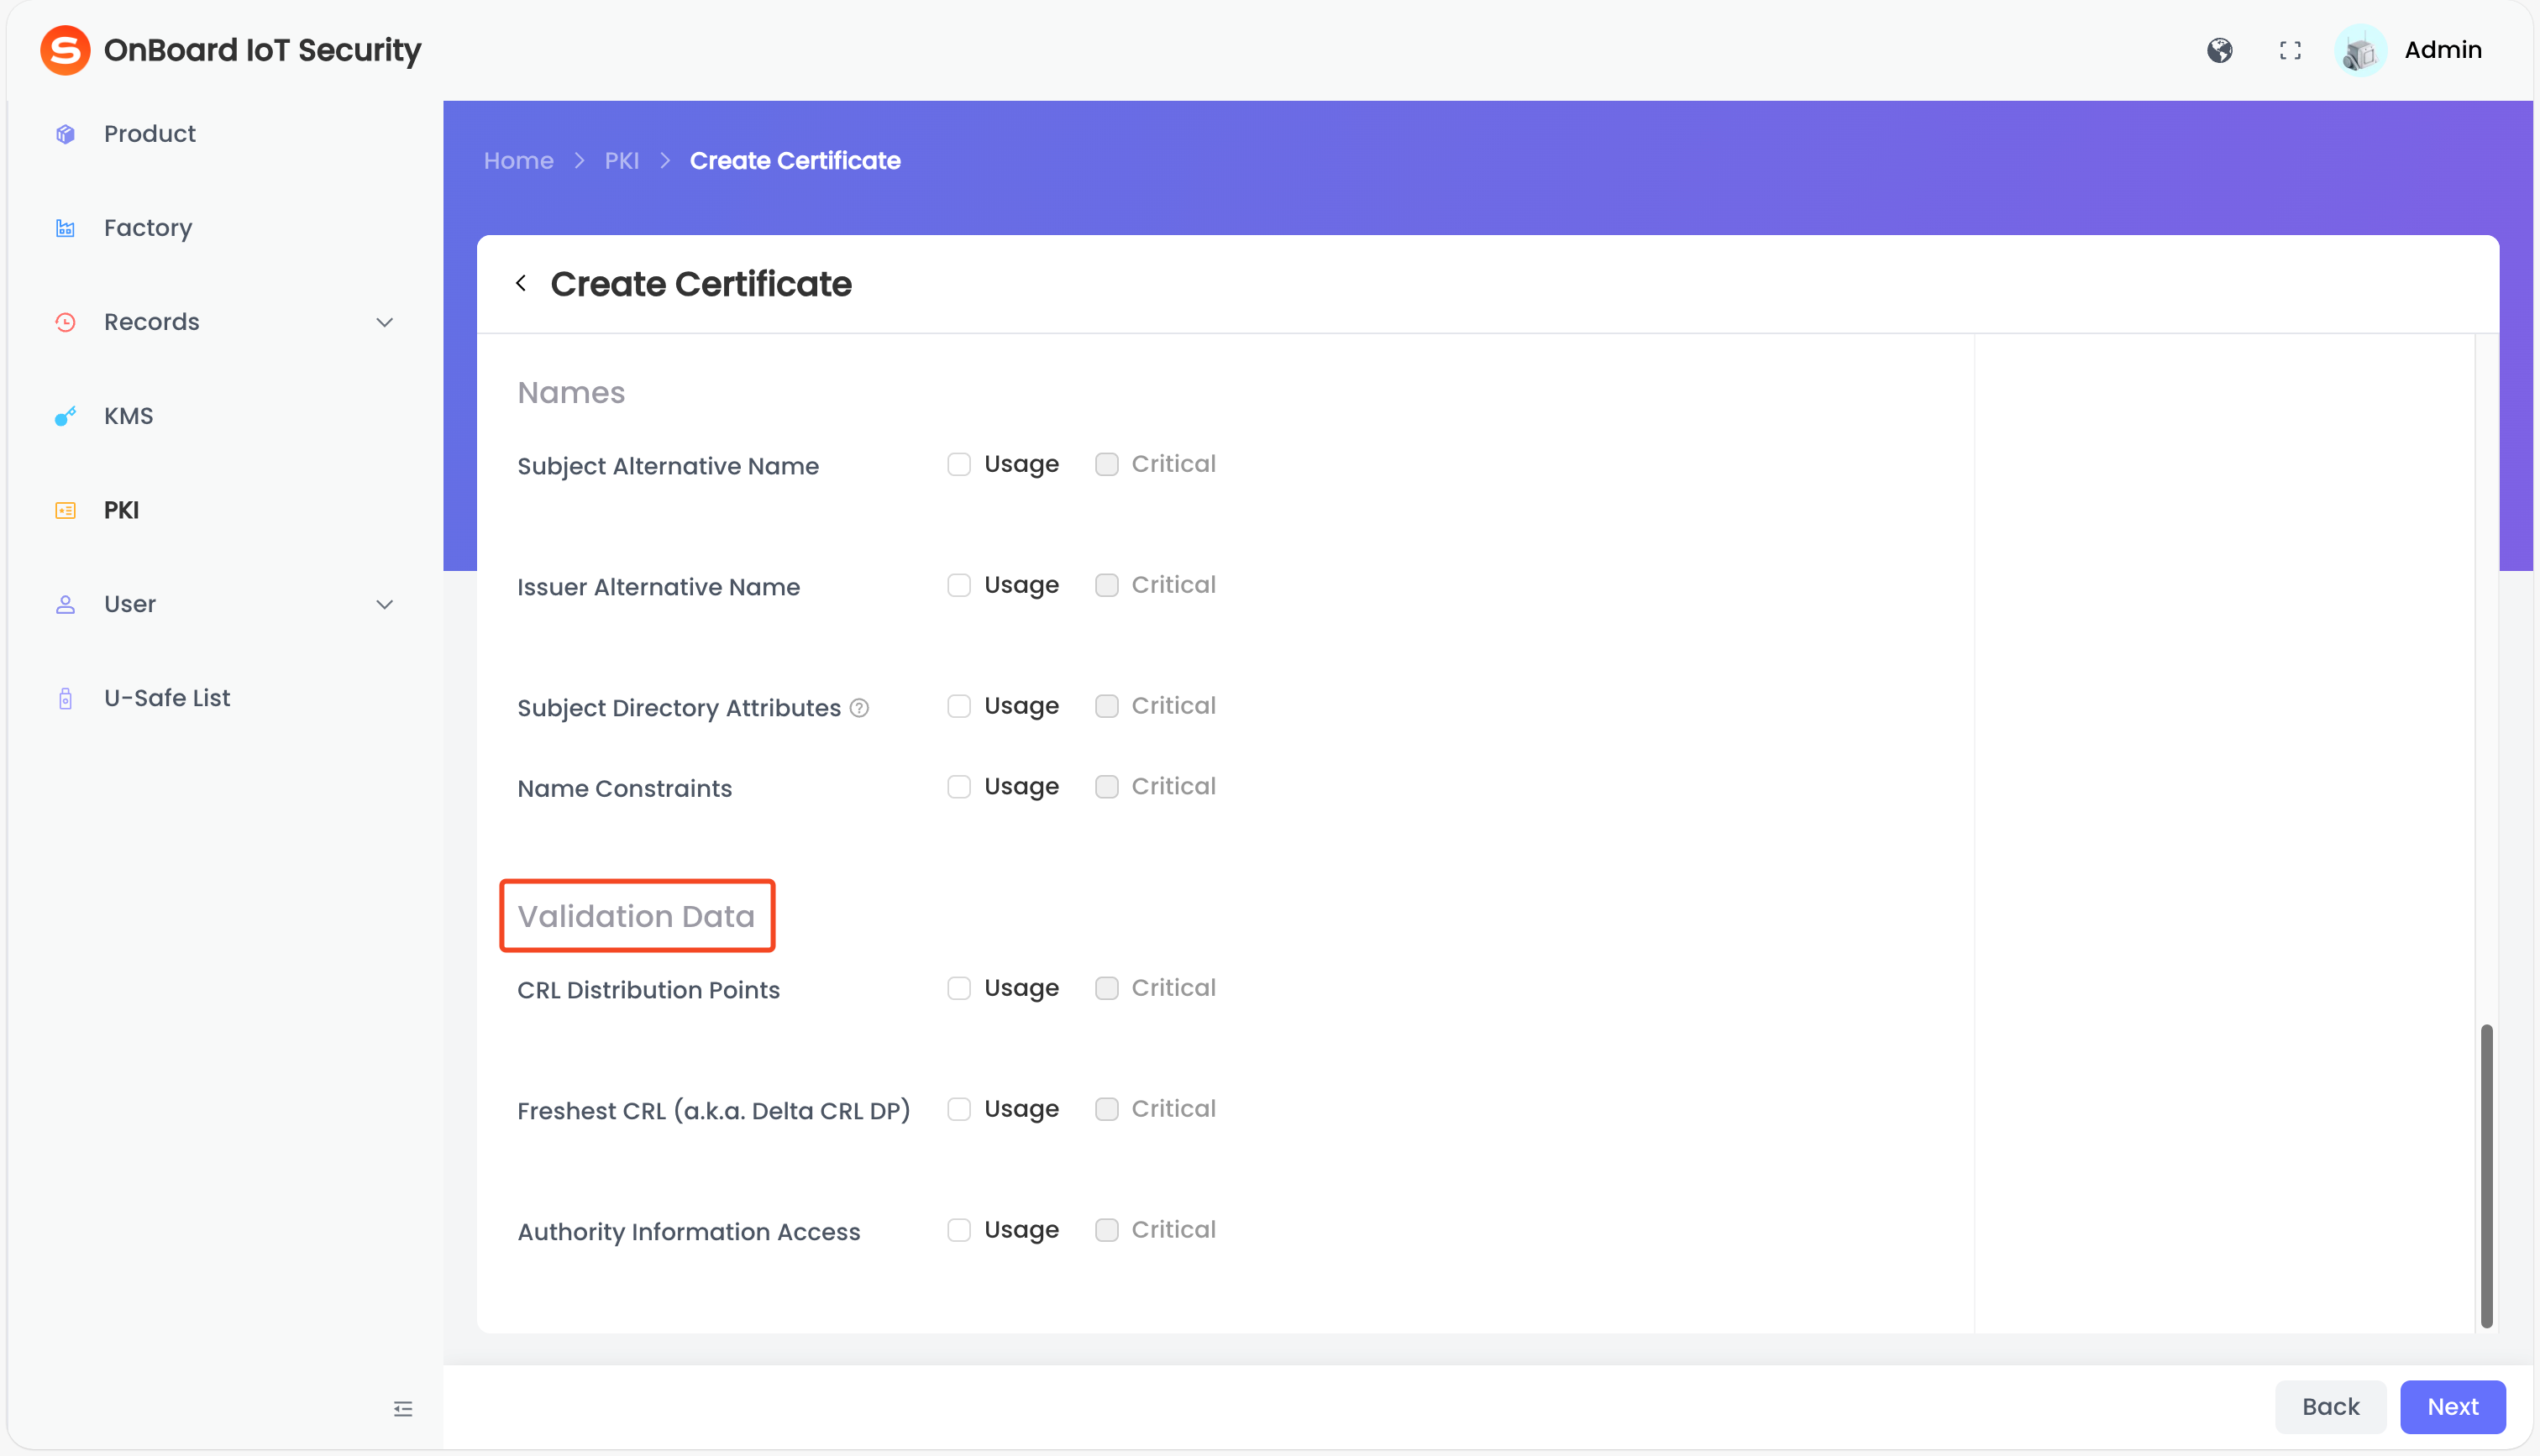
Before creating an intermediate certificate, please ensure that at least one root certificate has been created so that it can be selected and inherited during configuration.
-
On the Certificate Chain page, click the corresponding certificate chain, and then click Create.
tipThe Key
 icon indicates that the certificate contains a private key.
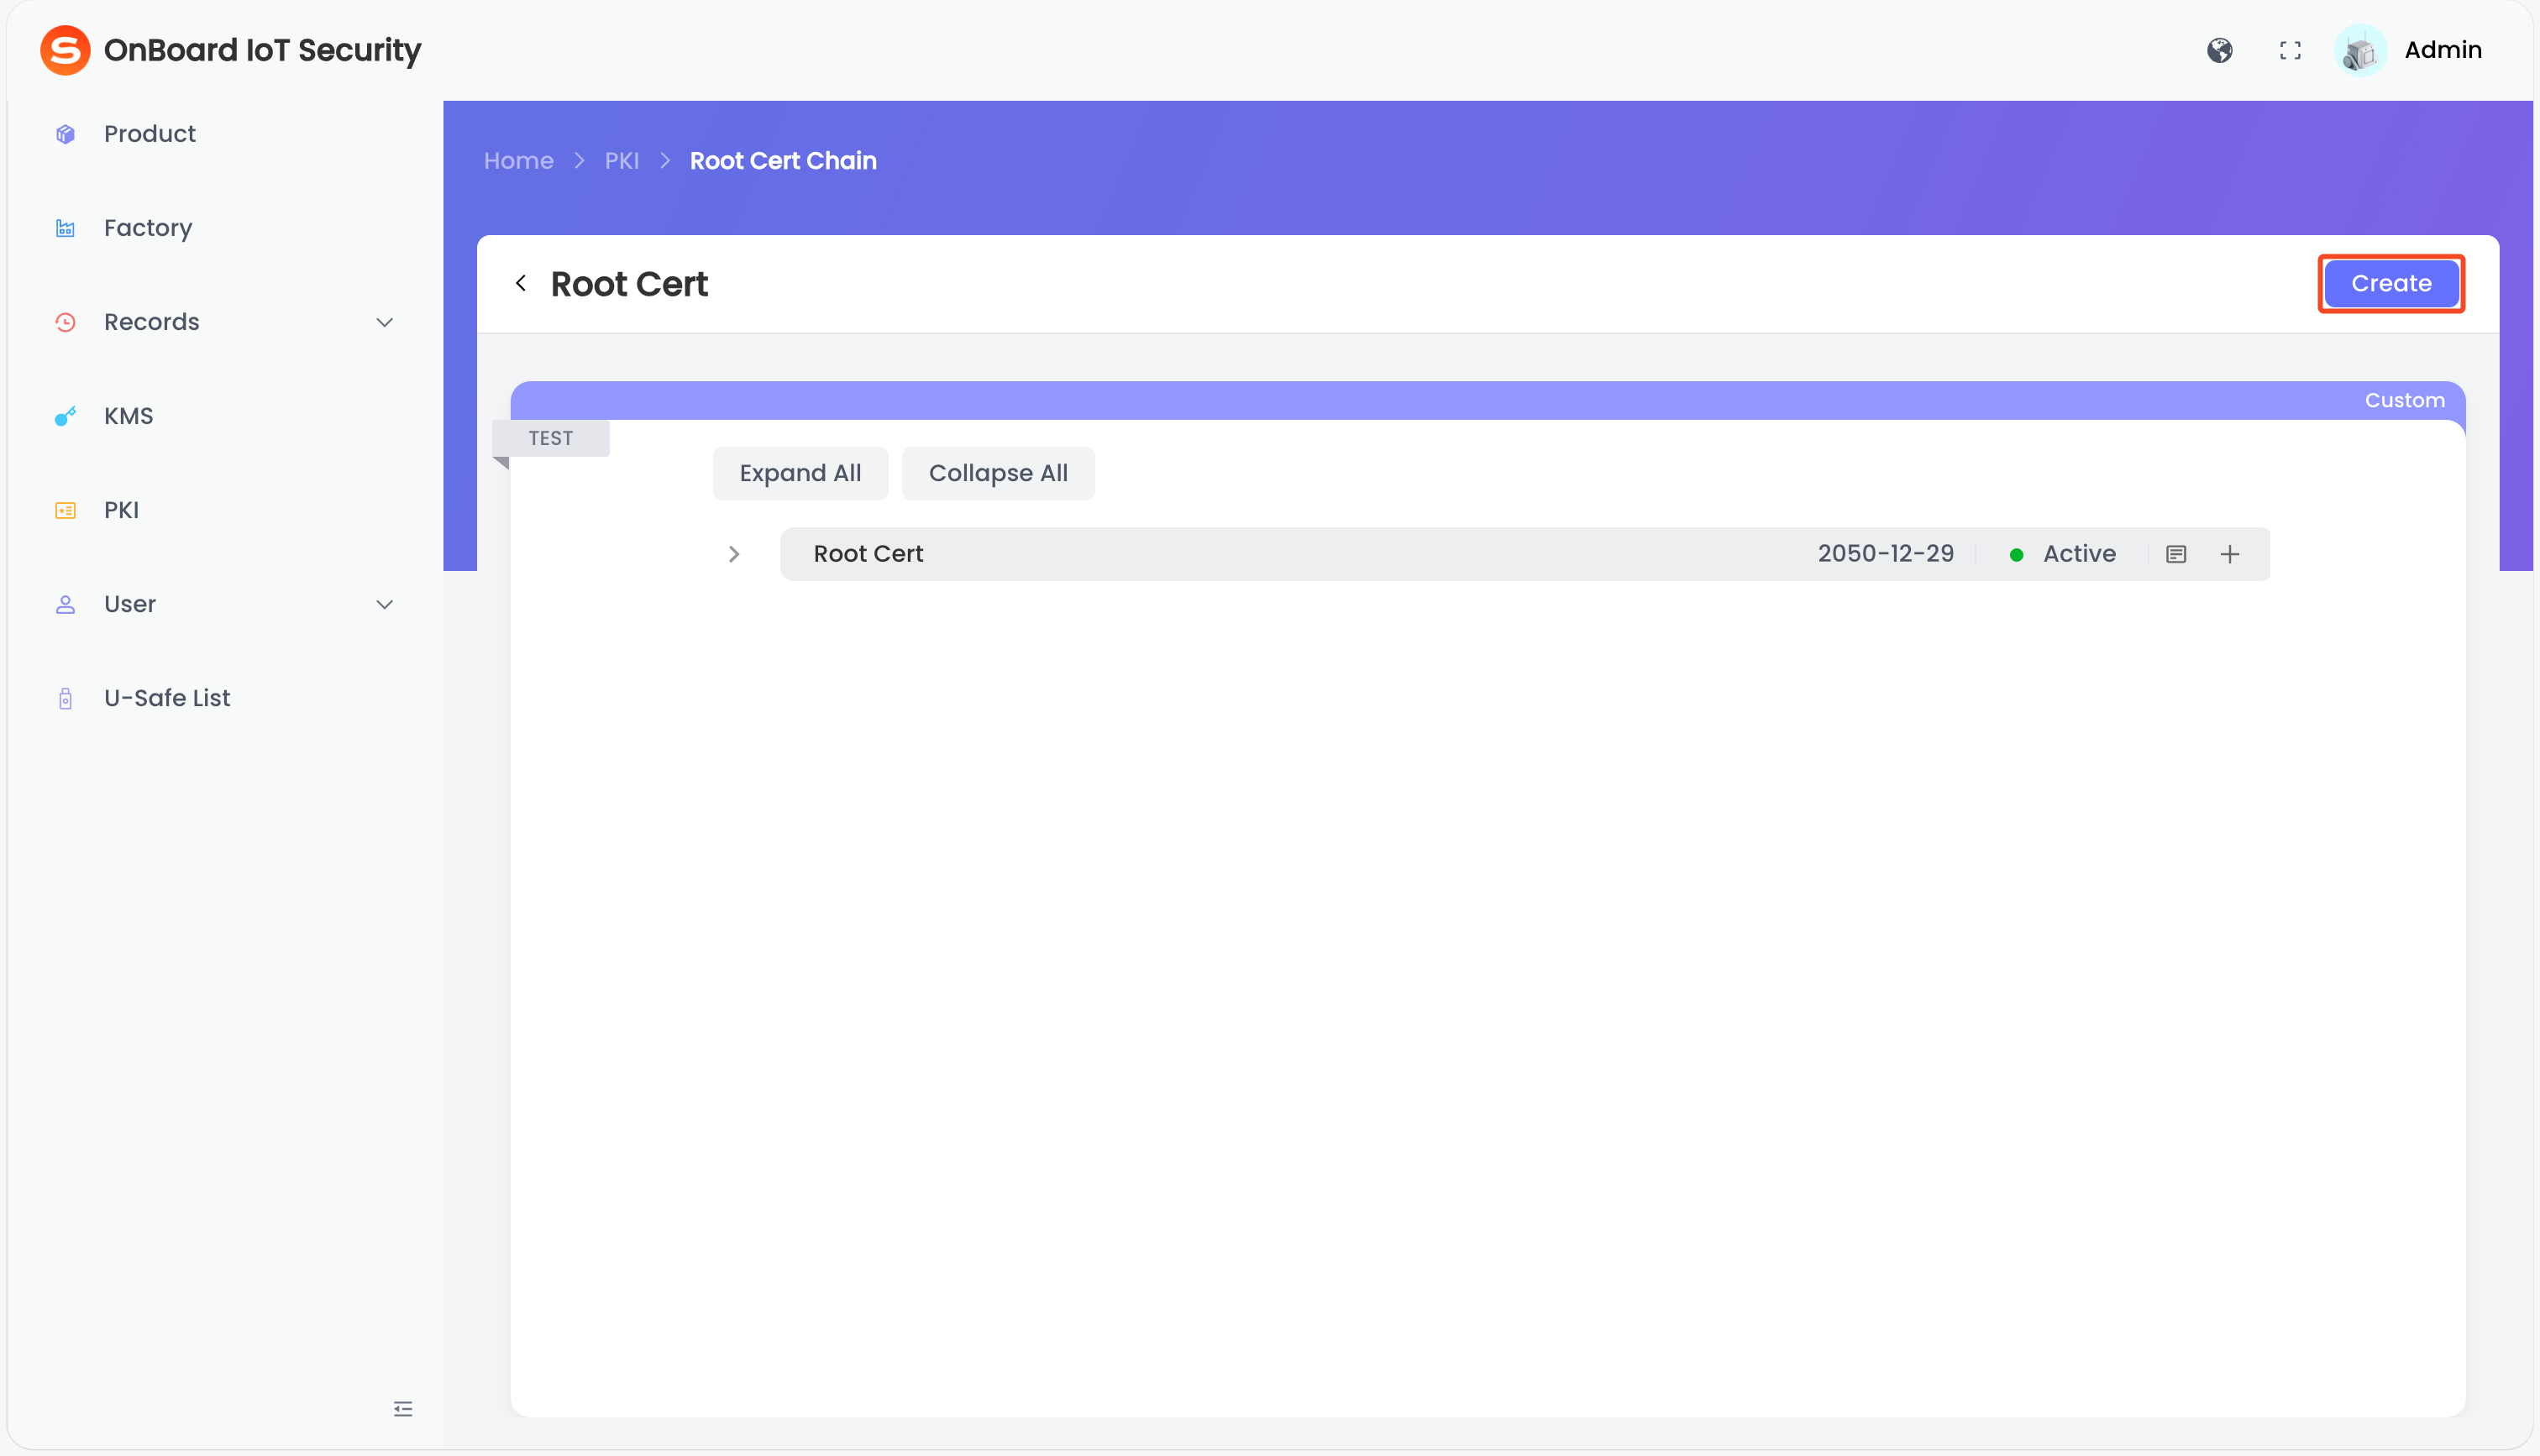
-
On the Create Certificate page, select Custom for the format and Intermediate Cert for the type, then select and enter the basic information.
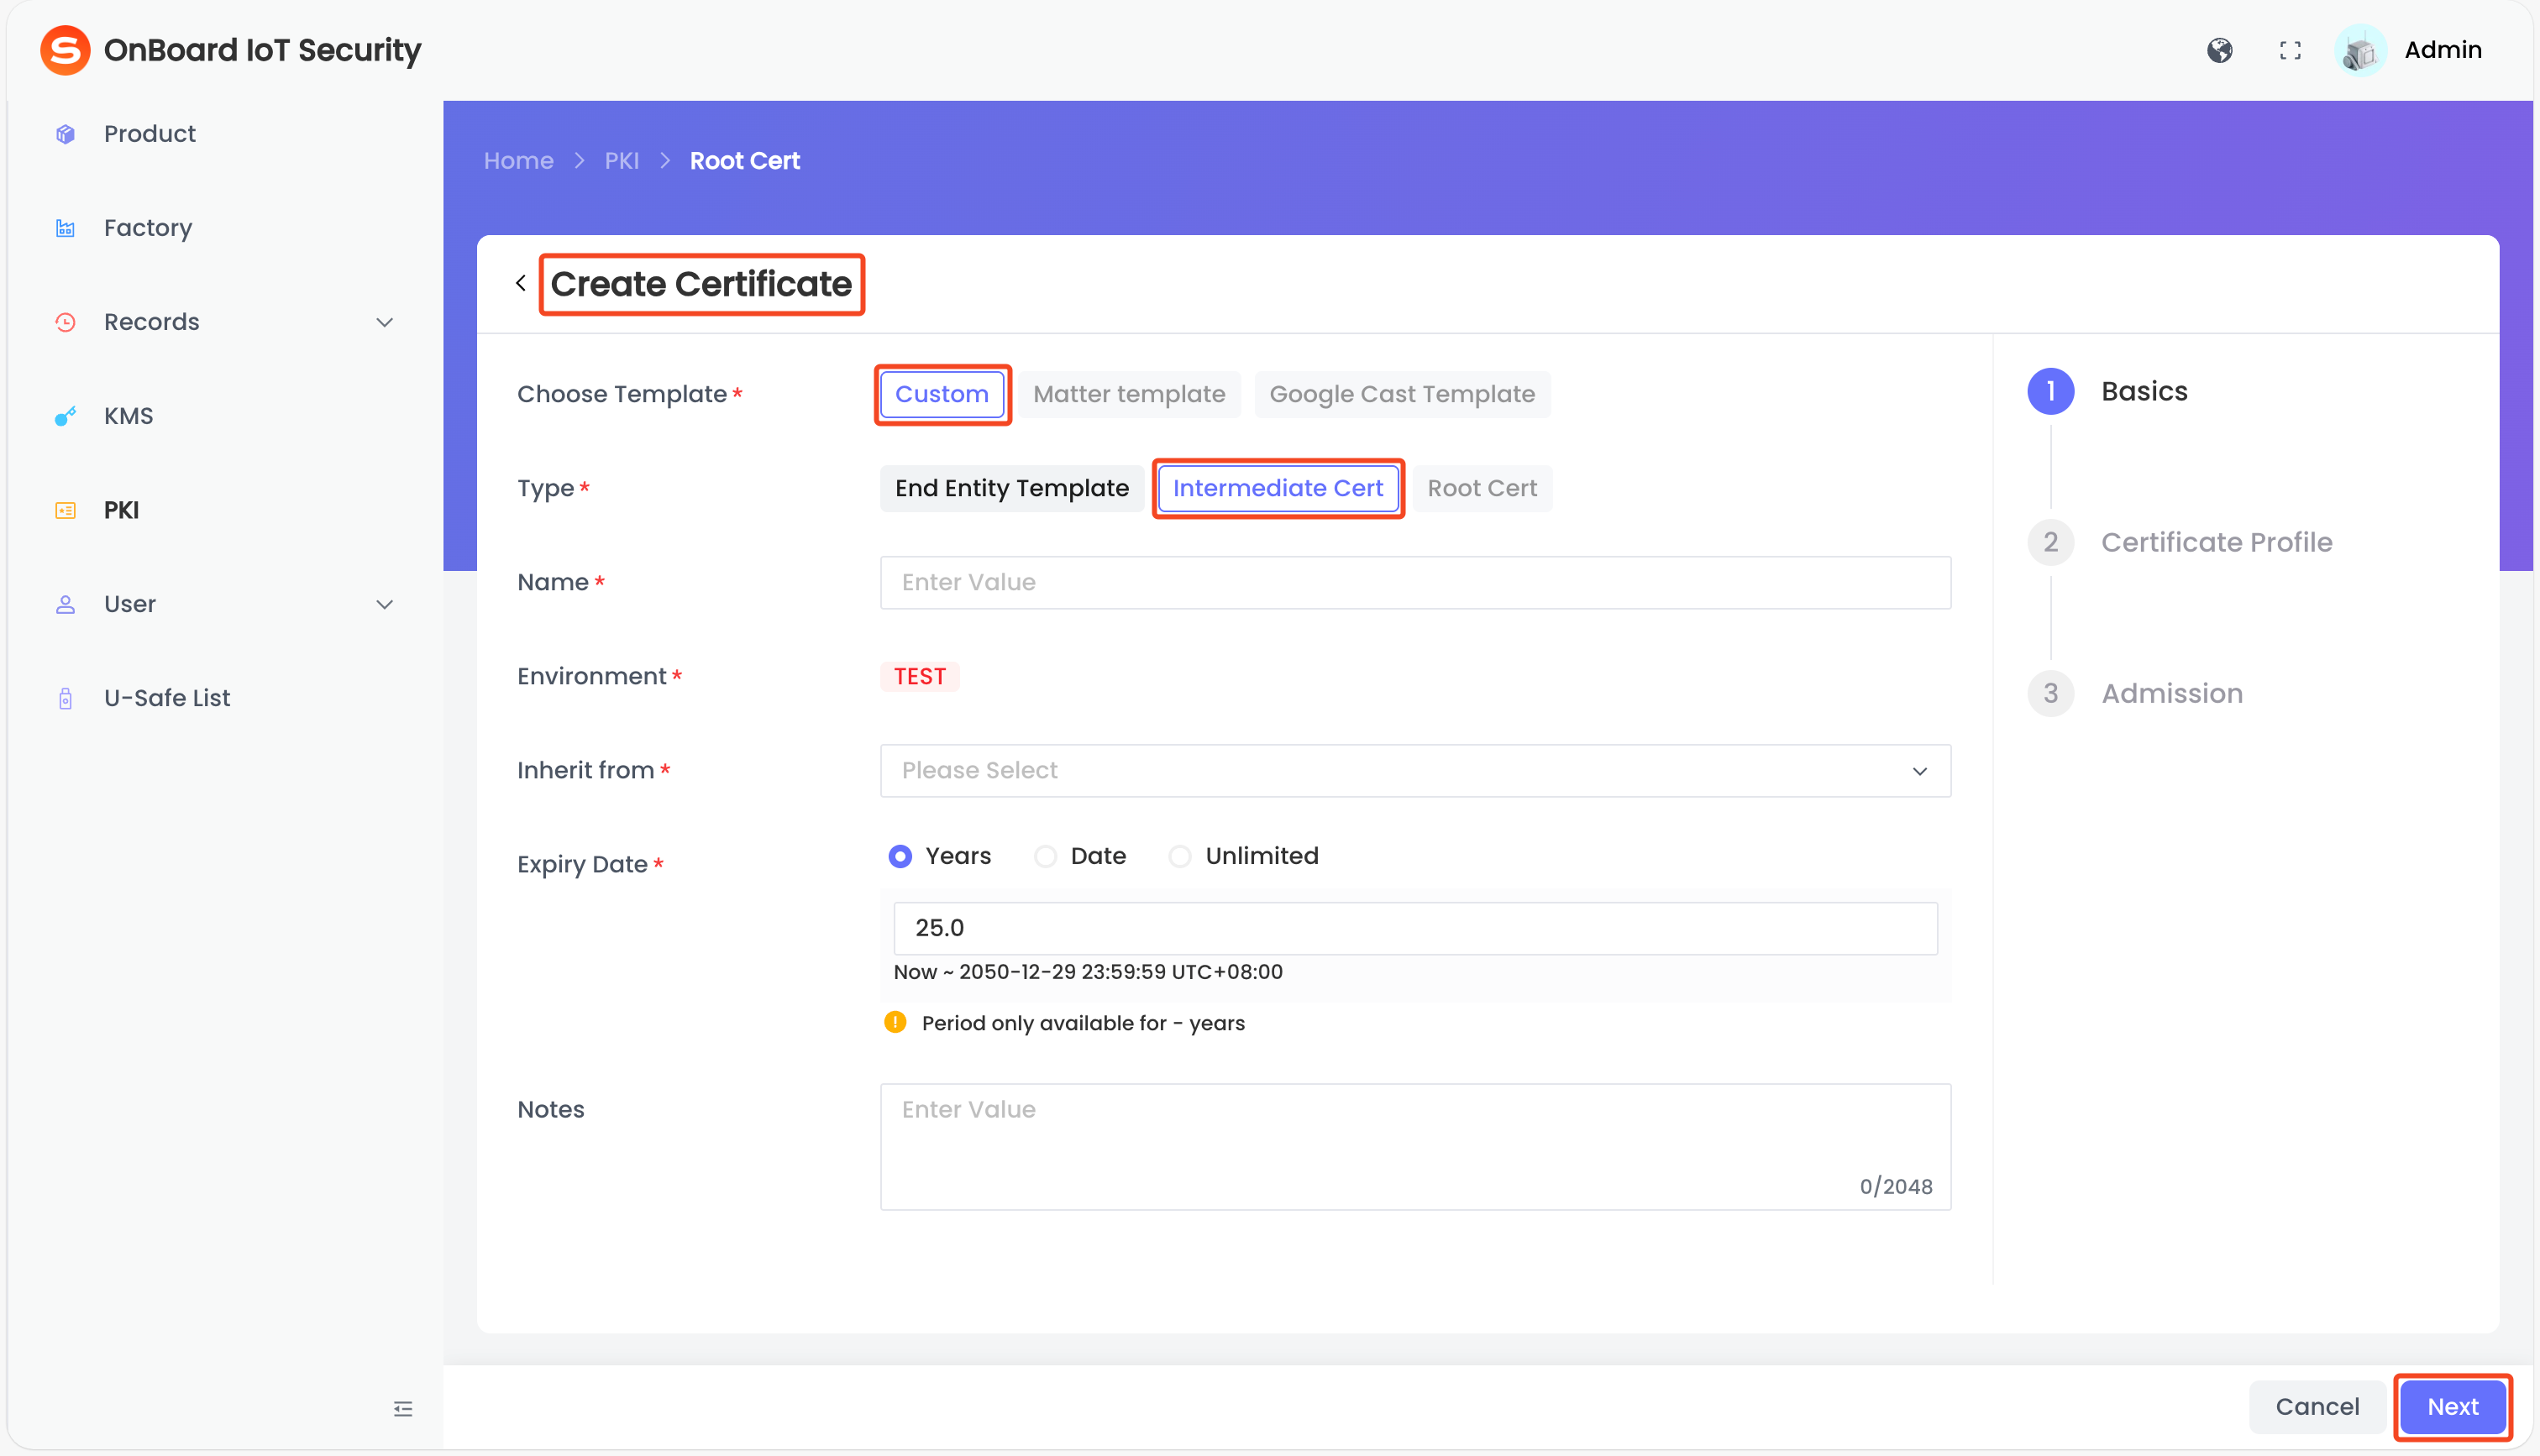
Description of intermediate certificate basic information:
-
After verifying that the information is correct, click Next and configure according to the following information.
tipIf the intermediate certificate is inherited from your own root certificate, only the Profile Basic area is displayed.
Description of Profile Basic information
Description of Profile Basic informationDescription of X-509v3 Extensions information
Description of X-509v3 Extensions informationDescription of Key Usage information
Description of Key Usage informationDescription of Names information
Description of Names informationDescription of Validation Data information
Description of Validation Data information -
After verifying that the information is correct, click Next, and then click Add on the Admission page.
-
In the Assign User Permissions window, enter the email address and assign the corresponding permission (View, Edit, Use, Revoke, Grant, and Delete). Then, click Add.
-
Click Complete to complete the intermediate certificate creation.
tipWhen creating an intermediate certificate, if it is inherited from your own root certificate, you must complete the CSR (Certificate Signing Request) configuration. Before the CSR configuration is completed, the certificate will remain in the Pending status and can't be used.
CSR configuration steps for the intermediate certificate
When creating an intermediate certificate, if it is inherited from your own root certificate, refer to the following steps to complete the CSR configuration.
-
On the Certificate Chain page, click the corresponding certificate chain, and then click the corresponding intermediate certificate to navigate to the certificate page.
-
On the certificate page, click the link in the prompt to complete the CSR Configuration.
-
On the CSR Configuration page, click the Download
 icon to download the CSR file. Then, use your Root CA (Certificate Authority) to sign the file, thereby generating an intermediate certificate signed by the Root CA.
-
After an intermediate certificate is generated, click the Add
 icon in the upload area, select and upload the intermediate certificate in .pem format, or directly drag and drop your intermediate certificate into the upload area.
-
Click Submit. Once the configuration is completed, the intermediate certificate status will change to Normal.
Before creating an end entity template, please ensure that at least one root certificate or intermediate certificate has been created so that it can be selected and inherited during configuration.
-
On the Certificate Chain page, click the corresponding certificate chain, and then click Create.
tipThe Key
icon indicates that the certificate contains a private key. -
On the Create Certificate page, select Custom for the format and End Entity Template for the type, then select and enter the basic information.
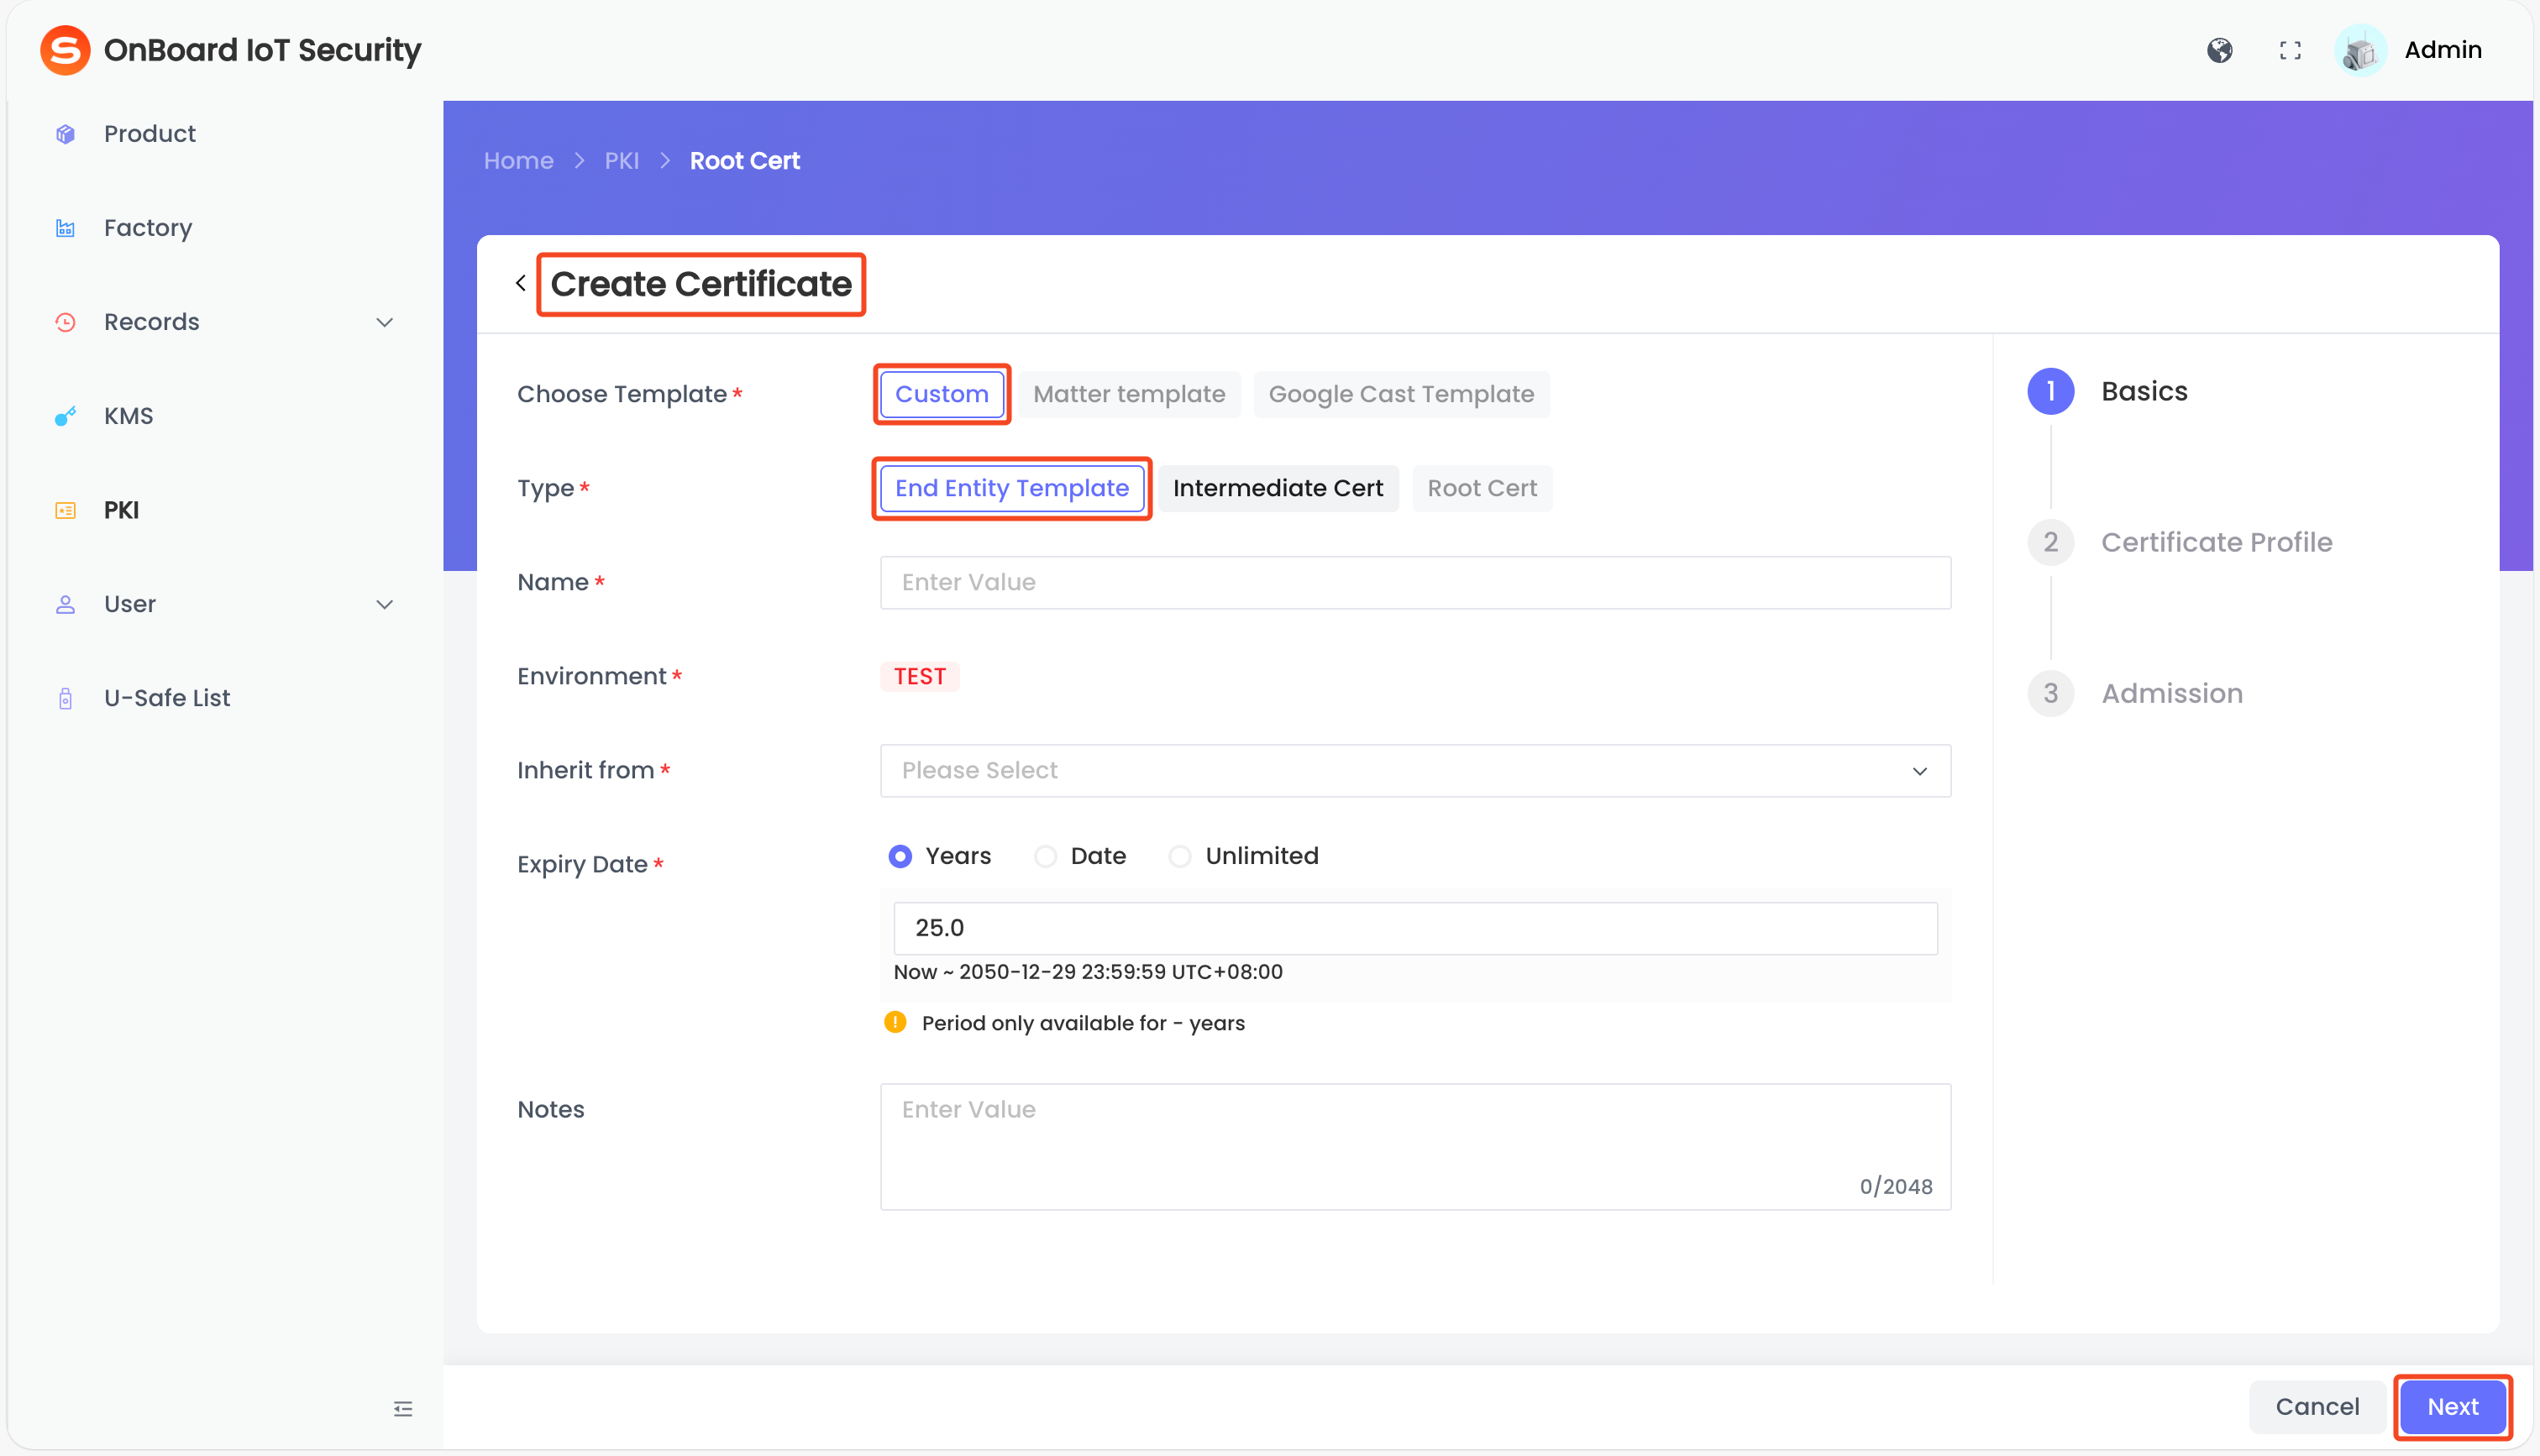
Description of end entity template basic information:
-
After verifying that the information is correct, click Next and configure according to the following information.
tipIf the end entity template is inherited from your own root certificate, only the Profile Basic area is displayed. After configuring the information, you can proceed directly to the next step.
Description of Profile Basic information
Description of Profile Basic informationDescription of X-509v3 Extensions information
Description of X-509v3 Extensions informationDescription of Key Usage information
Description of Key Usage informationDescription of Names information
Description of Names informationDescription of Validation Data information
Description of Validation Data information -
After verifying that the information is correct, click Next, and then click Add on the Admission page.
-
In the Assign User Permissions window, enter the email address and assign the corresponding permission (View, Edit, Use, Grant, and Delete). Then, click Add.
-
Click Complete to complete the end entity template creation.
tipWhen creating an end entity template certificate, if it is inherited from your own root certificate, you must complete the CSR (Certificate Signing Request) configuration. Before the CSR configuration is completed, the template will remain in the Pending status and can't be used.
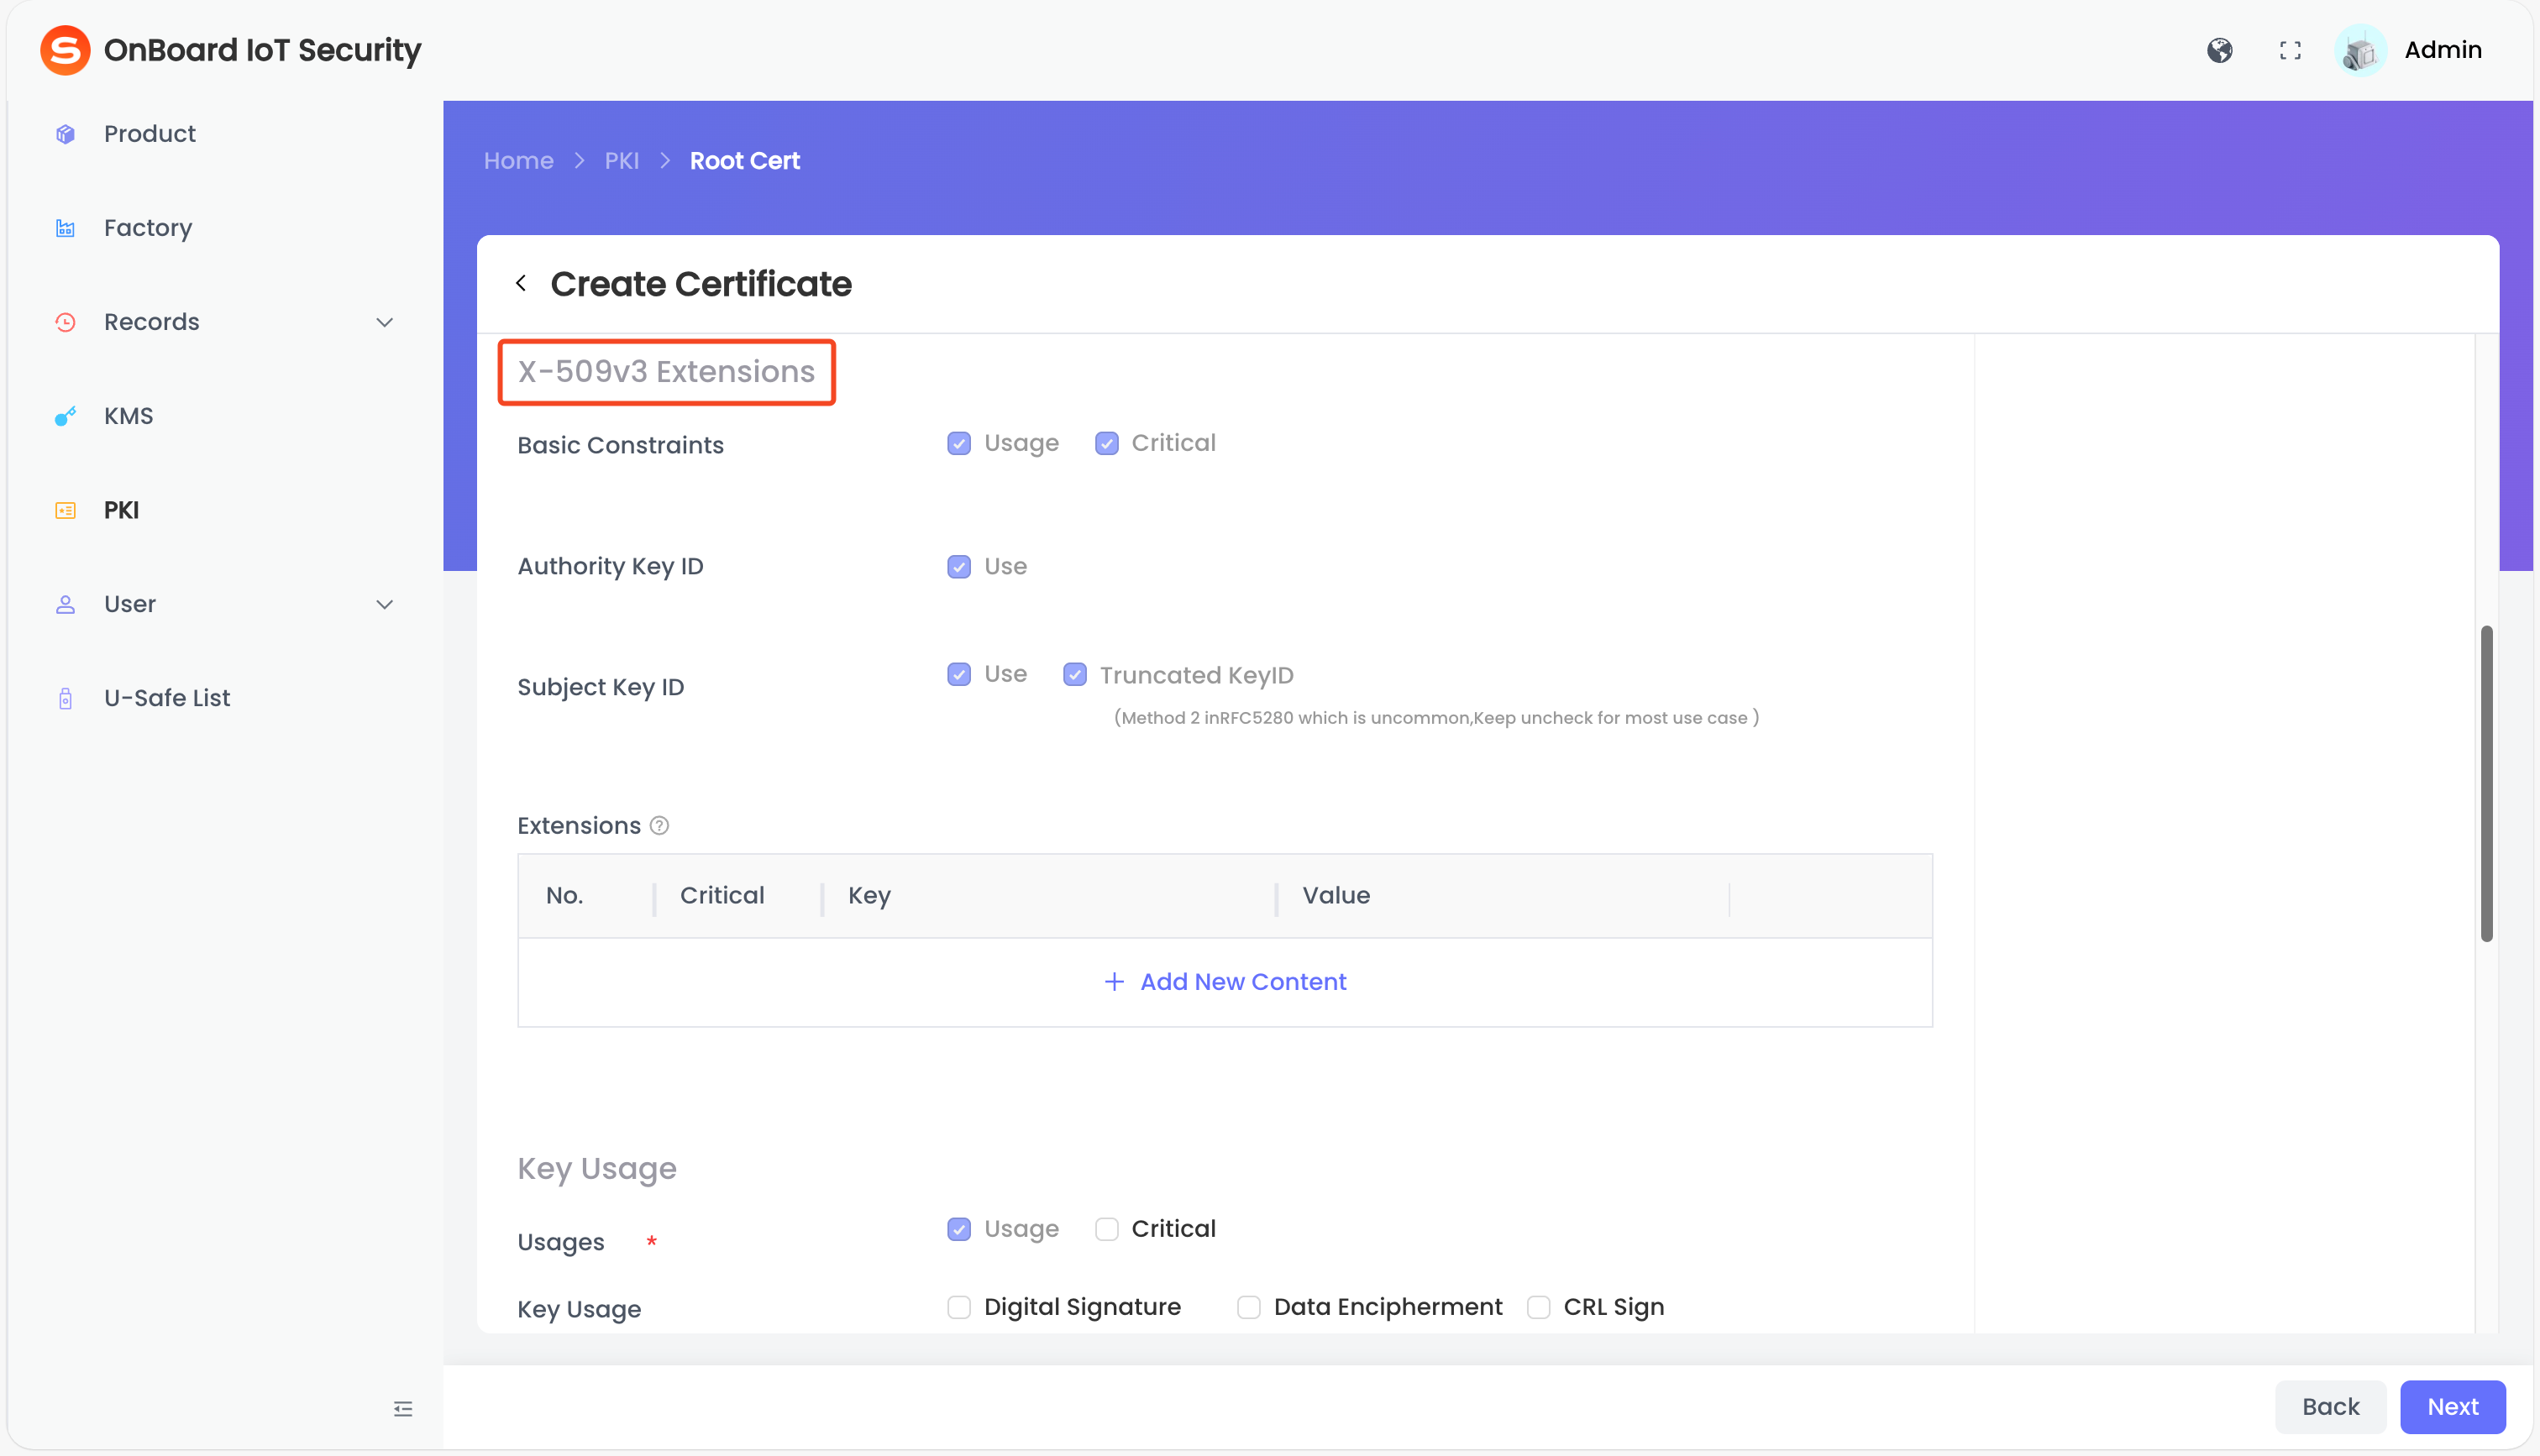
CSR configuration steps for the end entity template
When creating an end entity template, if it is inherited from your own root certificate, refer to the following steps to complete the CSR configuration.
-
On the Certificate Chain page, click the corresponding certificate chain, and then click the corresponding end entity template to navigate to the certificate page.
-
On the certificate page, click the link in the prompt to complete the CSR Configuration.
-
On the CSR Configuration page, click the Download
icon to download the CSR file. Then, use your Root CA (Certificate Authority) to sign the file, thereby generating an end entity template signed by the Root CA. -
After an end entity template is generated, click the Add
icon in the upload area, select and upload the end entity template in .pem format, or directly drag and drop your end entity template into the upload area. -
Click Submit. Once the configuration is completed, the end entity template status will change to Normal.
Create a certificate based on the Matter template
After a certificate or certificate template based on the Matter template is created, it can be selected when configuring Certificate for a product.
- Create a PAA certificate based on the Matter template
- Create a PAI certificate based on the Matter template
- Create a DAC template based on the Matter template
-
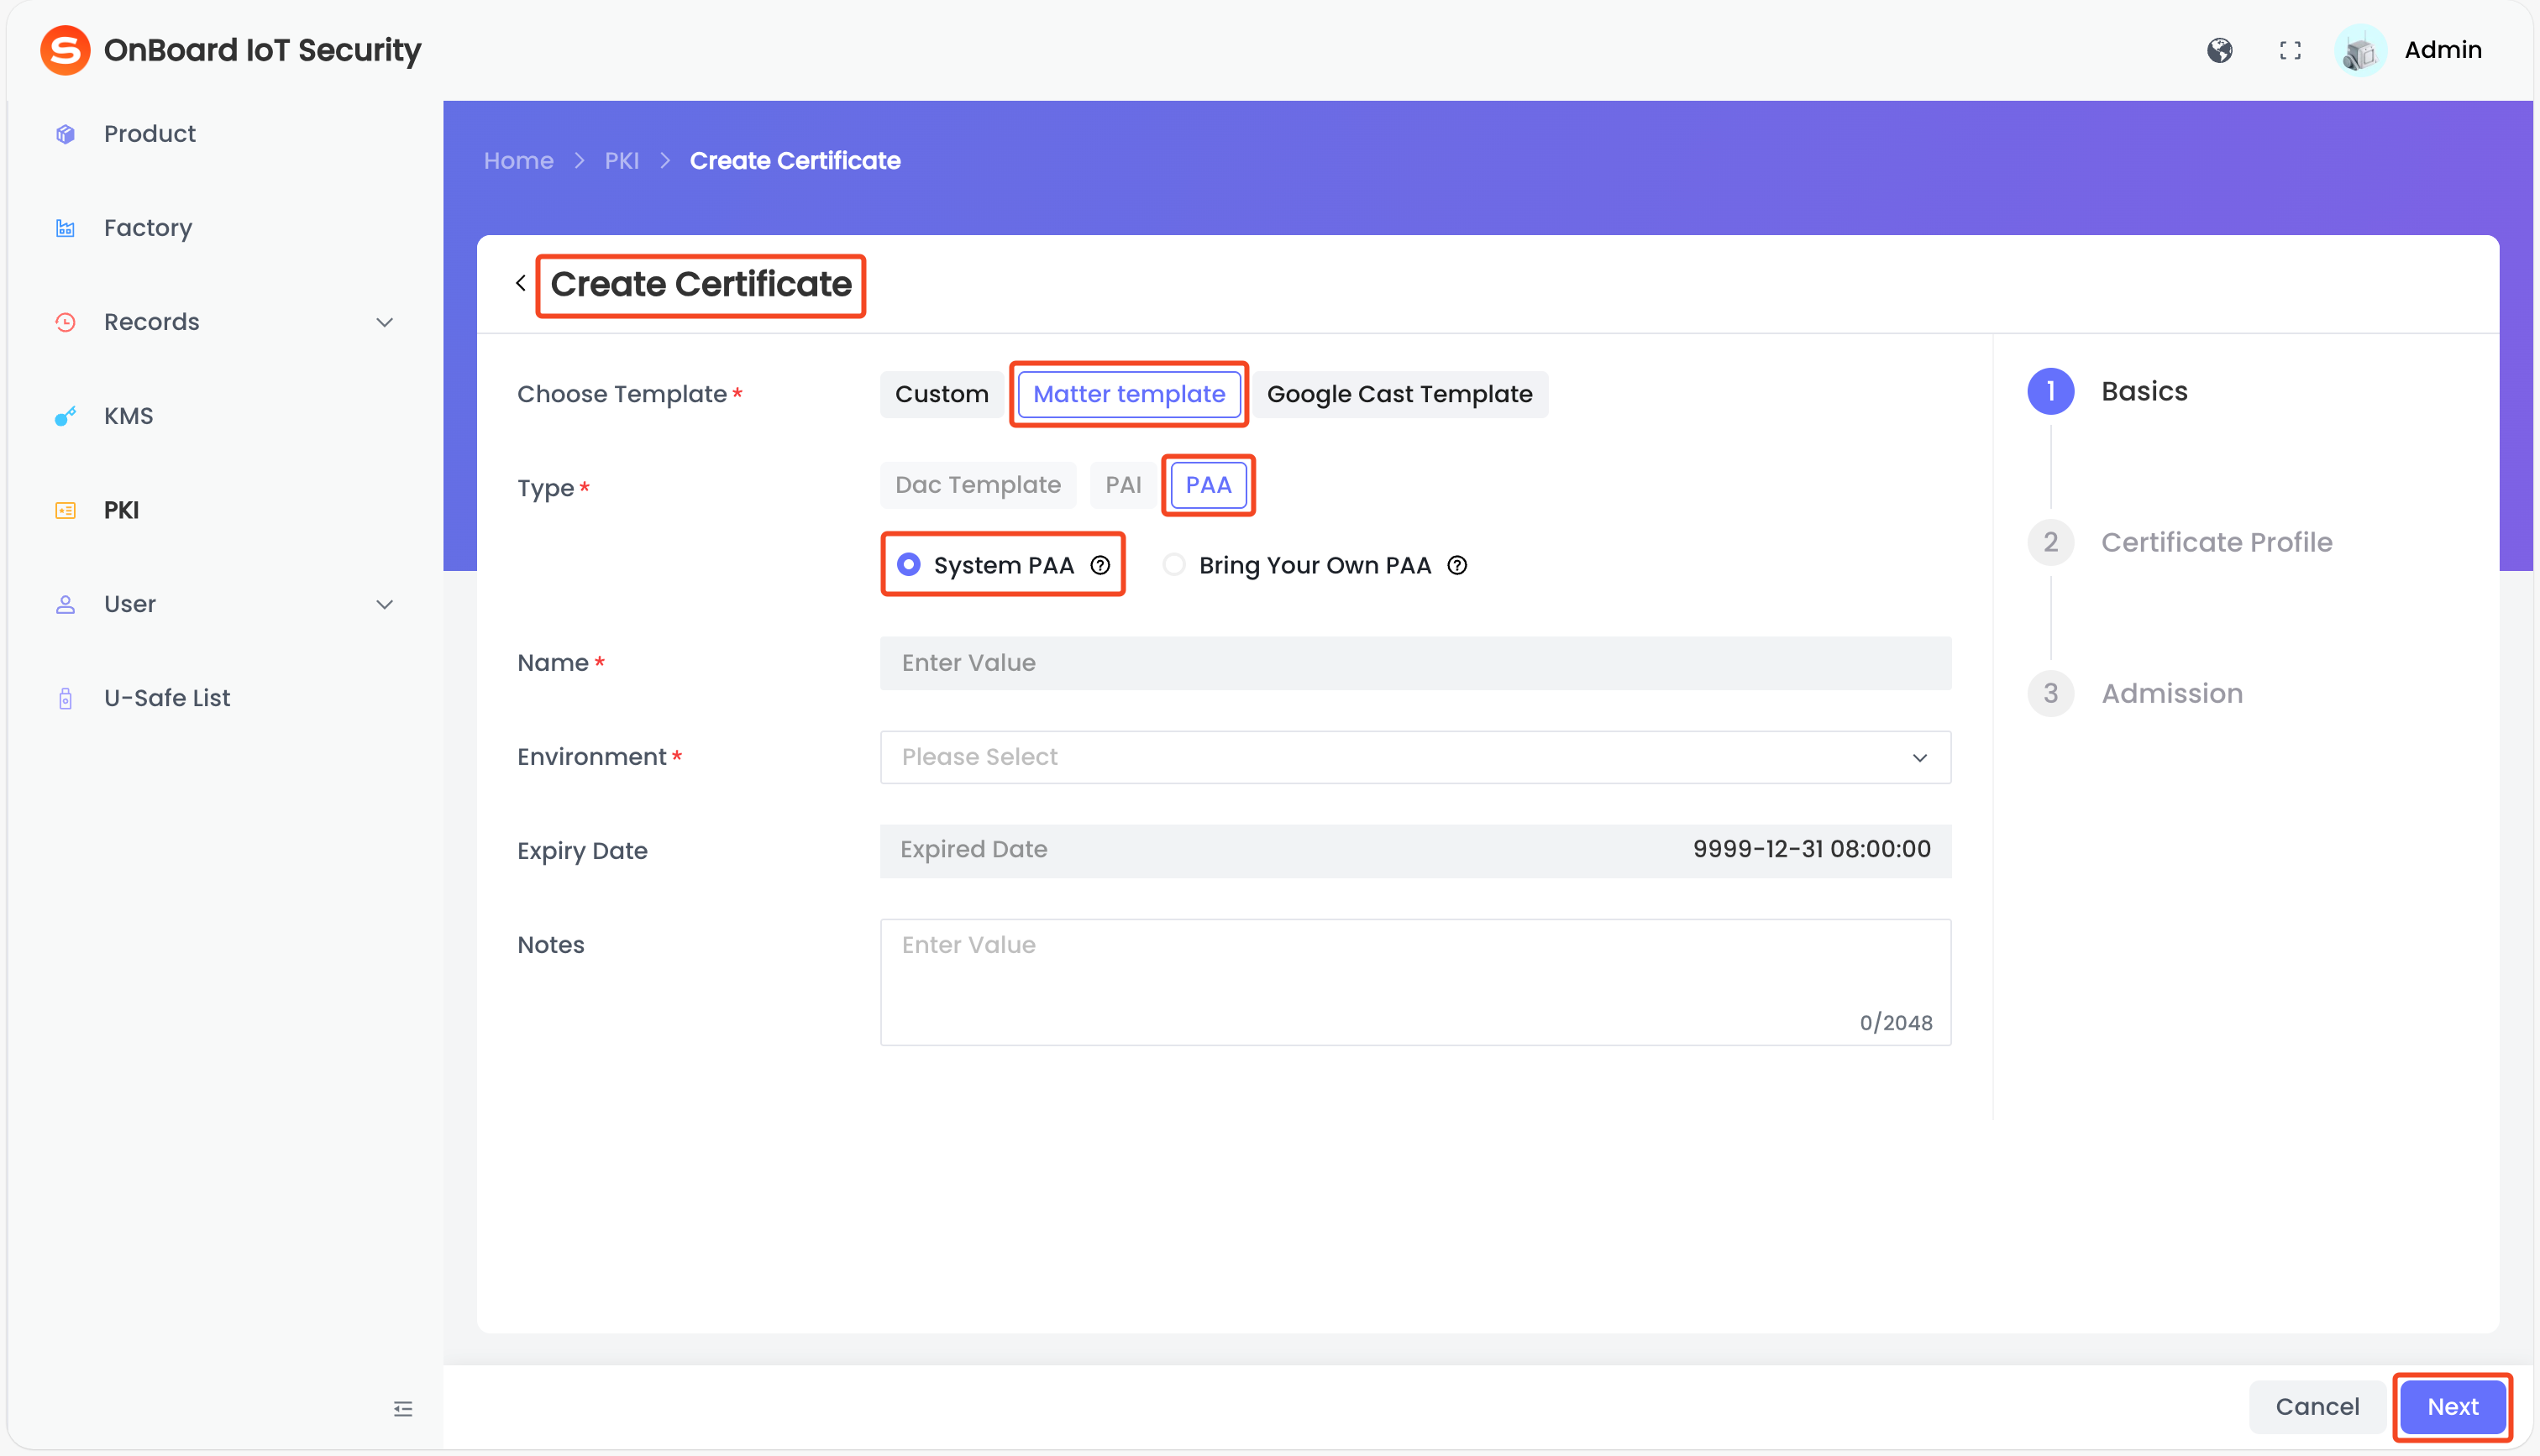
On the Create Certificate page, select Matter template for the format and PAA for the type.
-
Select System PAA or Bring Your Own PAA as needed.
-
If you are not using your own PAA certificate based on the Matter template, select System PAA, then select and enter the basic information.
tipUse the PAA provided by Snowball.
-
If you are using your own PAA certificate based on the Matter template, select Bring Your Own PAA, then select and enter the basic information.
tipManually upload your own PAA certificate (with public key only) generated outside the system for verifying signature.
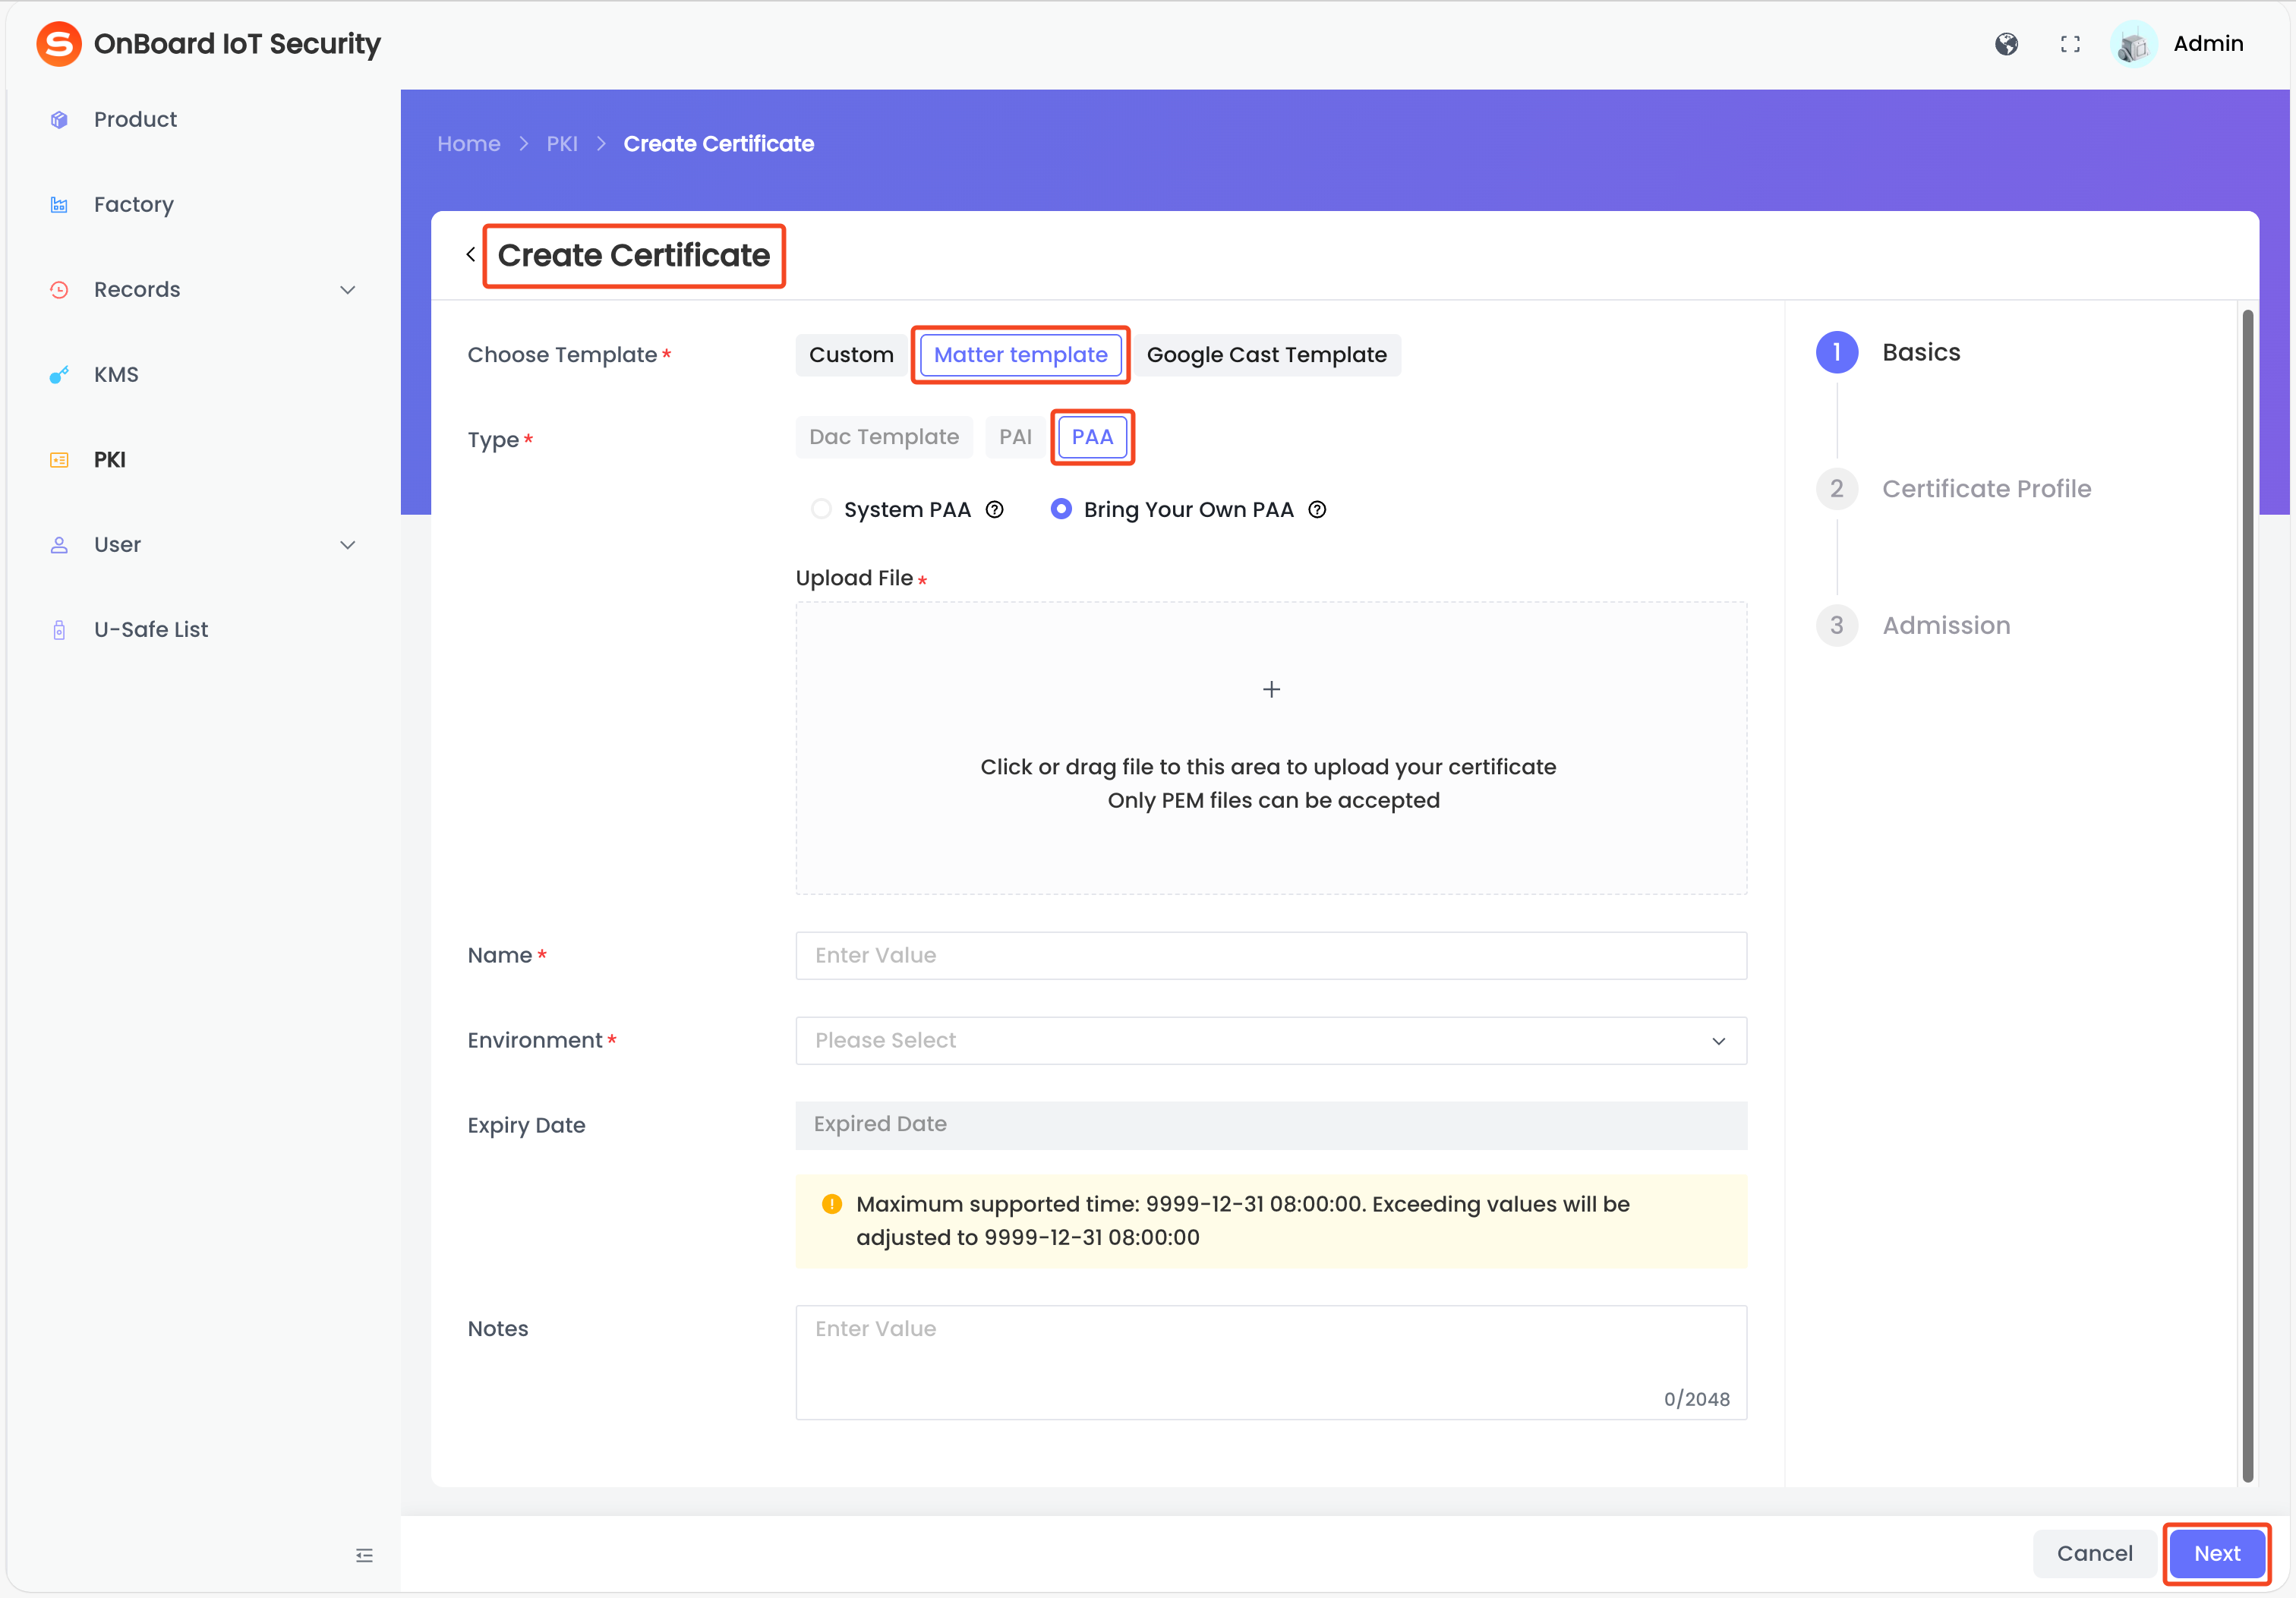
Description of PAA certificate basic information:
Information System PAA Bring Your Own PAA Upload file No file upload is required. in the Upload File area, click the Add icon to select and upload a PAA certificate in .pem format, or directly drag your own PAA certificate into the upload area.Name The name is fixed and can't be modified. - TEST environment: Snowball Matter UAT PAA 01
- PROD environment: Snowball Matter PROD PAA 01
The PAA certificate name must be unique in the same environment. Environment Two environments can be selected: TEST and PROD. Expiry Date The expiry date of the System PAA certificate and can't be modified. Automatically parsed from the certificate content and can't be modified. Notes Provide additional information related to the PAA certificate, such as special requirements and important notes.
-
-
After verifying that the information is correct, click Next and configure according to the following information.
tipIf using a private PAA certificate, the page only displays the Profile Basic area.
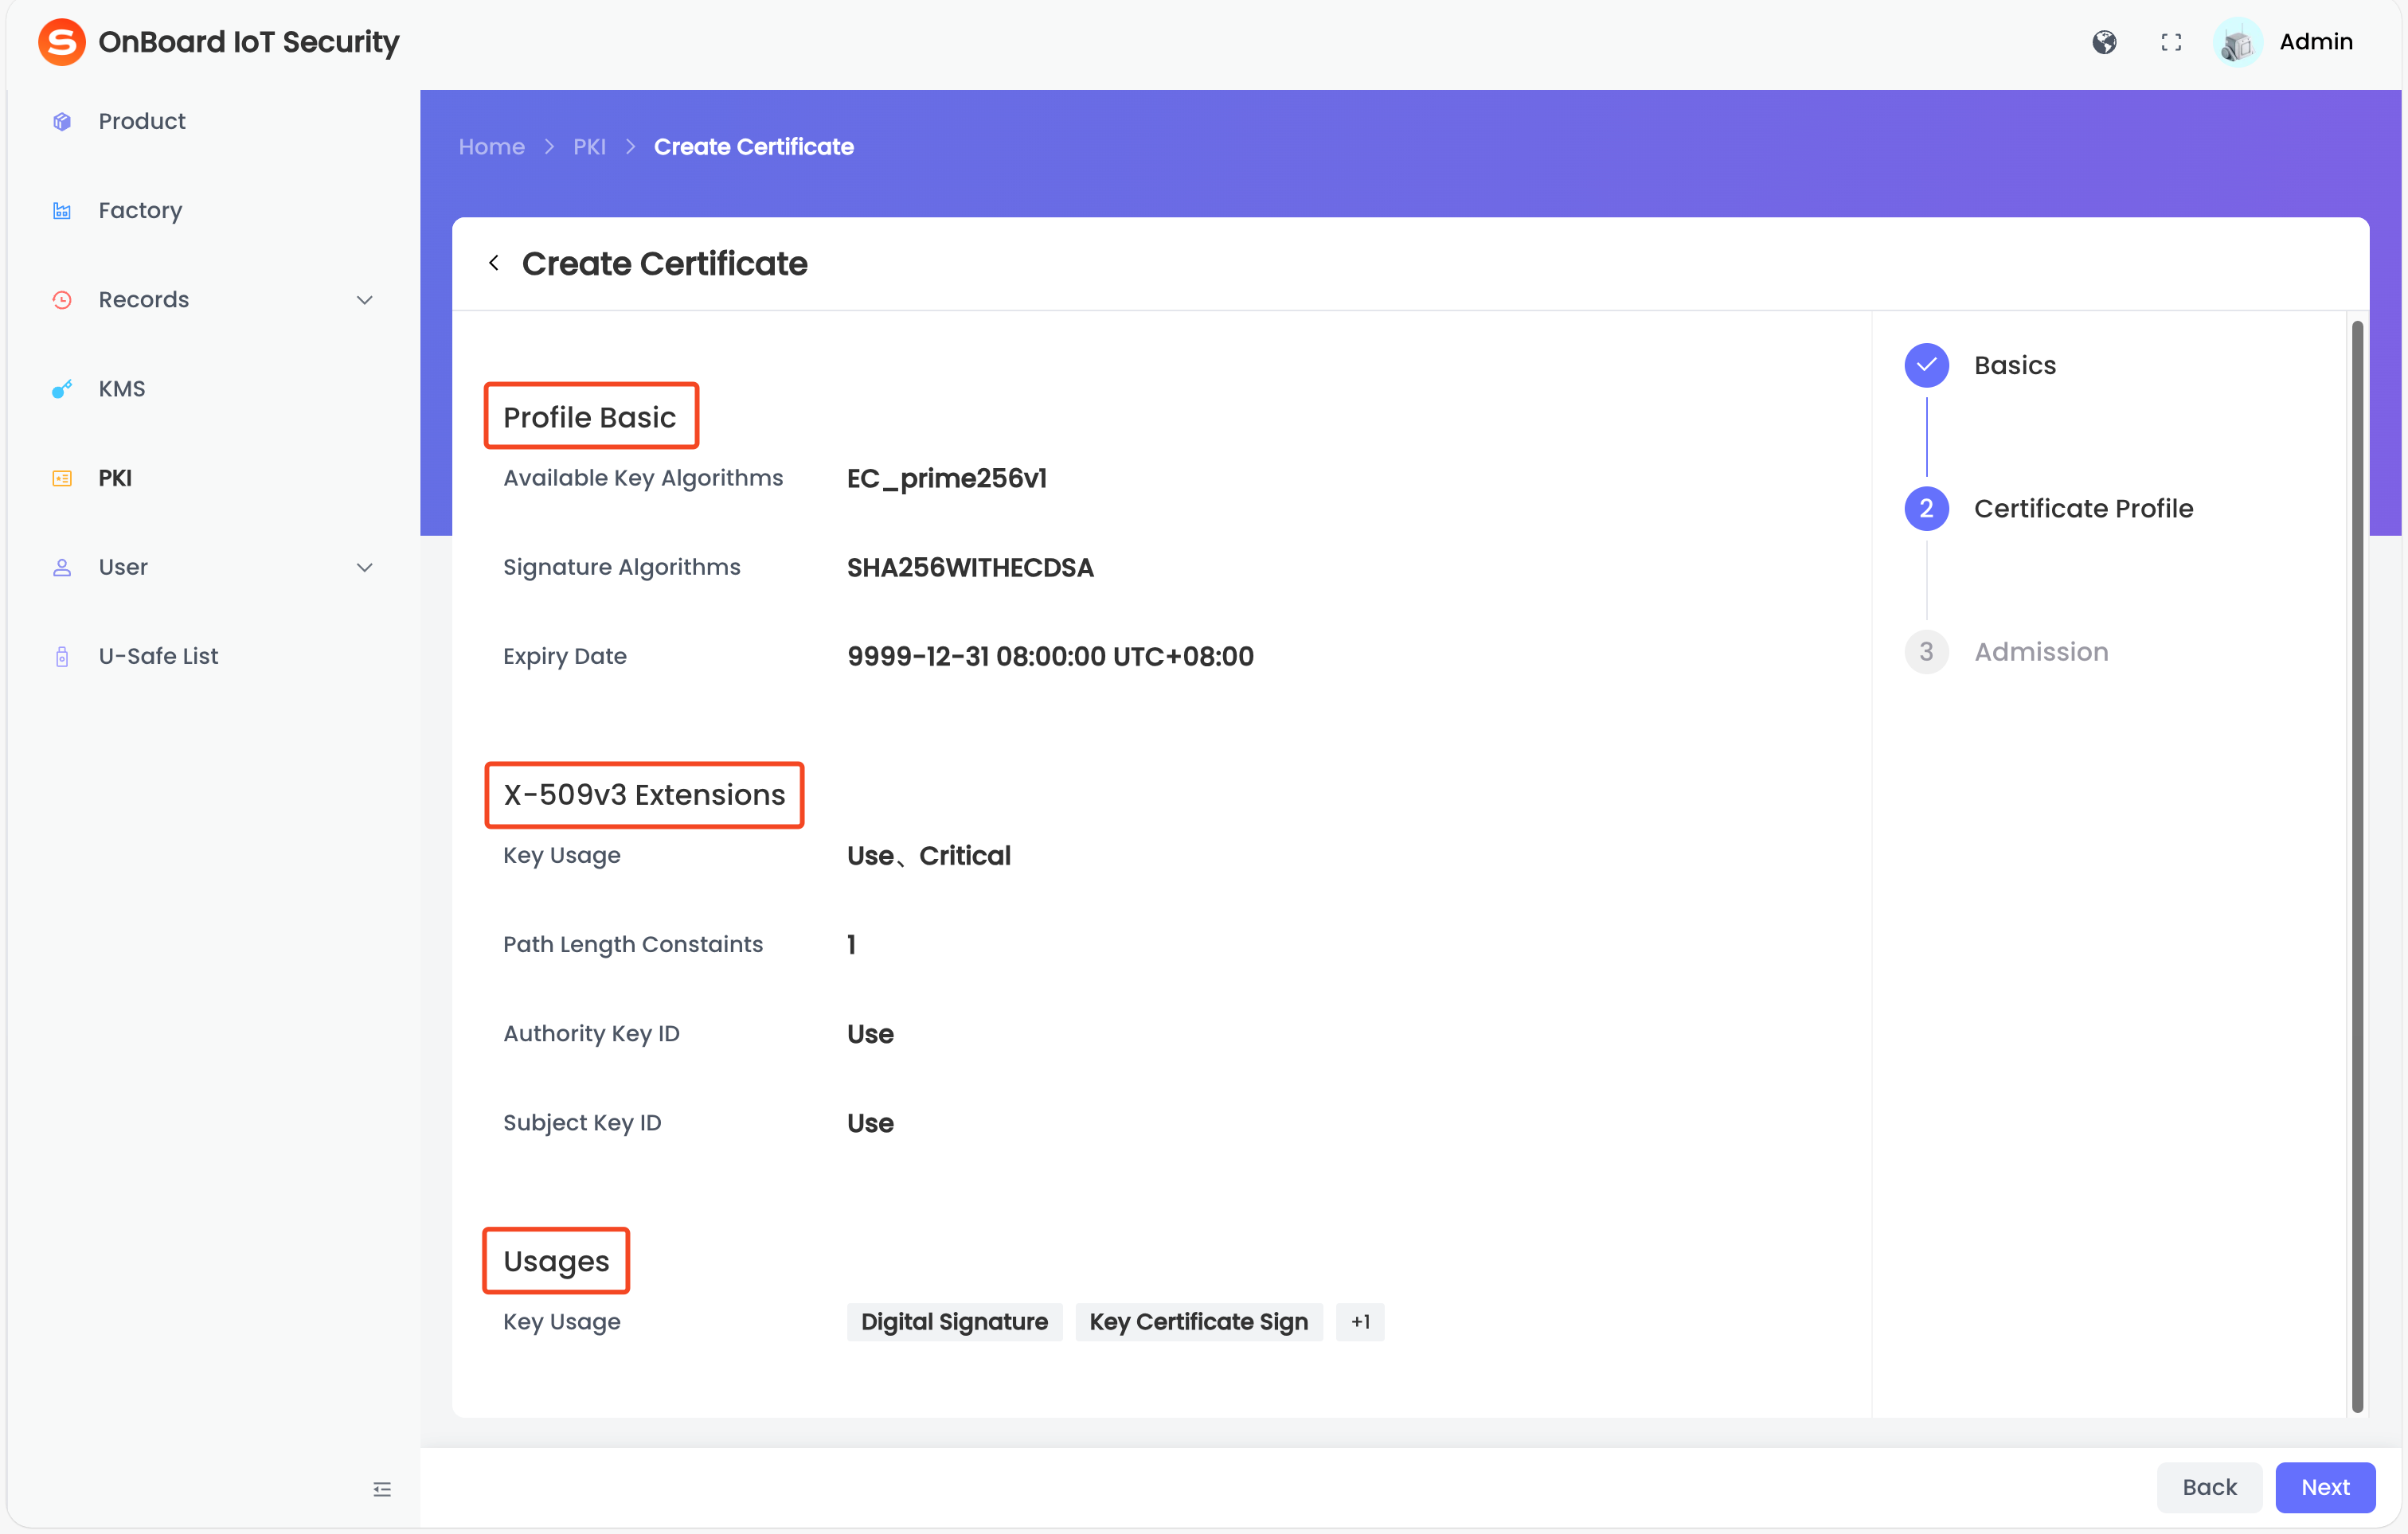
Description of PAA certificate profile information:
Area Information Description Profile Basic Available Key Algorithms Automatically parsed from the certificate content and can't be modified. Signature Algorithms Automatically parsed from the certificate content and can't be modified. Expiry Date Automatically parsed from the certificate content and can't be modified. X-509v3 Extensions Key Usage Automatically parsed from the certificate content and can't be modified. Path Length Constaints Automatically parsed from the certificate content and can't be modified. Authority Key ID Automatically parsed from the certificate content and can't be modified. Subject Key ID Automatically parsed from the certificate content and can't be modified. Usages Key Usage Optional key usages, such as Digital Signature, Key Certificate Sign, and CRL Sign. -
After verifying that the information is correct, click Next, and then click Add on the Admission page.
-
In the Assign User Permissions window, enter the email address and assign corresponding permission (View, Edit, Use, Revoke, Grant, and Delete). Then, click Add.
-
Click Complete to complete the PAA certificate creation.
Before creating a PAI certificate based on the Matter template, please ensure that at least one PAA certificate based on the Matter template has been created so that it can be selected and inherited during configuration.
-
On the Certificate Chain page, click the corresponding certificate chain, and then click Create.
tipThe Key
icon indicates that the certificate contains a private key.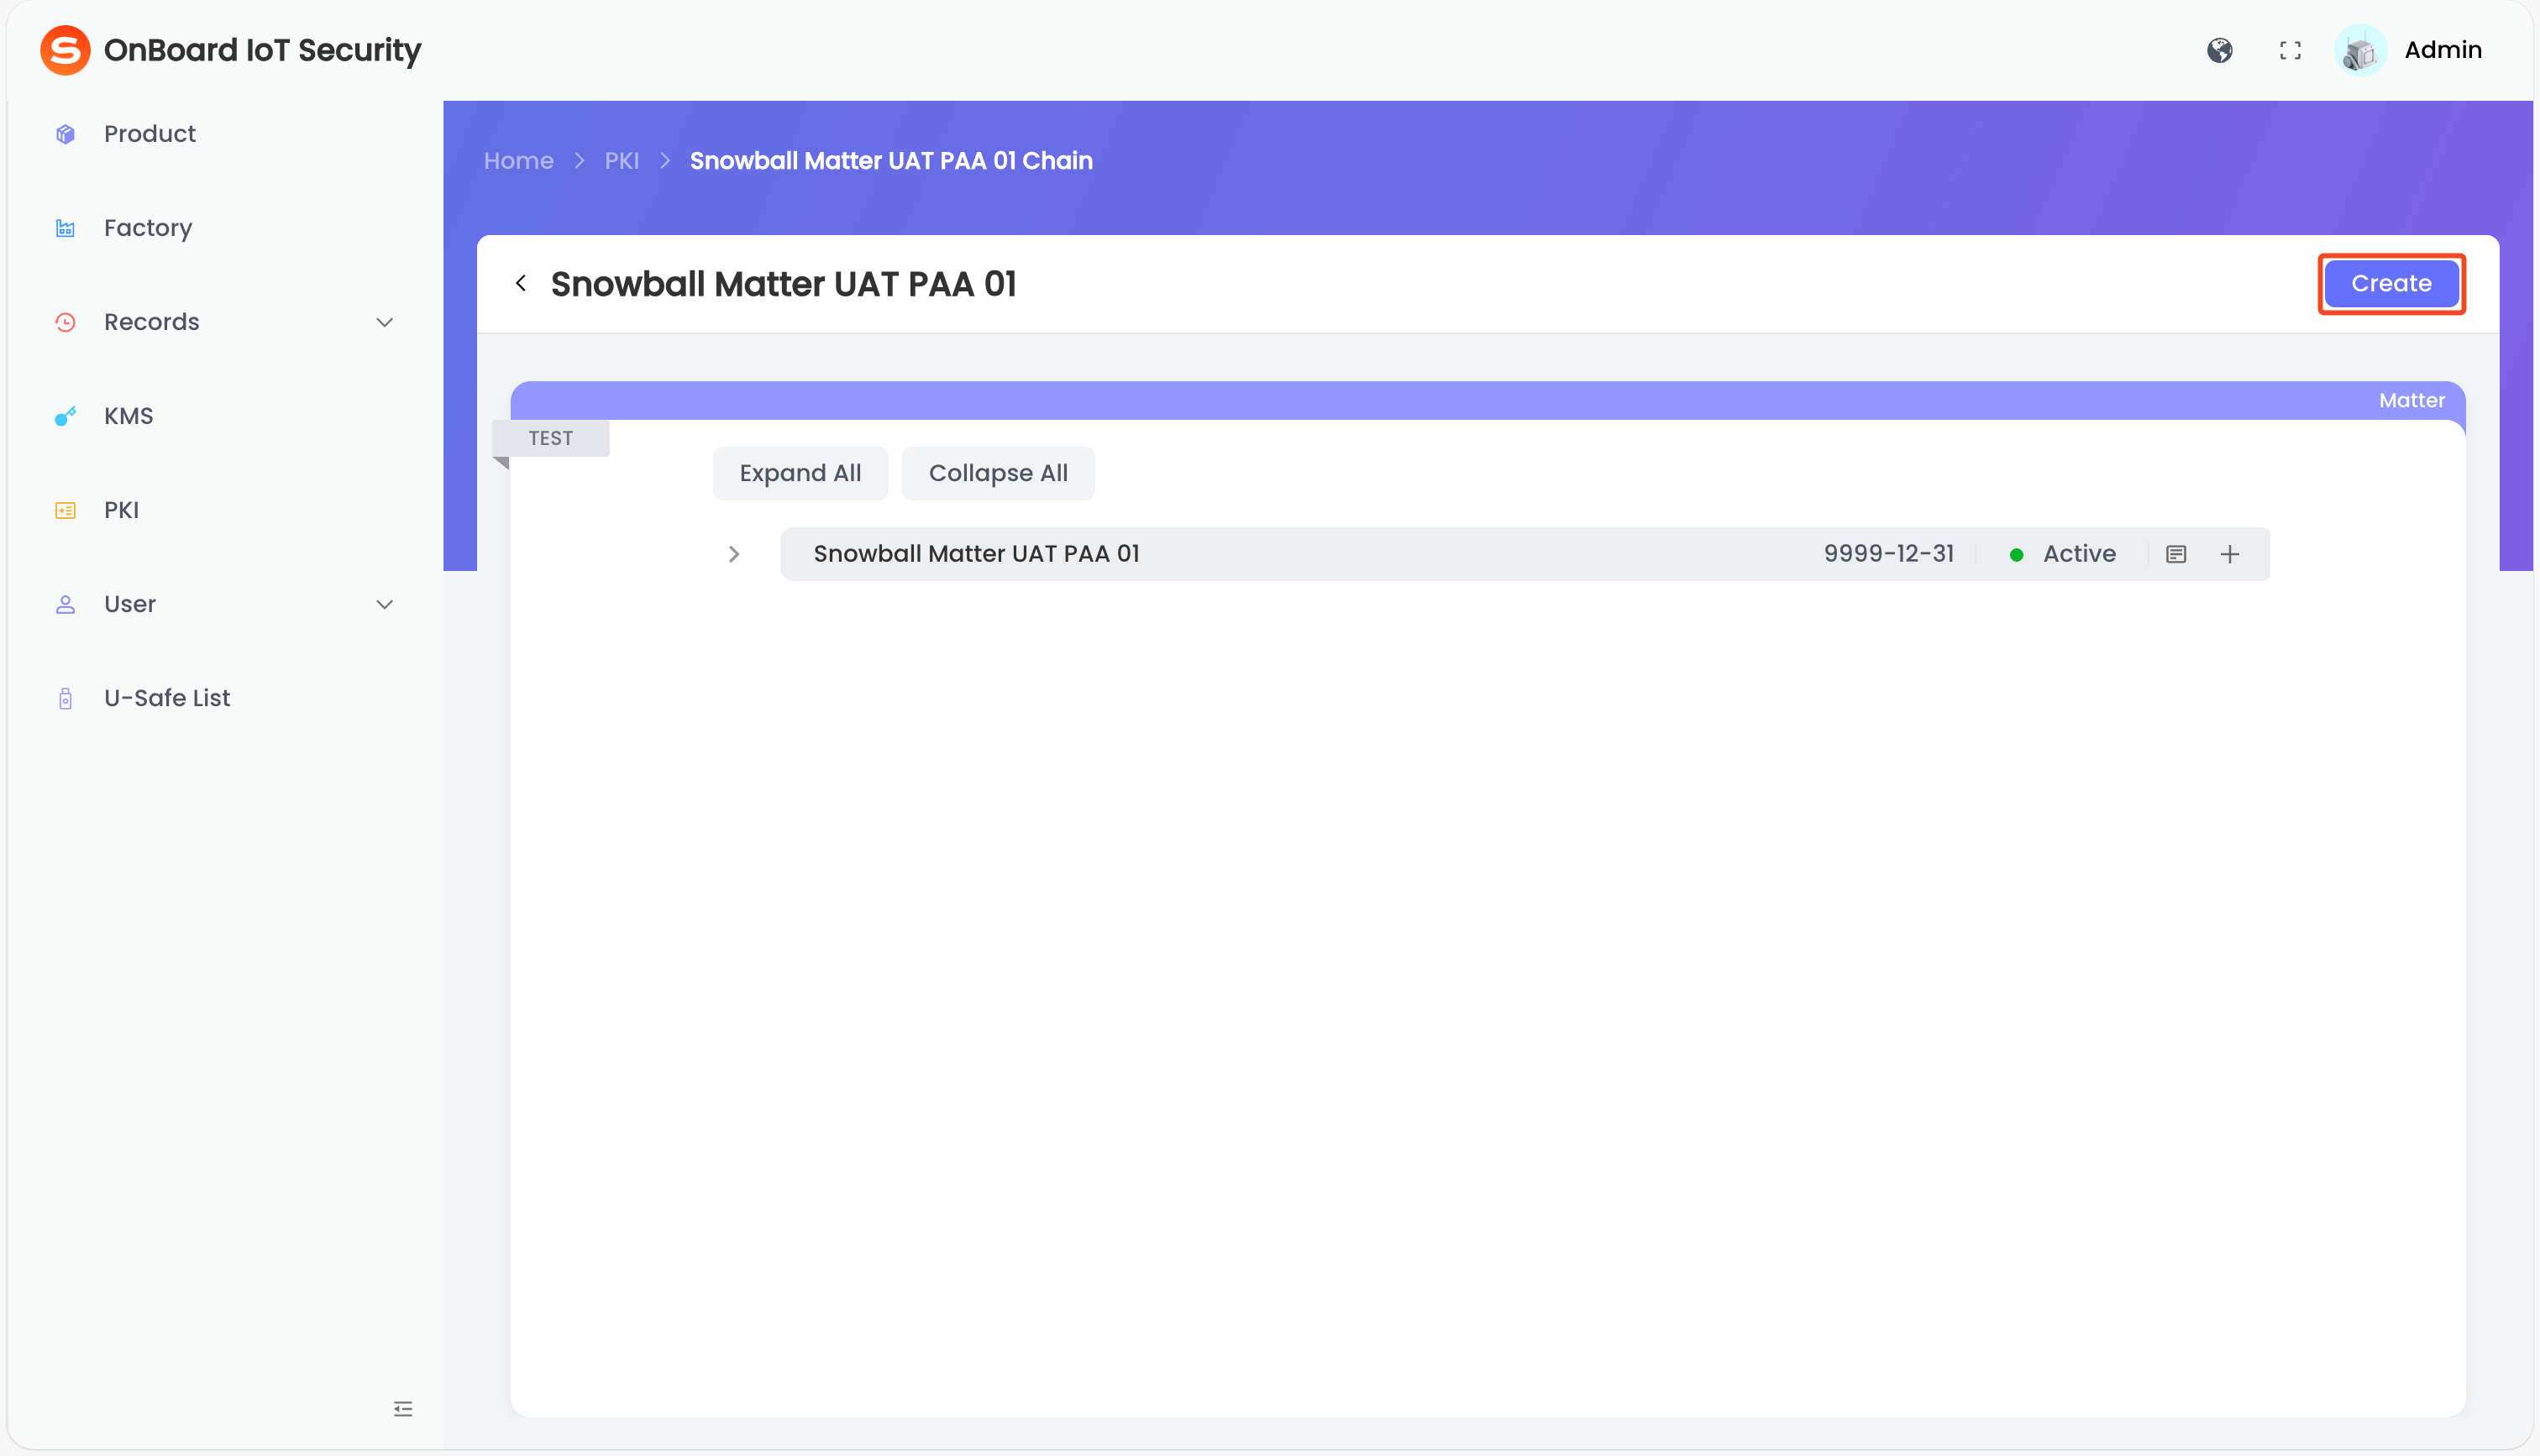
-
On the Create Certificate page, select Matter template for the format and PAI for the type, then select and enter the basic information.
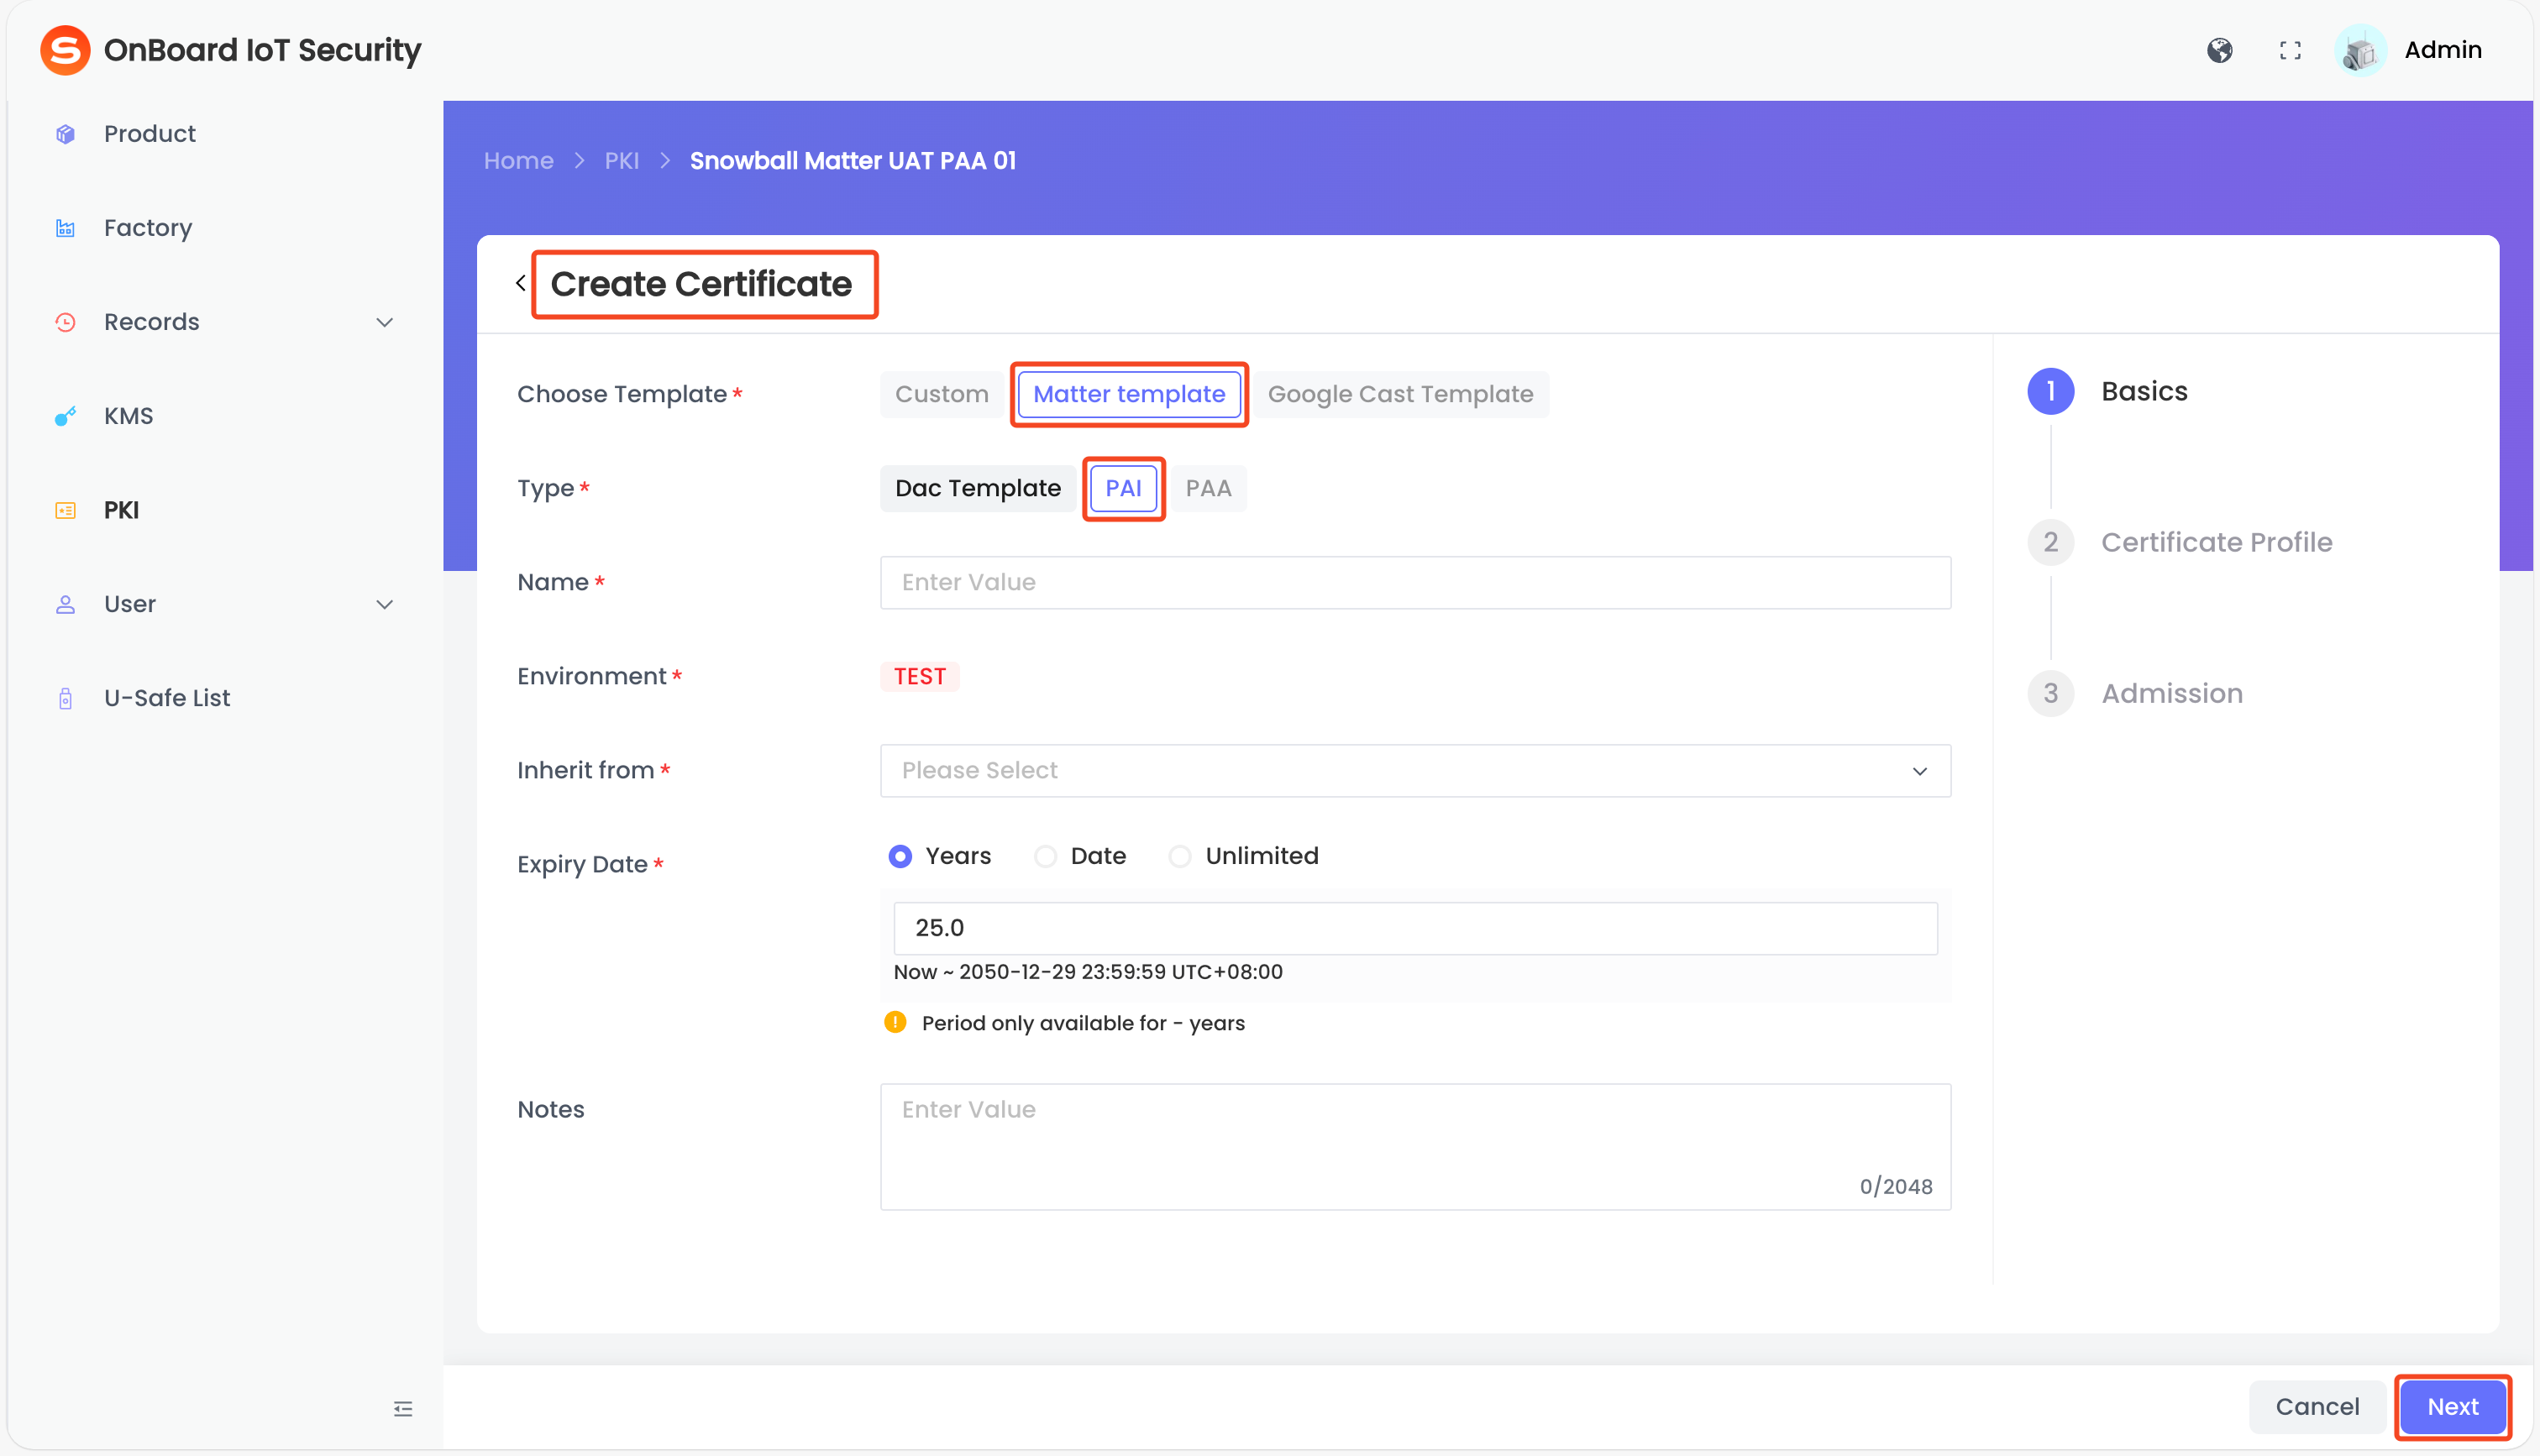
Description of PAI certificate basic information:
-
After verifying that the information is correct, click Next and configure according to the following information.
tipIf the PAI certificate is inherited from your own PAA certificate, only the Matter Basic and Profile Basic areas are dispalyed.
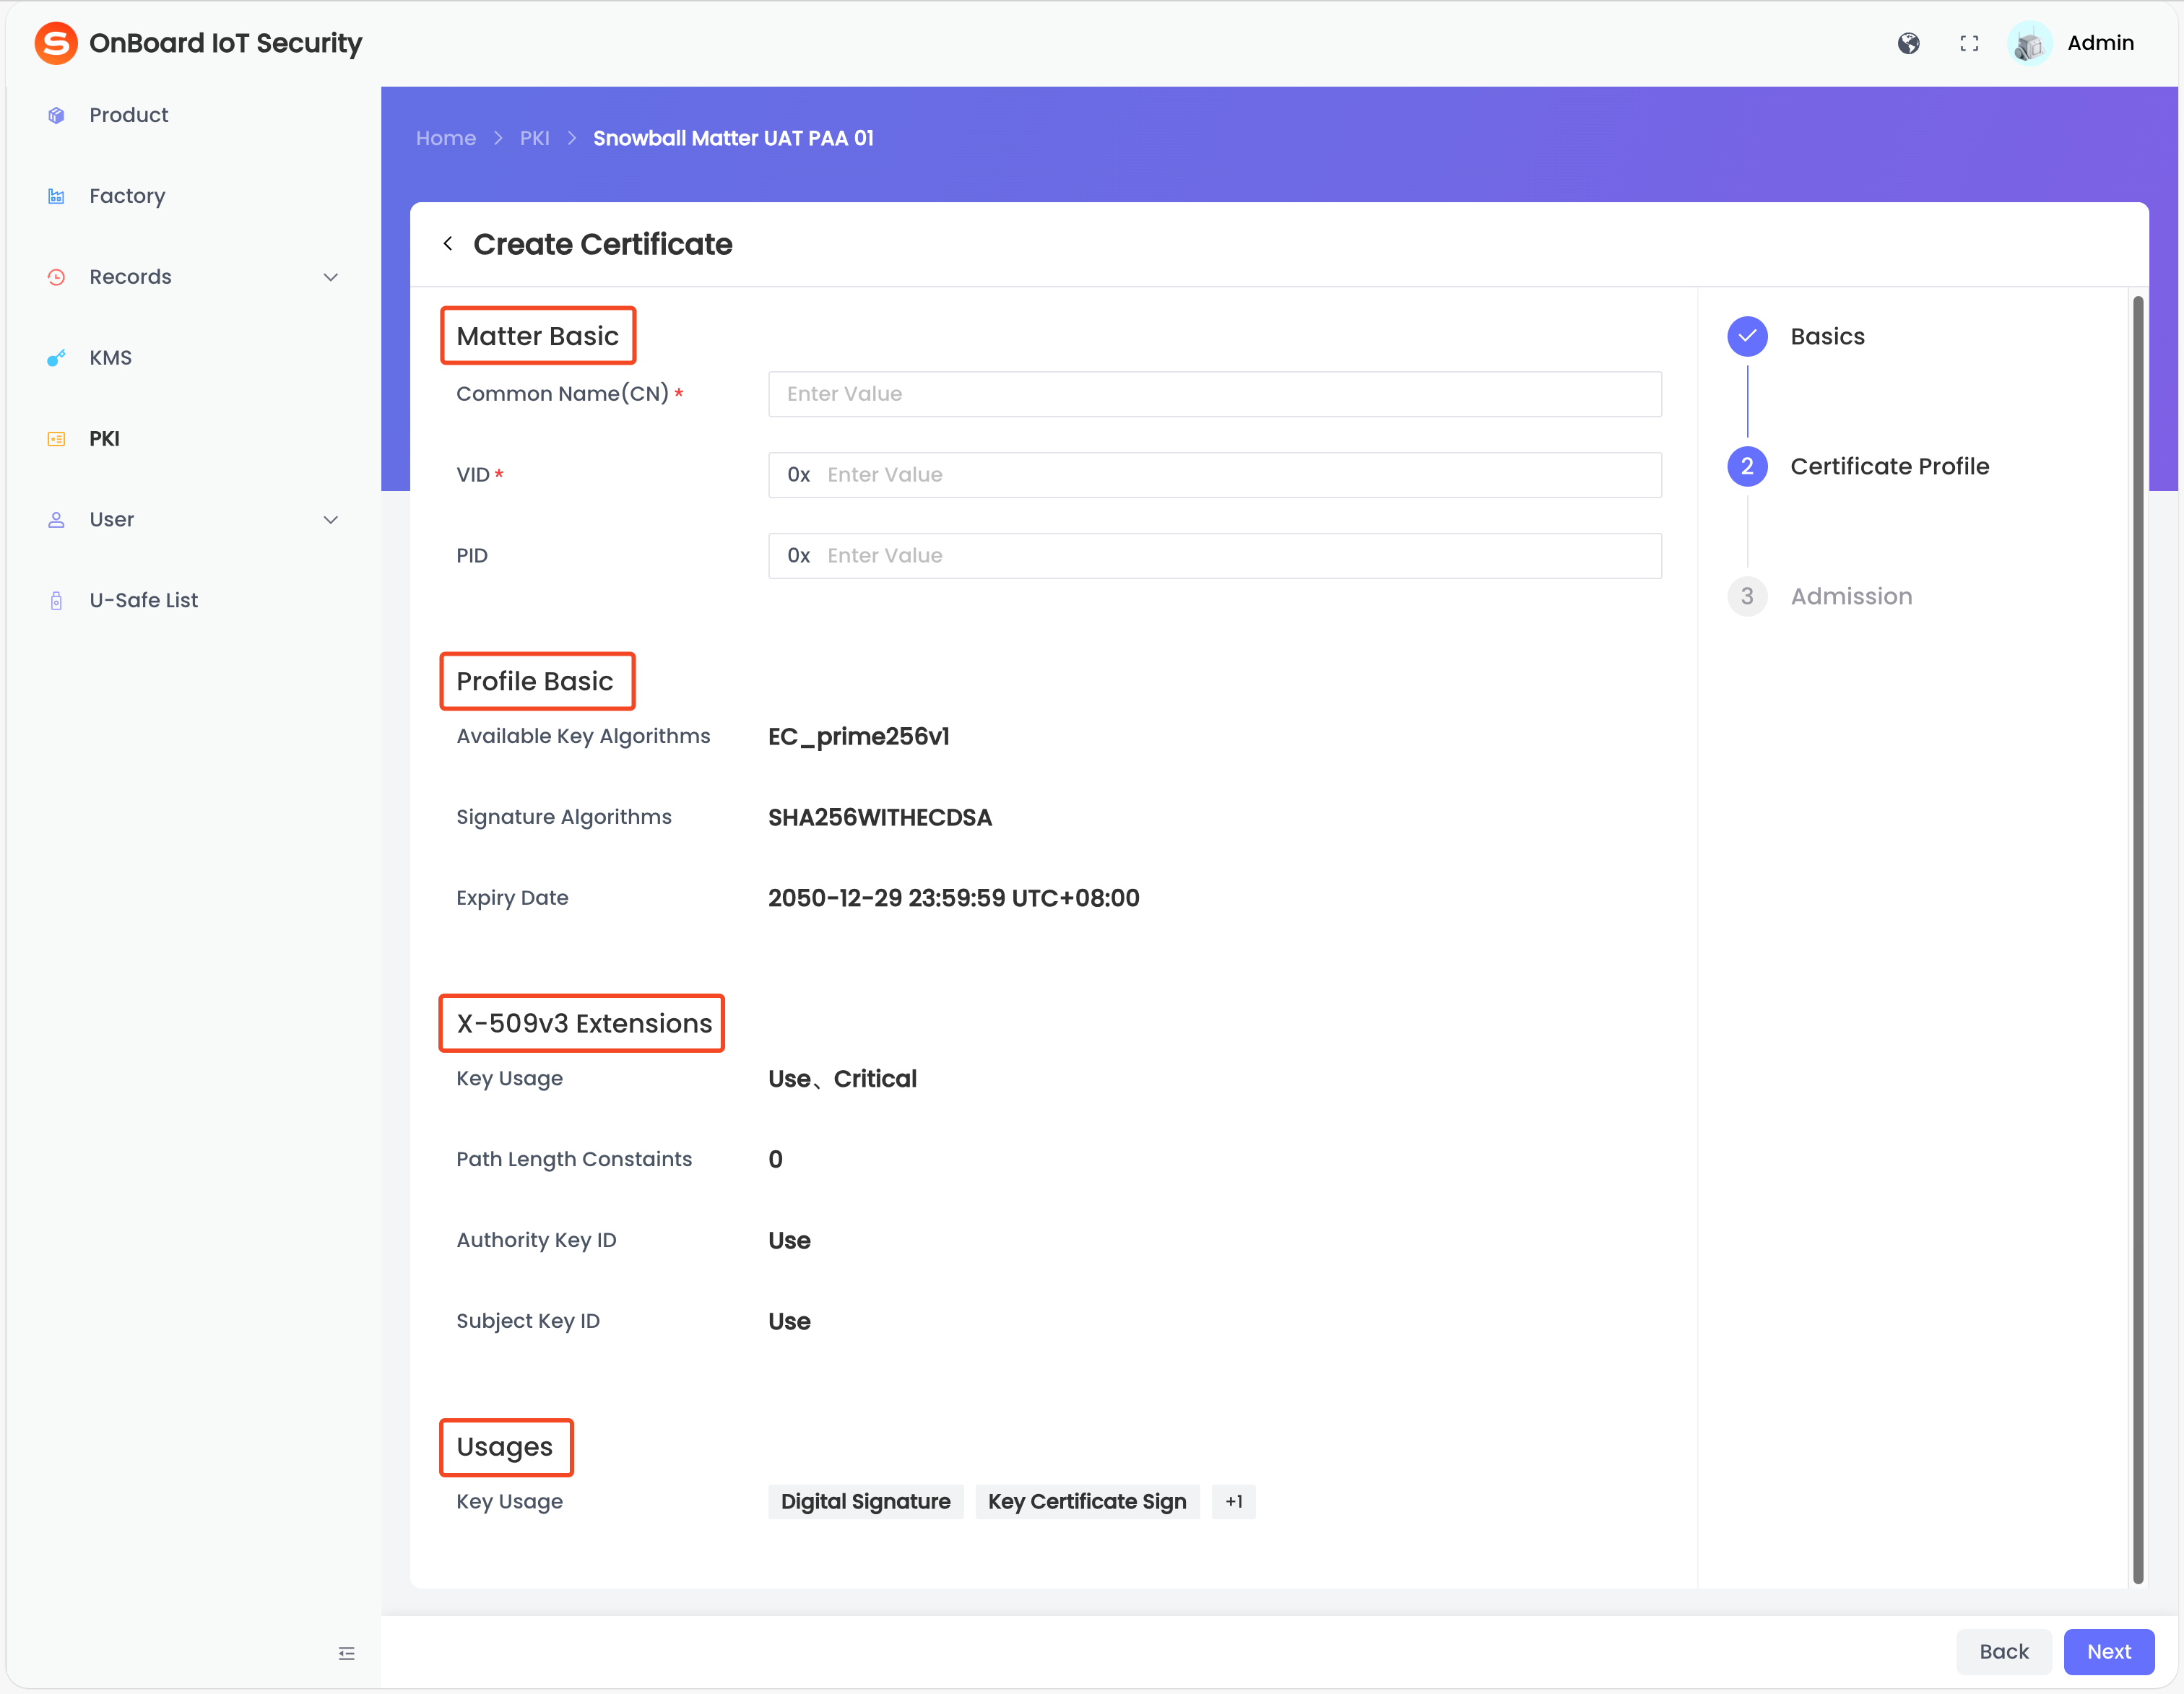
Description of PAI certificate profile information:
Area Information Description Matter Basic Common Name (CN) (Required) The common name of the certificate. VID (Required) Vendor ID. PID (optional) Product ID. Profile Basic Available Key Algorithms Automatically parsed from the certificate content and can't be modified. Signature Algorithms Automatically parsed from the certificate content and can't be modified. Expiry Date Inherits the Expiry Date set in the previous step and can't be modified. X-509v3 Extensions Key Usage Automatically parsed from the certificate content and can't be modified. Path Length Constaints Automatically parsed from the certificate content and can't be modified. Authority Key ID Automatically parsed from the certificate content and can't be modified. Subject Key ID Automatically parsed from the certificate content and can't be modified. Usages Key Usage Optional key usages, such as Digital Signature, Key Certificate Sign, and CRL Sign. -
After verifying that the information is correct, click Next, and then click Add on the Admission page.
-
In the Assign User Permissions window, enter the email address and assign the corresponding permission (View, Edit, Use, Revoke, Grant, and Delete). Then, click Add.
-
Click Complete to complete the PAI certificate creation.
tipWhen creating a PAI certificate, if it is inherited from your own PAA certificate, you must complete the CSR (Certificate Signing Request) configuration. Before the CSR configuration is completed, the certificate will remain in the Pending status and can't be used.
CSR configuration steps for the PAI certificate
When creating a PAI certificate, if it is inherited from your own PAA certificate, refer to the following steps to complete the CSR configuration.
-
On the Certificate Chain page, click the corresponding certificate chain, and then click the corresponding PAI certificate to navigate to the certificate page.
-
On the certificate page, click the link in the prompt to complete the CSR Configuration.
-
On the CSR Configuration page, click the Download
icon to download the CSR file. Then, use your Root CA to sign the file, thereby generate a PAI certificate signed by the Root CA.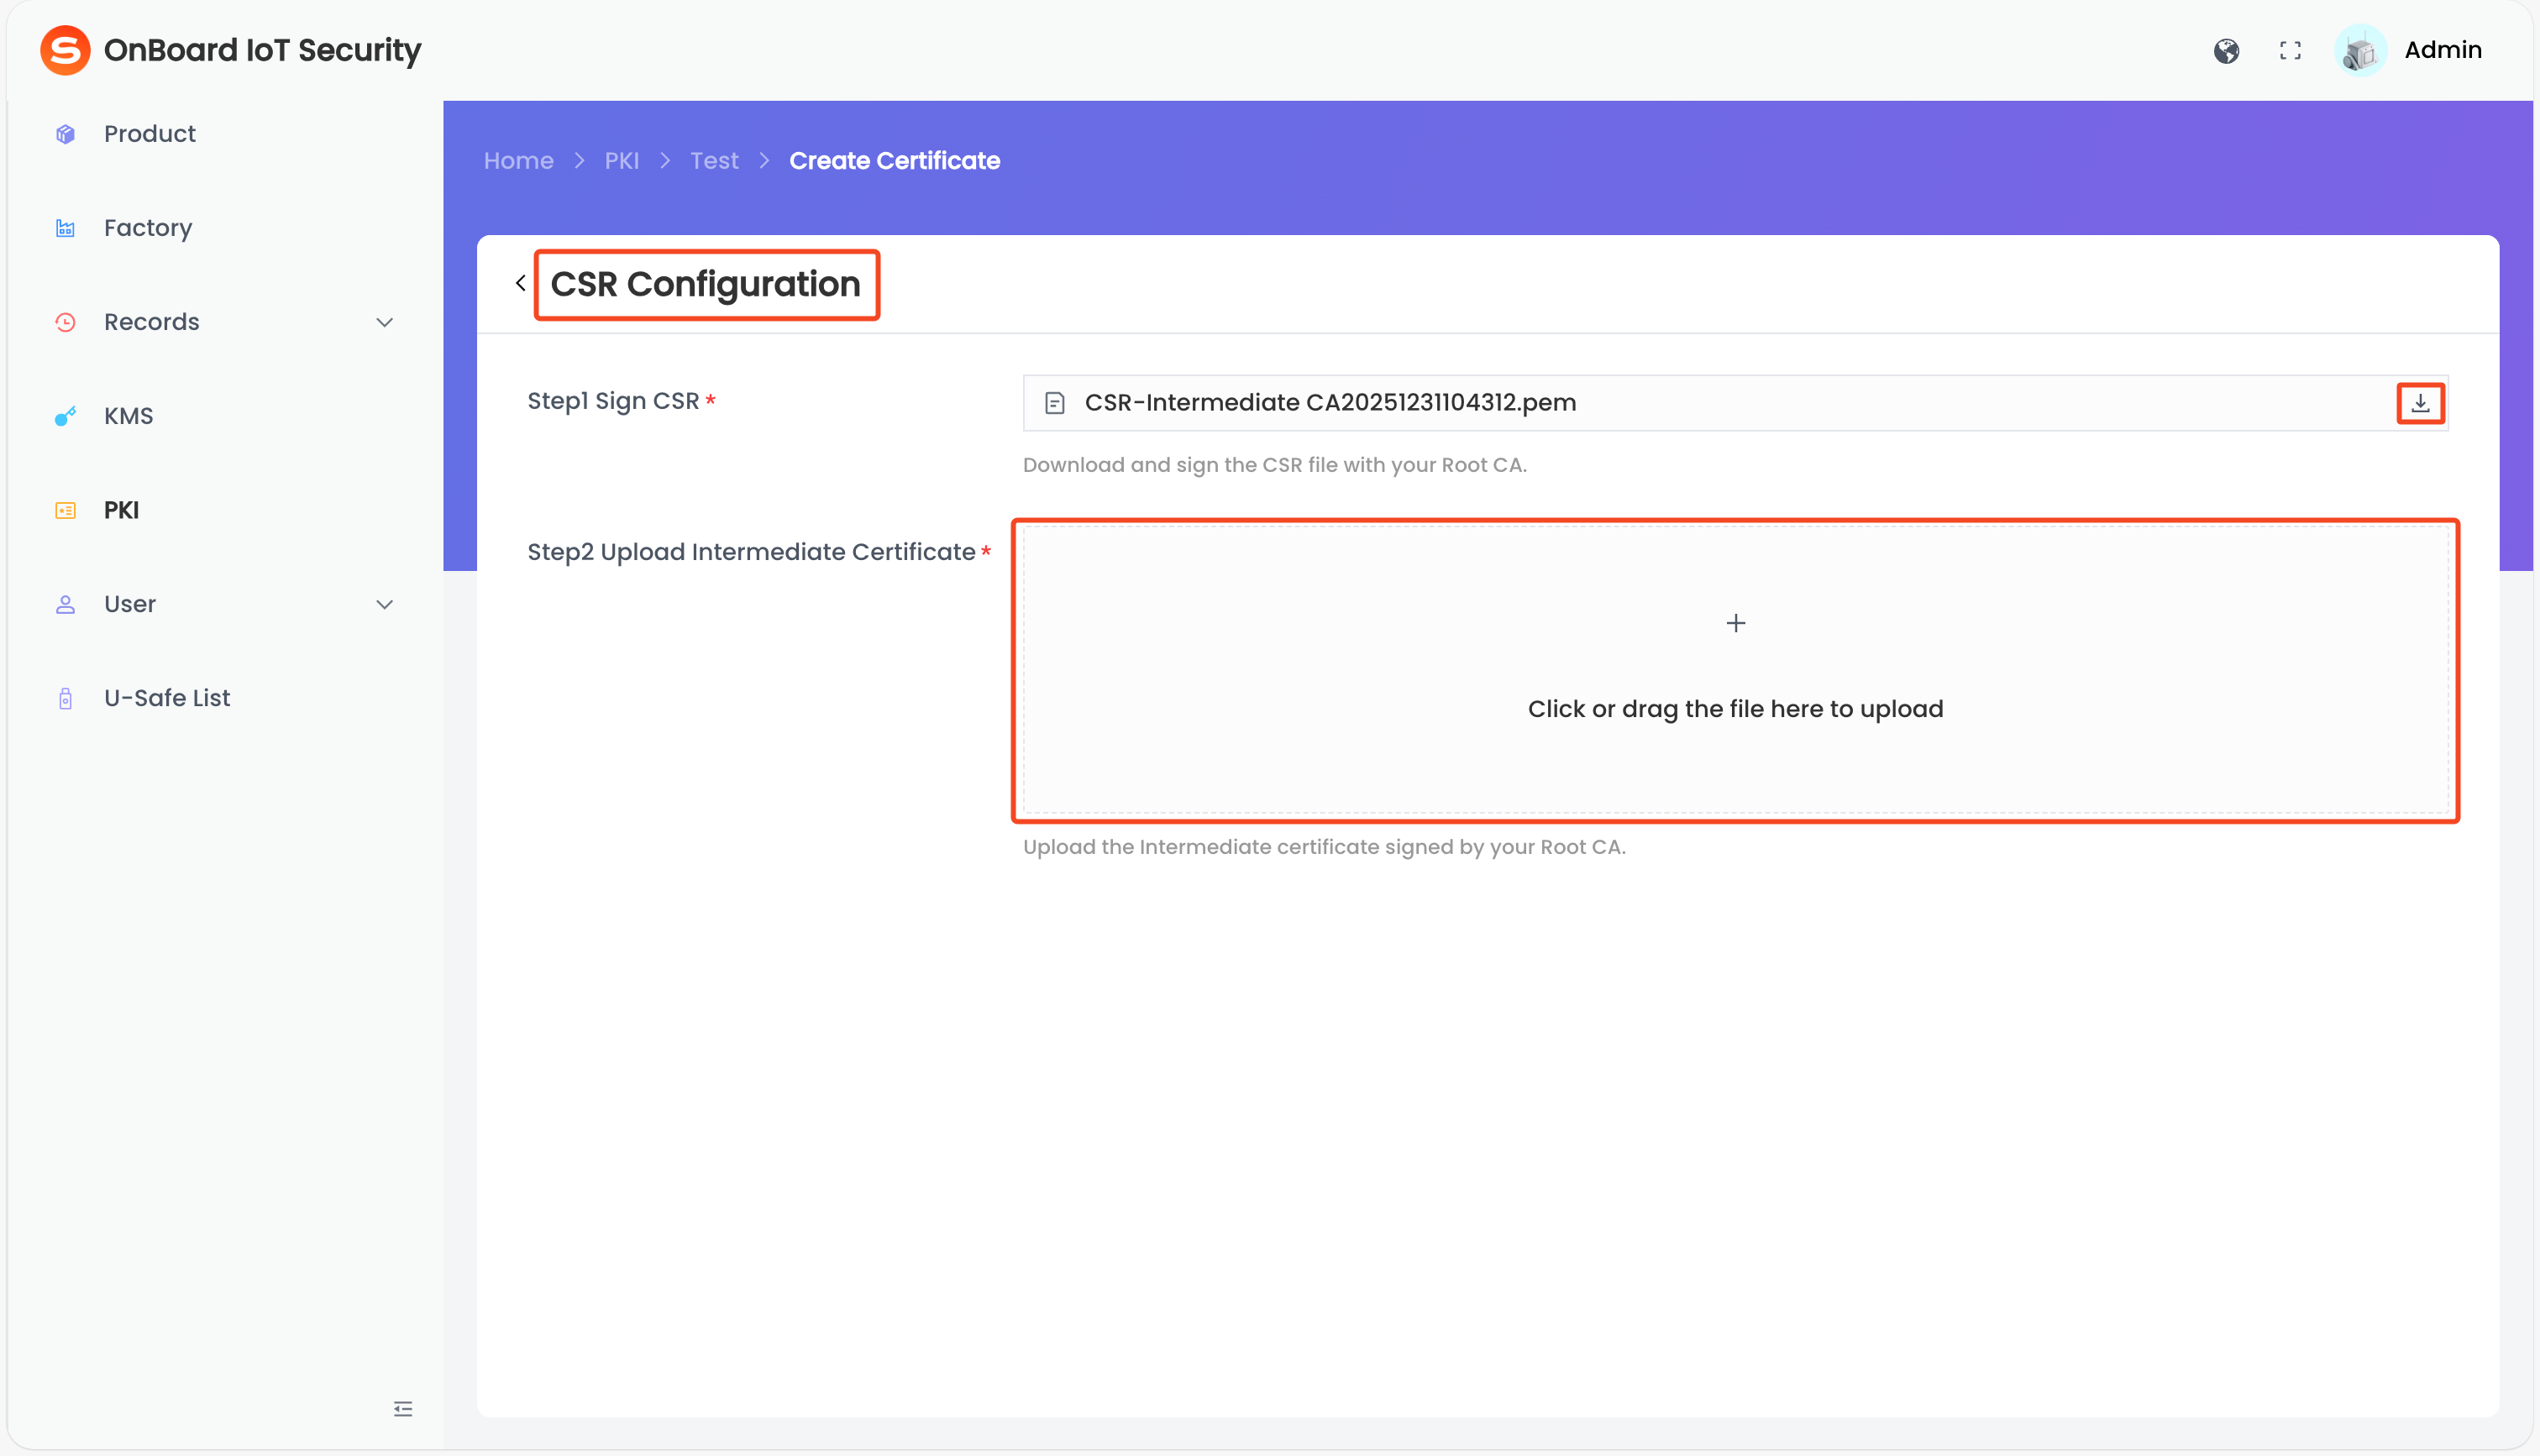
-
After a PAI certificate is generated, click the Add
icon in the upload area, select and upload the PAI certificate in .pem format, or directly drag and drop your PAI certificate into the upload area. -
Click Submit. Once the configuration is completed, the PAI certificate status will change to Normal.
Before creating a DAC template, please ensure that at least one PAI certificate based on the Matter template has been created so that it can be selected and inherited during configuration.
-
On the Create Certificate page, click the corresponding certificate chain, and then click Create.
tipThe Key
icon indicates that the certificate contains a private key.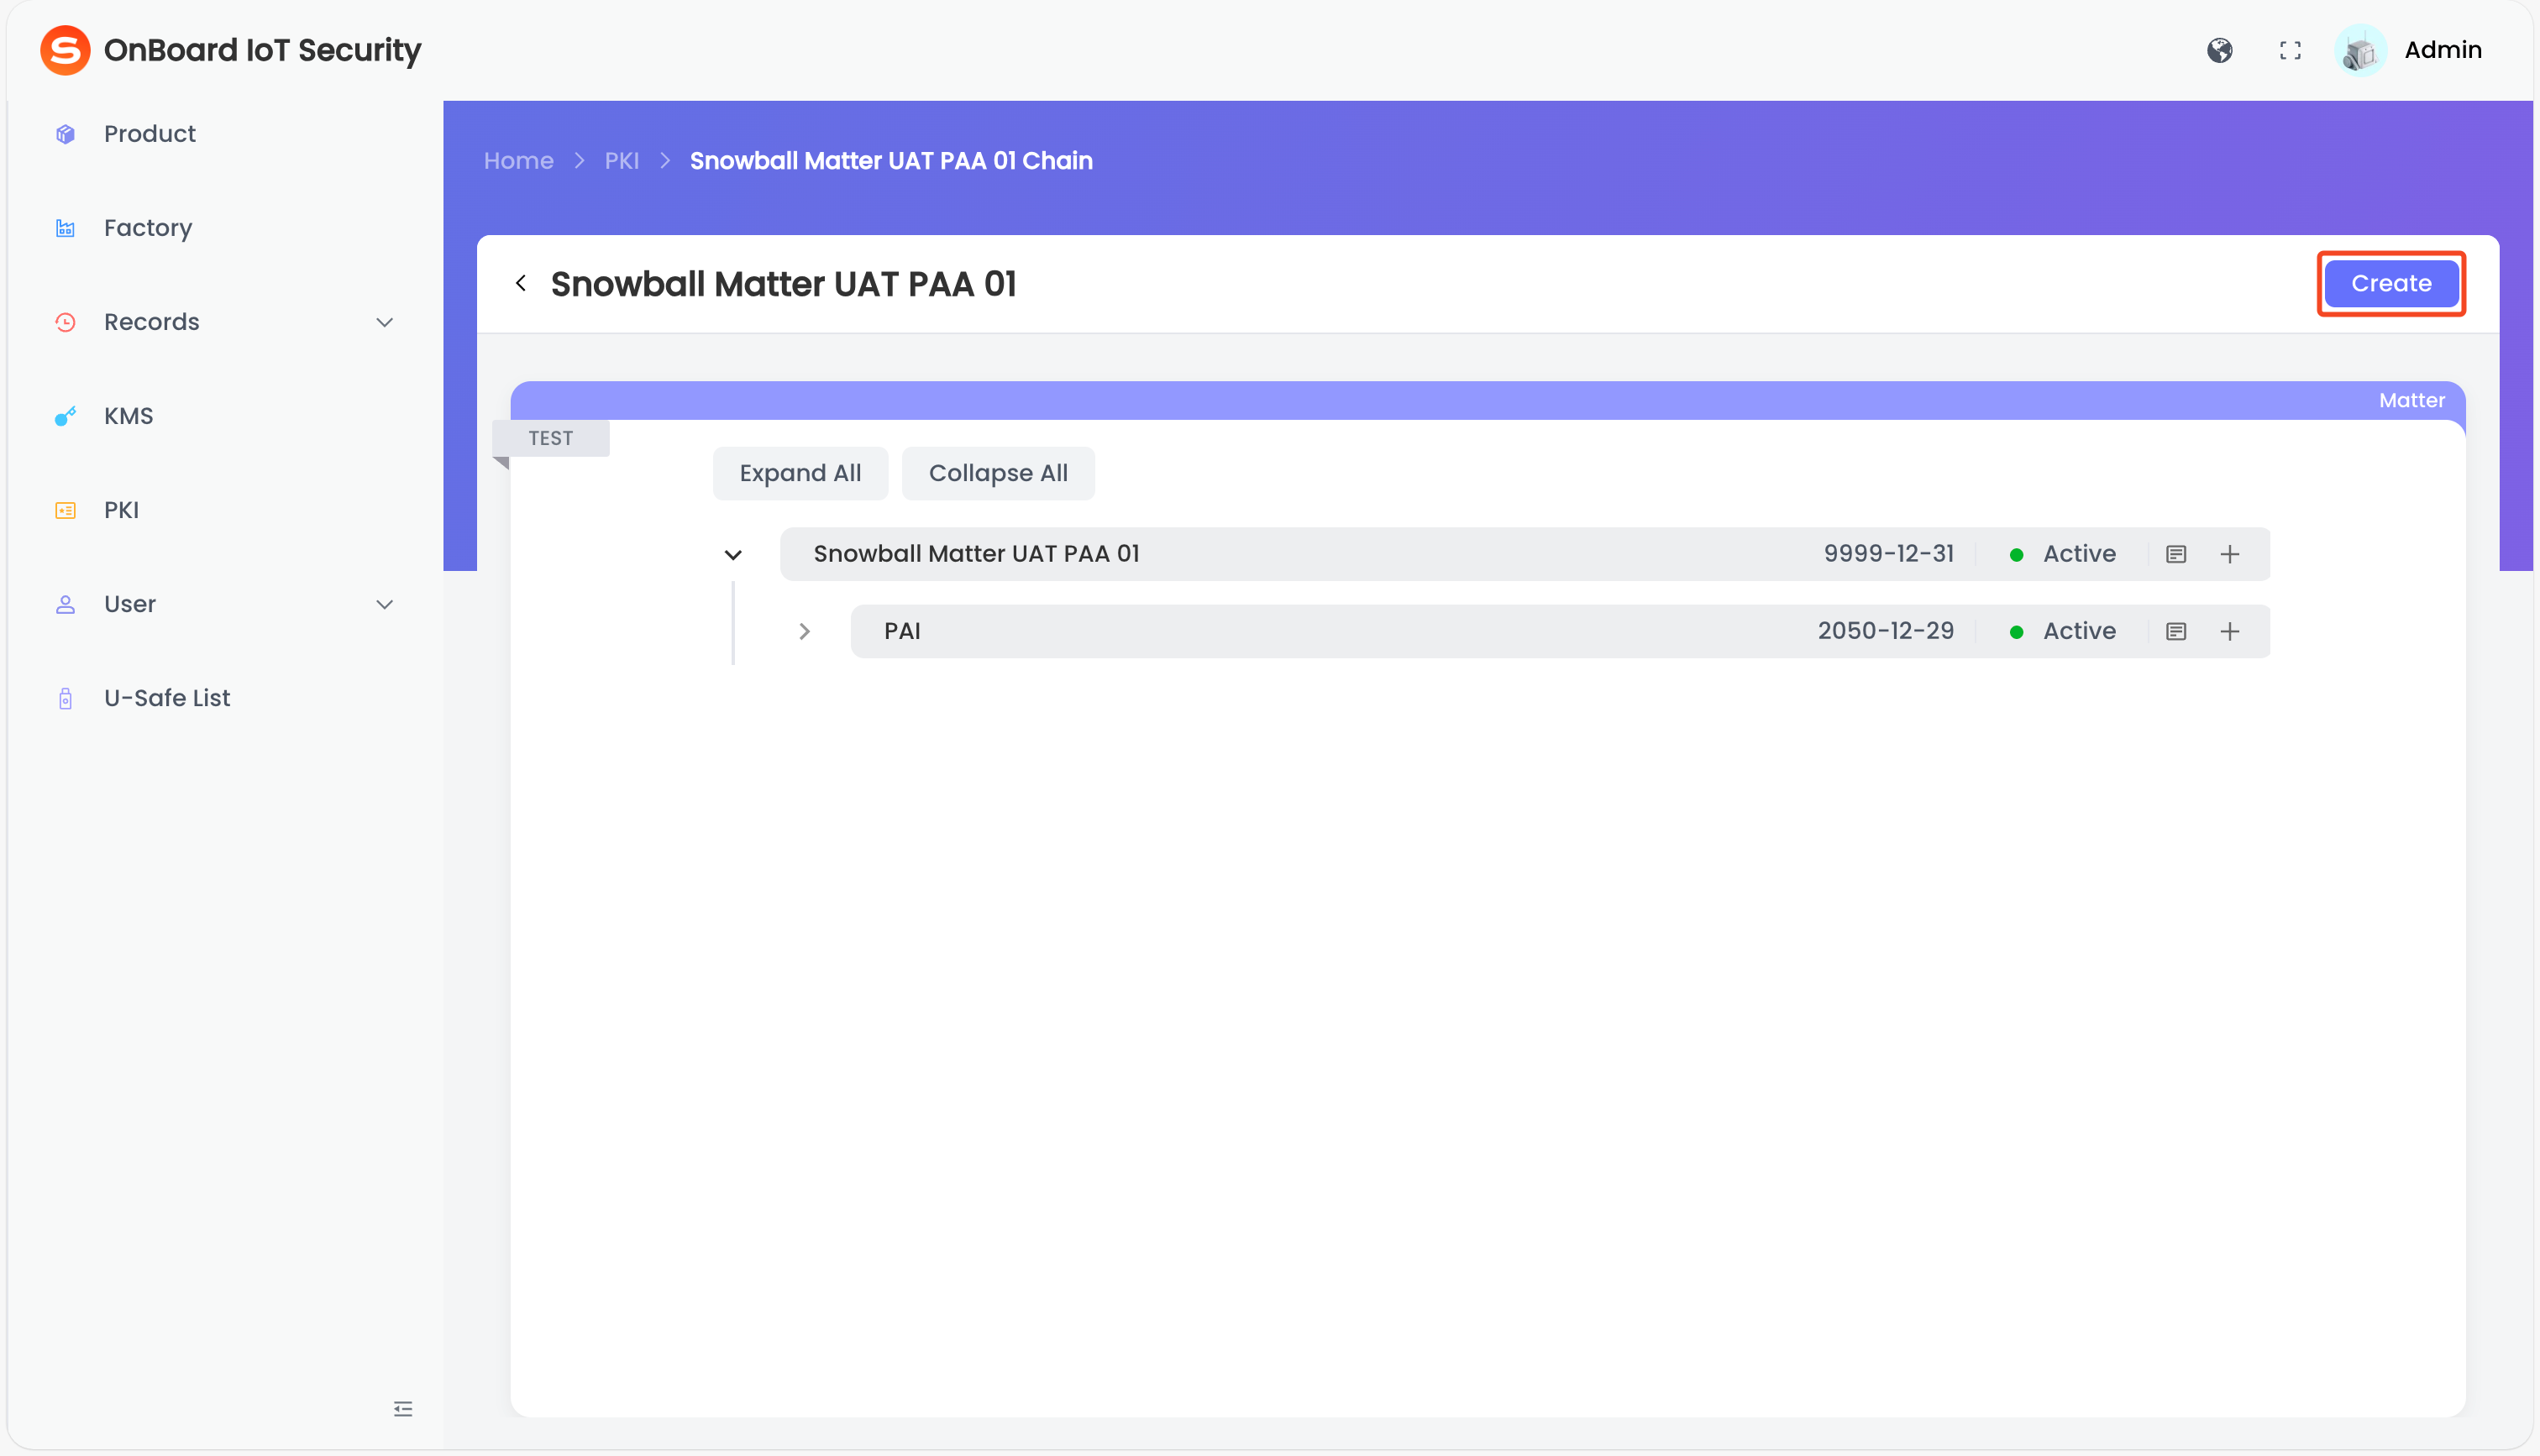
-
On the Create Certificate page, select Matter template for the format and Dac Template for the type, then select and enter the basic information.
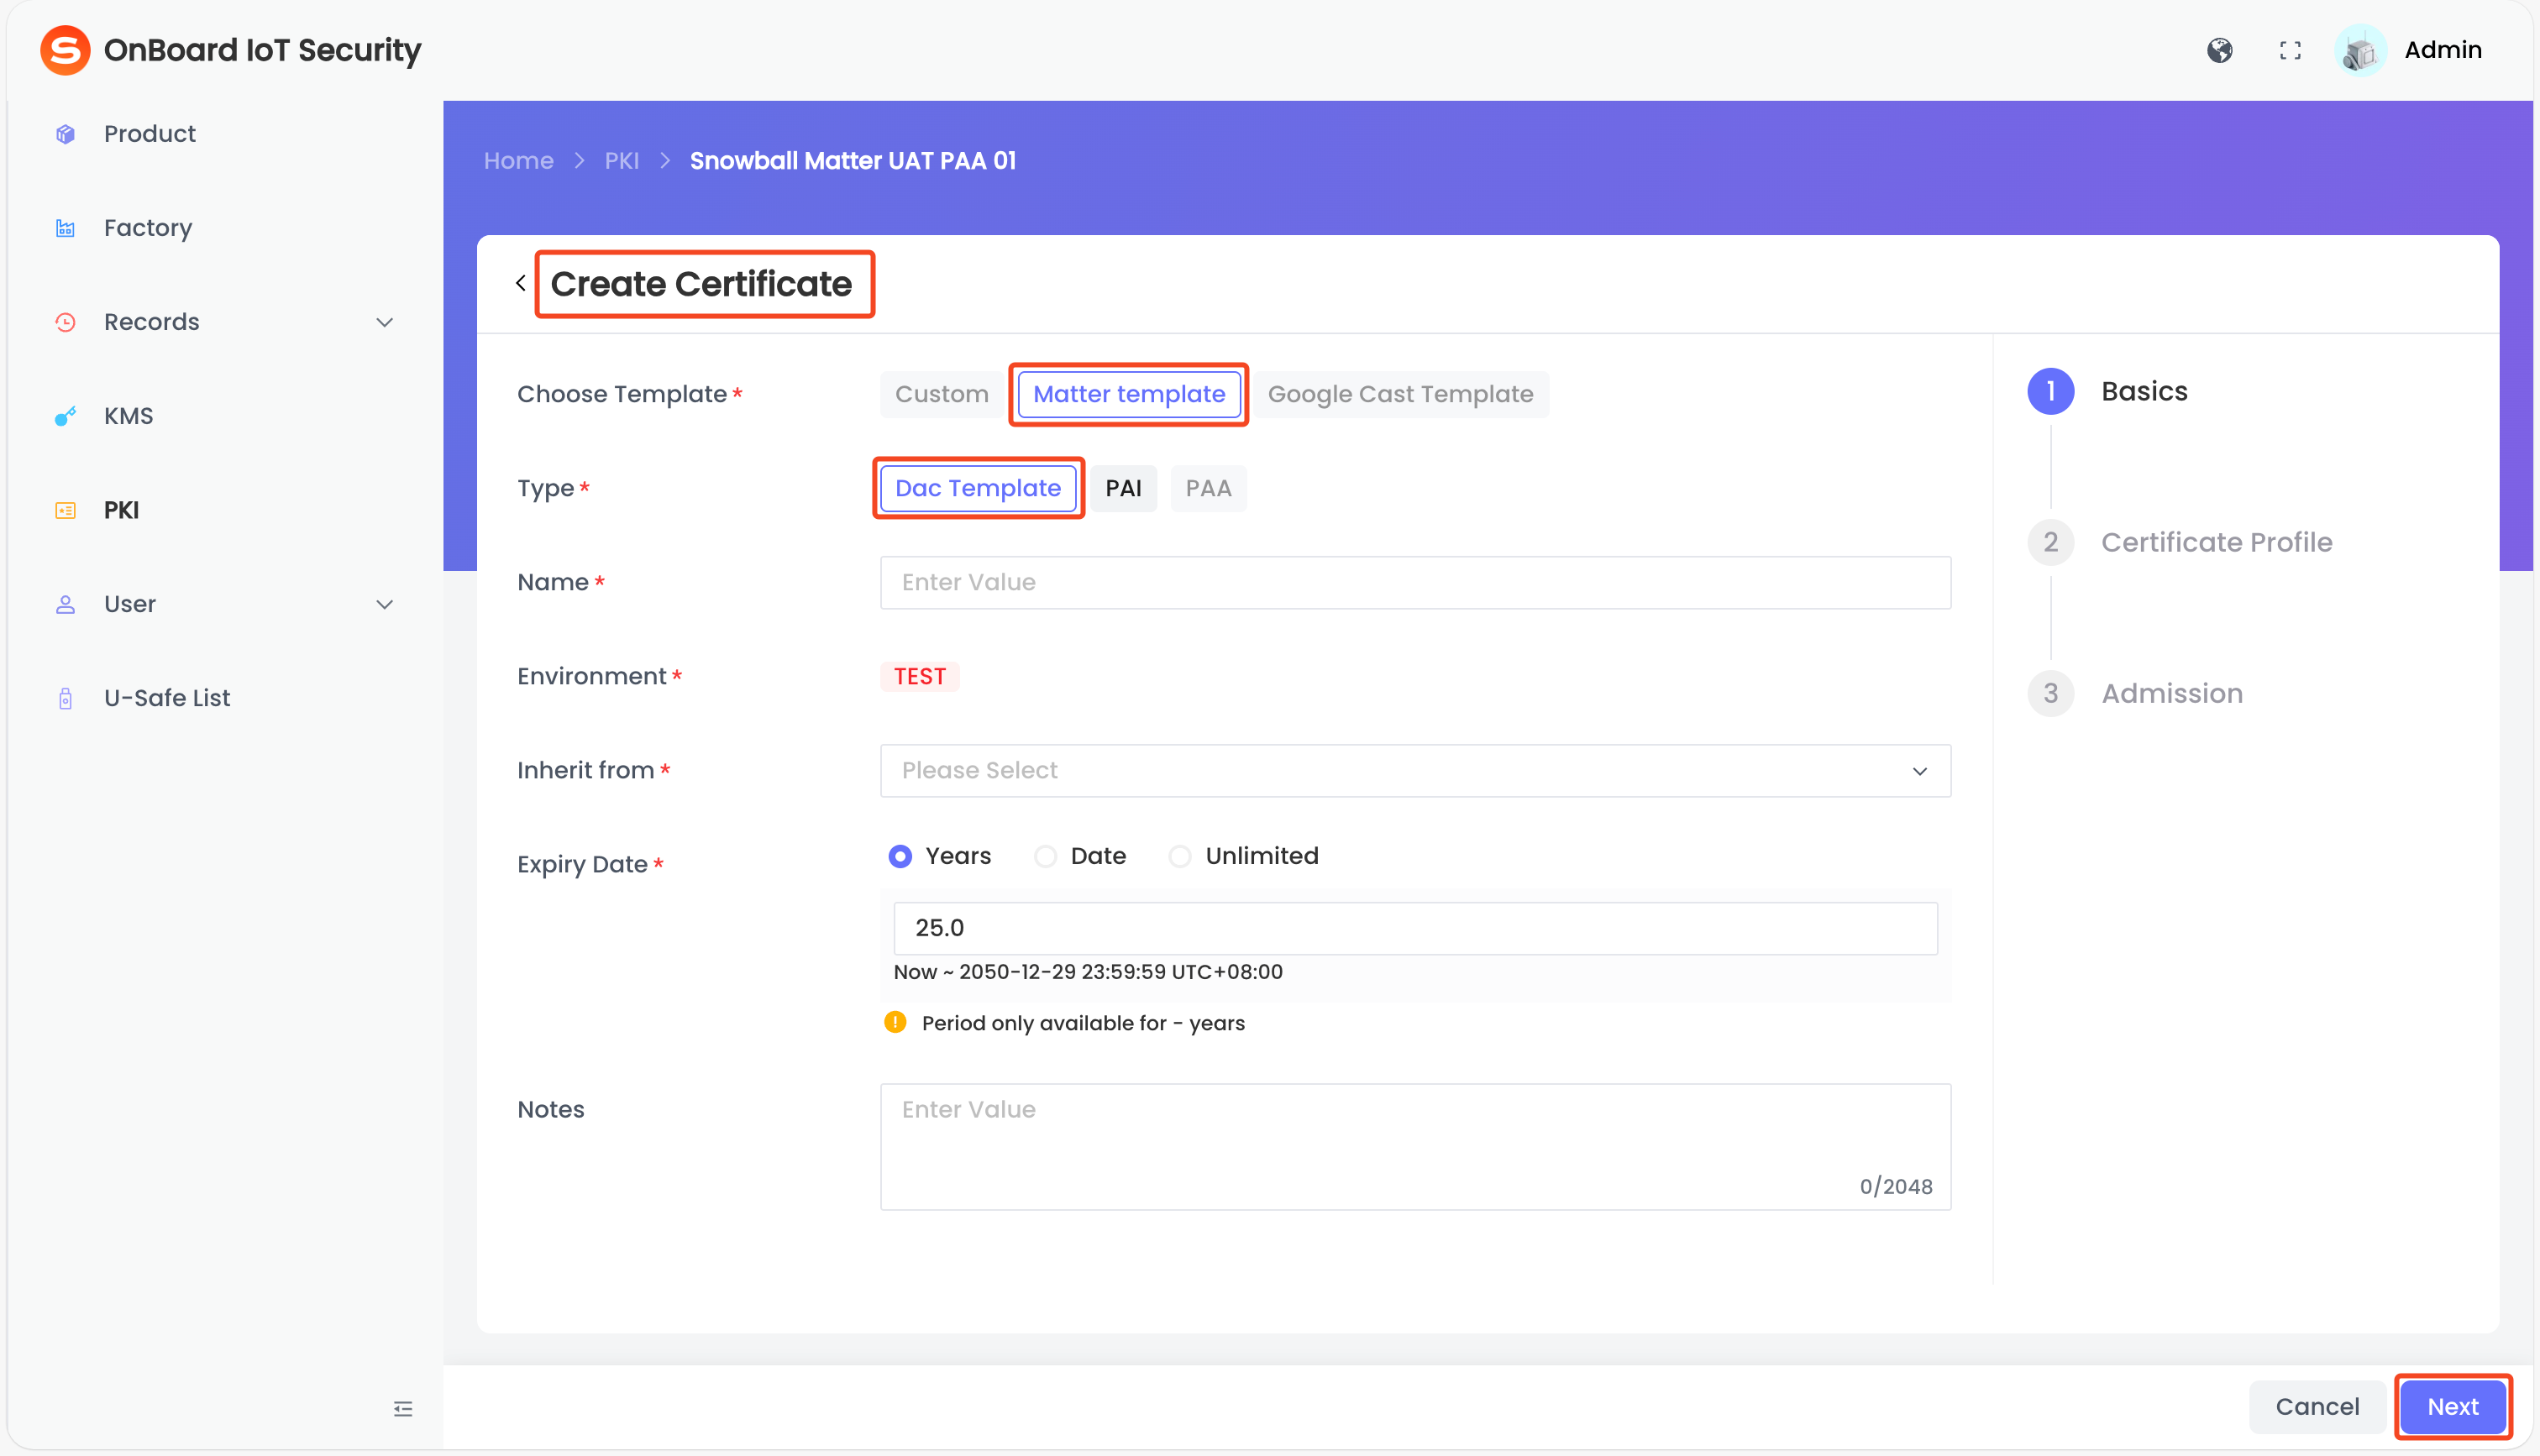
Description of DAC template basic information:
-
After verifying that the information is correct, click Next and configure according to the following information.
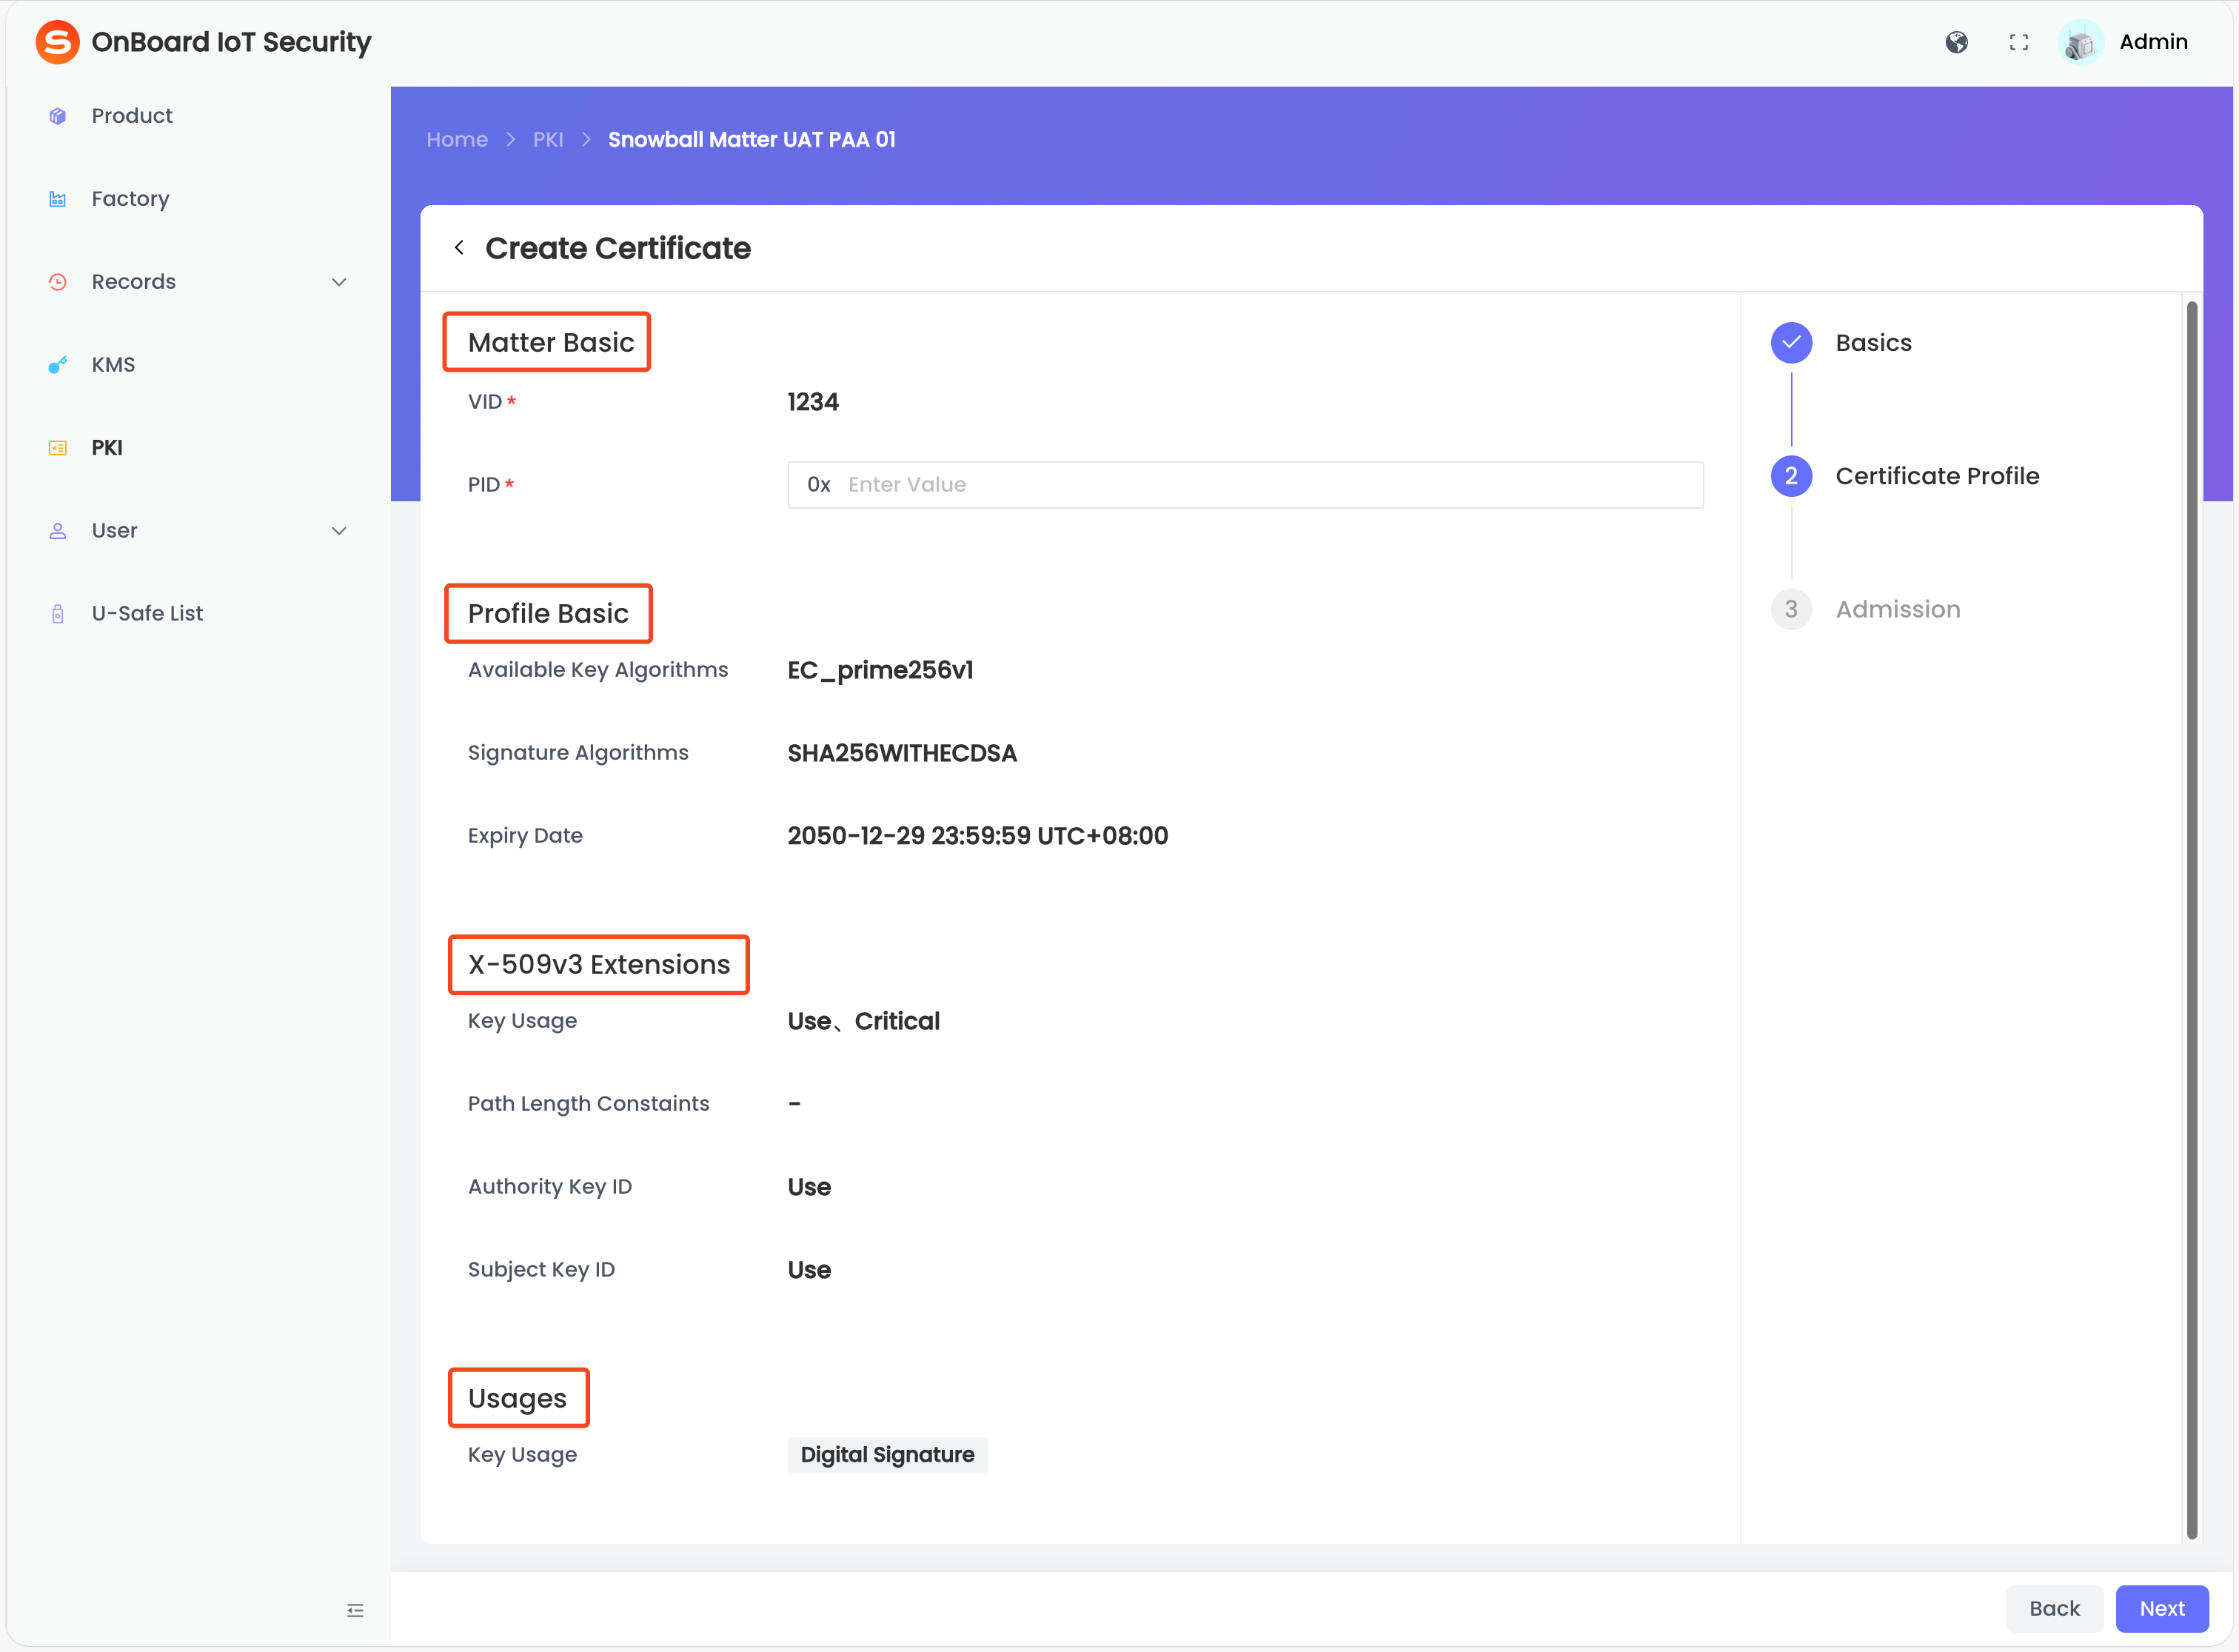
Description of DAC template profile information:
Area Information Description Matter Basic VID (Required) Vendor ID inherited from the PAI certificate. PID (Required) Product ID.
Note: When a DAC template is inherited from a PAI certificate with a configured PID, the PID is automatically inherited and can't be modified.Profile Basic Available Key Algorithms Automatically parsed from the certificate content and can't be modified. Signature Algorithms Automatically parsed from the certificate content and can't be modified. Expiry Date Inherits the Expiry Date set in the previous step and can't be modified. X-509v3 Extensions Key Usage Automatically parsed from the certificate content and can't be modified. Path Length Constaints Automatically parsed from the certificate content and can't be modified. Authority Key ID Automatically parsed from the certificate content and can't be modified. Subject Key ID Automatically parsed from the certificate content and can't be modified. Usages Key Usage Optional key usages, such as Digital Signature. -
After verifying that the information is correct, click Next, and then click Add on the Admission page.
-
In the Assign User Permissions window, enter the email address and assign the corresponding permission (View, Edit, Use, Grant, and Delete), and then click Add.
-
Click Complete to complete the DAC template creation.
Create a certificate based on the Google Cast template
After a certificate or certificate template based on the Google Cast template is created, it can be selected when configuring Certificate for a product.
- Create a Google Root certificate based on the Google Cast template
- Create a Manufacturer certificate based on the Google Cast template
- Create a Model certificate based on the Google Cast template
- Create a Device template based on the Google Cast template
-
On the Create Certificate page, select Google Cast Template for the format and Google Root for the type, then select and enter the basic information.
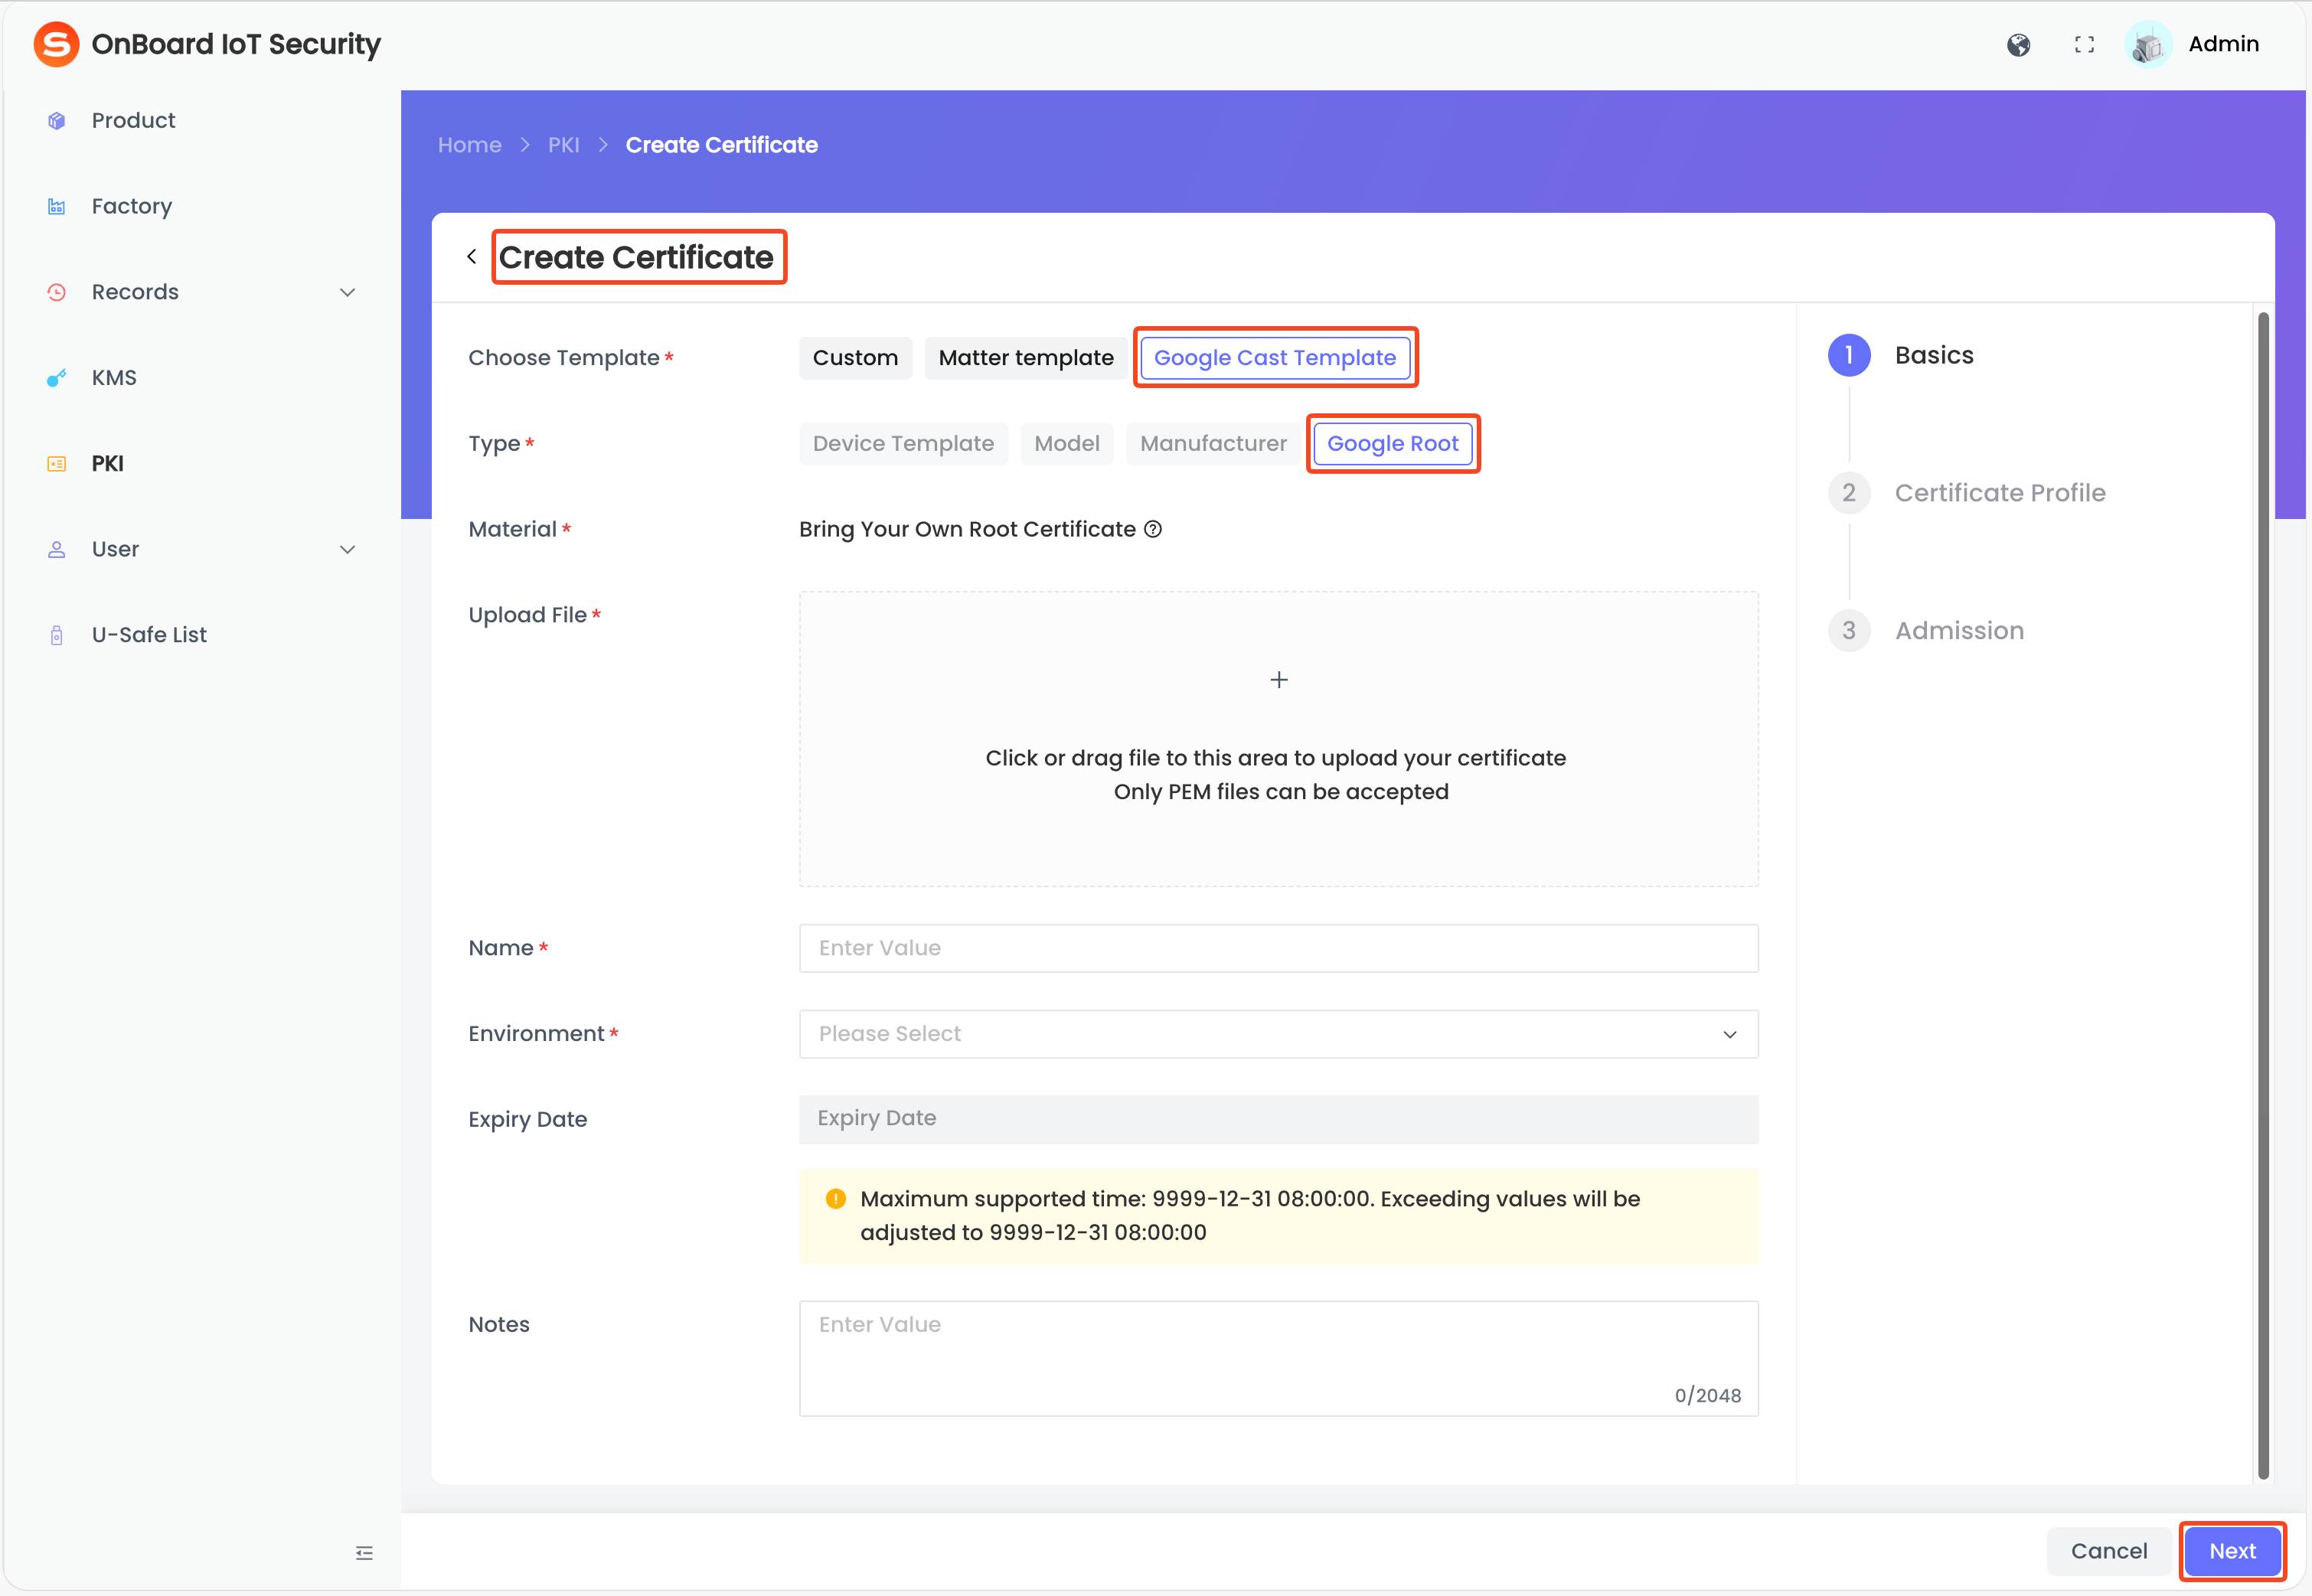
Description of Google Root certificate basic information:
Information Description Upload file In the Upload File area, click the Add icon to select and upload a Google Root certificate in .pem format, or directly drag and drop the Google Root certificate into the upload area.Name The Google Root certificate name must be unique in the same environment. Environment Two environments can be selected: TEST and PROD. Expiry Date Automatically parsed from the certificate content and can't be modified. Notes Provide additional information related to the Google Root certificate, such as special requirements and important notes. -
After verifying that the information is correct, click Next and configure according to the following information.
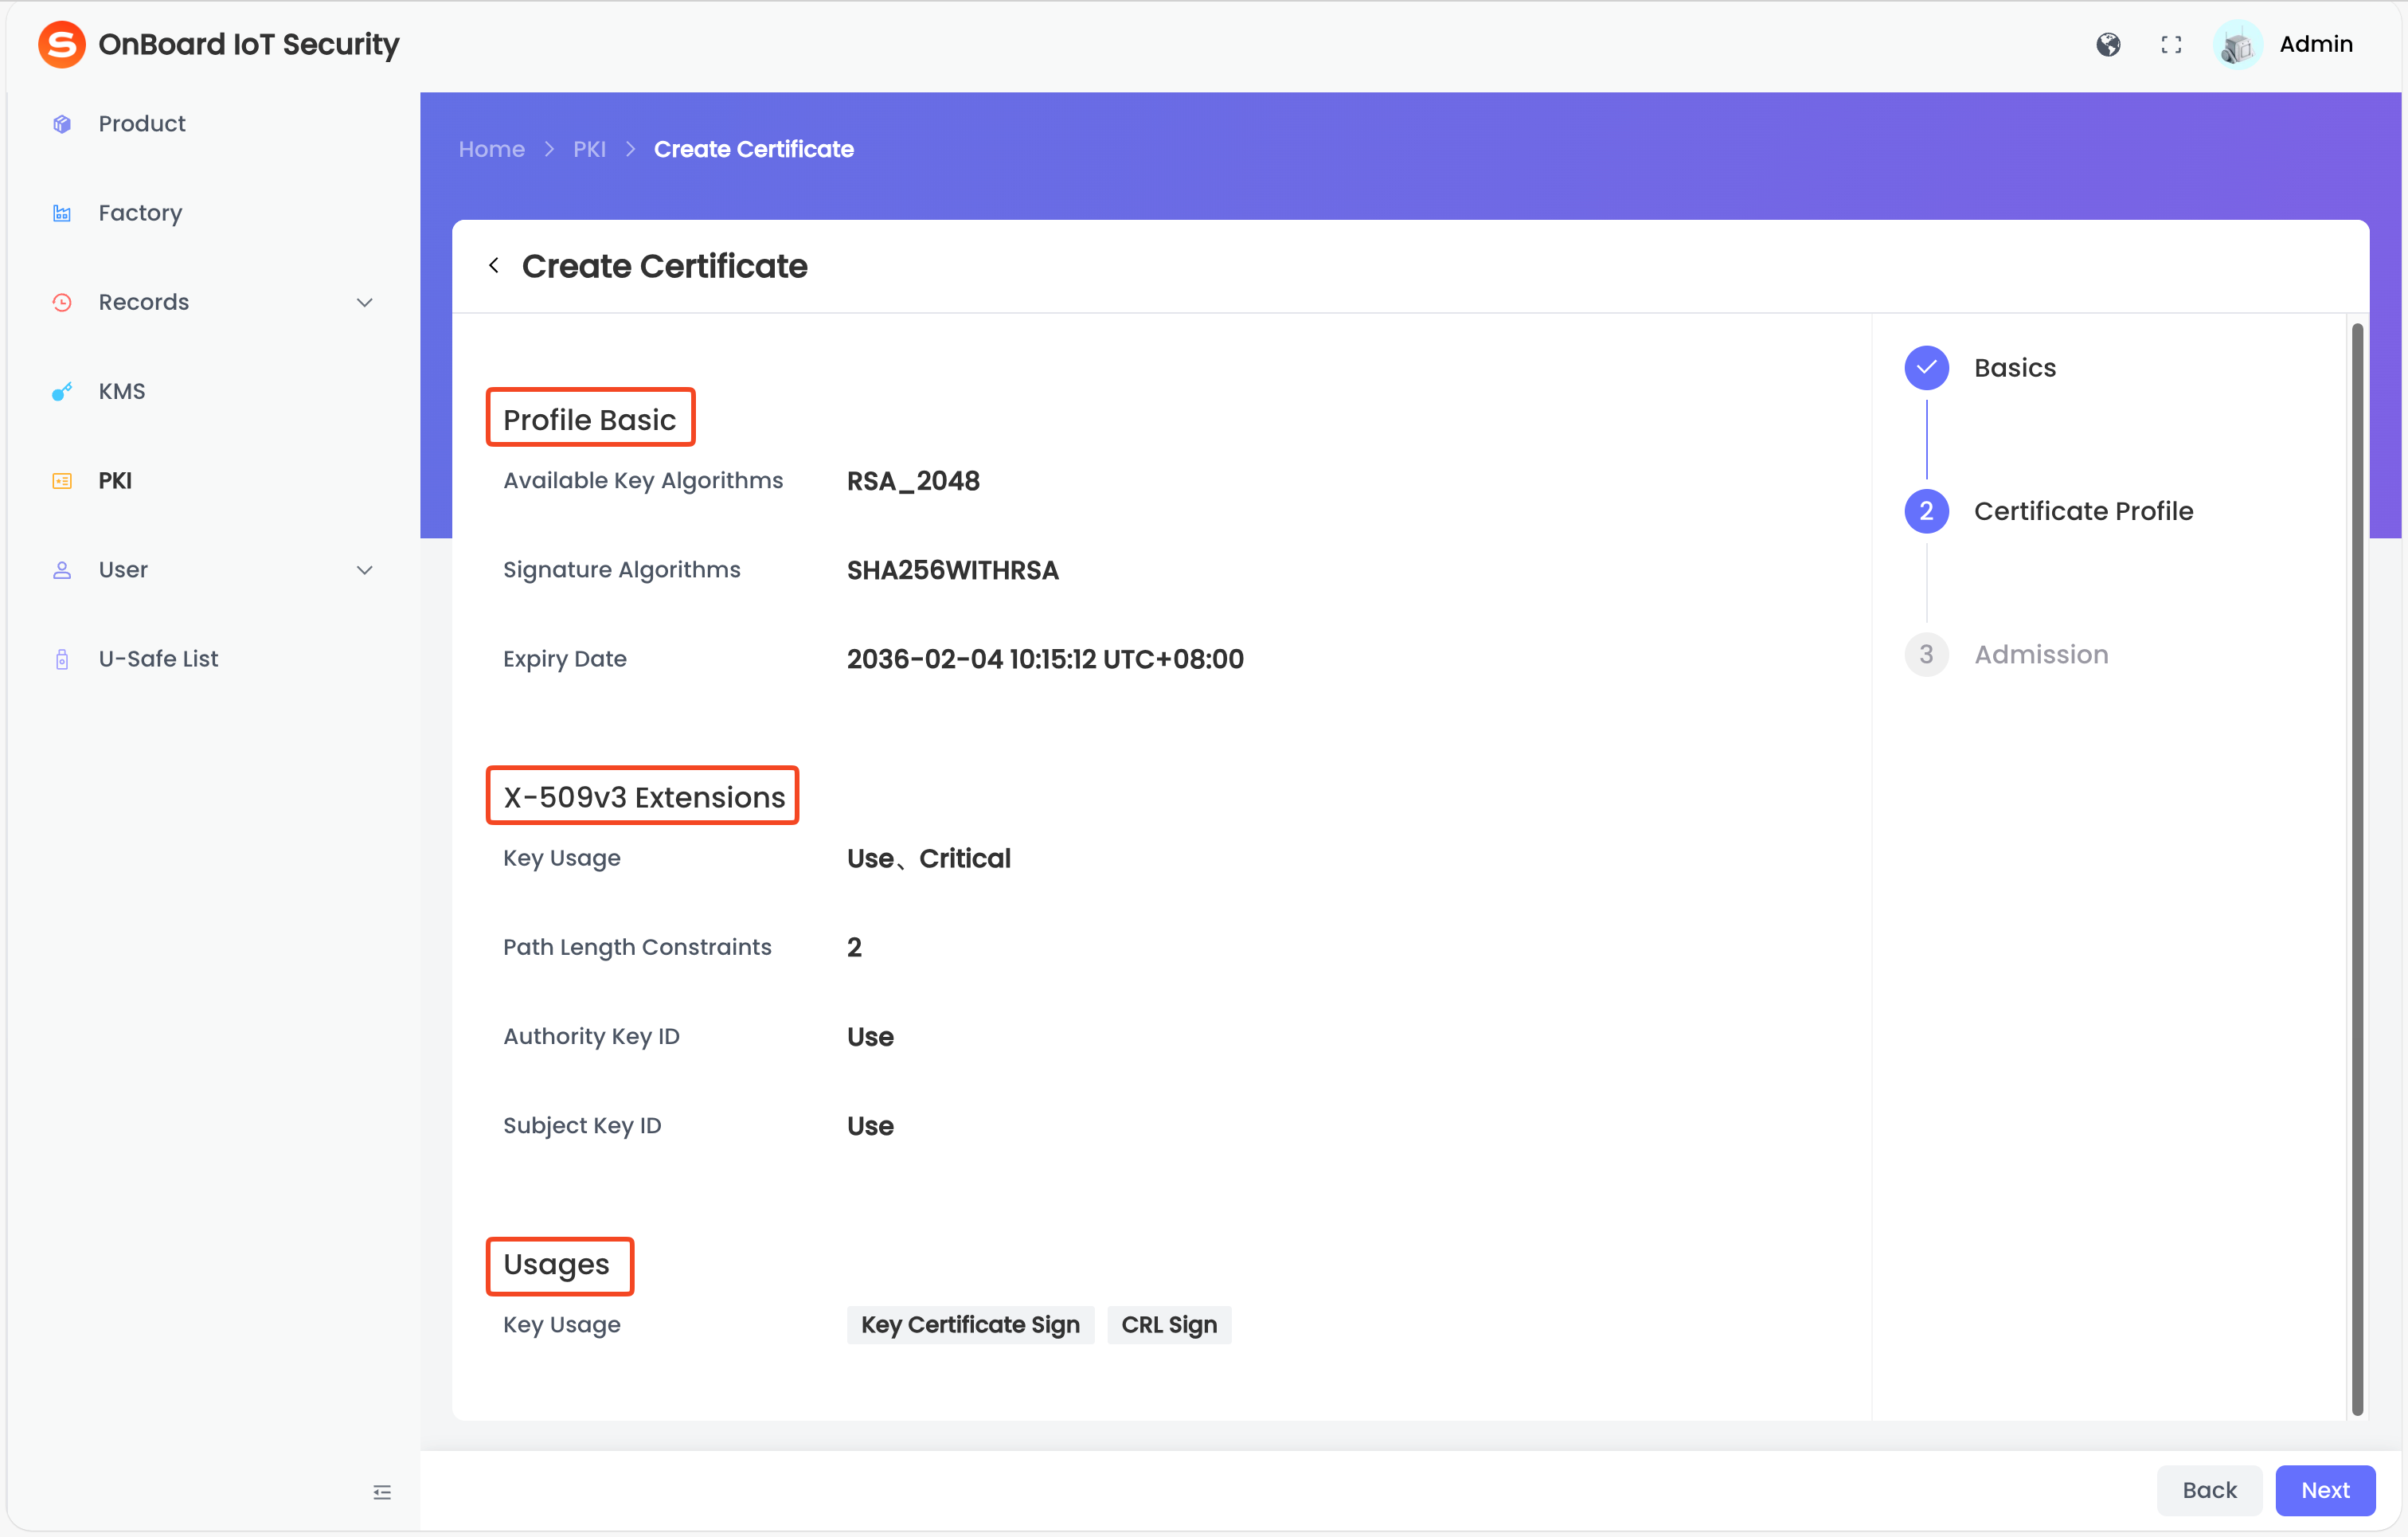
Description of Google Root certificate profile information:
Area Information Description Profile Basic Available Key Algorithms Automatically parsed from the certificate content and can't be modified. Signature Algorithms Automatically parsed from the certificate content and can't be modified. Expiry Date Automatically parsed from the certificate content and can't be modified. X-509v3 Extensions Key Usage Automatically parsed from the certificate content and can't be modified. Path Length Constaints Automatically parsed from the certificate content and can't be modified. Authority Key ID Automatically parsed from the certificate content and can't be modified. Subject Key ID Automatically parsed from the certificate content and can't be modified. Usages Key Usage Optional key usages, such as Digital Signature, Key Certificate Sign, and CRL Sign. -
After verifying that the information is correct, click Next, and then click Add on the Admission page.
-
In the Assign User Permissions window, enter the email address and assign the corresponding permission (View, Edit, Use, Revoke, Grant, and Delete). Then, click Add.
-
Click Complete to complete the Google Root certificate creation.
Before creating a Manufacturer certificate based on the Google Cast template, please ensure that at least one Google Root certificate based on the Google Cast template has been created so that it can be selected and inherited during configuration.
-
On the Certificate Chain page, click the corresponding certificate chain, and then click Create.
tipThe Key
icon indicates that the certificate contains a private key.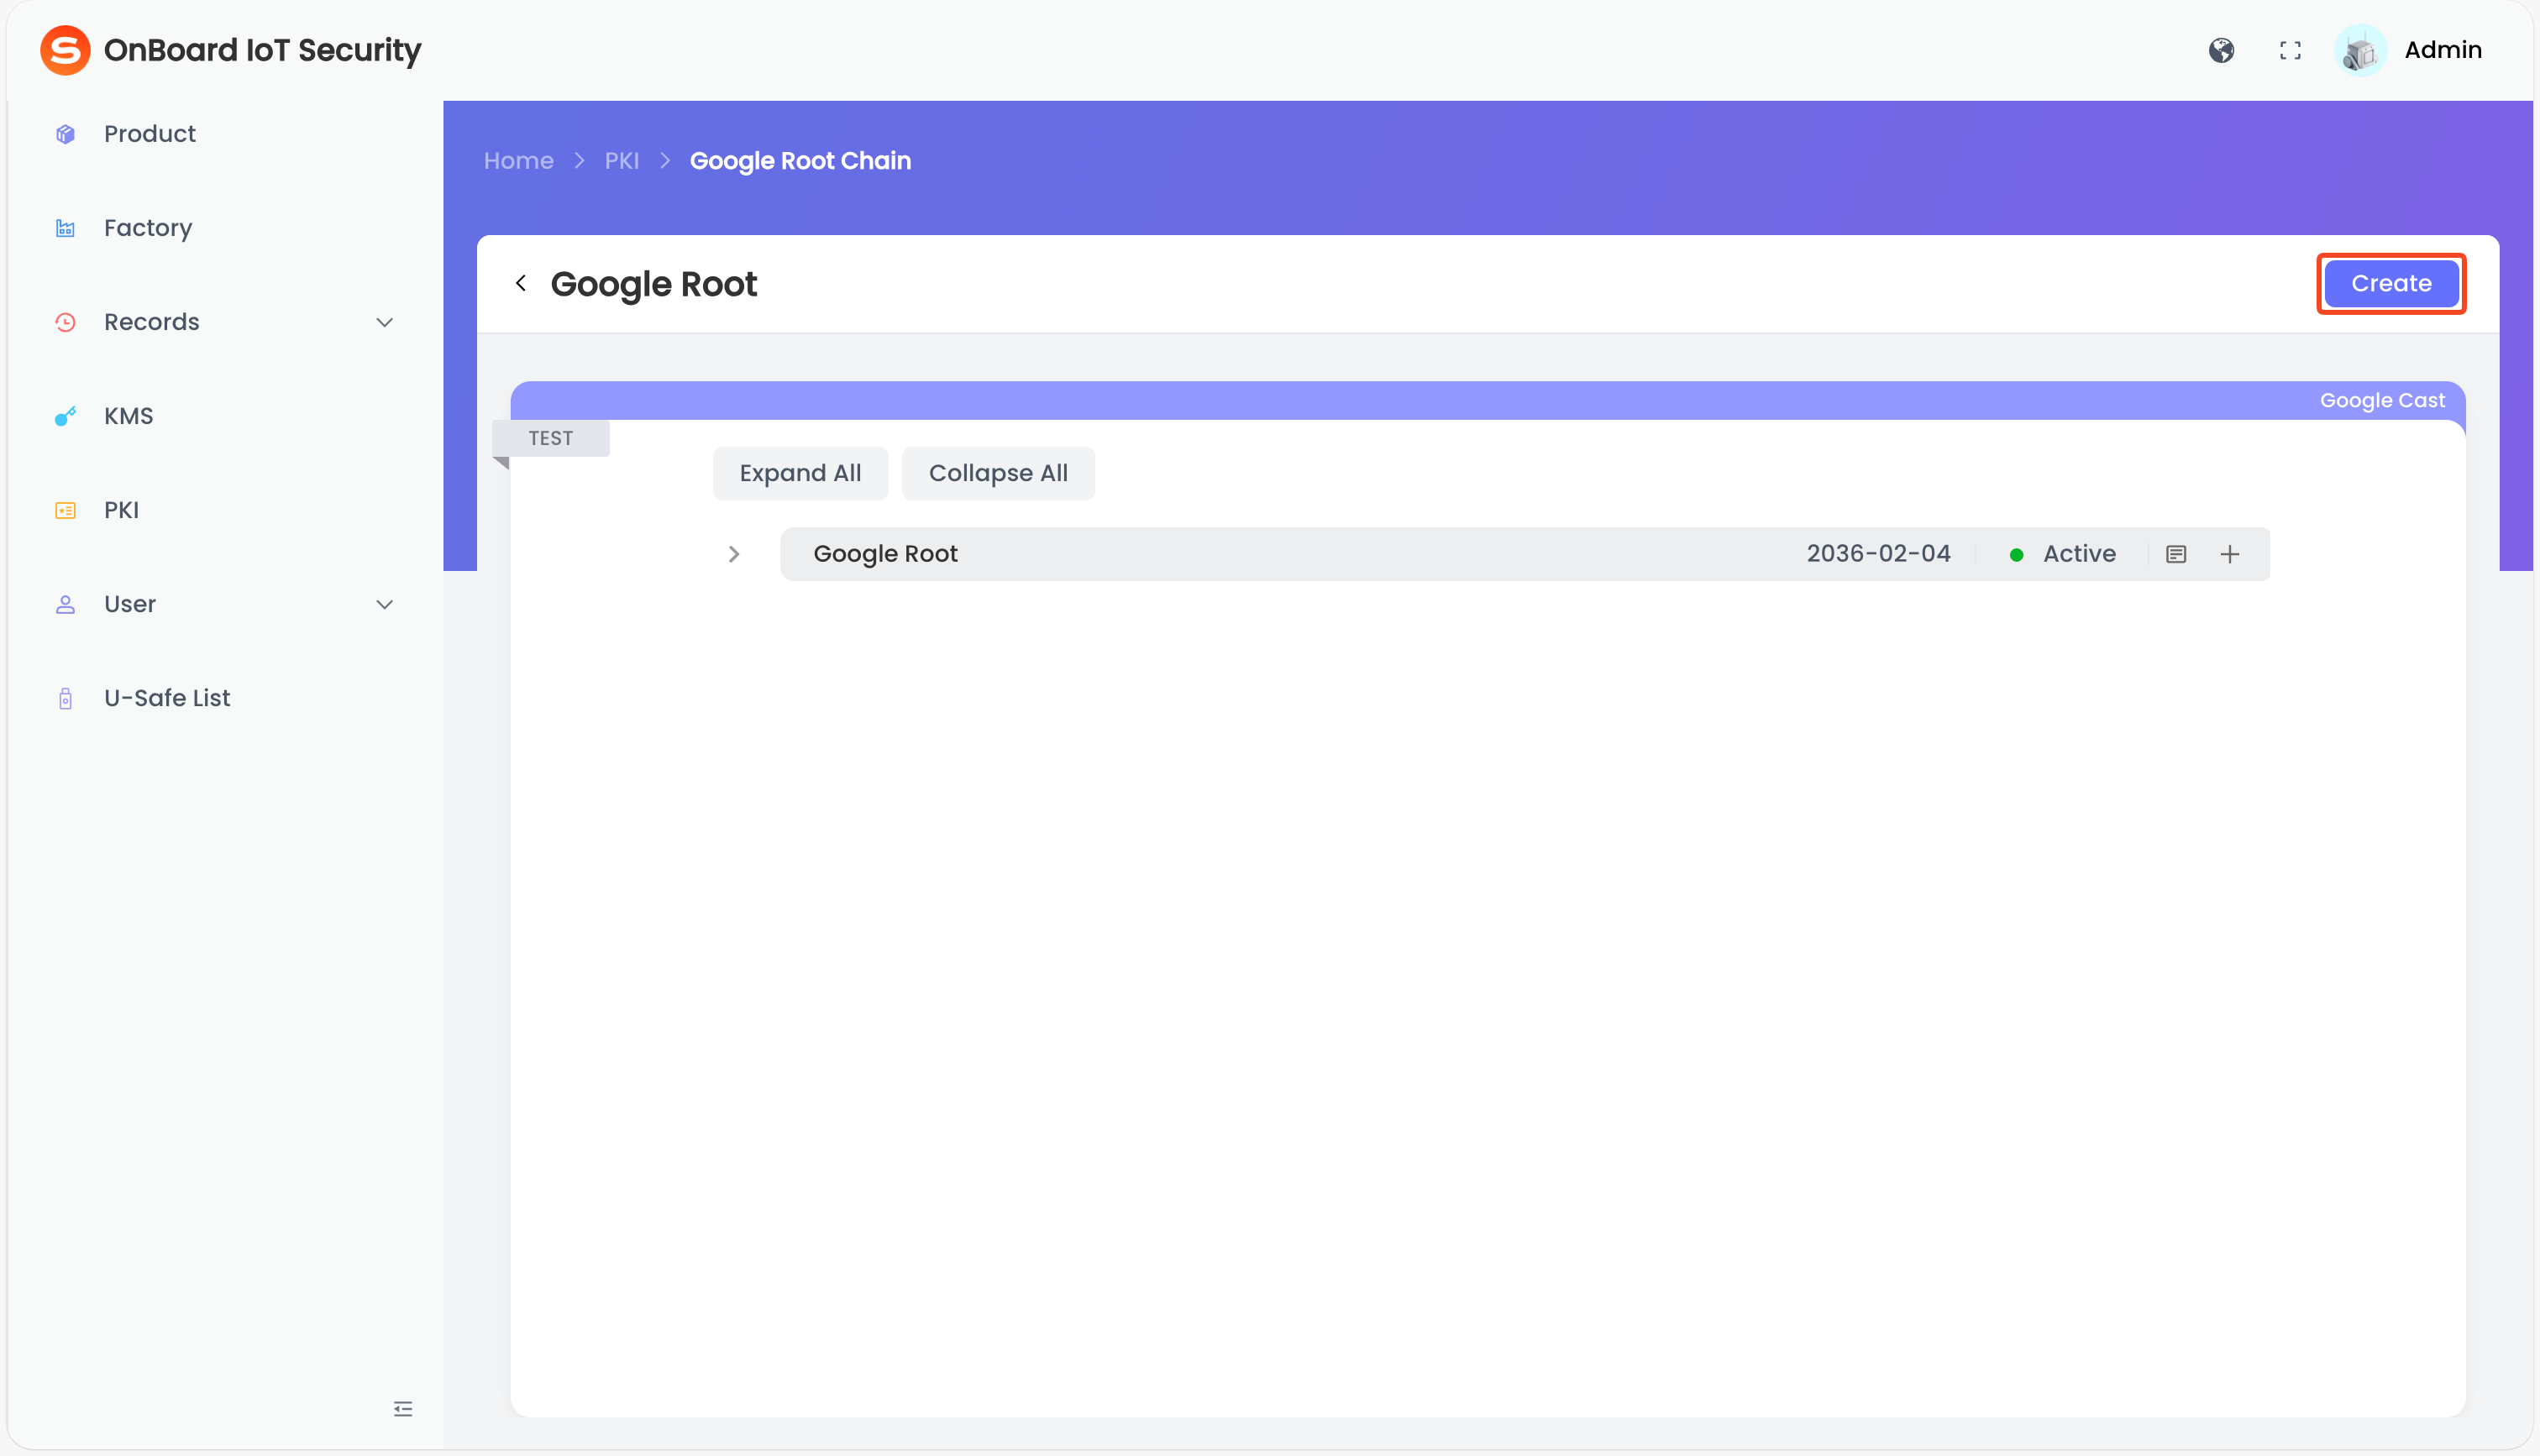
-
On the Create Certificate page, select Google Cast template for the format and Manufacturer for the type.
-
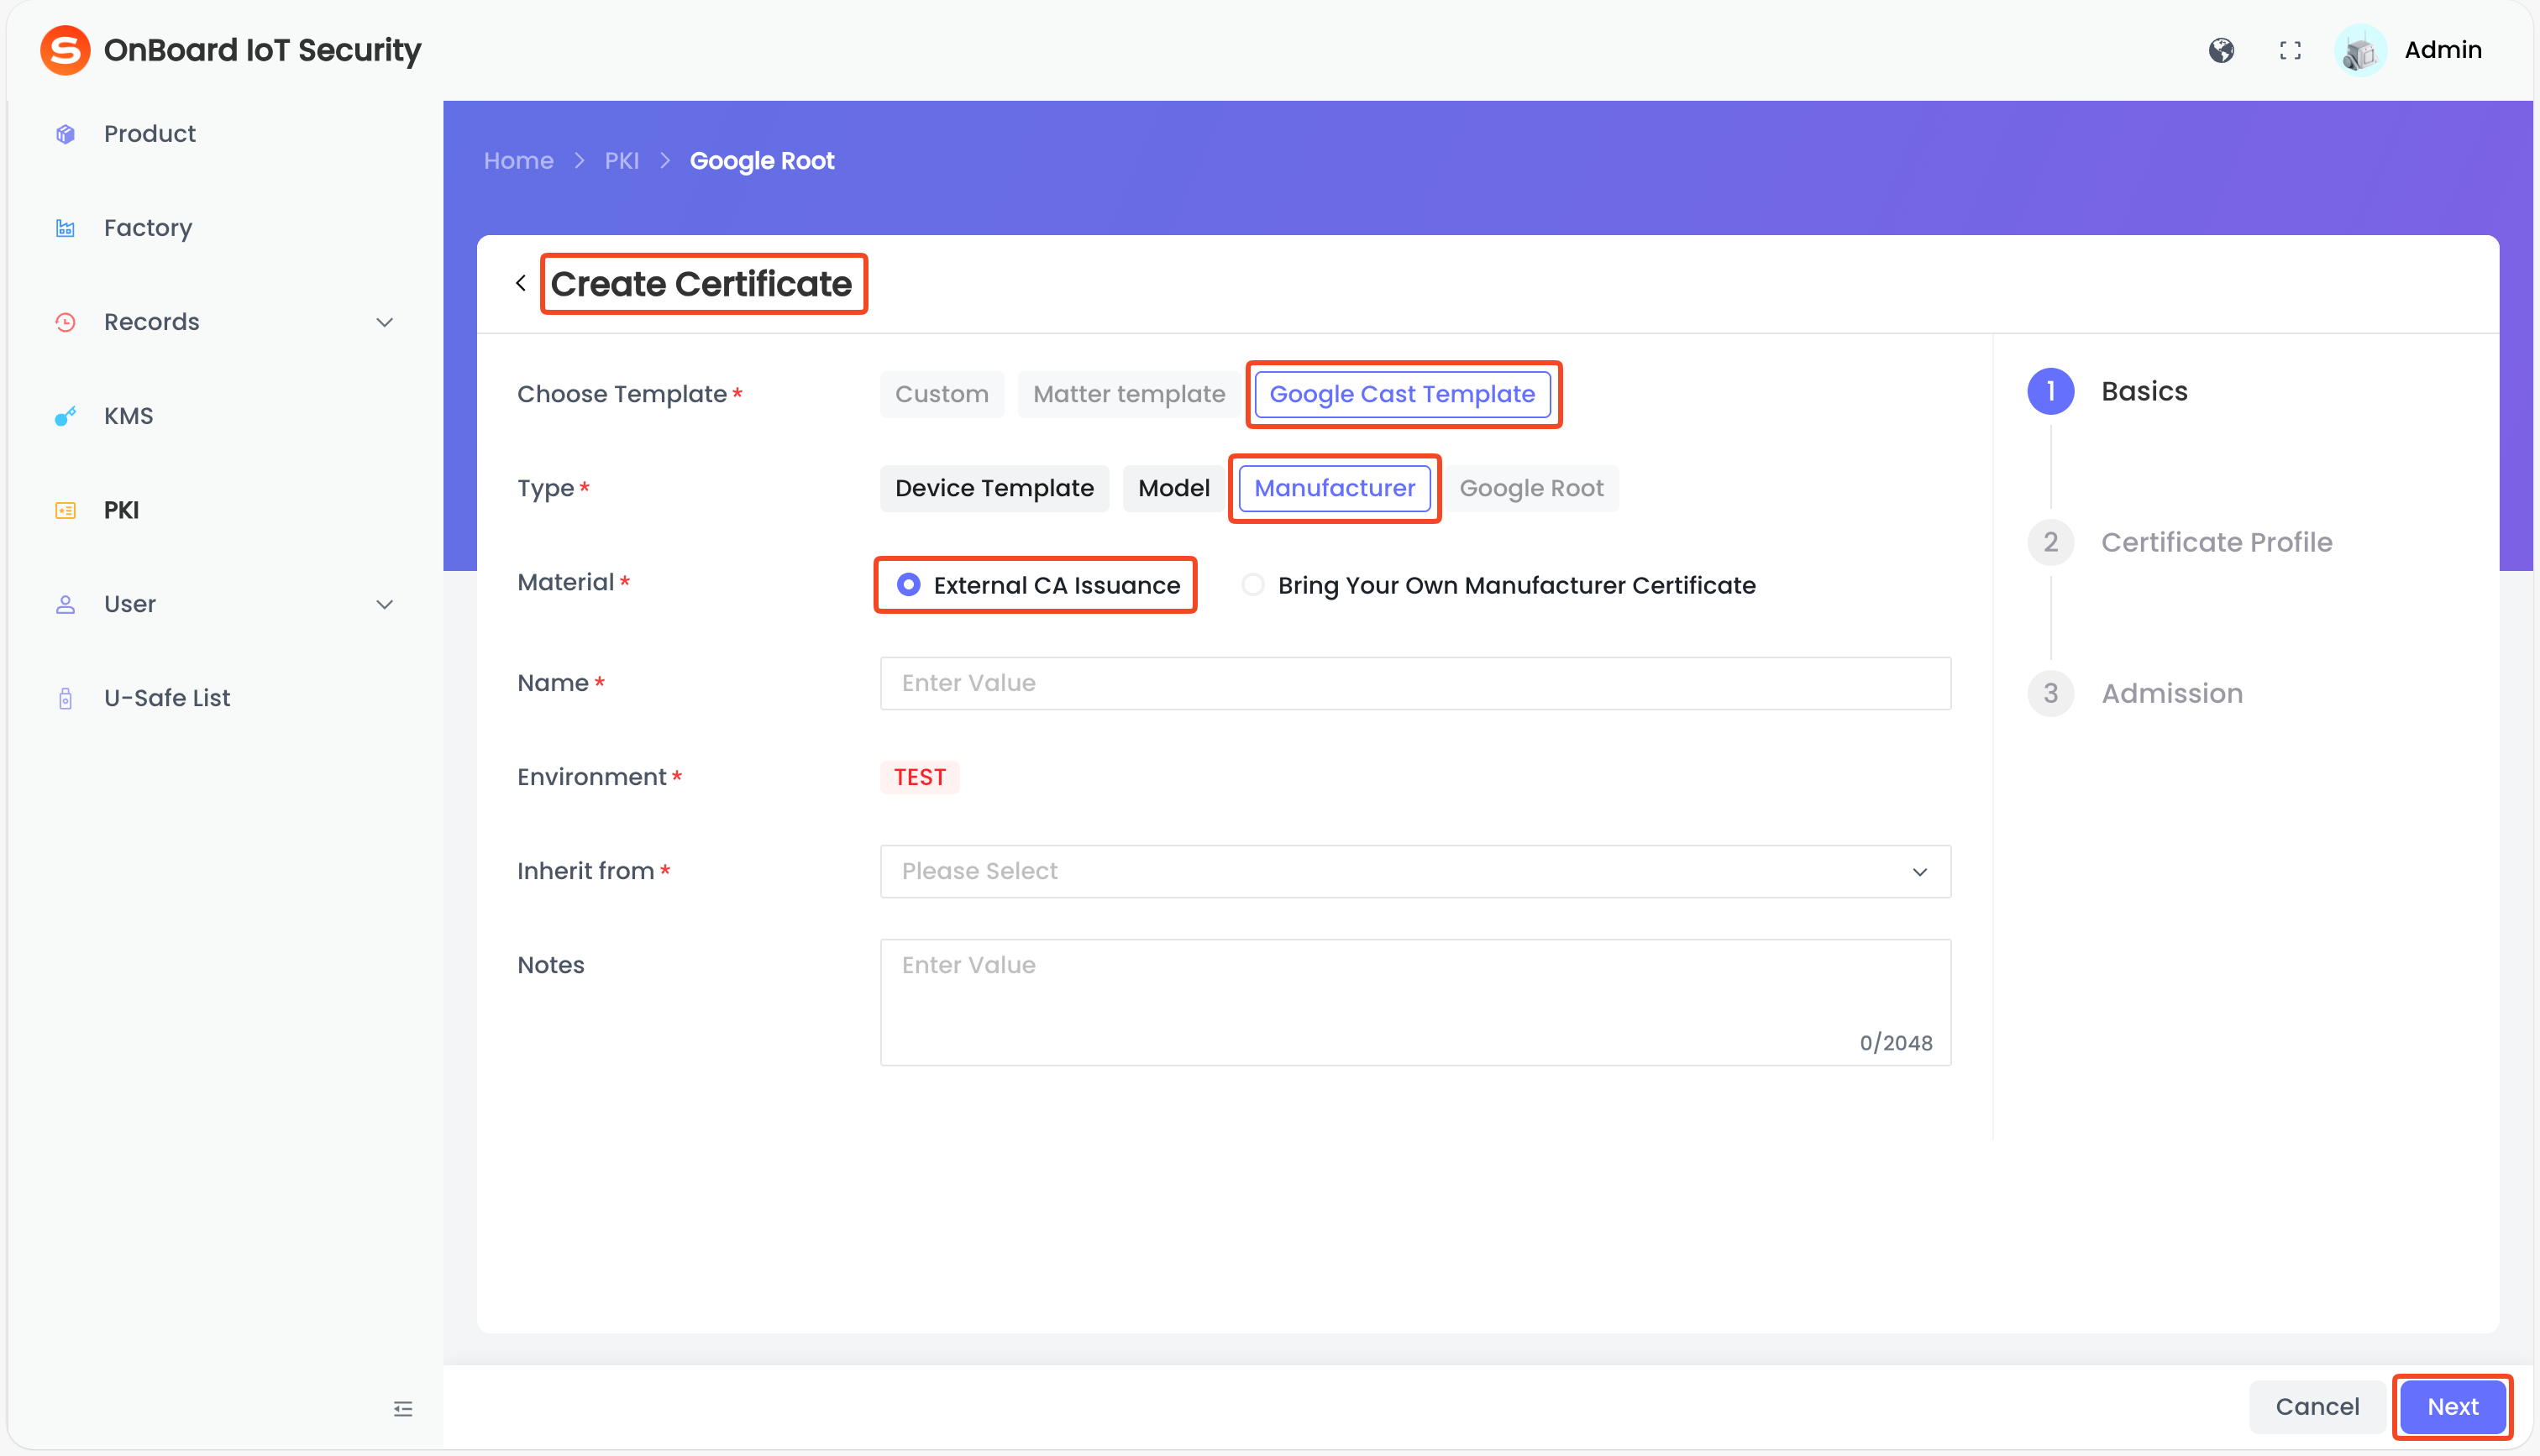
Select External CA Issuance or Bring Your Own Manufacturer Certificate as needed.
-
If you are not using your own Manufacturer certificate based on the Google Cast template, select External CA Issuance, then select and enter the basic information.
-
If you are using your own Manufacturer certificate based on the Google Cast template, select Bring Your Own Manufacturer Certificate, then select and enter the basic information.
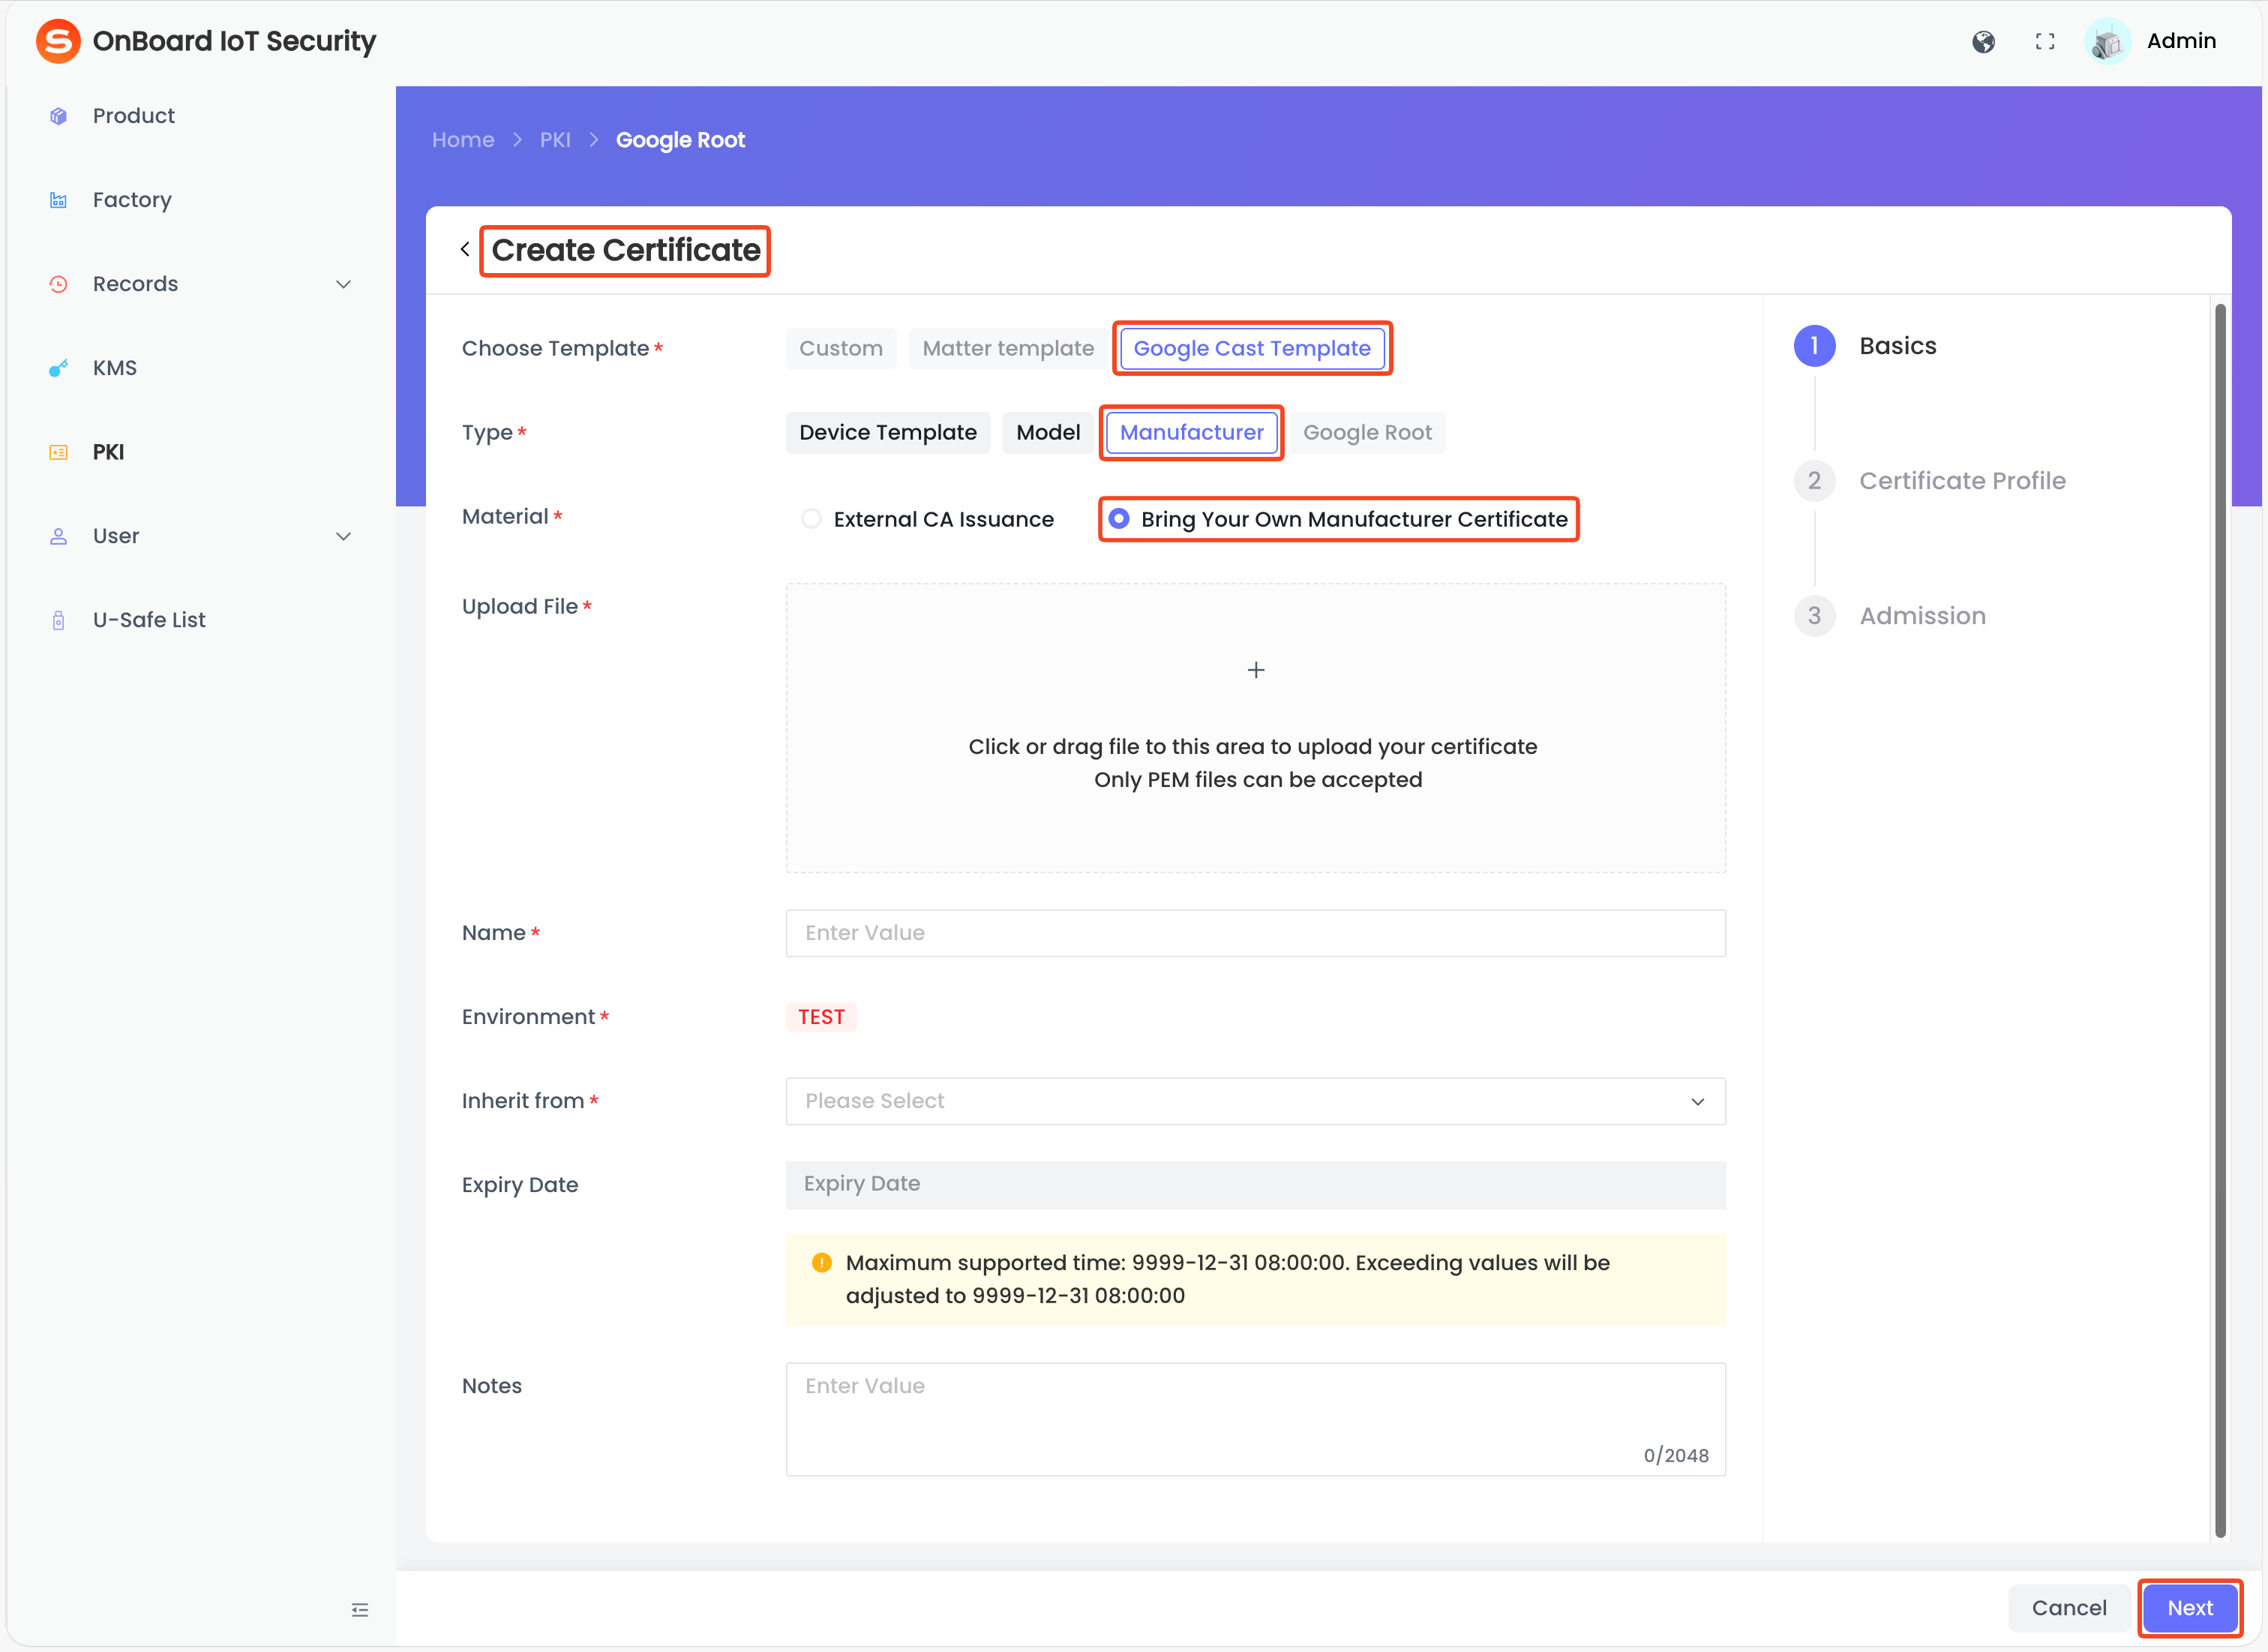
Description of Manufacturer certificate basic information::
Information External CA Issuance Bring Your Own Manufacturer Certificate Upload File No file upload is required. In the Upload File area, click the Add icon to select and upload aa Manufacturer certificate in .pem format, or directly drag and drop your own Manufacturer certificate into the upload area.Name Within the same certificate chain, certificate names at the same hierarchy level must be unique. Environment The environment inherited from the Google Root certificate. Inherit from Select the Google Root certificate to inherit from. Expiry Date No need to set an expiration date. Automatically parsed from the certificate content and can't be modified. Notes Provide additional information related to the Manufacturer certificate, such as special requirements and important notes. -
-
After verifying that the information is correct, click Next and configure according to the following information.
tipIf you are using your own Manufacturer certificate, only the Profile Basic area are dispalyed.
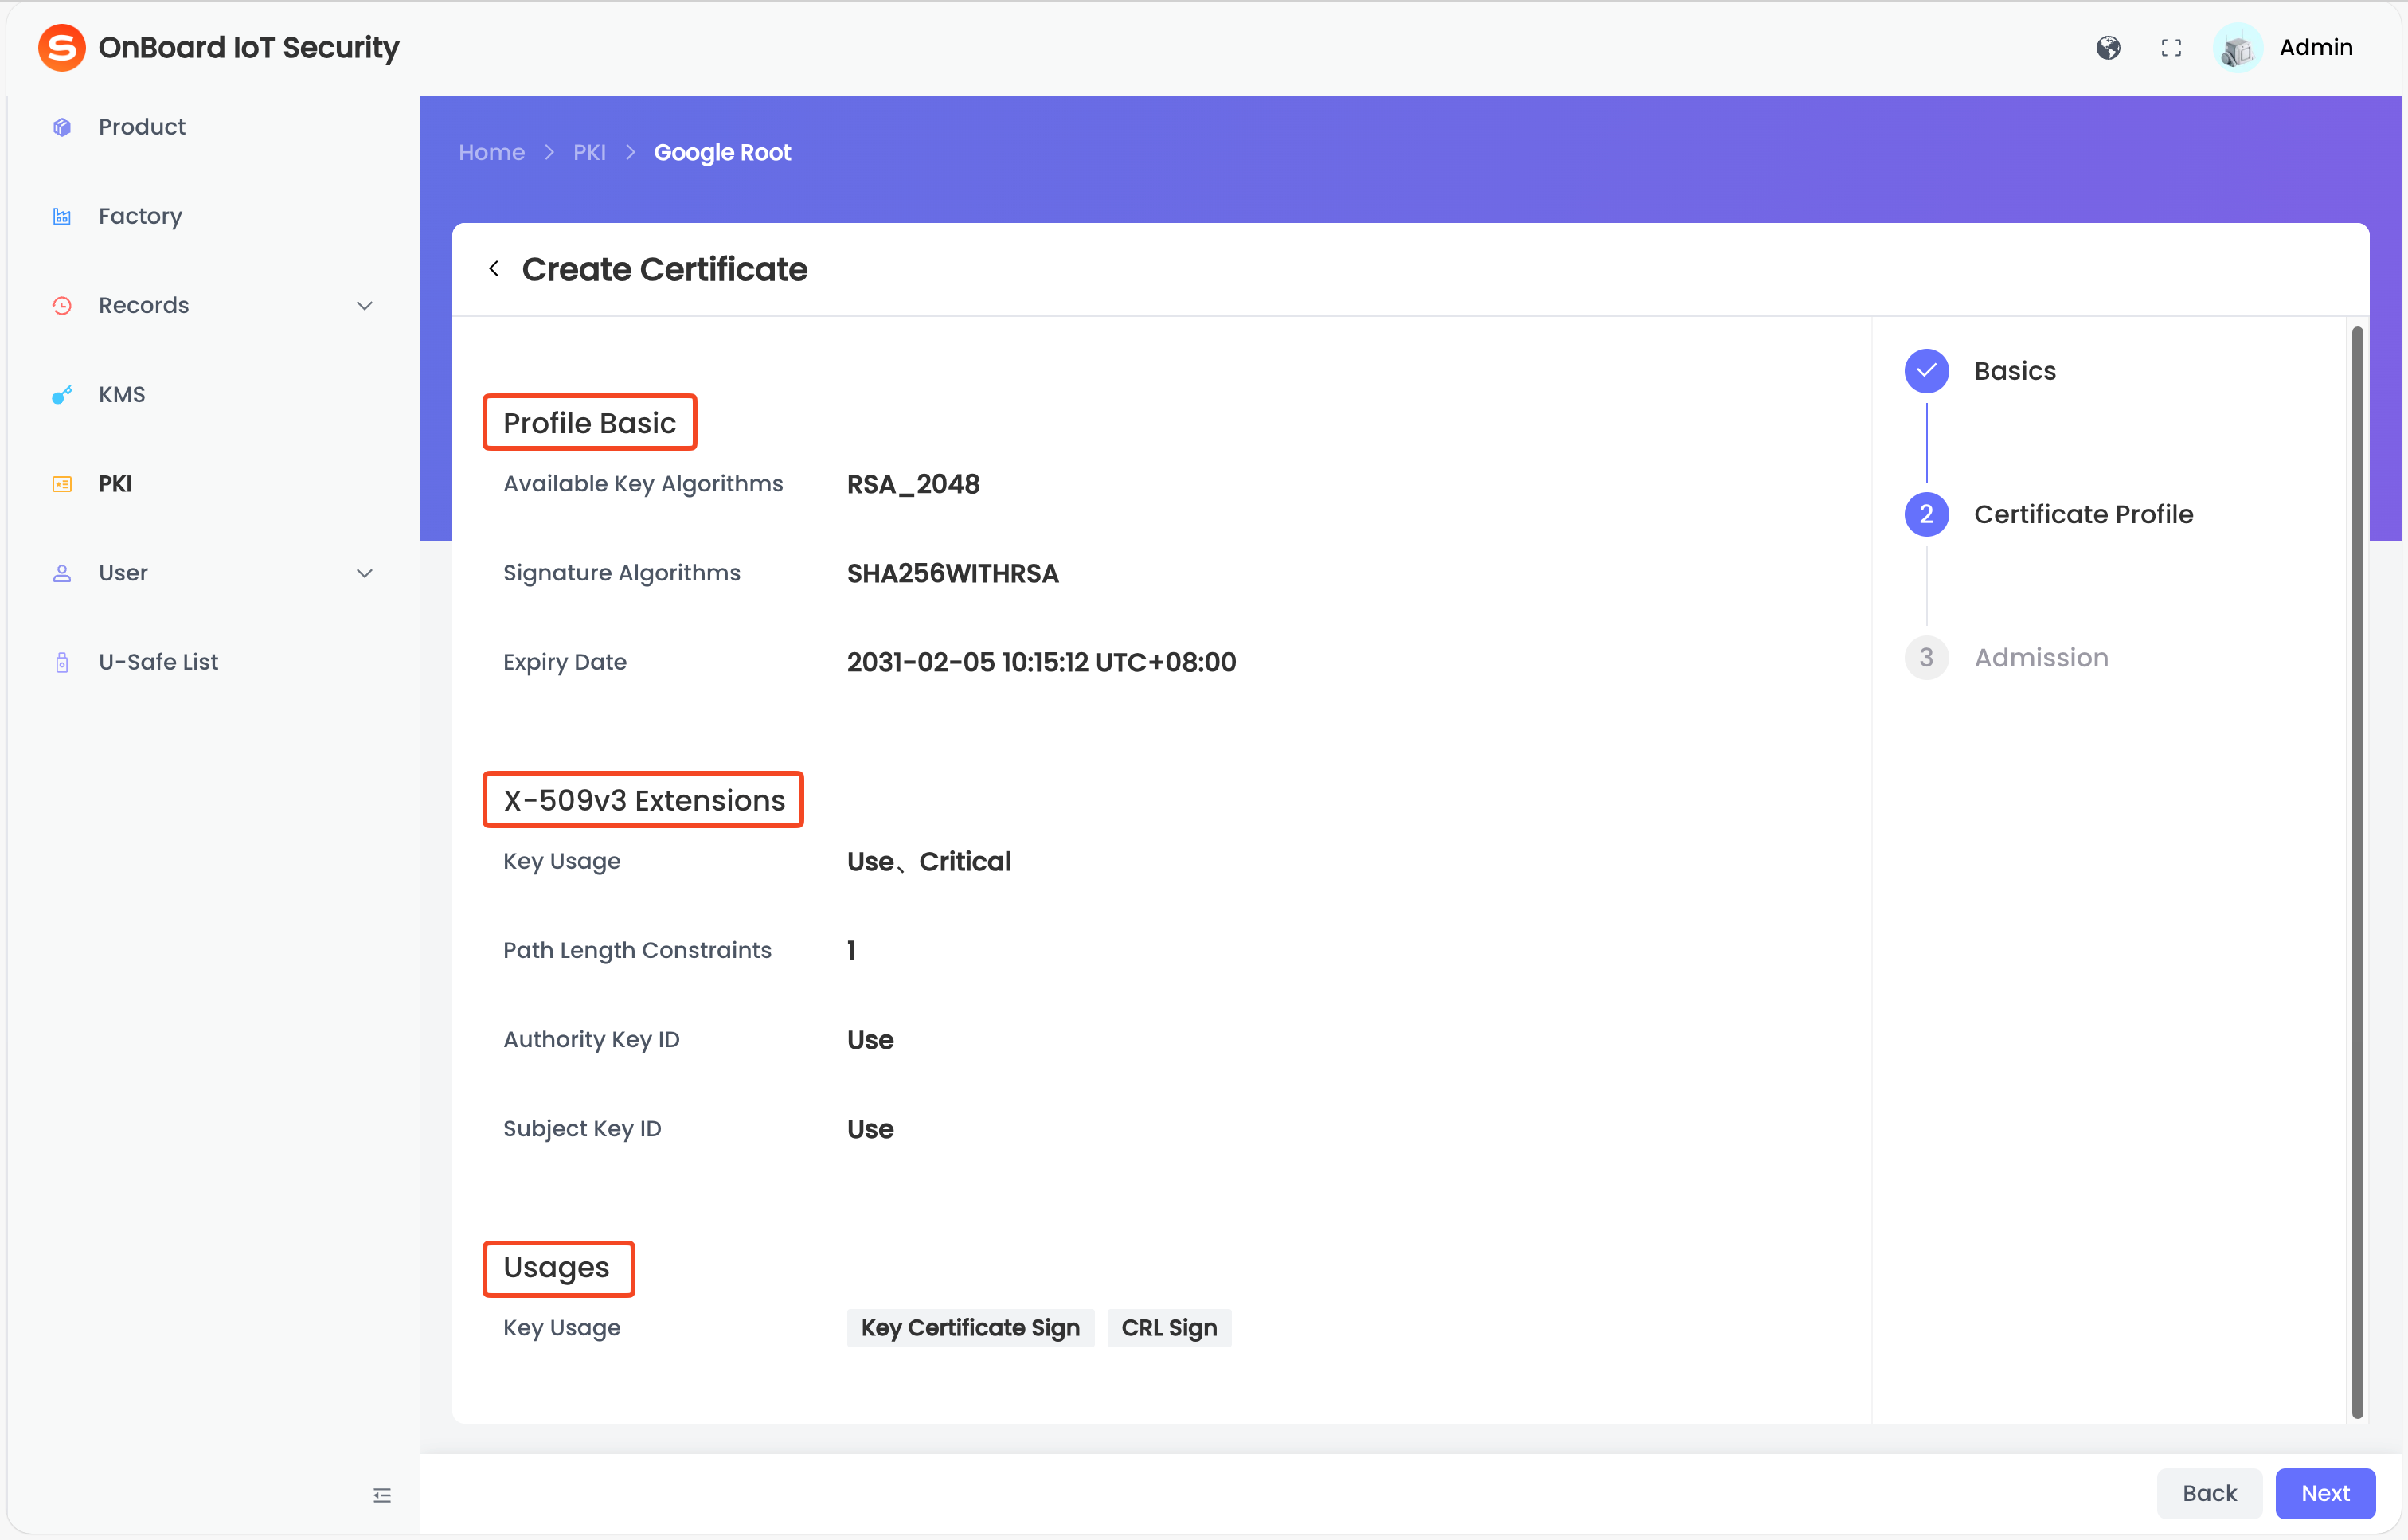
Description of Manufacturer certificate profile information:
Area Information Description Profile Basic Available Key Algorithms Automatically parsed from the certificate content and can't be modified. Signature Algorithms Automatically parsed from the certificate content and can't be modified. Expiry Date Automatically parsed from the certificate content and can't be modified. X-509v3 Extensions Key Usage Automatically parsed from the certificate content and can't be modified. Path Length Constaints Automatically parsed from the certificate content and can't be modified. Authority Key ID Automatically parsed from the certificate content and can't be modified. Subject Key ID Automatically parsed from the certificate content and can't be modified. Usages Key Usage Optional key usages, such as Digital Signature, Key Certificate Sign, and CRL Sign. -
After verifying that the information is correct, click Next, and then click Add on the Admission page.
-
In the Assign User Permissions window, enter the email address and assign the corresponding permission (View, Edit, Use, Revoke, Grant, and Delete). Then, click Add.
-
Click Complete to complete the Manufacturer certificate creation.
tipWhen creating a Manufacturer certificate issued by an external CA, you must complete the CSR configuration. Before the CSR configuration is completed, the certificate will remain in the Pending status and can't be used.
CSR configuration steps for the Manufacturer certificate
When creating a Manufacturer certificate issued by an external CA, refer to the following steps to complete the CSR configuration.
-
On the Certificate Chain page, click the corresponding certificate chain, and then click the corresponding Manufacturer certificate to navigate to the certificate page.
-
On the certificate page, click the link in the prompt to complete the CSR Configuration.
-
On the CSR Configuration page, click the Download
icon to download the CSR file. Then, use your Root CA to sign the file, thereby generate a Manufacturer certificate signed by the Root CA. -
After a Manufacturer certificate is generated, click the Add
icon in the upload area, select and upload the Manufacturer certificate in .pem format, or directly drag and drop your Manufacturer certificate into the upload area. -
Click Submit. Once the configuration is completed, the Manufacturer certificate status will change to Normal.
Before creating a Model certificate based on the Google Cast template, please ensure that at least one Manufacturer certificate based on the Google Cast template has been created so that it can be selected and inherited during configuration.
-
On the Certificate Chain page, click the corresponding certificate chain, and then click Create.
tipThe Key
icon indicates that the certificate contains a private key.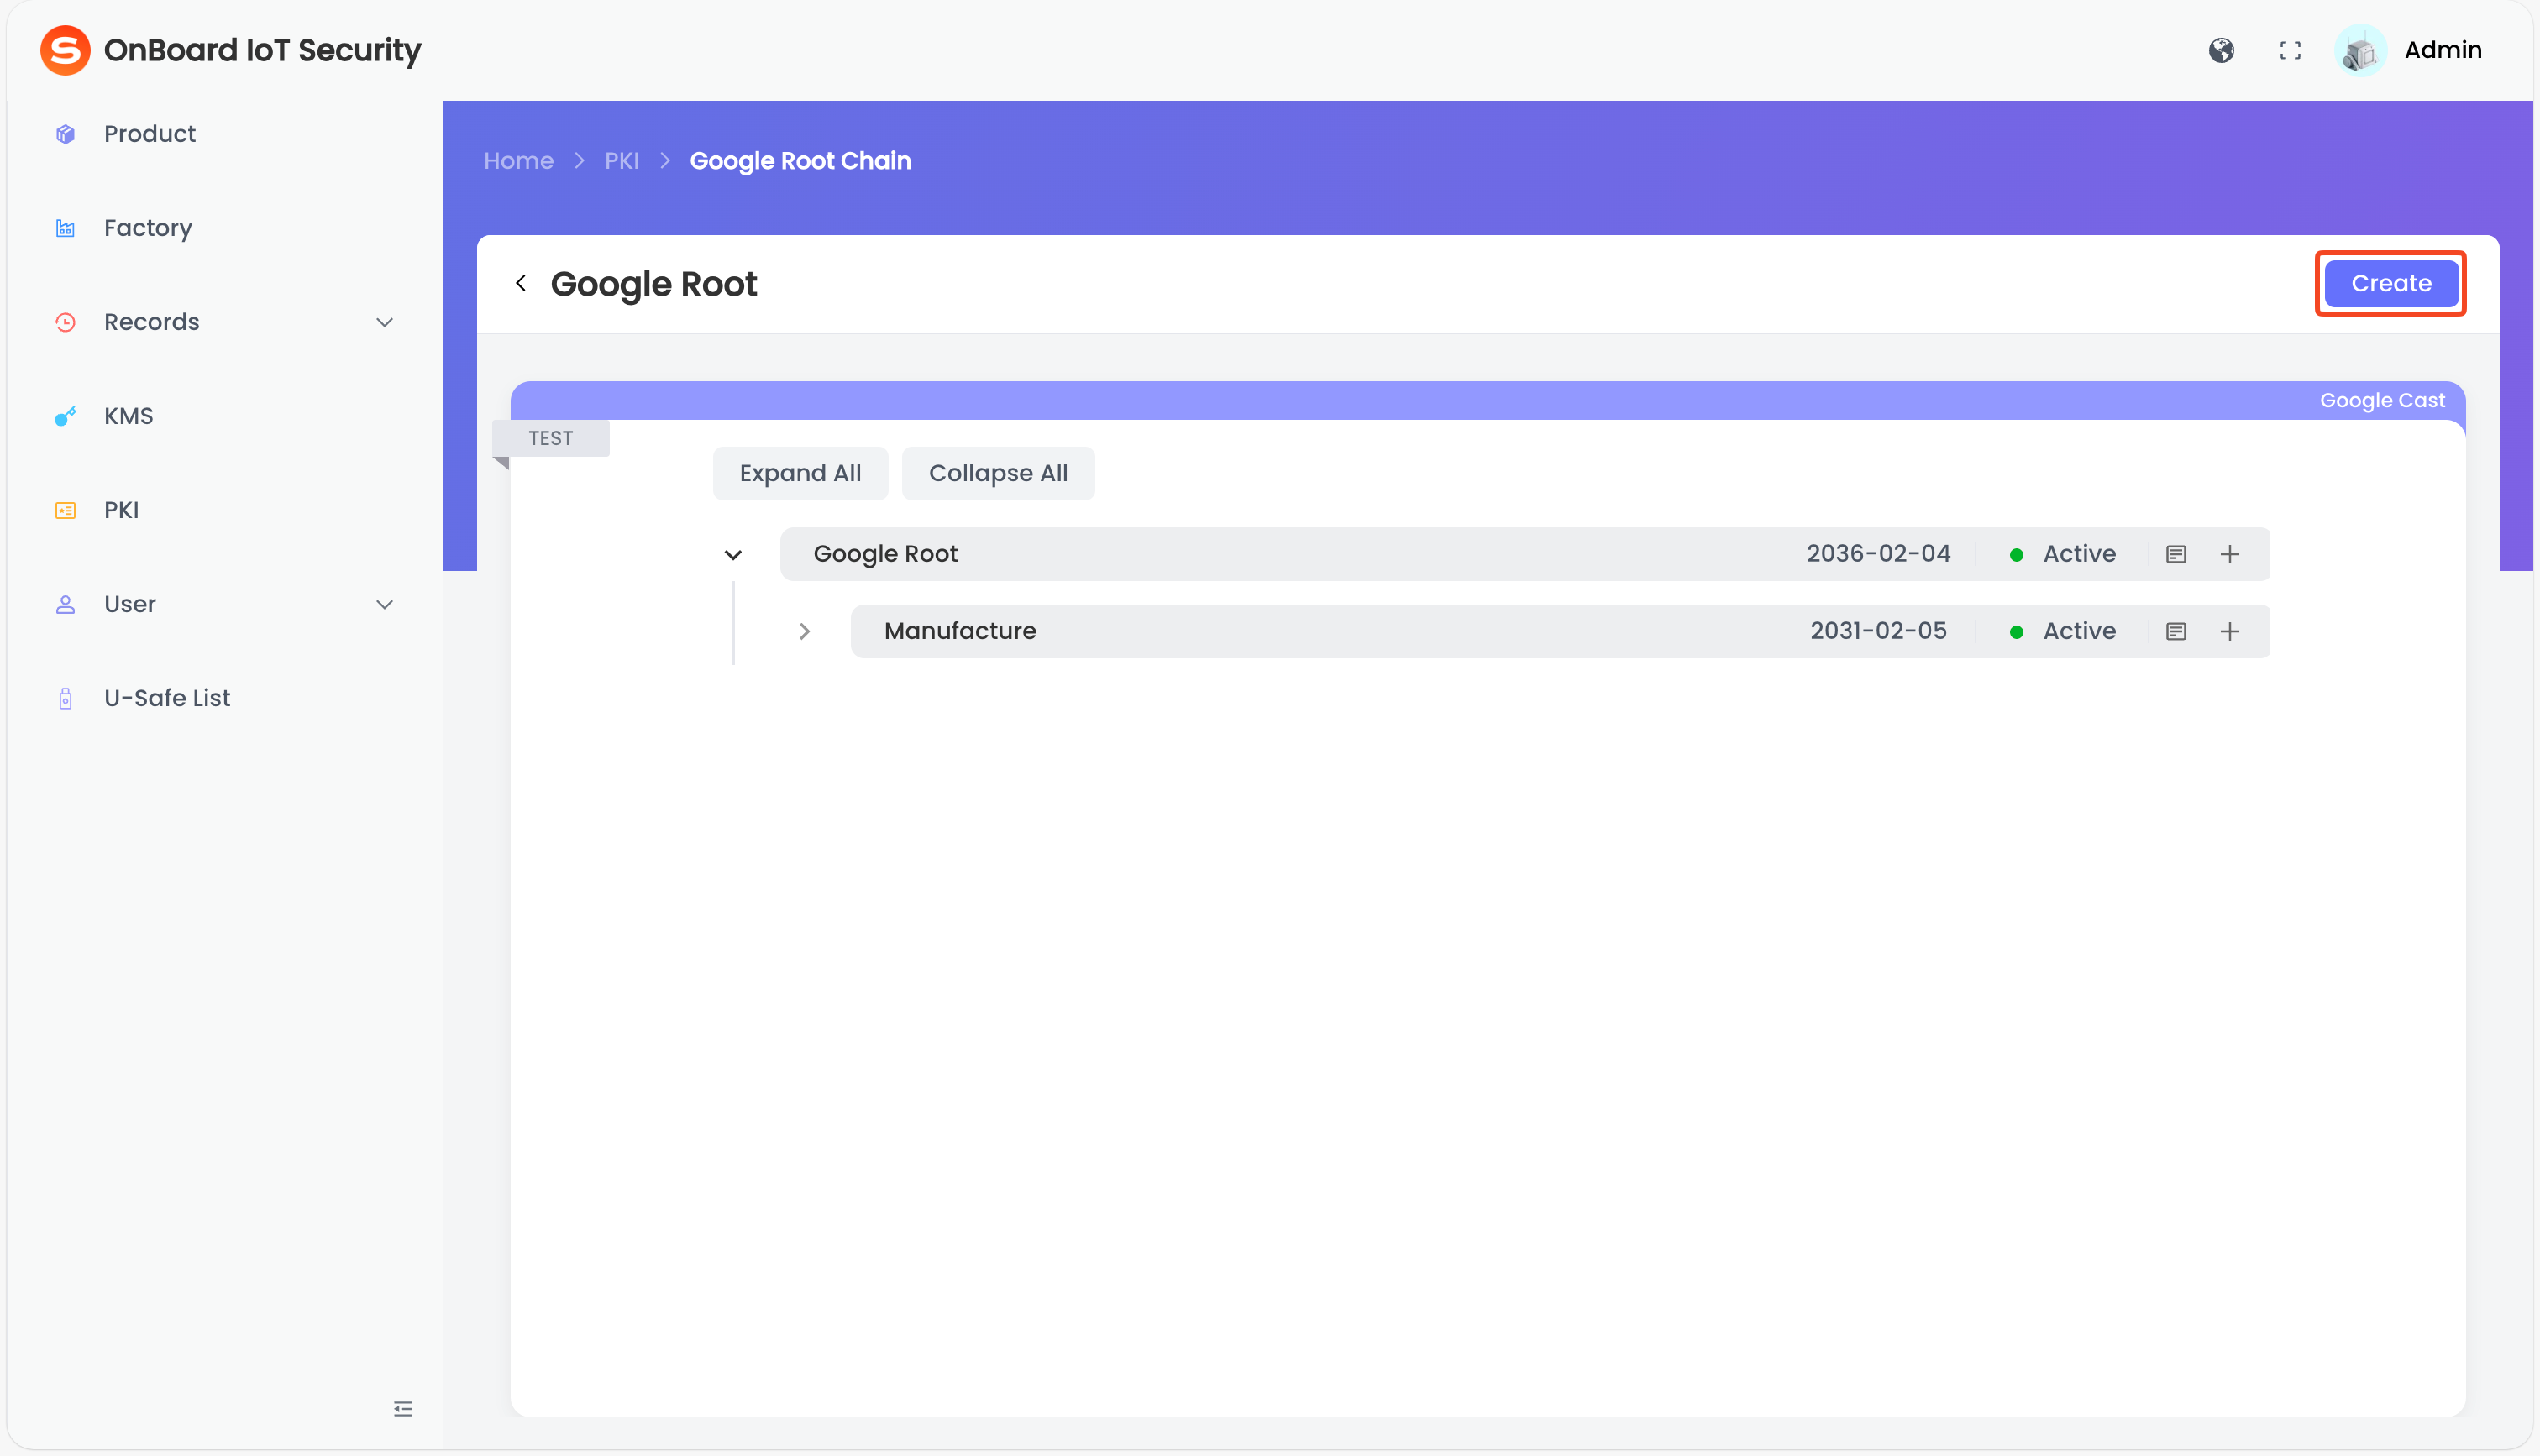
-
On the Create Certificate page, select Google Cast template for the format and Model for the type, then select and enter the basic information.
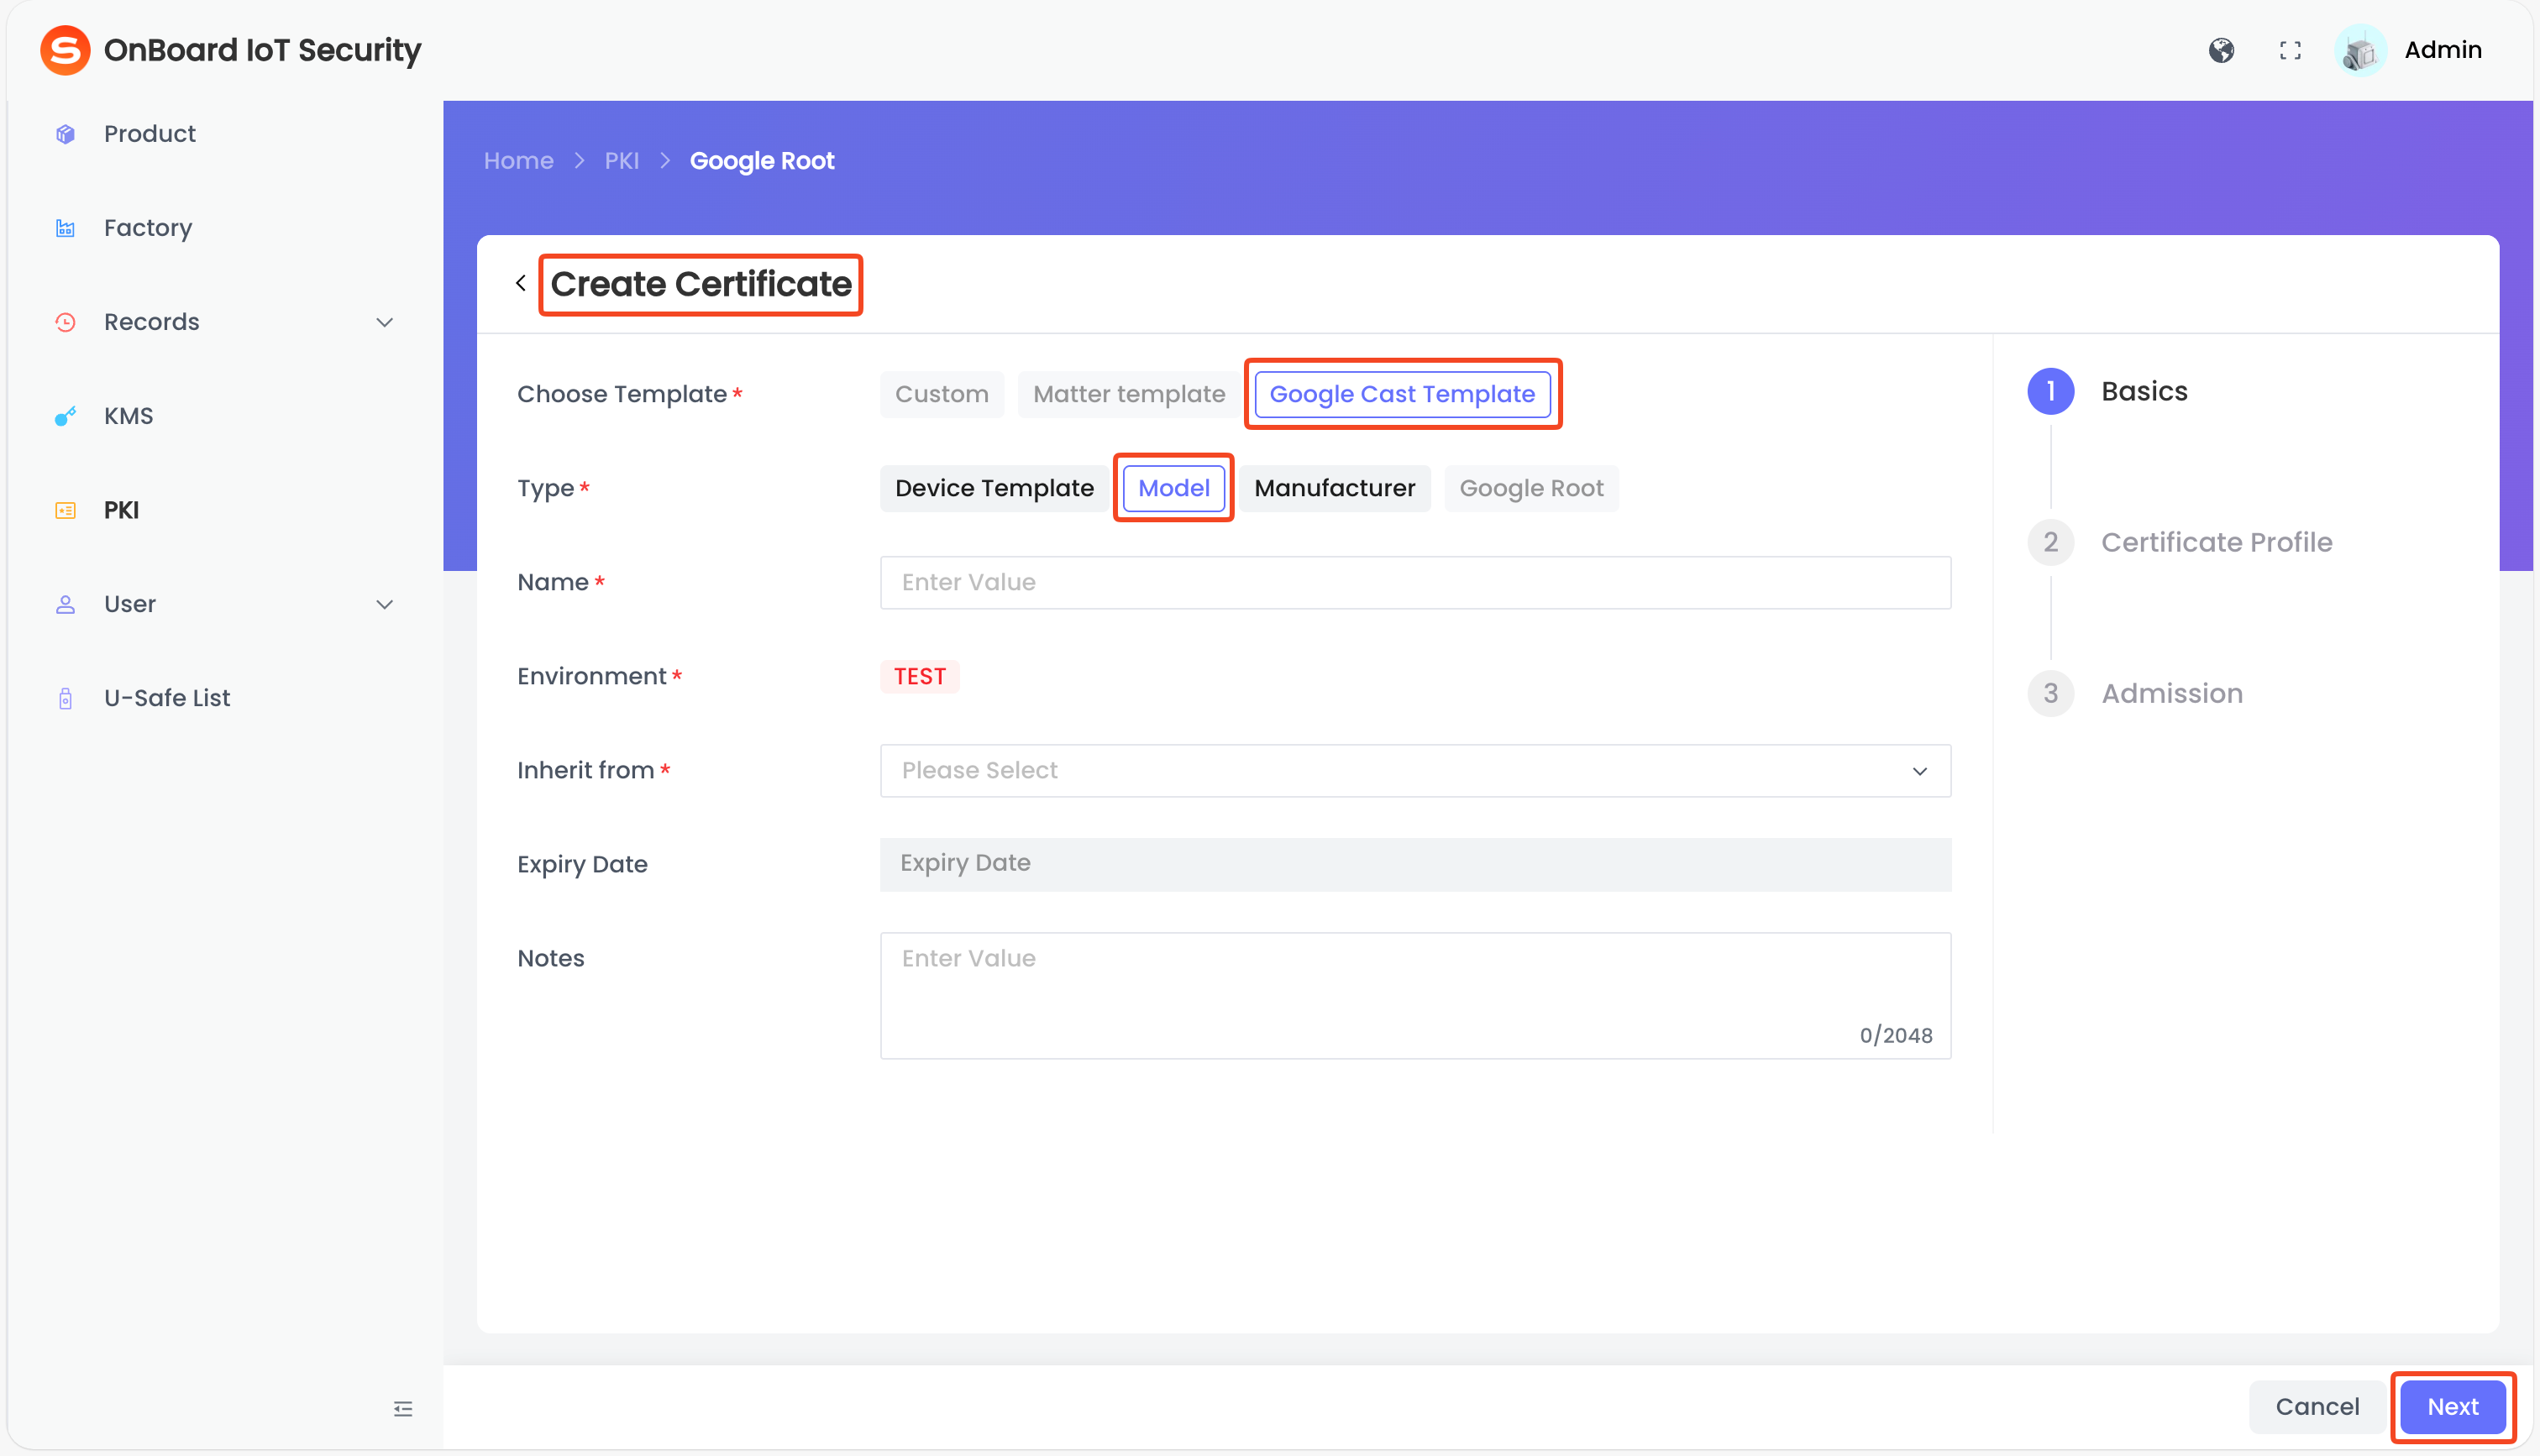
Description of Model certificate basic information:
-
After verifying that the information is correct, click Next and configure according to the following information.
tipIf the Model certificate is inherited from your own Manufacturer certificate, only the Profile Basic area are dispalyed.
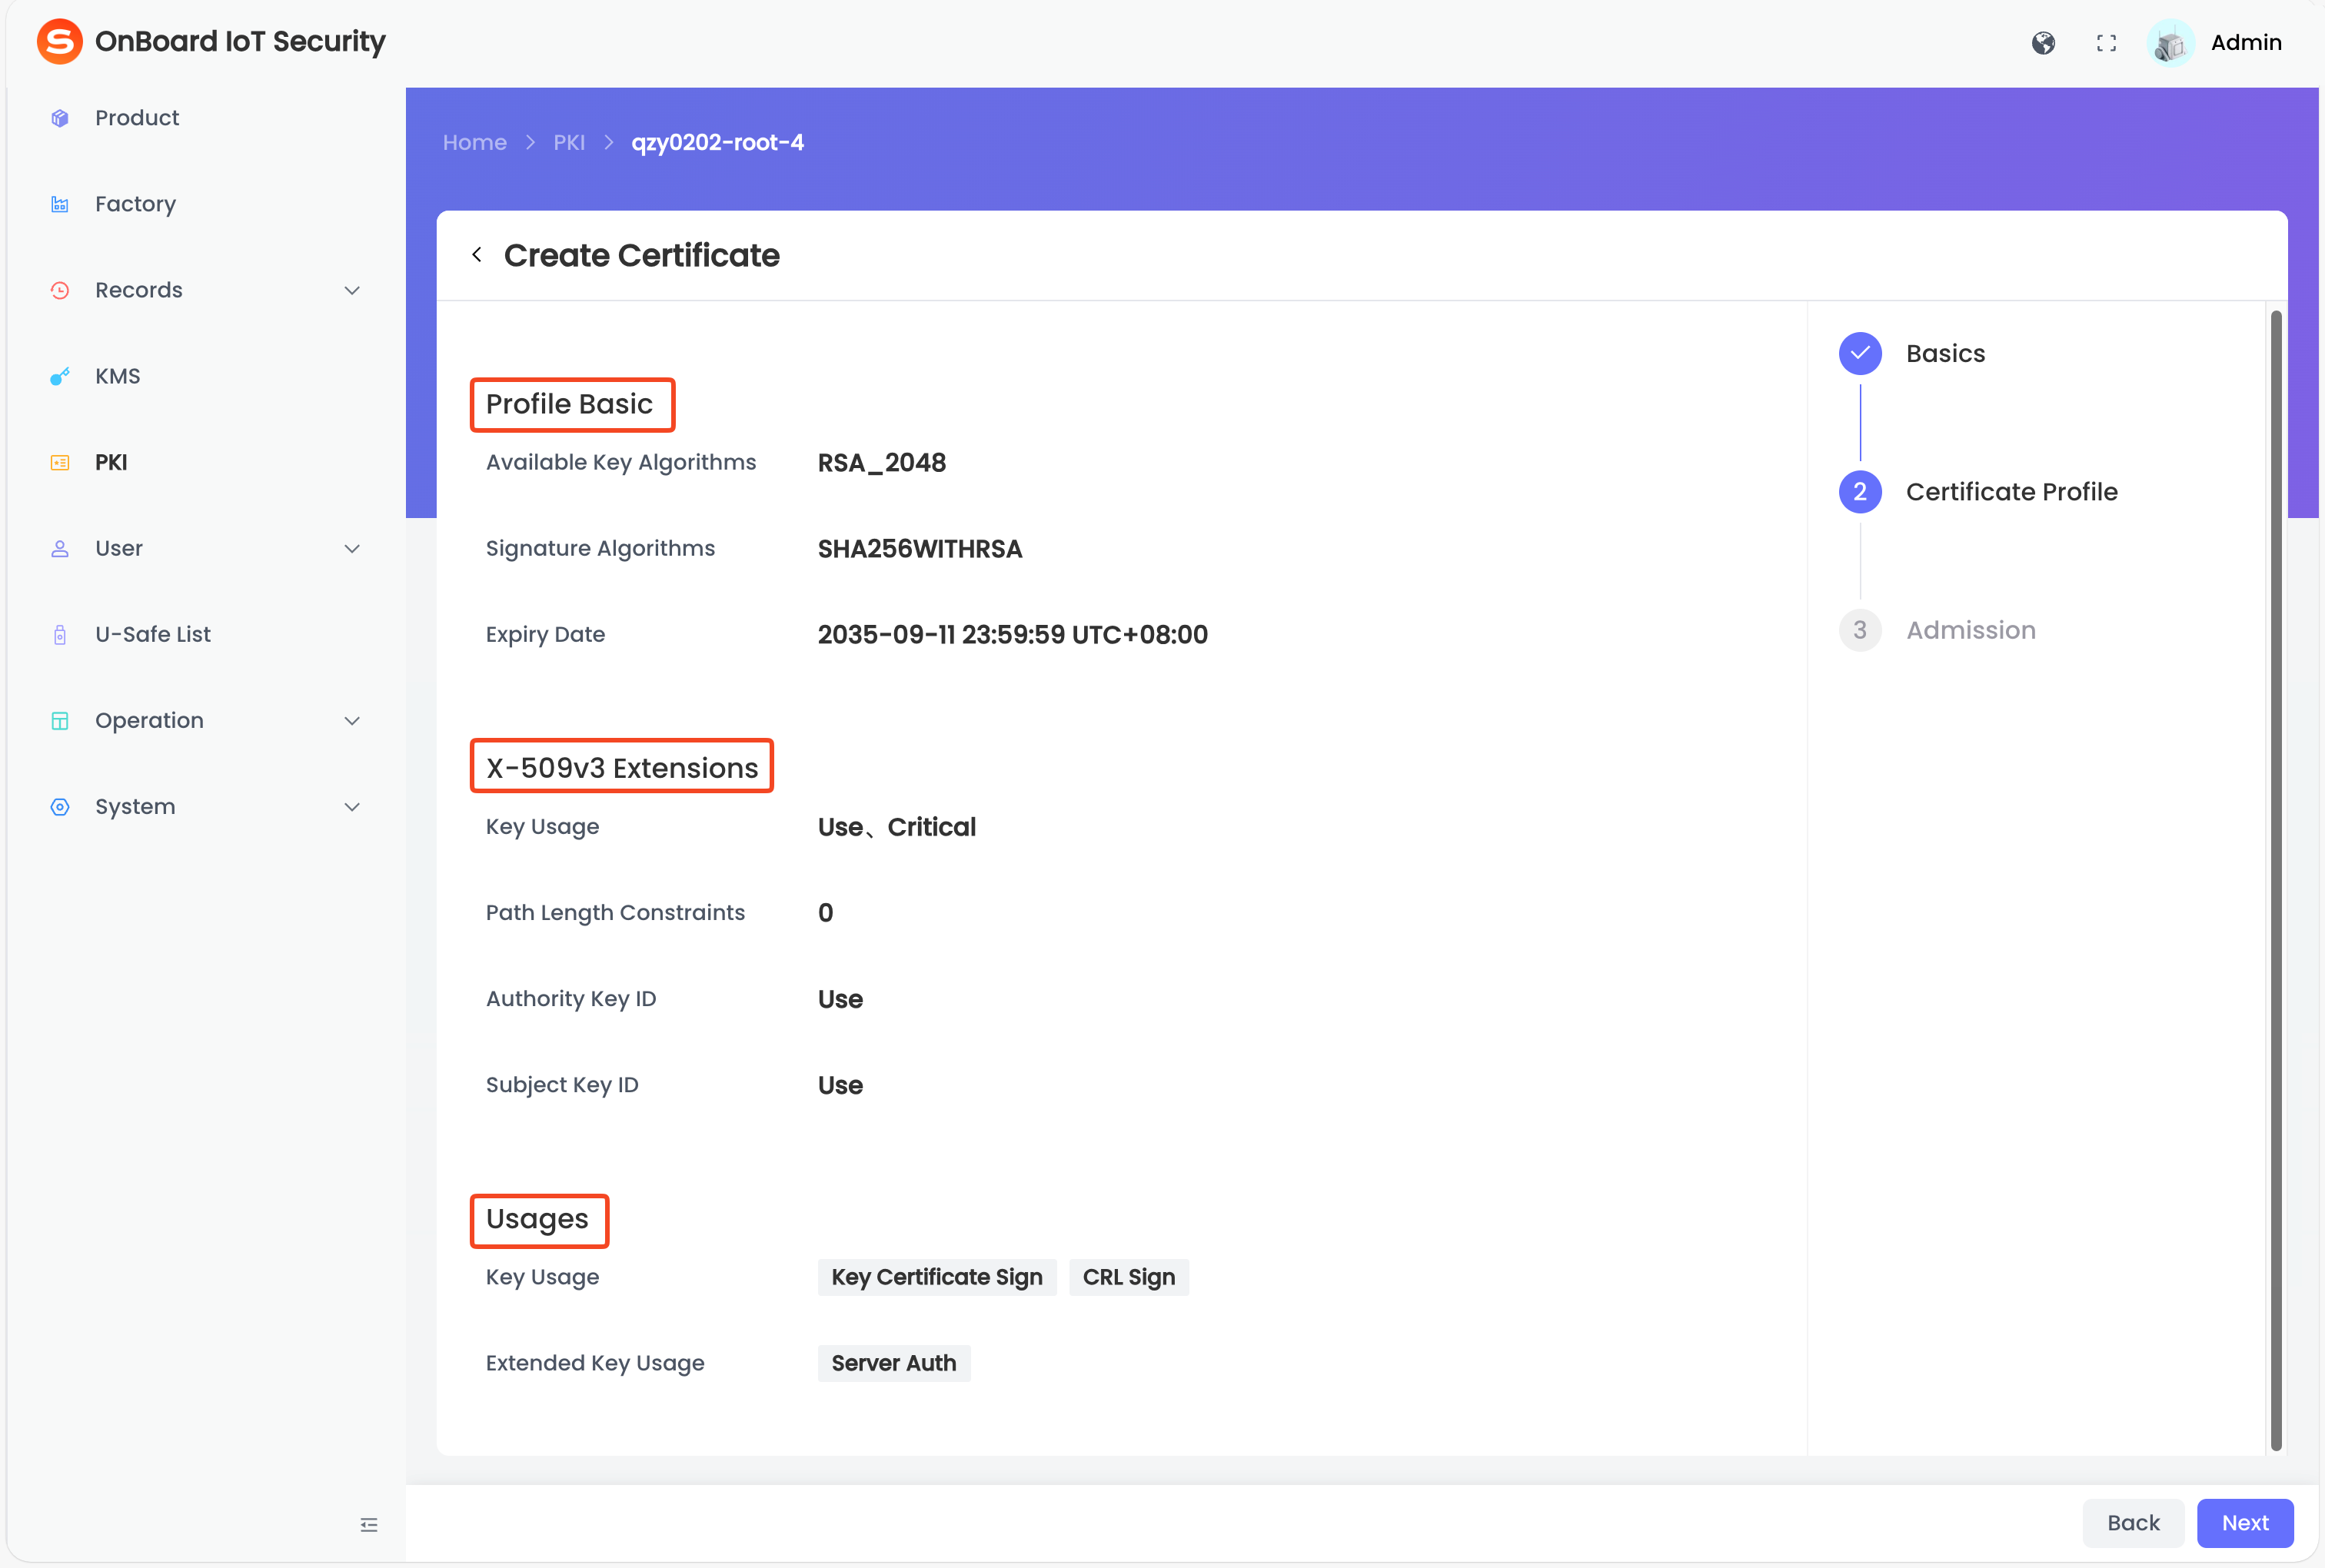
Description of Model certificate profile information:
Area Information Description Profile Basic Available Key Algorithms Automatically parsed from the certificate content and can't be modified. Signature Algorithms Automatically parsed from the certificate content and can't be modified. Expiry Date Inherits the Expiry Date set in the previous step and can't be modified. X-509v3 Extensions Key Usage Automatically parsed from the certificate content and can't be modified. Path Length Constaints Automatically parsed from the certificate content and can't be modified. Authority Key ID Automatically parsed from the certificate content and can't be modified. Subject Key ID Automatically parsed from the certificate content and can't be modified. Usages Key Usage Optional key usages, such as Key Certificate Sign and CRL Sign. Extended Key Usage Optional extended key usages, such as Server Auth. -
After verifying that the information is correct, click Next, and then click Add on the Admission page.
-
In the Assign User Permissions window, enter the email address and assign the corresponding permission (View, Edit, Use, Revoke, Grant, and Delete). Then, click Add.
-
Click Complete to complete the Model certificate creation.
tipWhen creating a Model certificate, you must complete the CSR configuration. Before the CSR configuration is completed, the certificate will remain in the Pending status and can't be used.
CSR configuration steps for the Model certificate
When creating a Model certificate, refer to the following steps to complete the CSR configuration.
-
On the Certificate Chain page, click the corresponding certificate chain, and then click the corresponding Manufacturer certificate to navigate to the certificate page.
-
On the certificate page, click the link in the prompt to complete the CSR Configuration.
-
On the CSR Configuration page, click the Download
icon to download the CSR file. Then, use your Root CA to sign the file, thereby generate a Model certificate signed by the Root CA. -
After a Model certificate is generated, click the Add
icon in the upload area, select and upload the Model certificate in .pem format, or directly drag and drop your Model certificate into the upload area. -
Click Submit. Once the configuration is completed, the Model certificate status will change to Normal.
Before creating a Device template, please ensure that at least one Model certificate based on the Google Cast template has been created so that it can be selected and inherited during configuration.
-
On the Create Certificate page, click the corresponding certificate chain, and then click Create.
tipThe Key
icon indicates that the certificate contains a private key.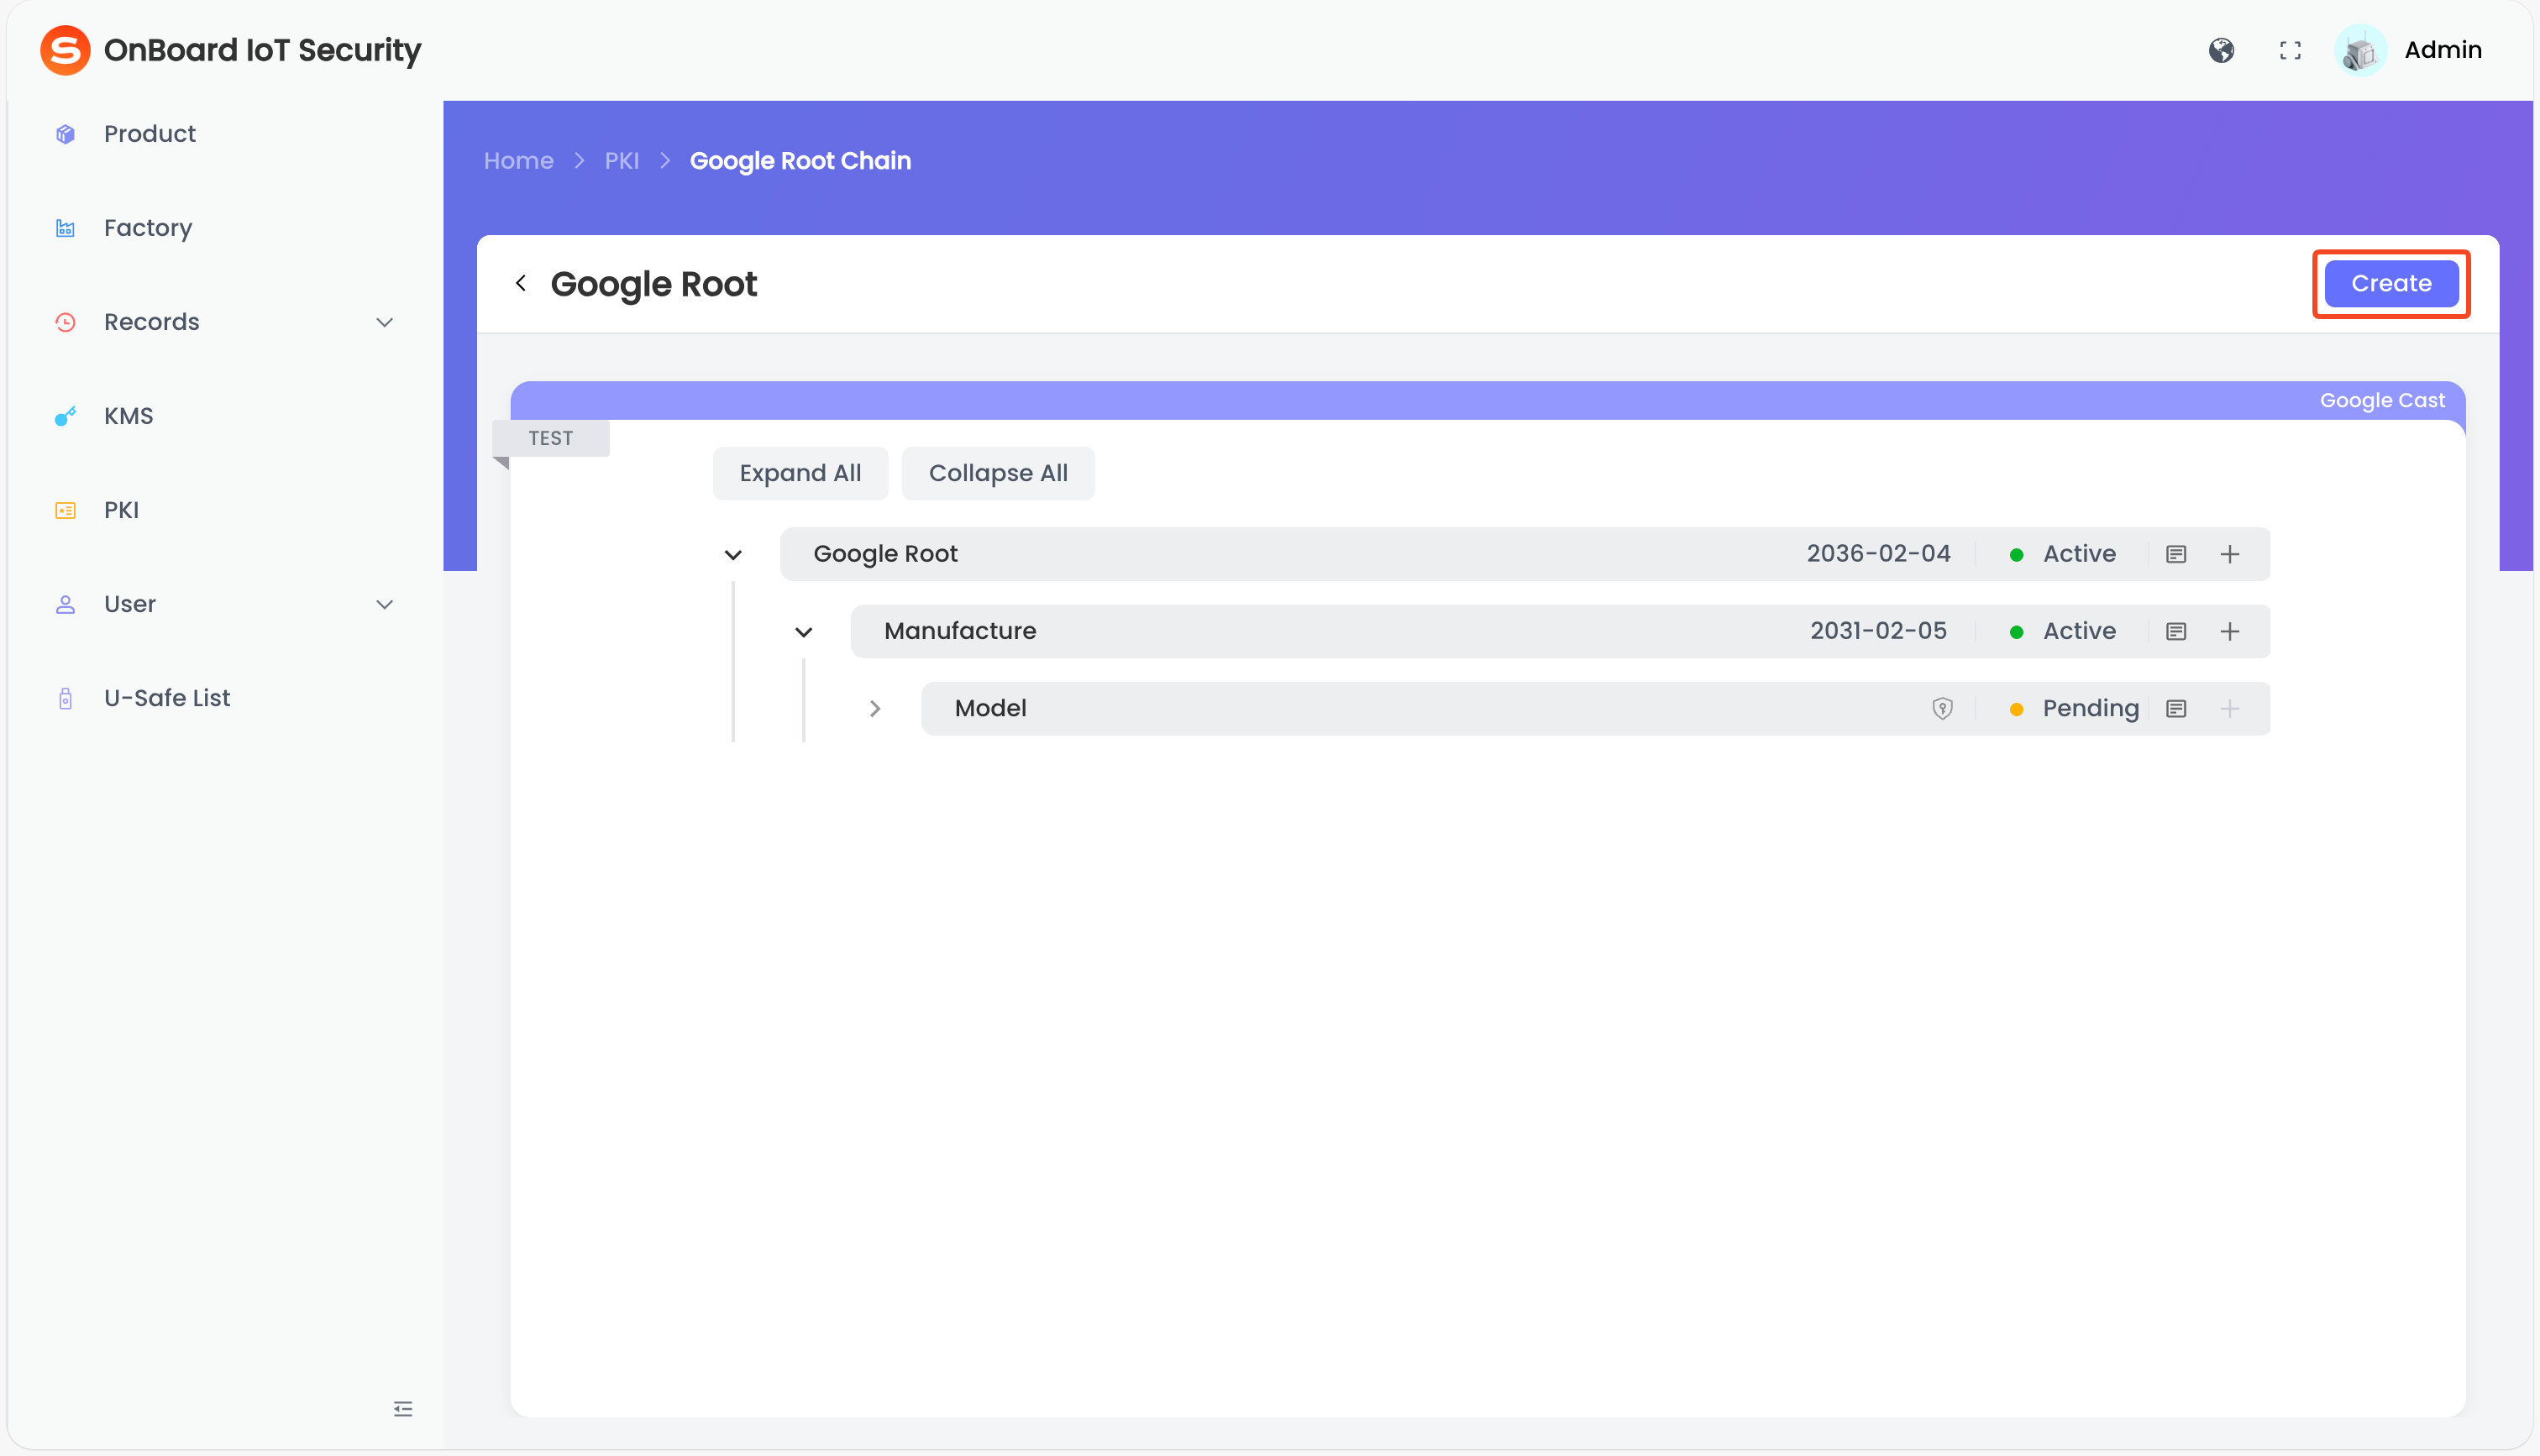
-
On the Create Certificate page, select Google Cast template for the format and Device Template for the type, then select and enter the basic information.
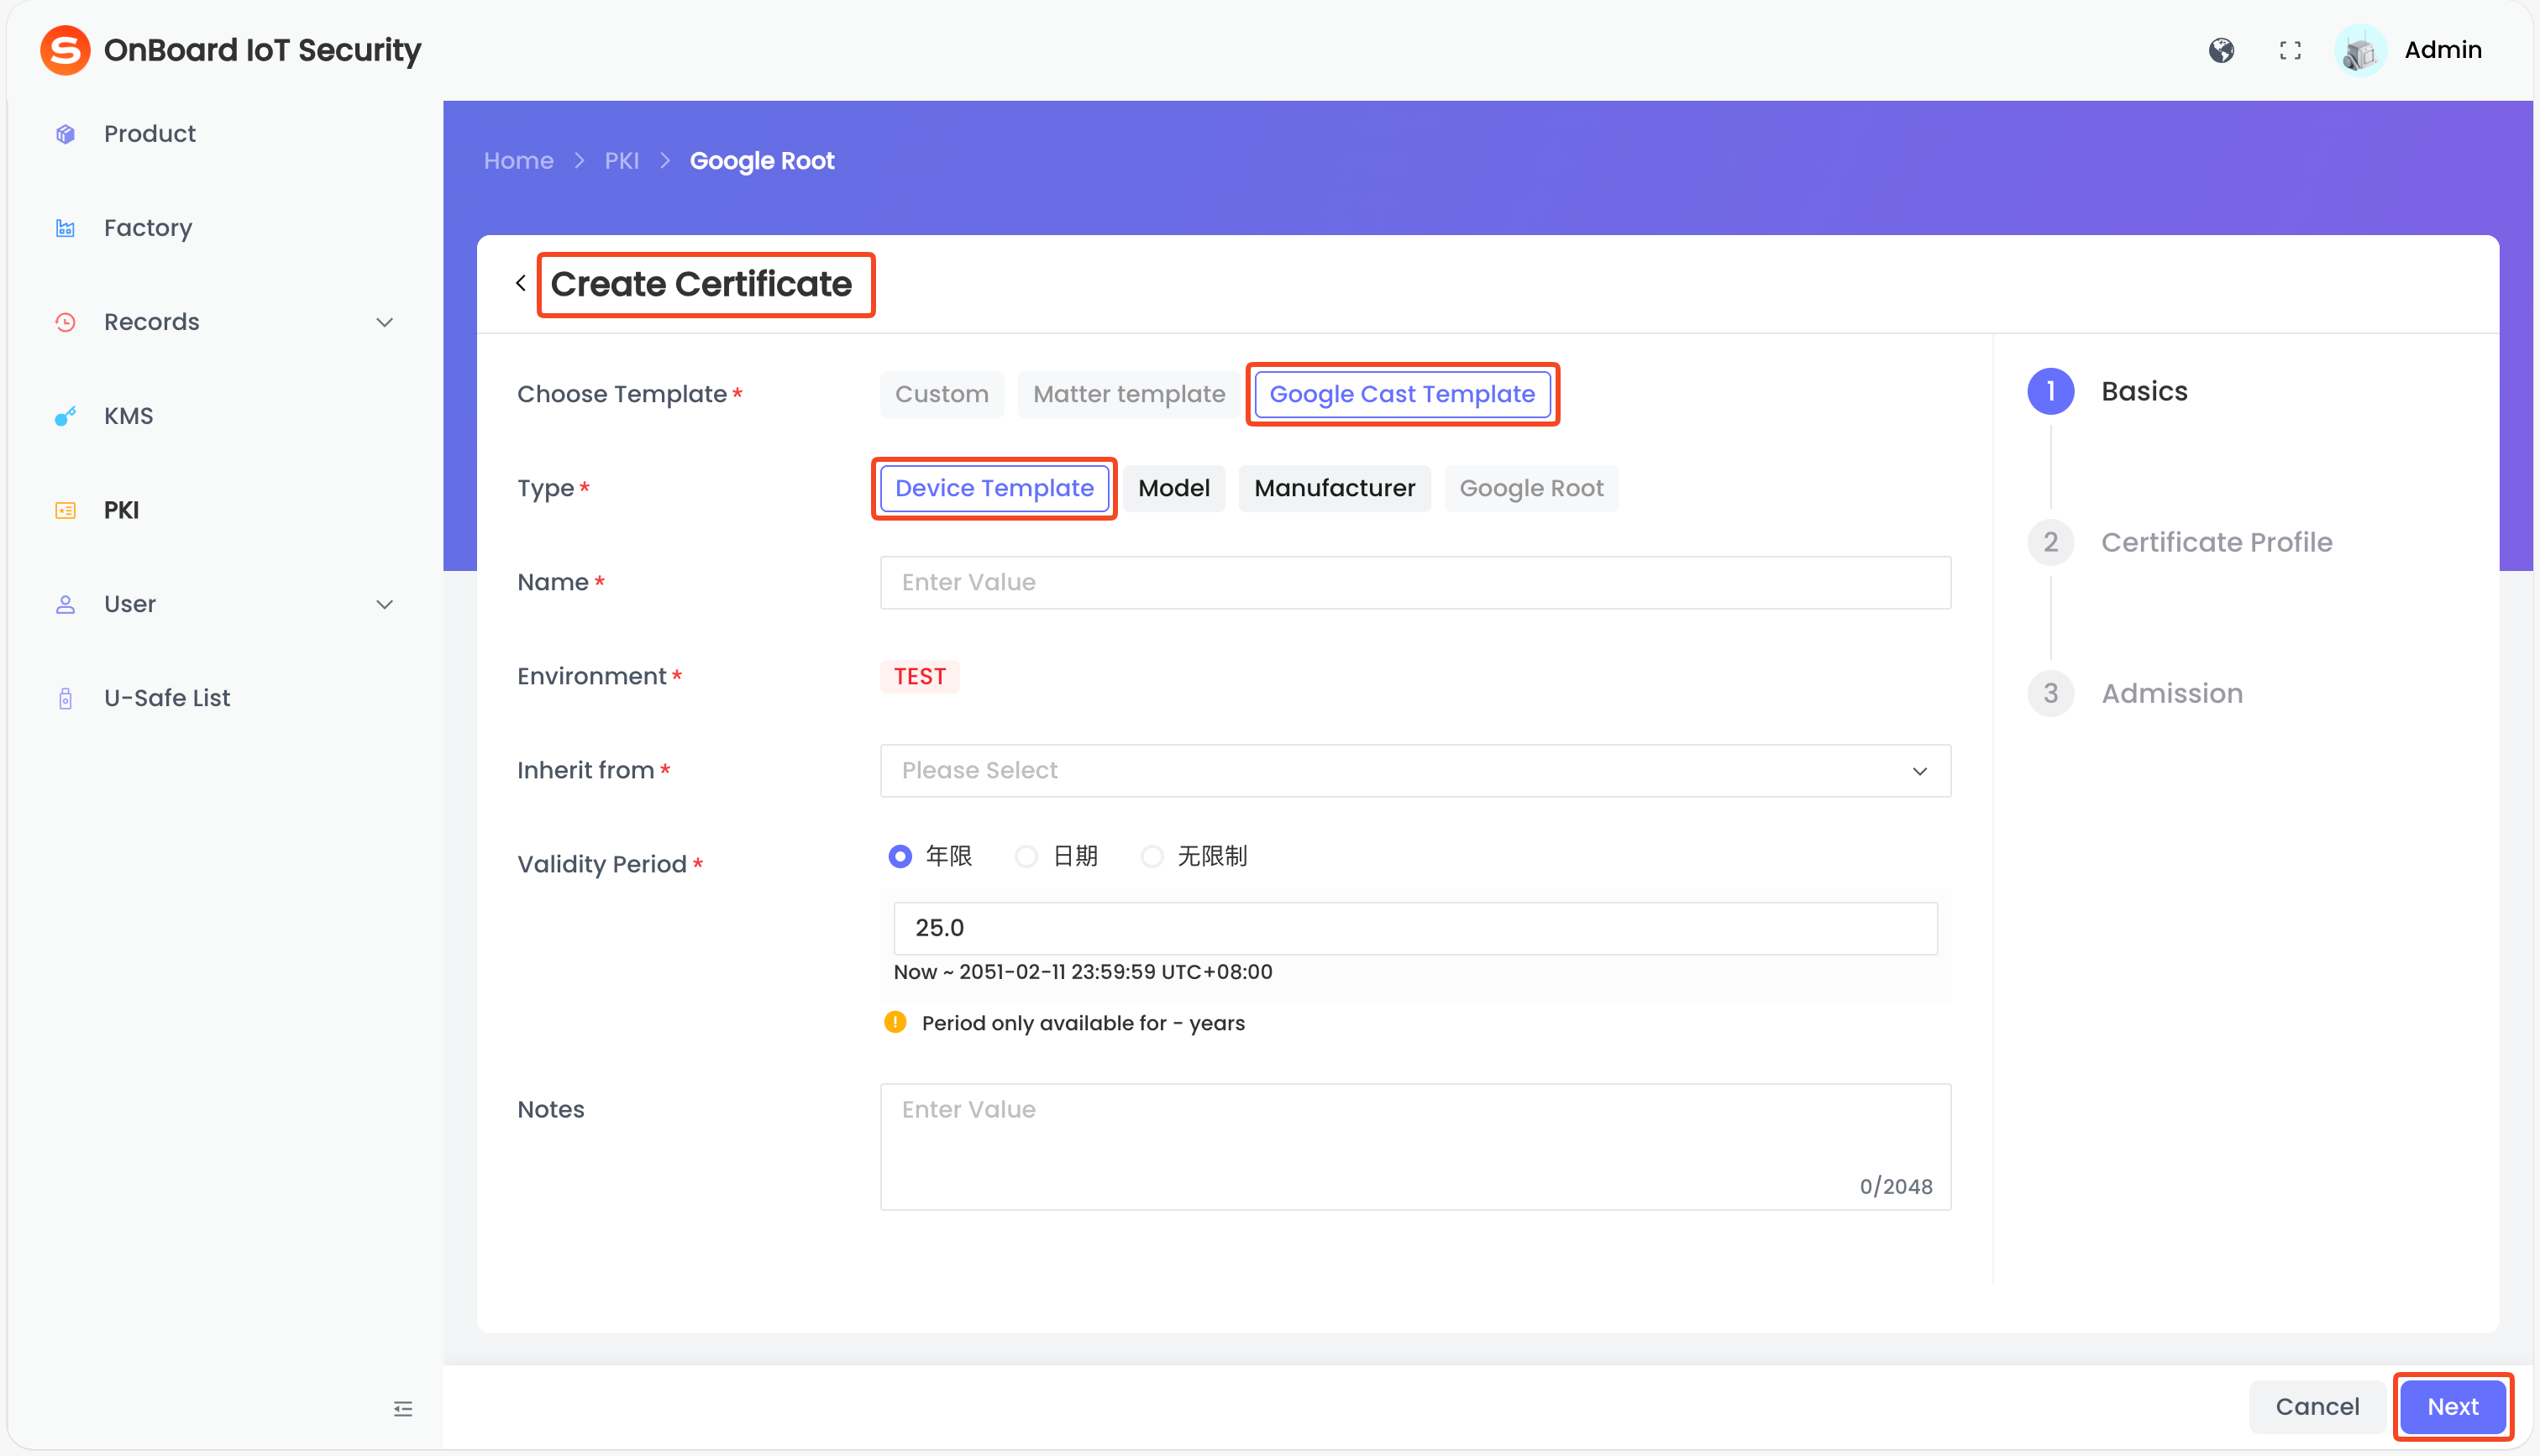
Description of Device template basic information:
-
After verifying that the information is correct, click Next and configure according to the following information.
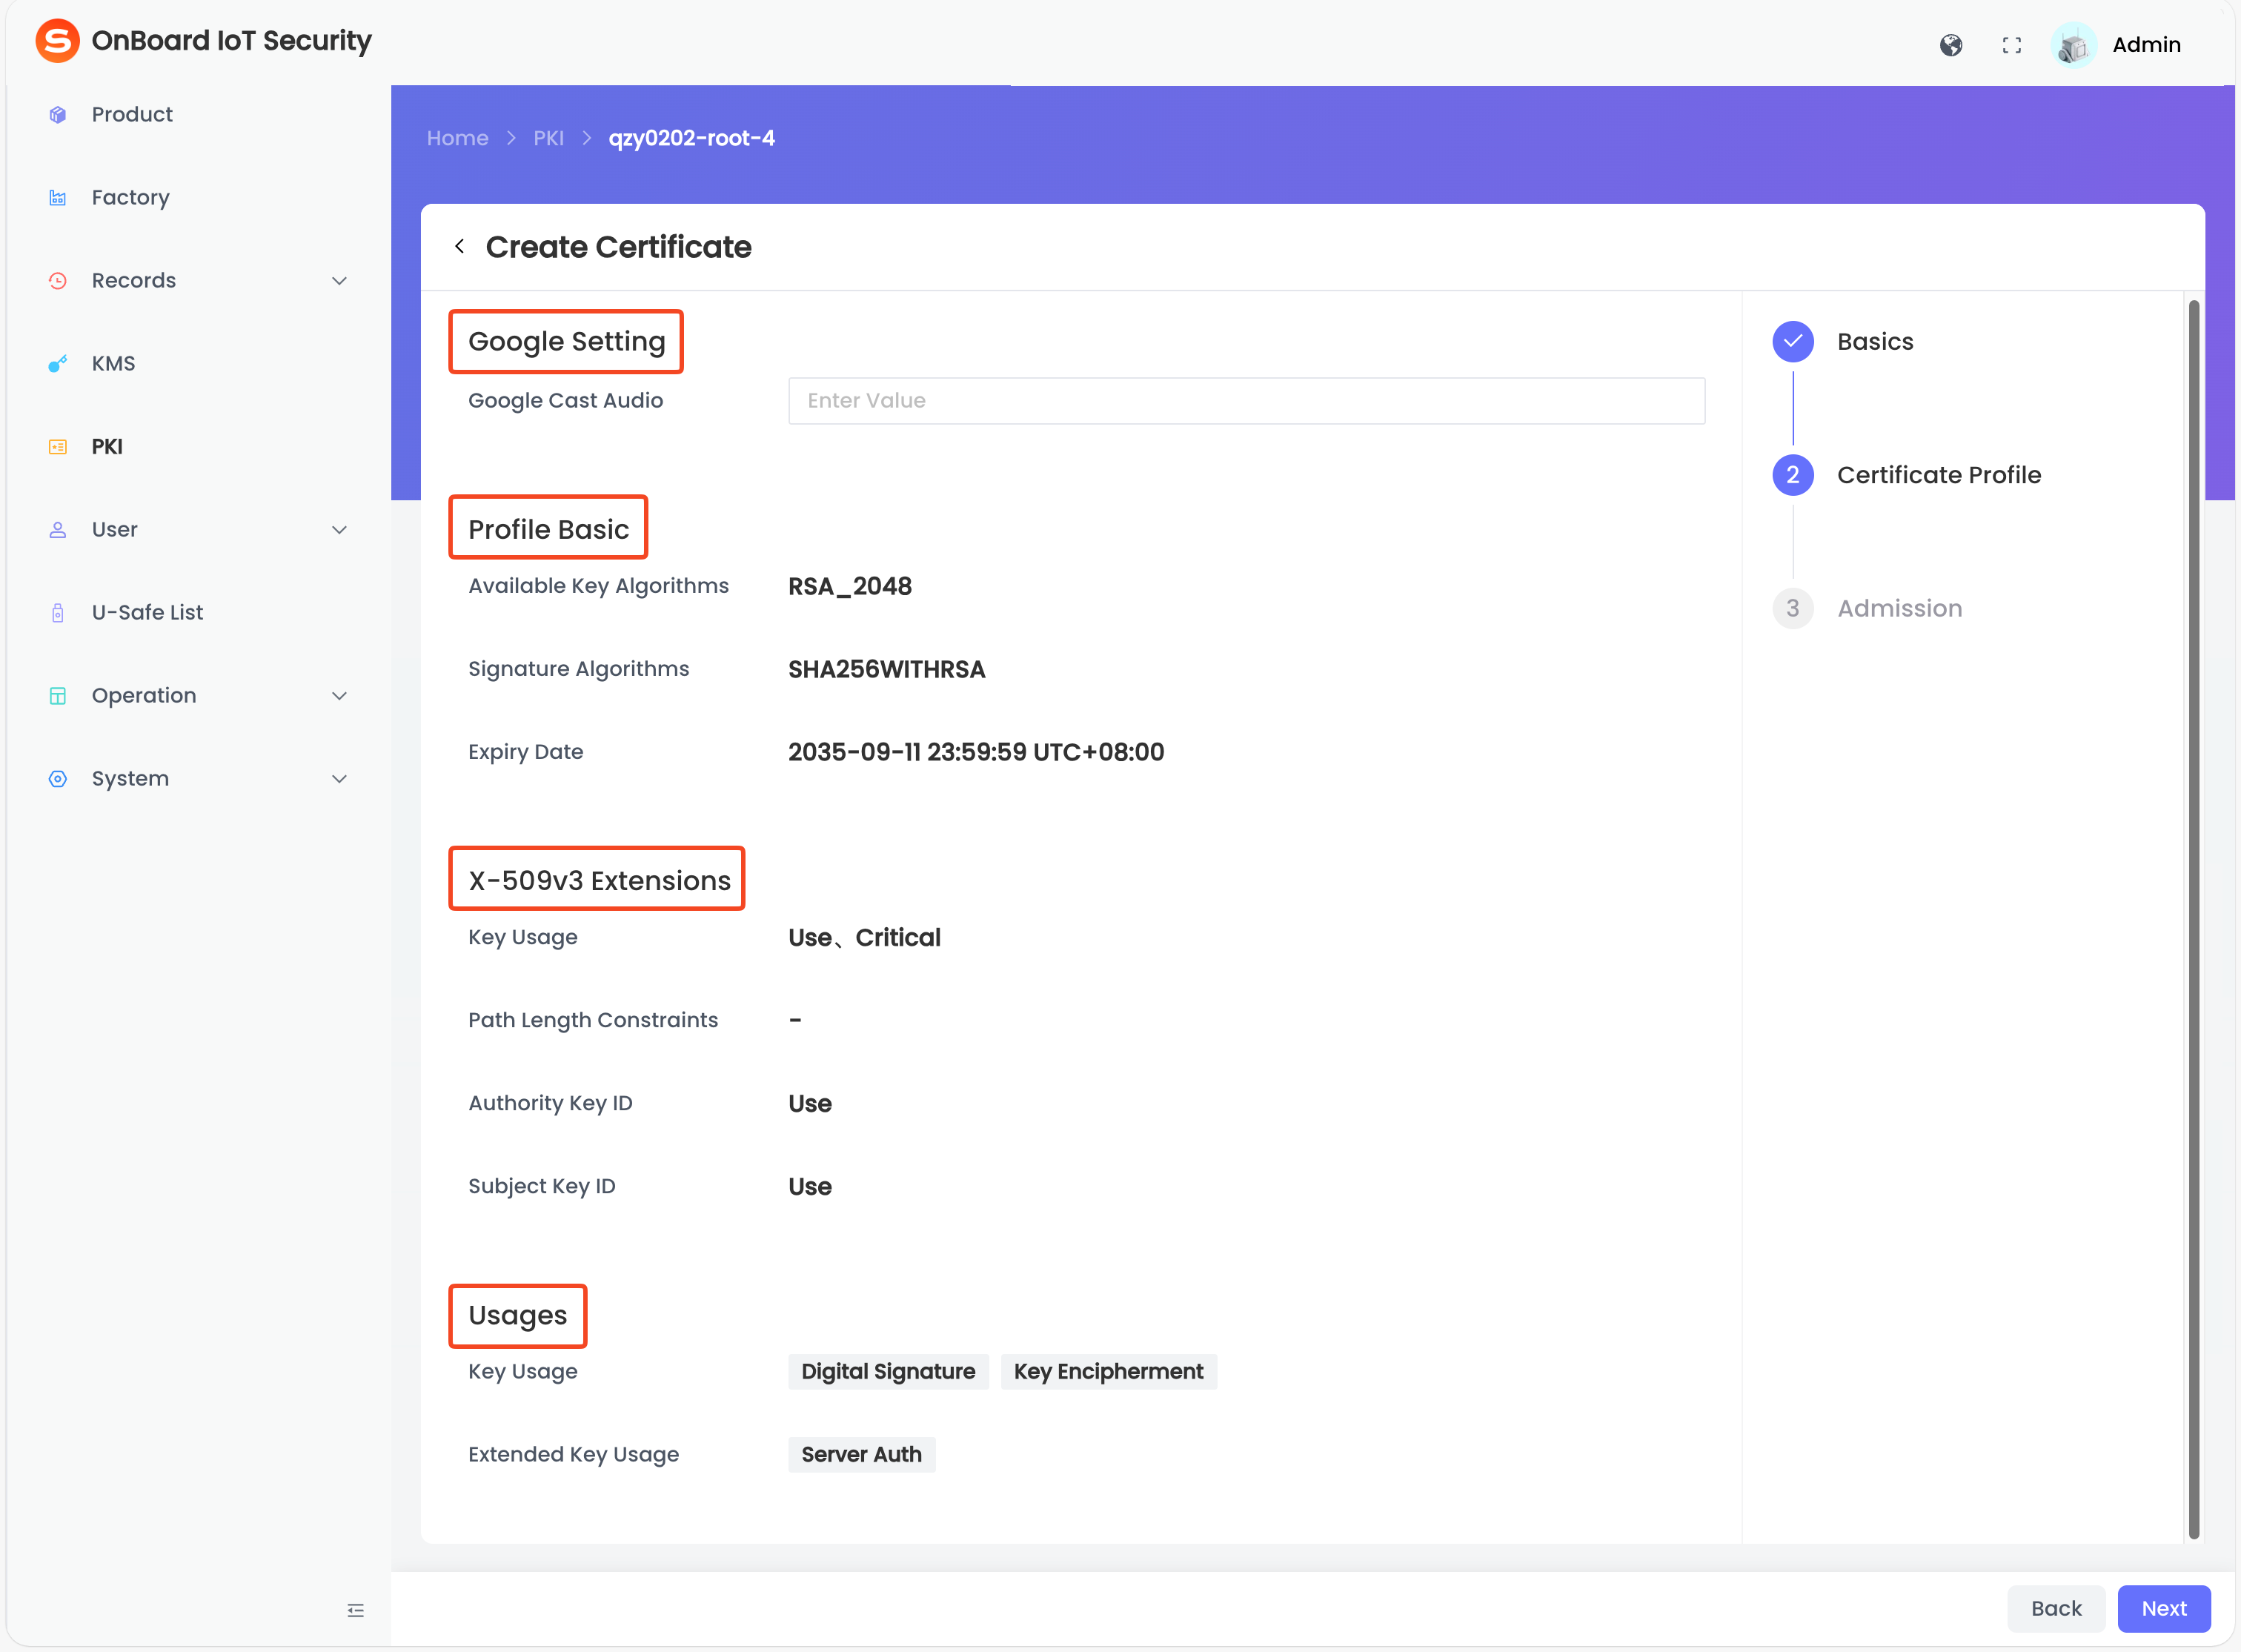
Description of Device template profile information:
Area Information Description Google Setting Google Cast Audio (optional) The certificate extension field, for example: 1.3.6.1.4.1.11129.2.5.2. Profile Basic Available Key Algorithms Automatically parsed from the certificate content and can't be modified. Signature Algorithms Automatically parsed from the certificate content and can't be modified. Expiry Date Inherits the Expiry Date set in the previous step and can't be modified. X-509v3 Extensions Key Usage Automatically parsed from the certificate content and can't be modified. Path Length Constaints Automatically parsed from the certificate content and can't be modified. Authority Key ID Automatically parsed from the certificate content and can't be modified. Subject Key ID Automatically parsed from the certificate content and can't be modified. Usages Key Usage Optional key usages, such as Digital Signature and Key Encipherment. Extended Key Usage Optional extended key usages, such as Server Auth. -
After verifying that the information is correct, click Next, and then click Add on the Admission page.
-
In the Assign User Permissions window, enter the email address and assign the corresponding permission (View, Edit, Use, Revoke, Grant, and Delete). Then, click Add.
-
Click Complete to complete the Device template creation.
Example of certificate chain hierarchy
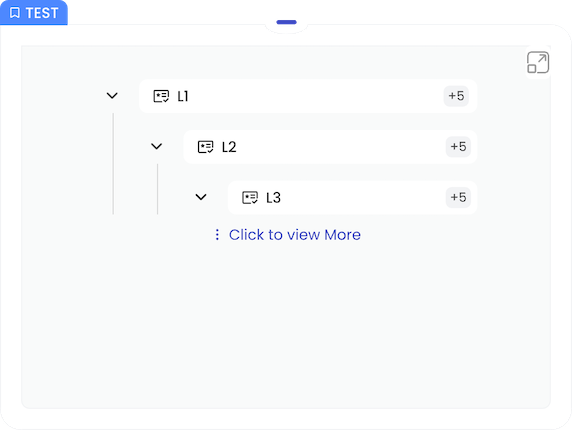
| Level | Description |
|---|---|
| L1 | Root Certificate Authority |
| L2 | Intermediate Certificate Authority |
| L3 | End Entity Certificate |

 Download User Manual