How to create a key in OnBoard™ IoT Security
This article will guide you on how to create a symmetric and asymmetric key in OnBoard™ IoT Security (OBIS).
Prerequisites
Before getting started, please ensure that you have OBIS role permissions as a System Manager or Resource Manager.
Instructions
After a key is created, it can be selected when configuring Key for a product.
-
Sign in to OBIS.
-
In the left menu, click KMS, and then click Create on the Key Management System page.
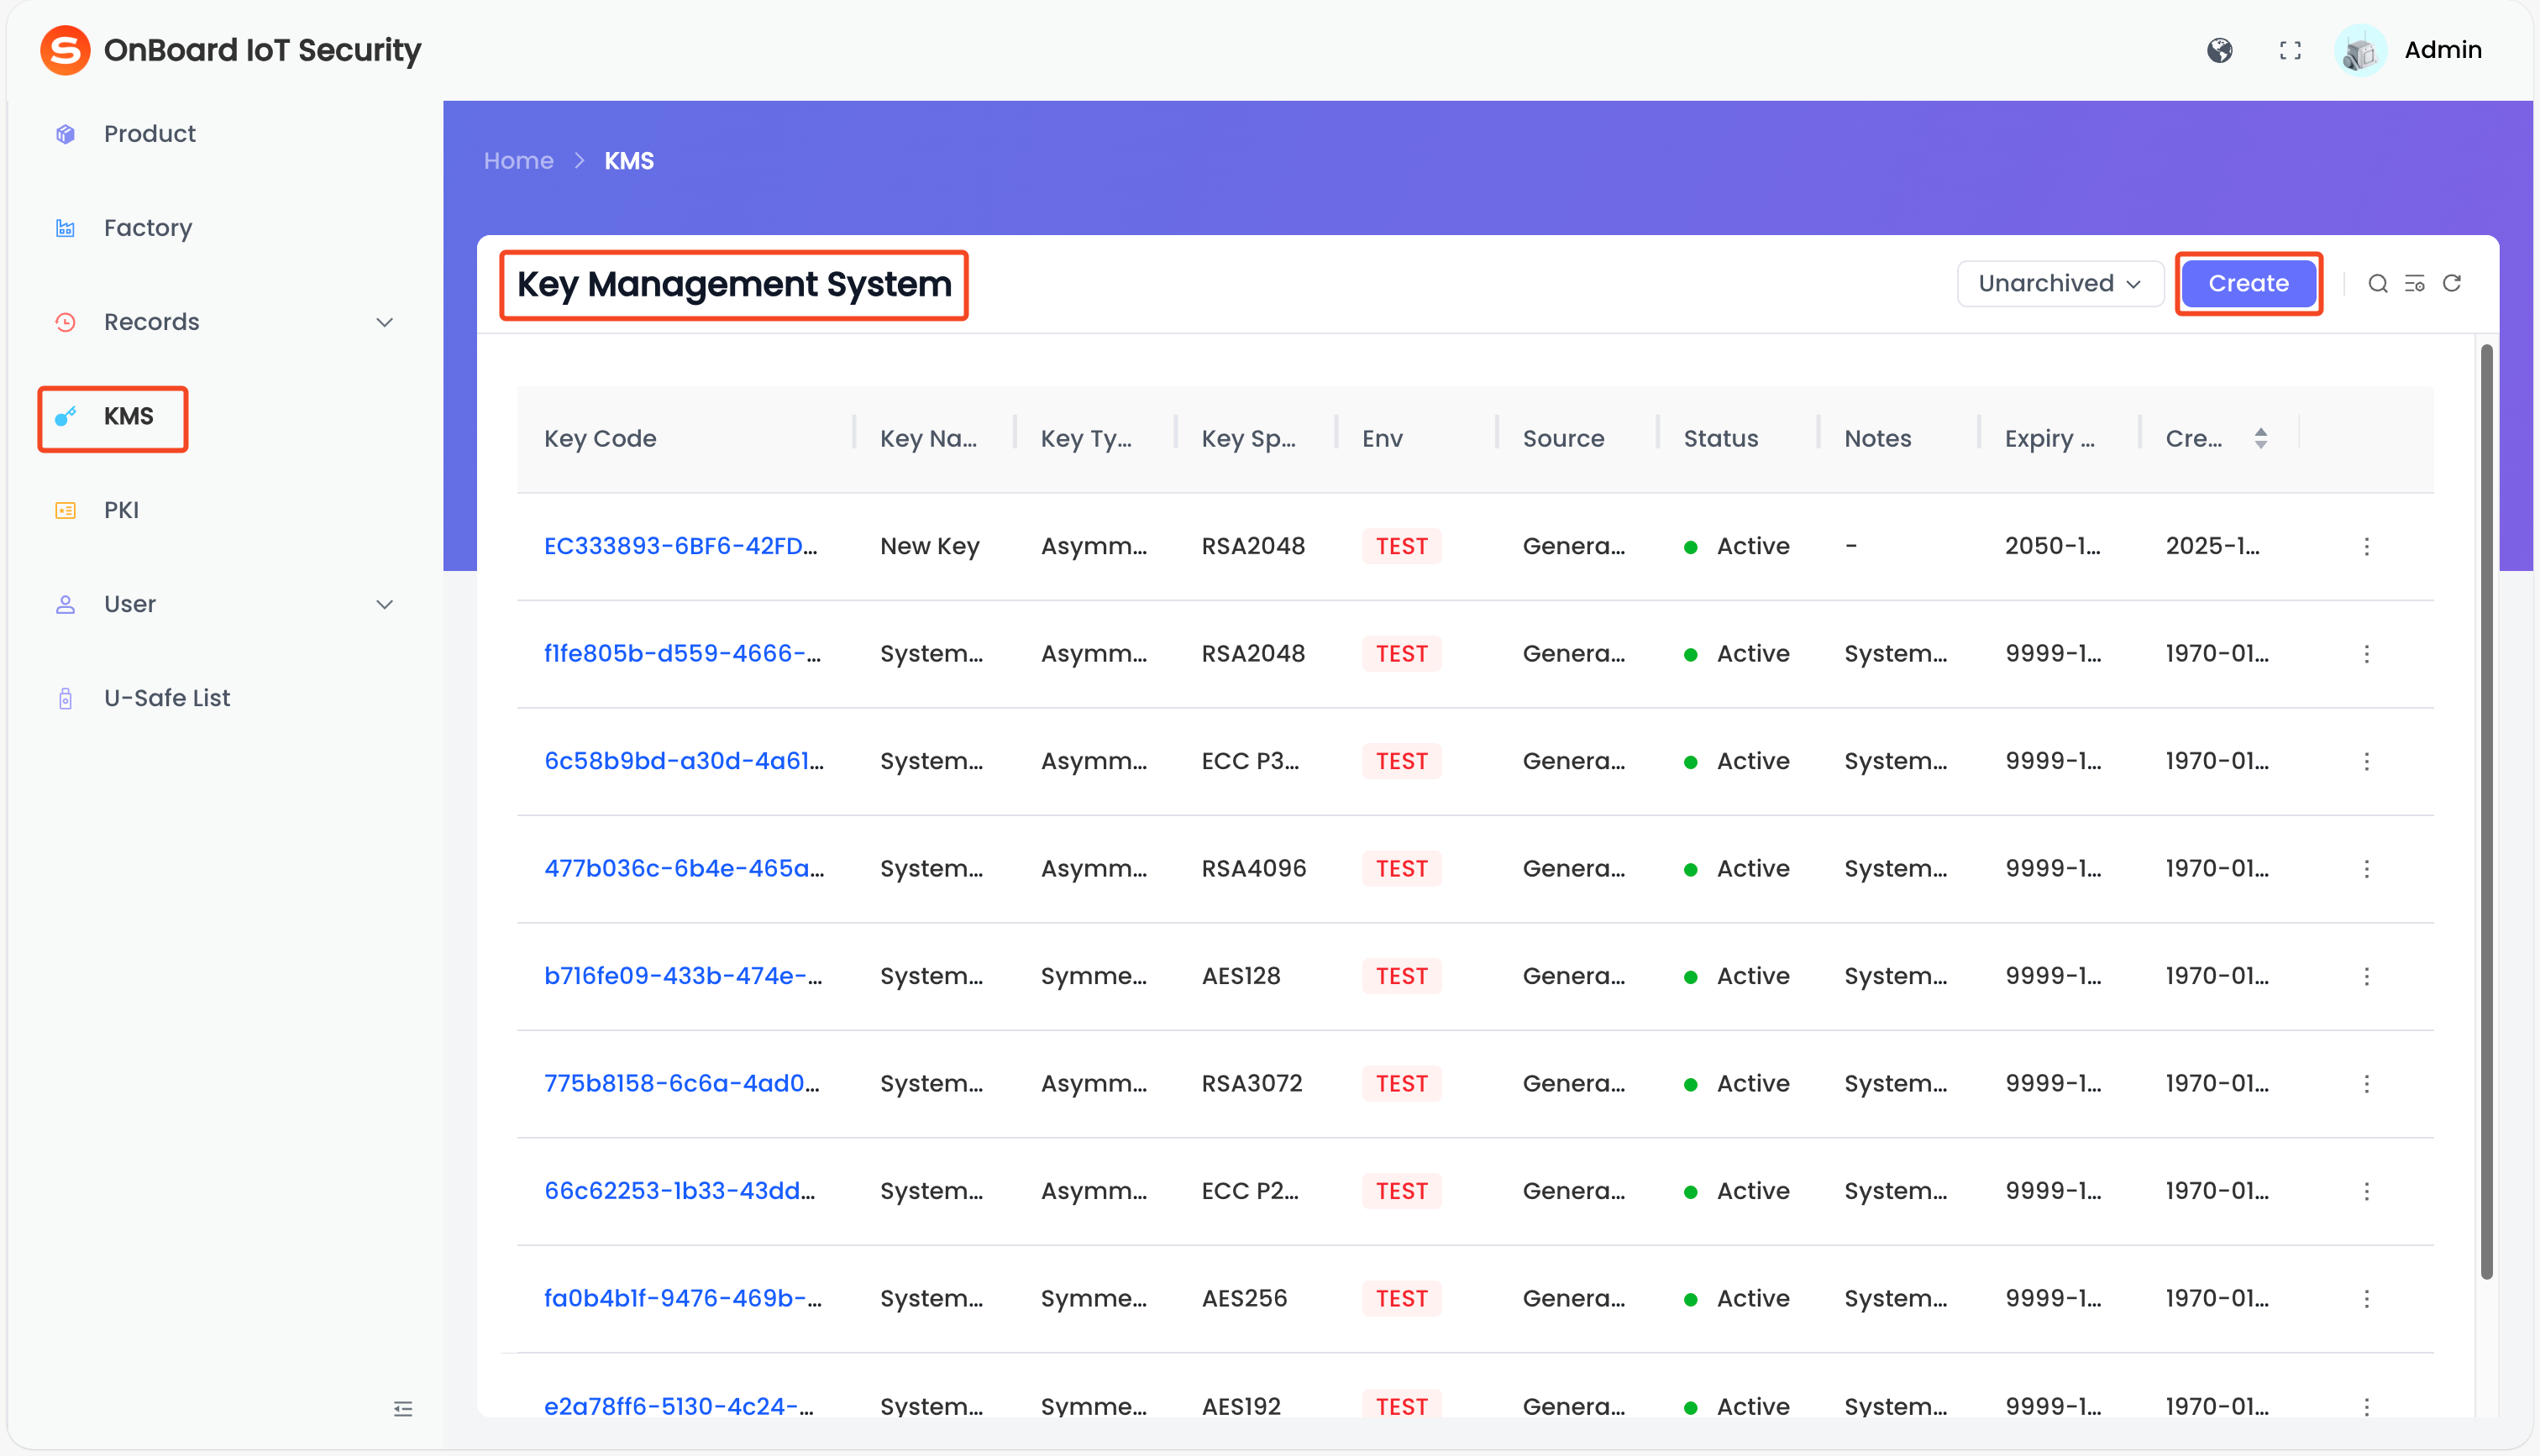
Step one: Configure the basic information
-
On the Create Key page, select and enter the key basic information.
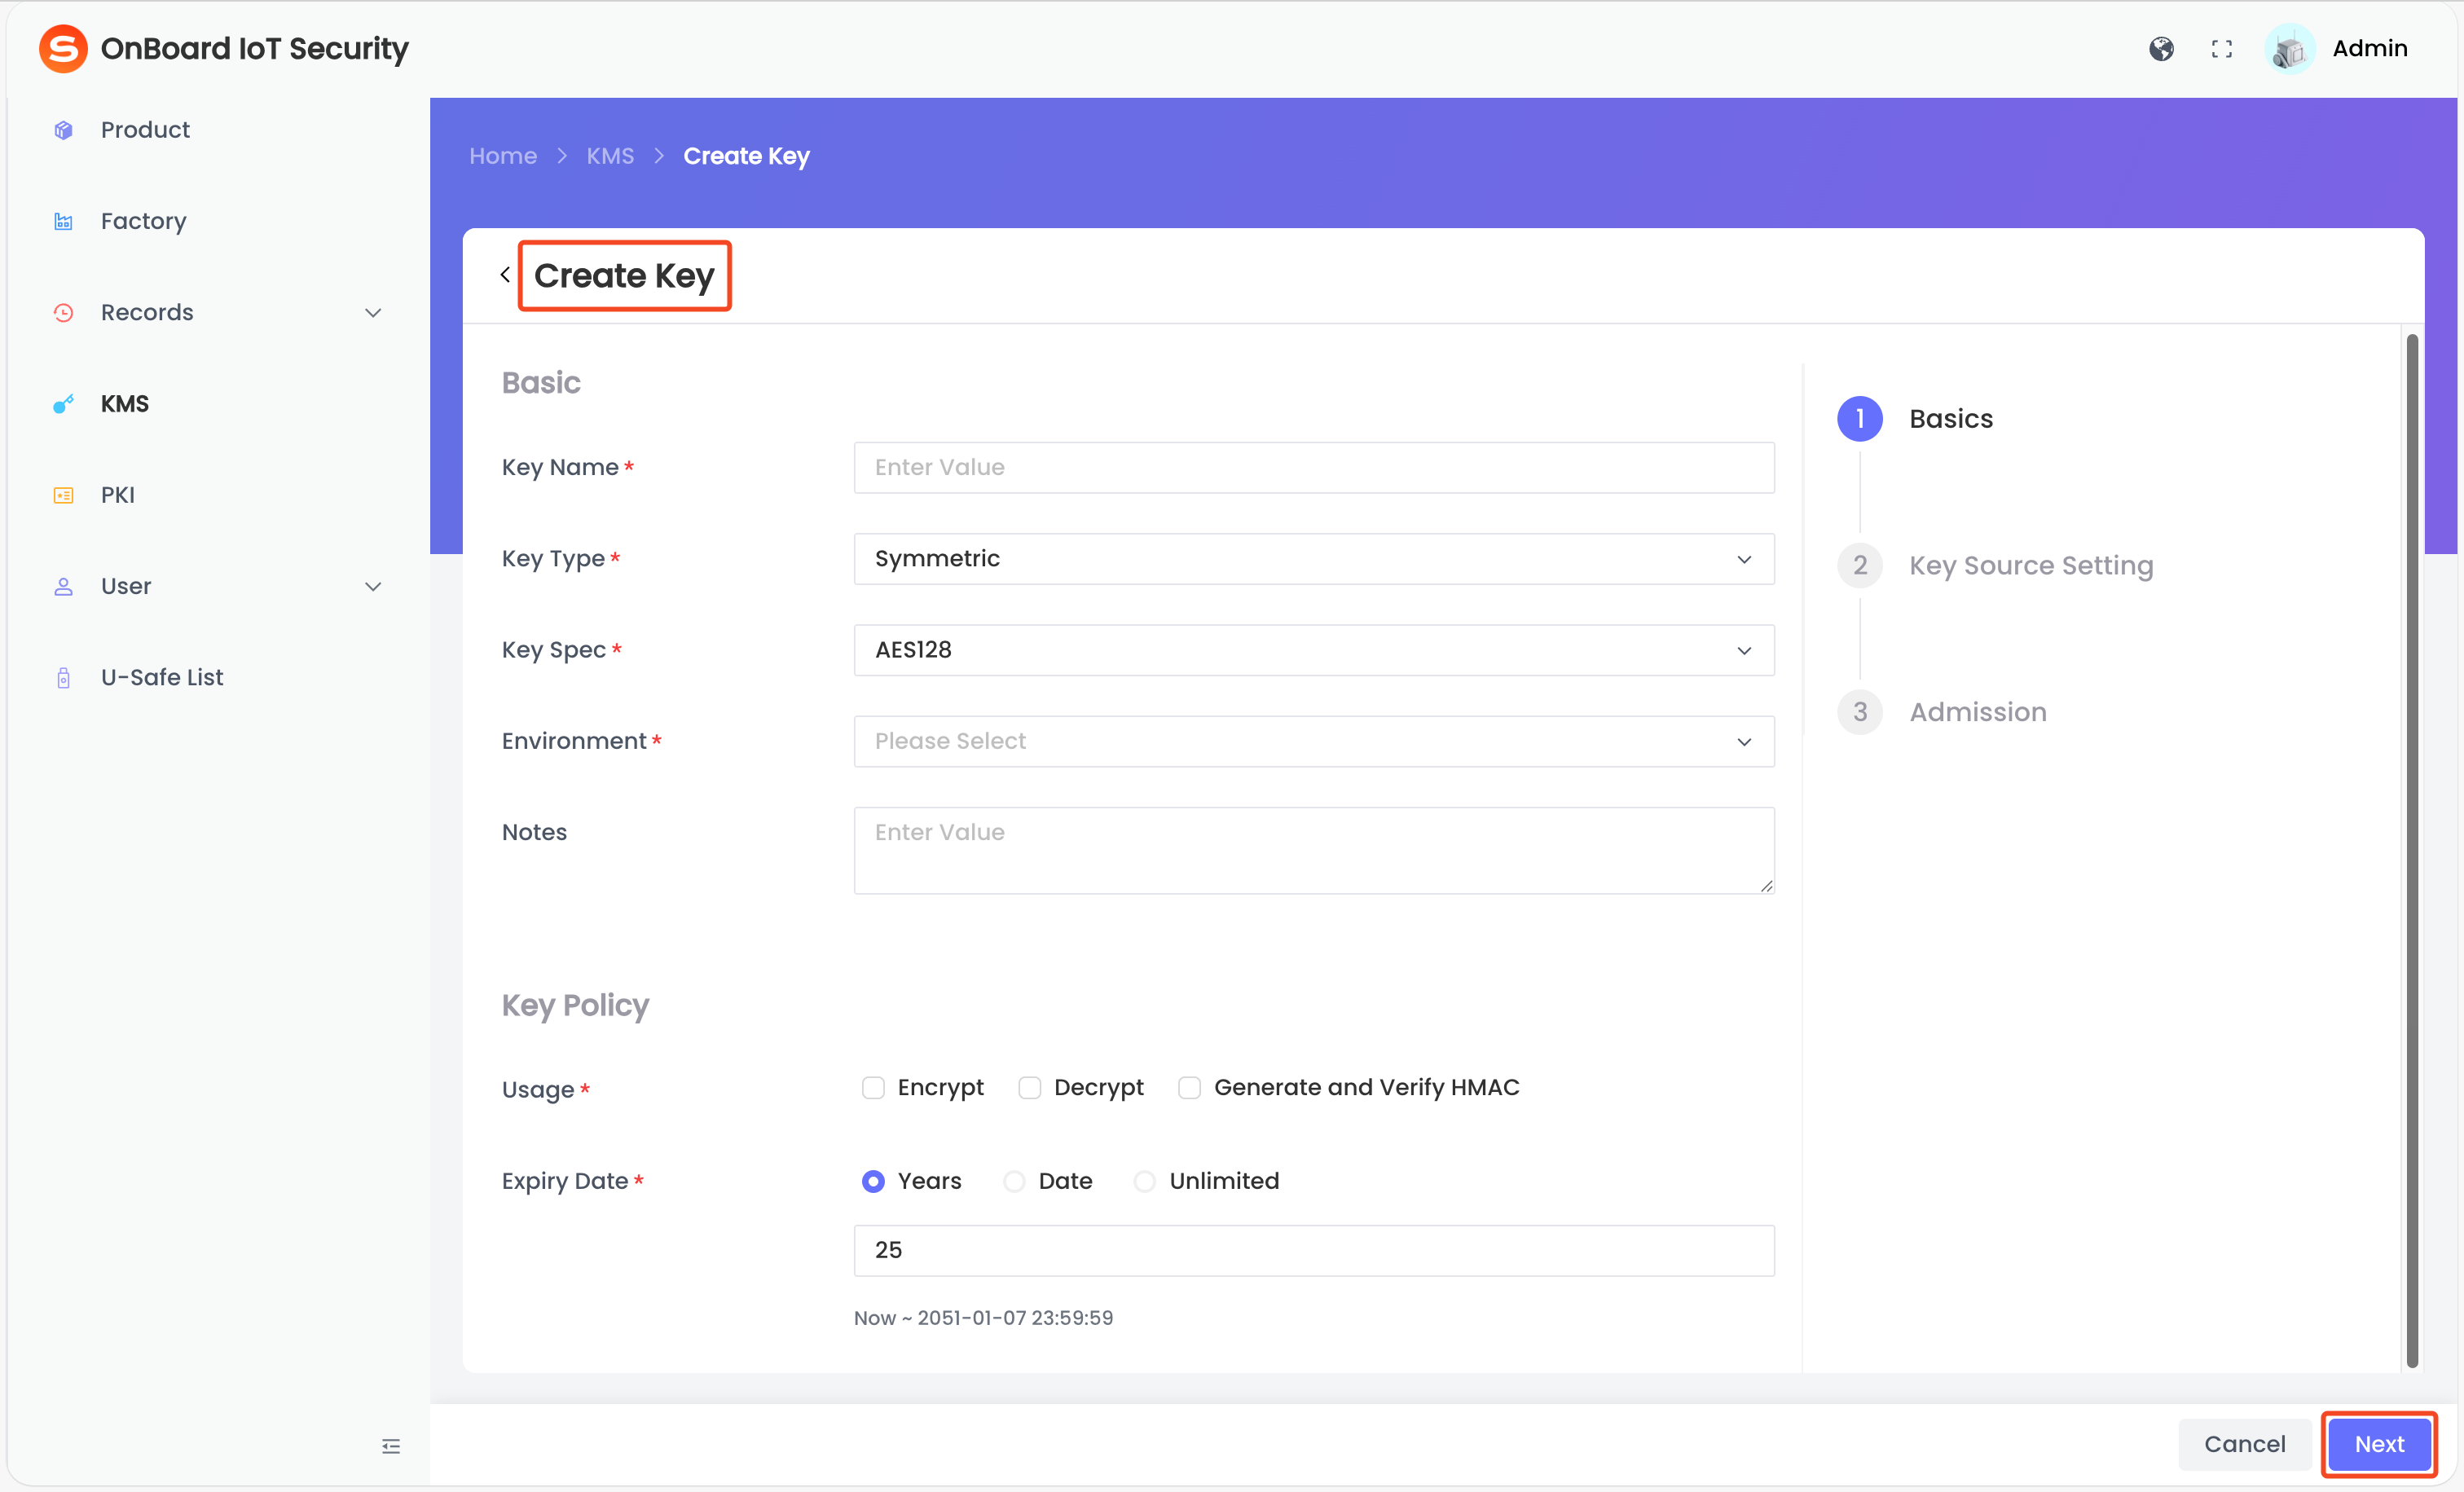
Description of key basic information:
Information Mandatory Description Key Name Yes The key name must be unique. Key Type Yes Two key types can be selected: Symmetric and Asymmetric. Key Spec Yes Select encryption algorithms for symmetric and asymmetric keys: - Symmetric key: AES128, AES192, or AES256
- Asymmetric key: RSA2048, RSA3072, RSA4096, ECC P256, or ECC P384
Environment Yes Two environments can be selected: TEST and PROD. Notes No Provide additional information related to the key, such as special requirements and important notes. Usage Yes Limit the operations the key is allowed to perform (multiple selections allowed): - Sign: Allows the use of an asymmetric key to generate digital signatures.
- Verify: Allow the use of an asymmetric key to verify digital signatures.
- Encrypt: Allow the use of a symmetric or asymmetric key to encrypt data.
- Decrypt: Allow the use of a symmetric or asymmetric key to decrypt data.
- Generate and Verify HMAC: Allows the use of a symmetric key to generate and verify message authentication codes to ensure data integrity.
Expiry Date Yes Set the expiry date of the key. -
After verifying that the basic information is correct, click Next to navigate to the Key Source Setting page.
Step two: Configure the key source
On the Key Source Setting page, you can click Skip to temporarily bypass key source configuration and proceed directly to configure the key admission. Before the key source configuration is completed, the key will remain in the Pending status and can't be used.
If you select to skip the key source configuration, you can configure it later by selecting the corresponding key on the Key Management System page. On the key page, click the link in the prompt to complete these final steps.
Symmetric key
- Generated by System
- Import Key
- BYOK AK/SK
- BYOK AWS Account Role
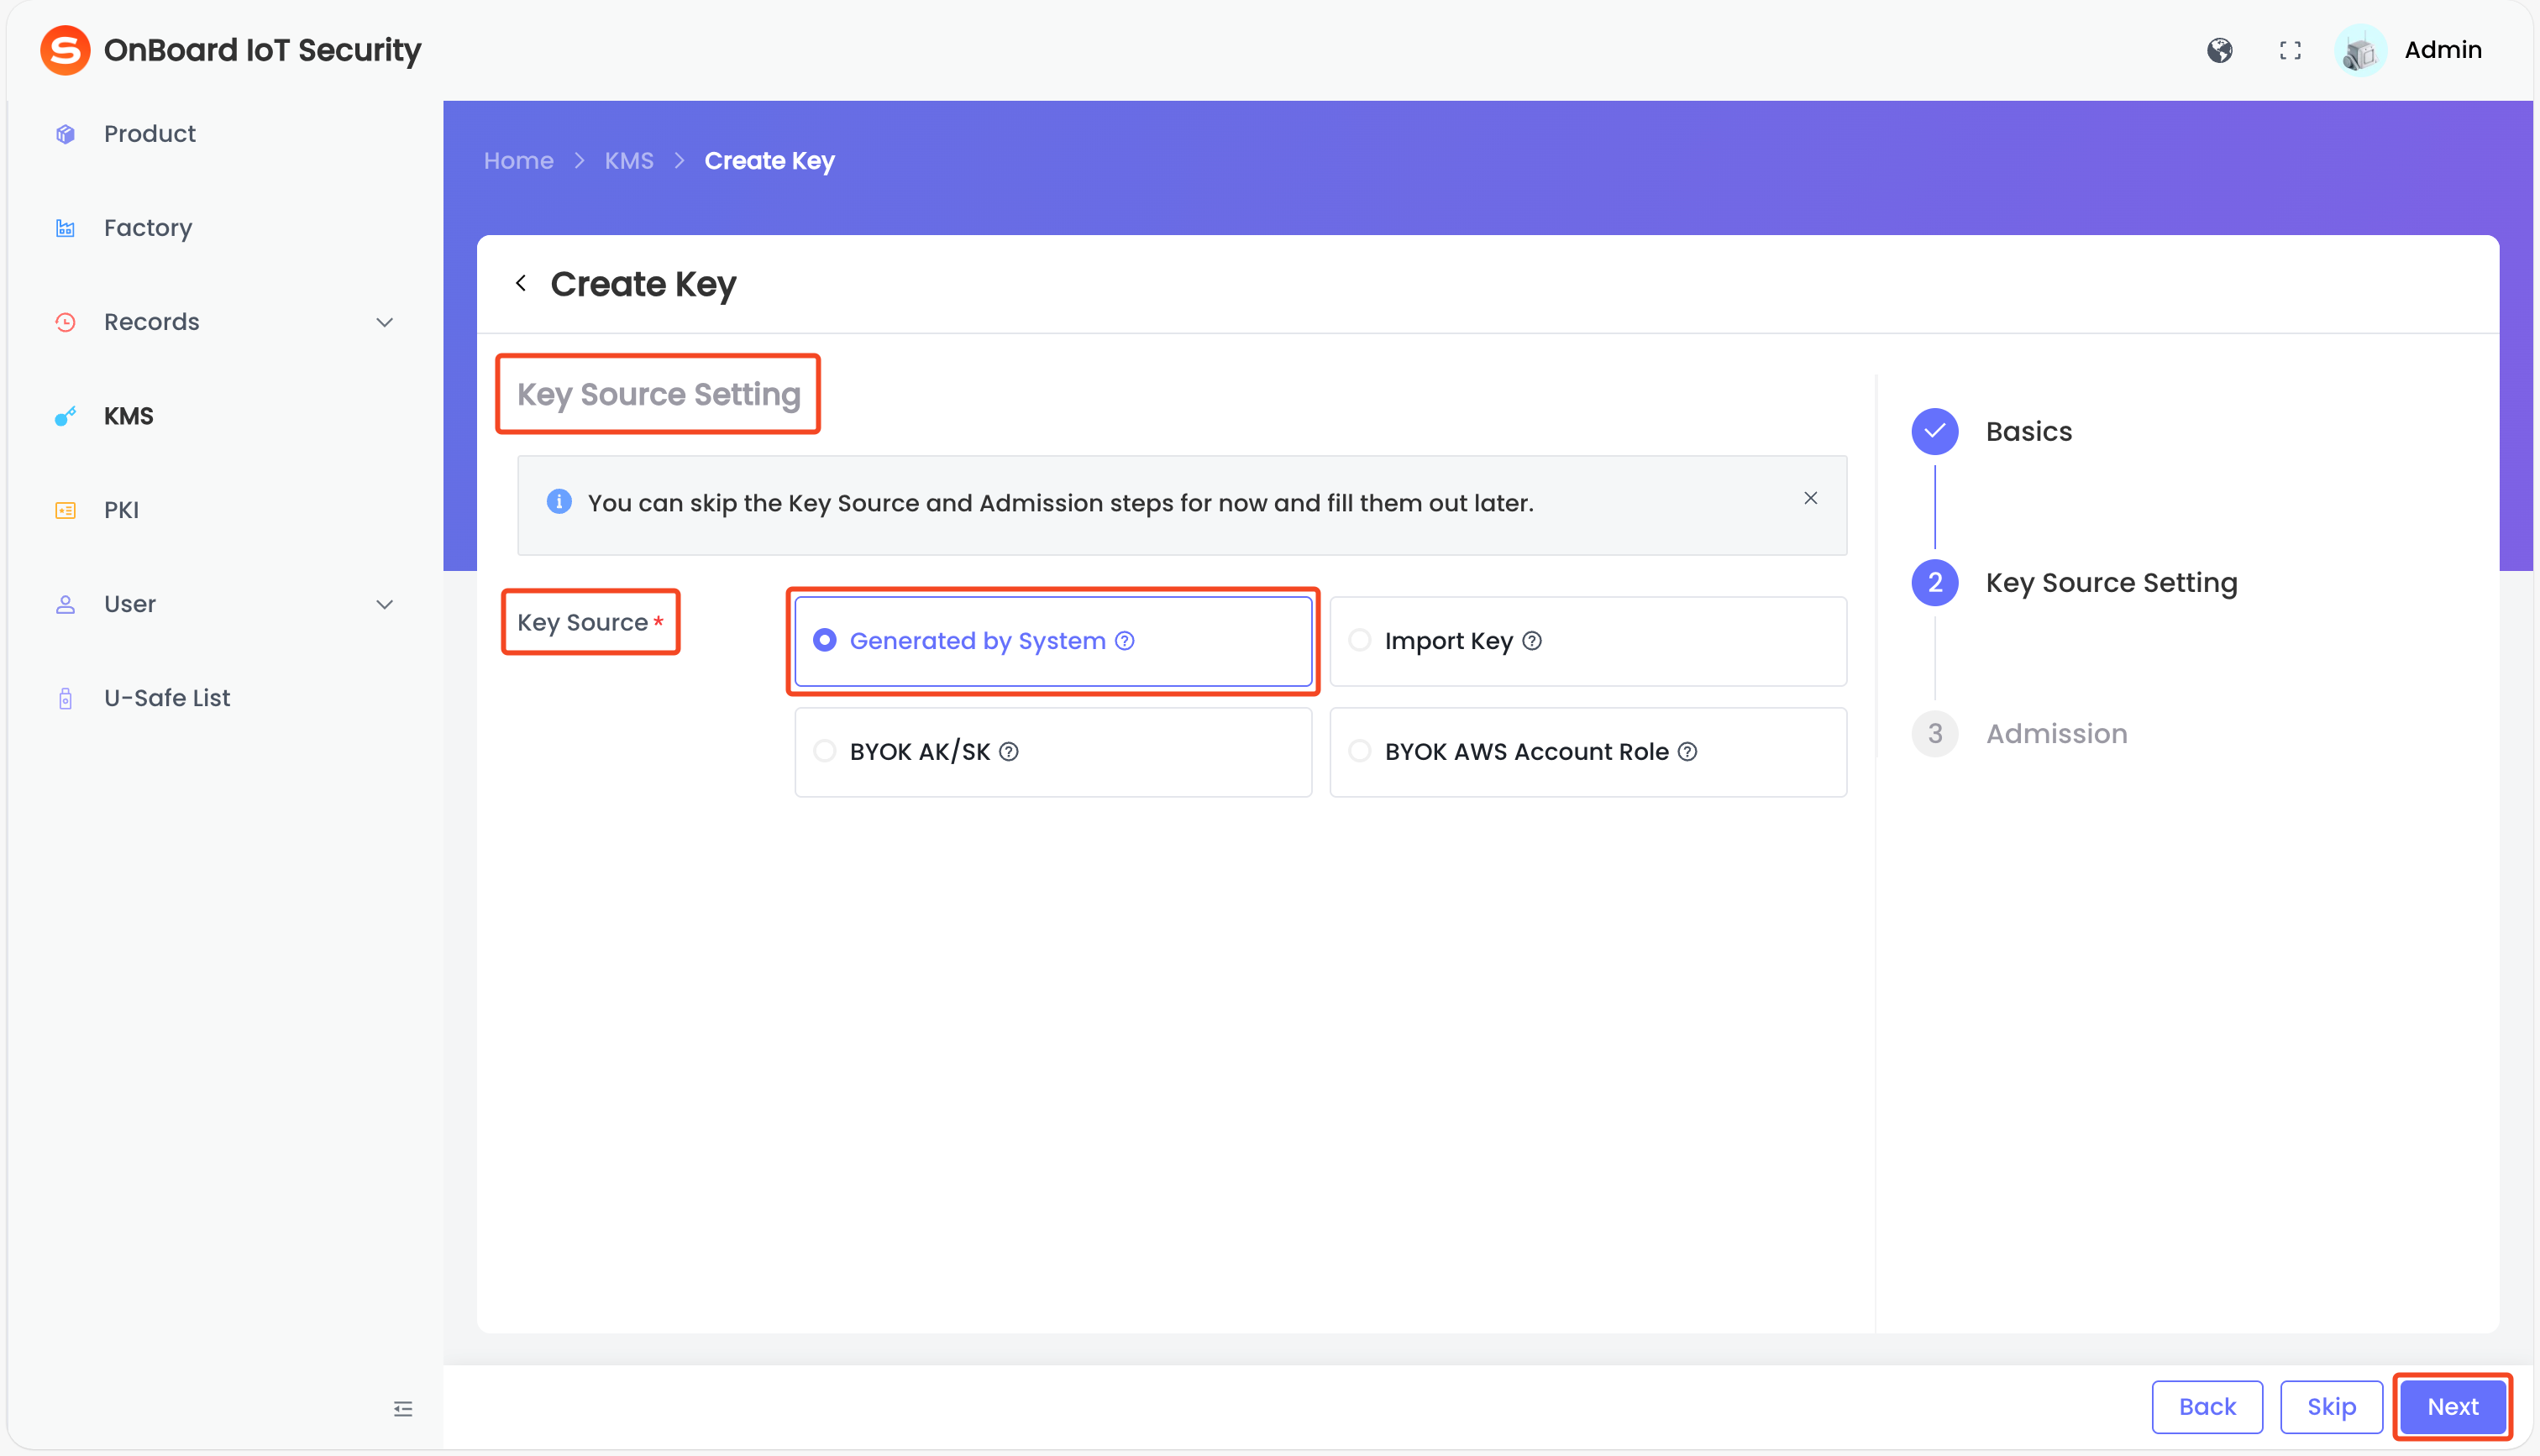
The system securely generates a random key pair inside a Hardware Security Module (HSM).
On the Key Source Setting page, select Generated by System in the Key Source area, and then click Next to navigate to the Admission page.
Manually upload an existing symmetric key generated outside the system.
-
On the Key Source Setting page, select Import Key in the Key Source area. Select the encryption method and key algorithm.
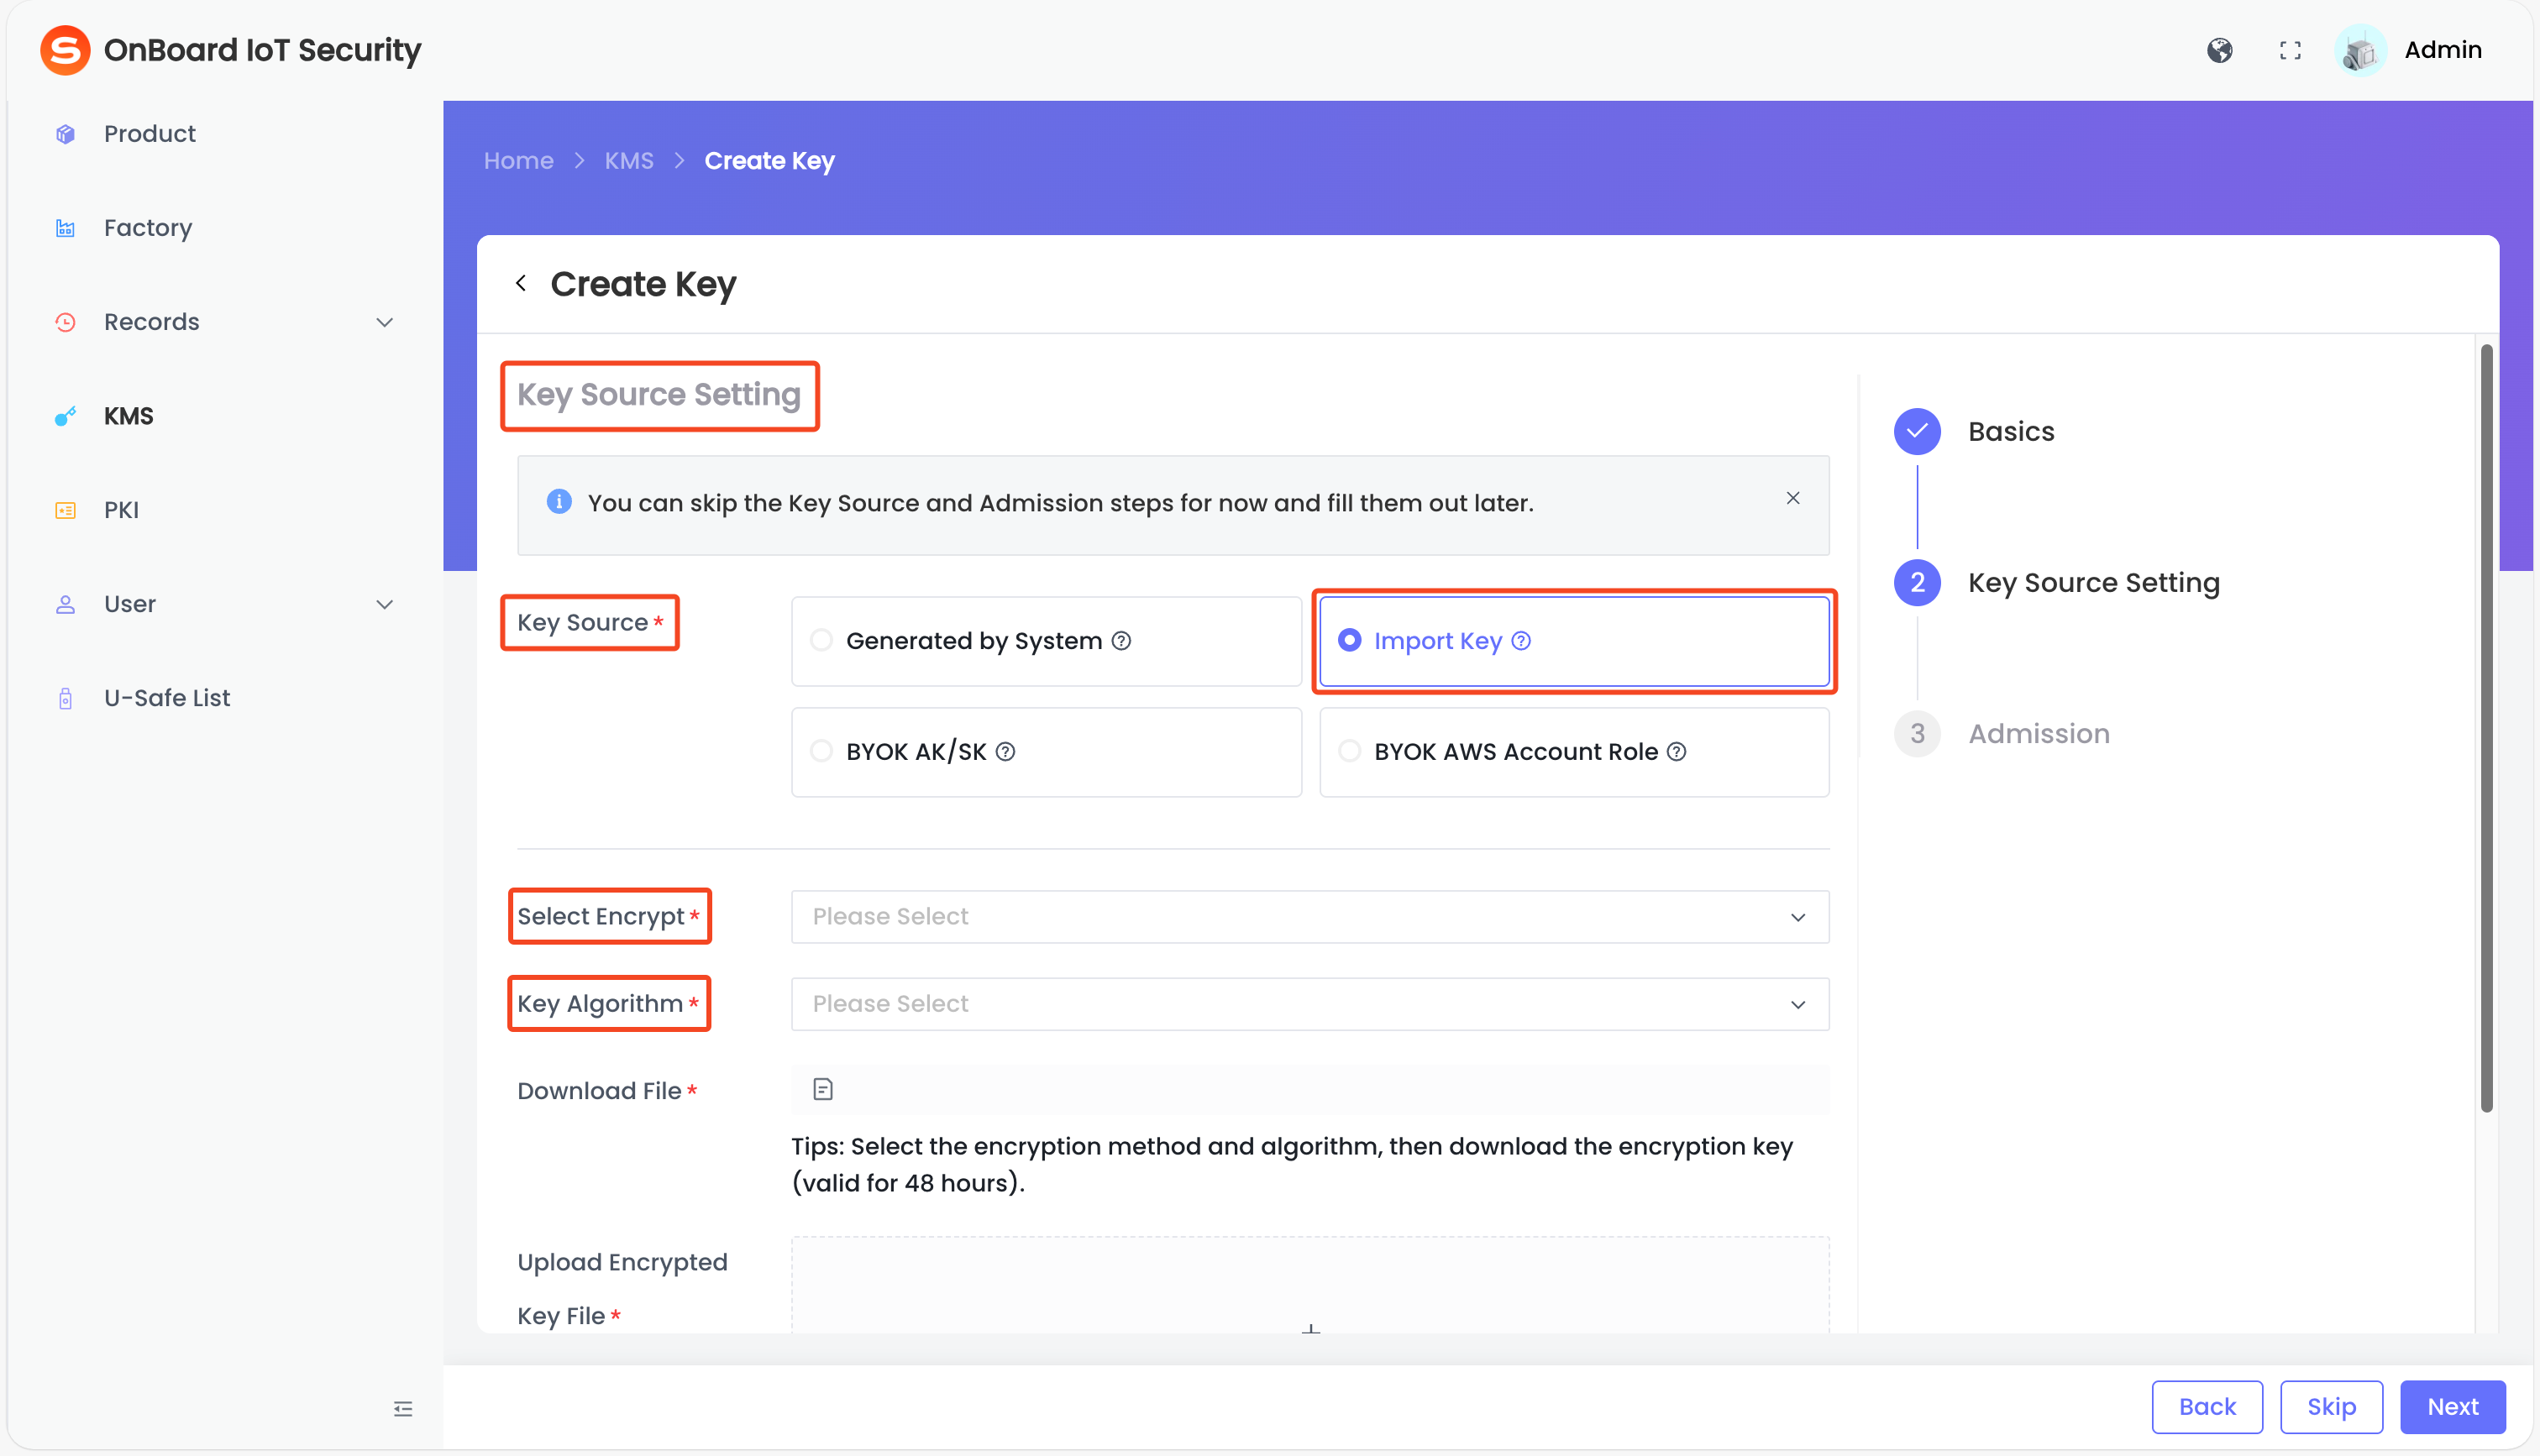
Description of Import Key information:
Information Mandatory Description Select Encrypt Yes Select the encryption algorithm. Currently, only RSA_2048 is supported, which provides a baseline level of security and is suitable for scenarios such as key encryption and digital signatures. Key Algorithm Yes Select the key algorithm: - RSA_AES_KEY_WRAP_SHA_1
- RSA_AES_KEY_WRAP_SHA_256
-
Click the Download
 icon to download the encryption key file.
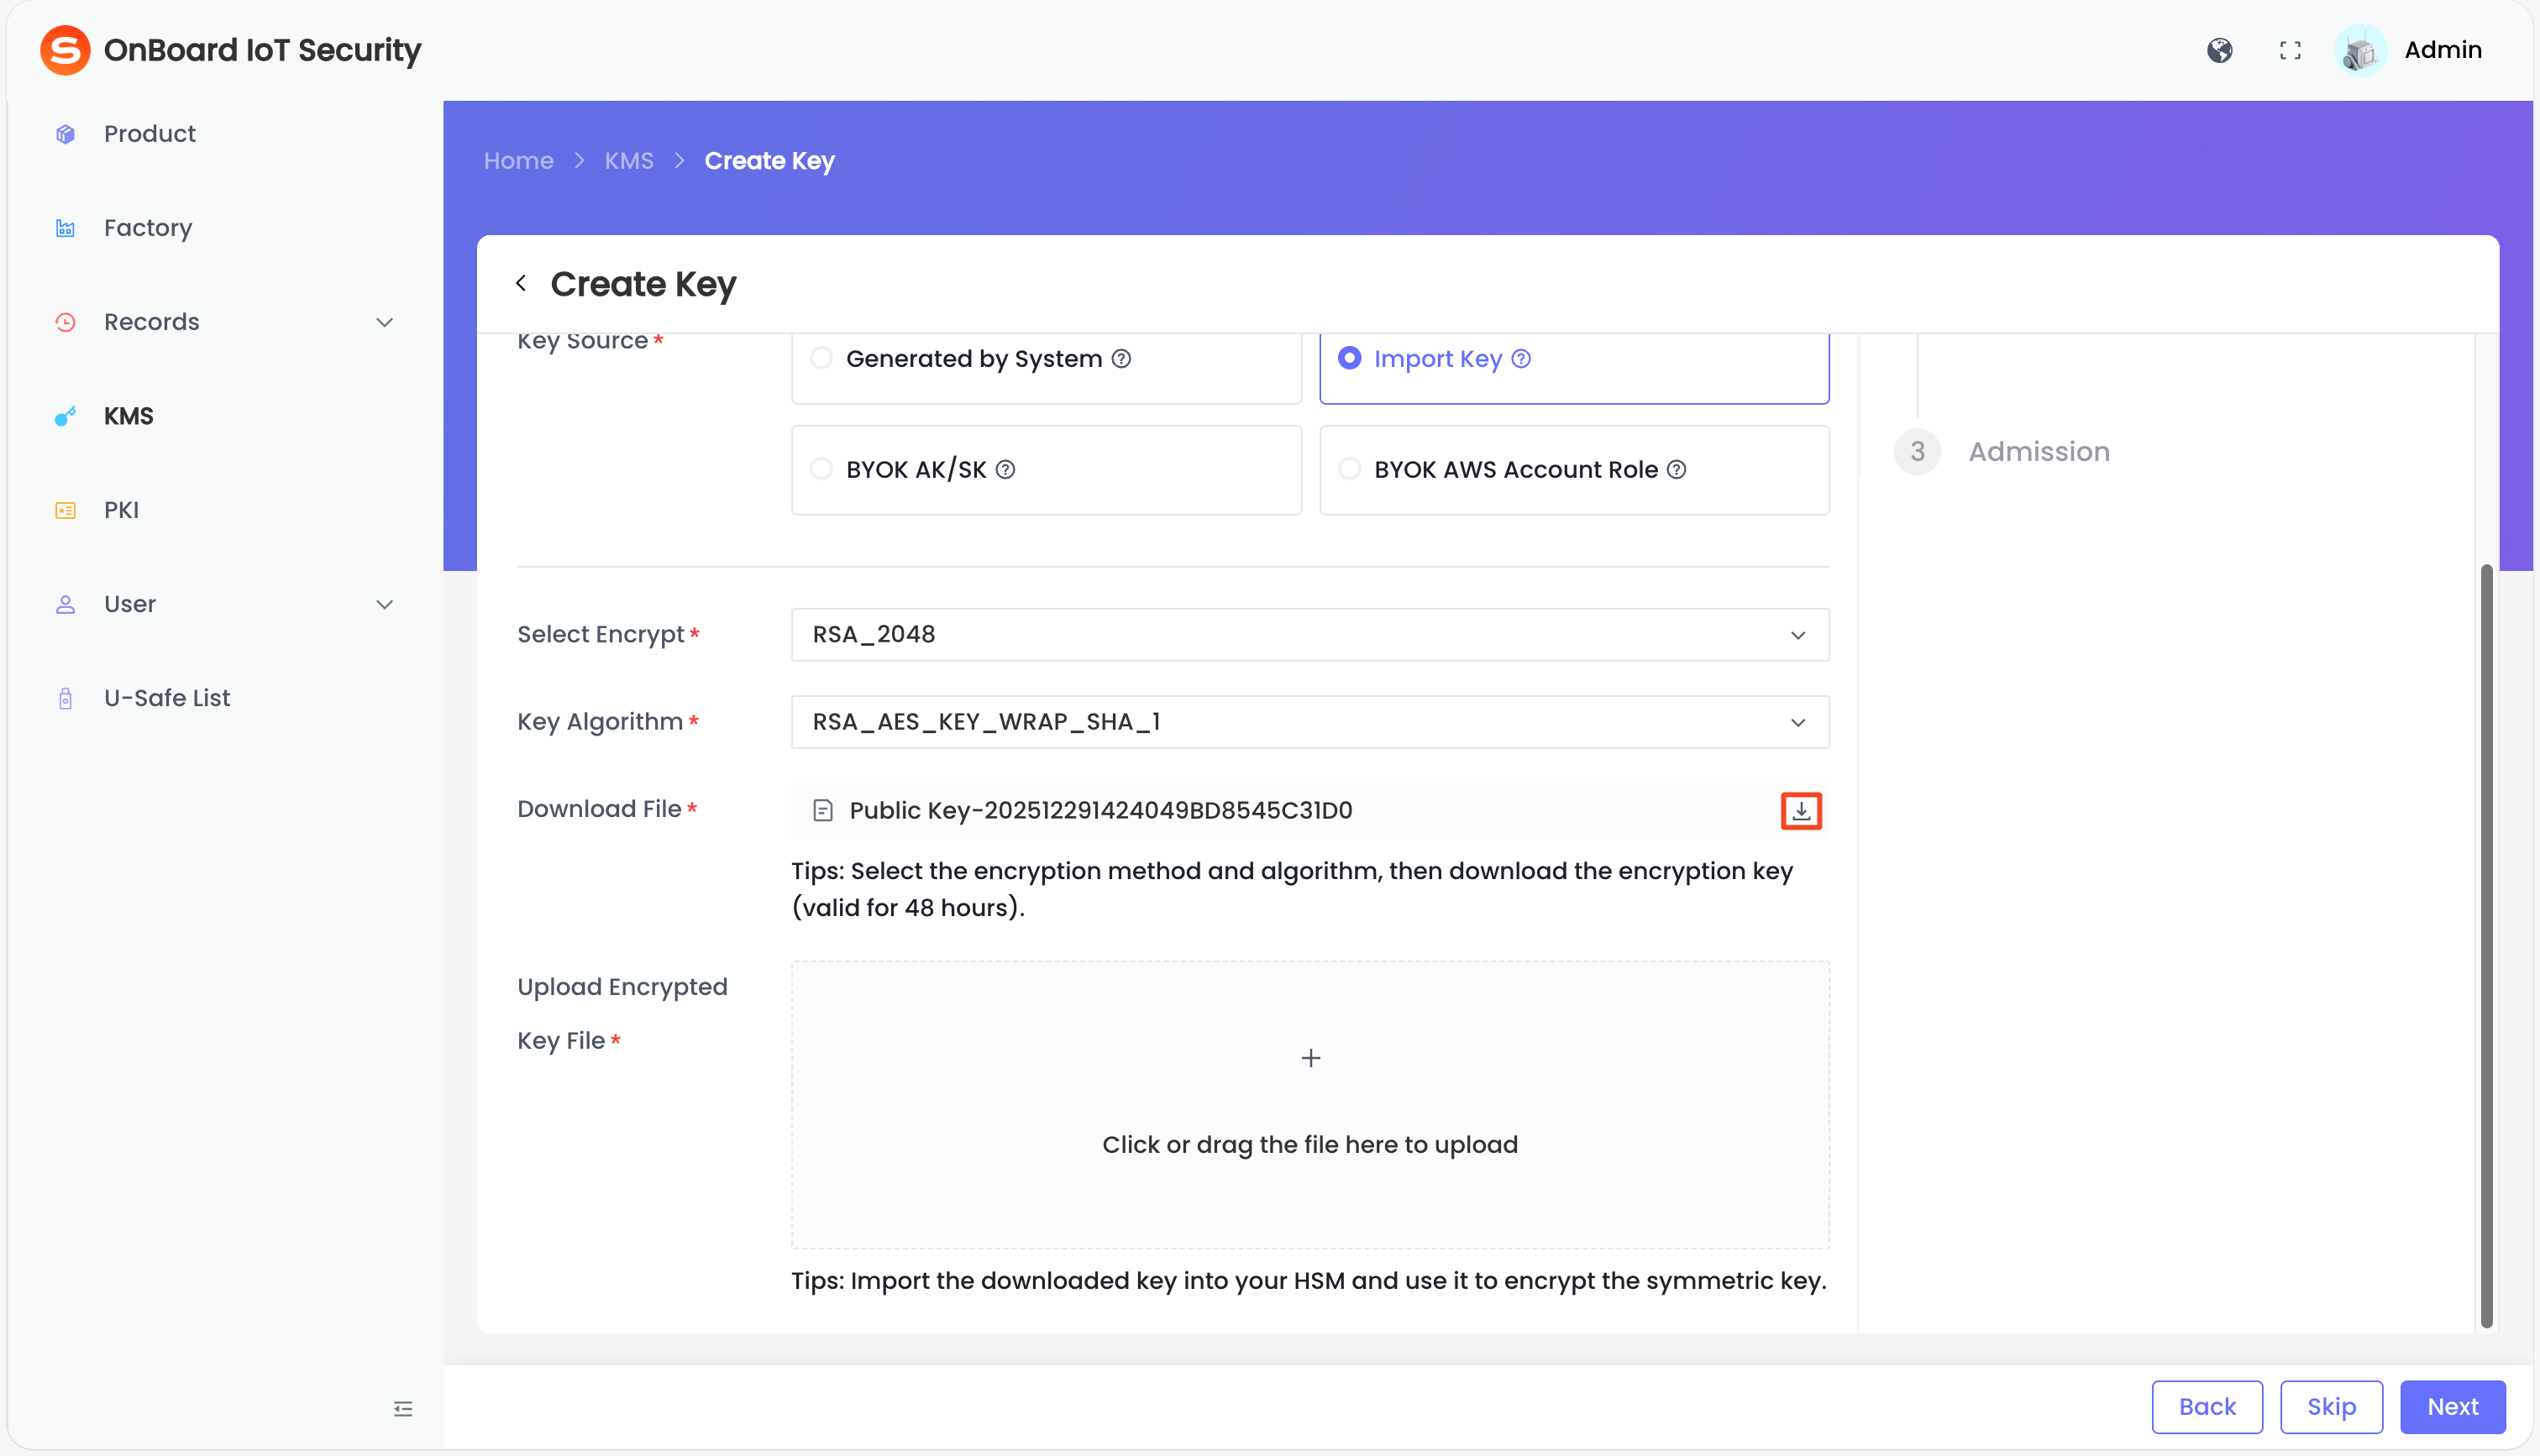
-
Import the downloaded encryption key into your HSM and use it to encrypt the symmetric key.
-
After the symmetric key is encrypted, select and upload the encrypted key file in .json format in the Upload Encrypted Key File area.
-
After verifying that the information is correct, click Next to navigate to the Admission page.
Access external keys from third-party KMS using Access Key and Secret Key credentials.
-
On the Key Source Setting page, select BYOK AK/SK in the Key Source area, and then enter the key-related information.
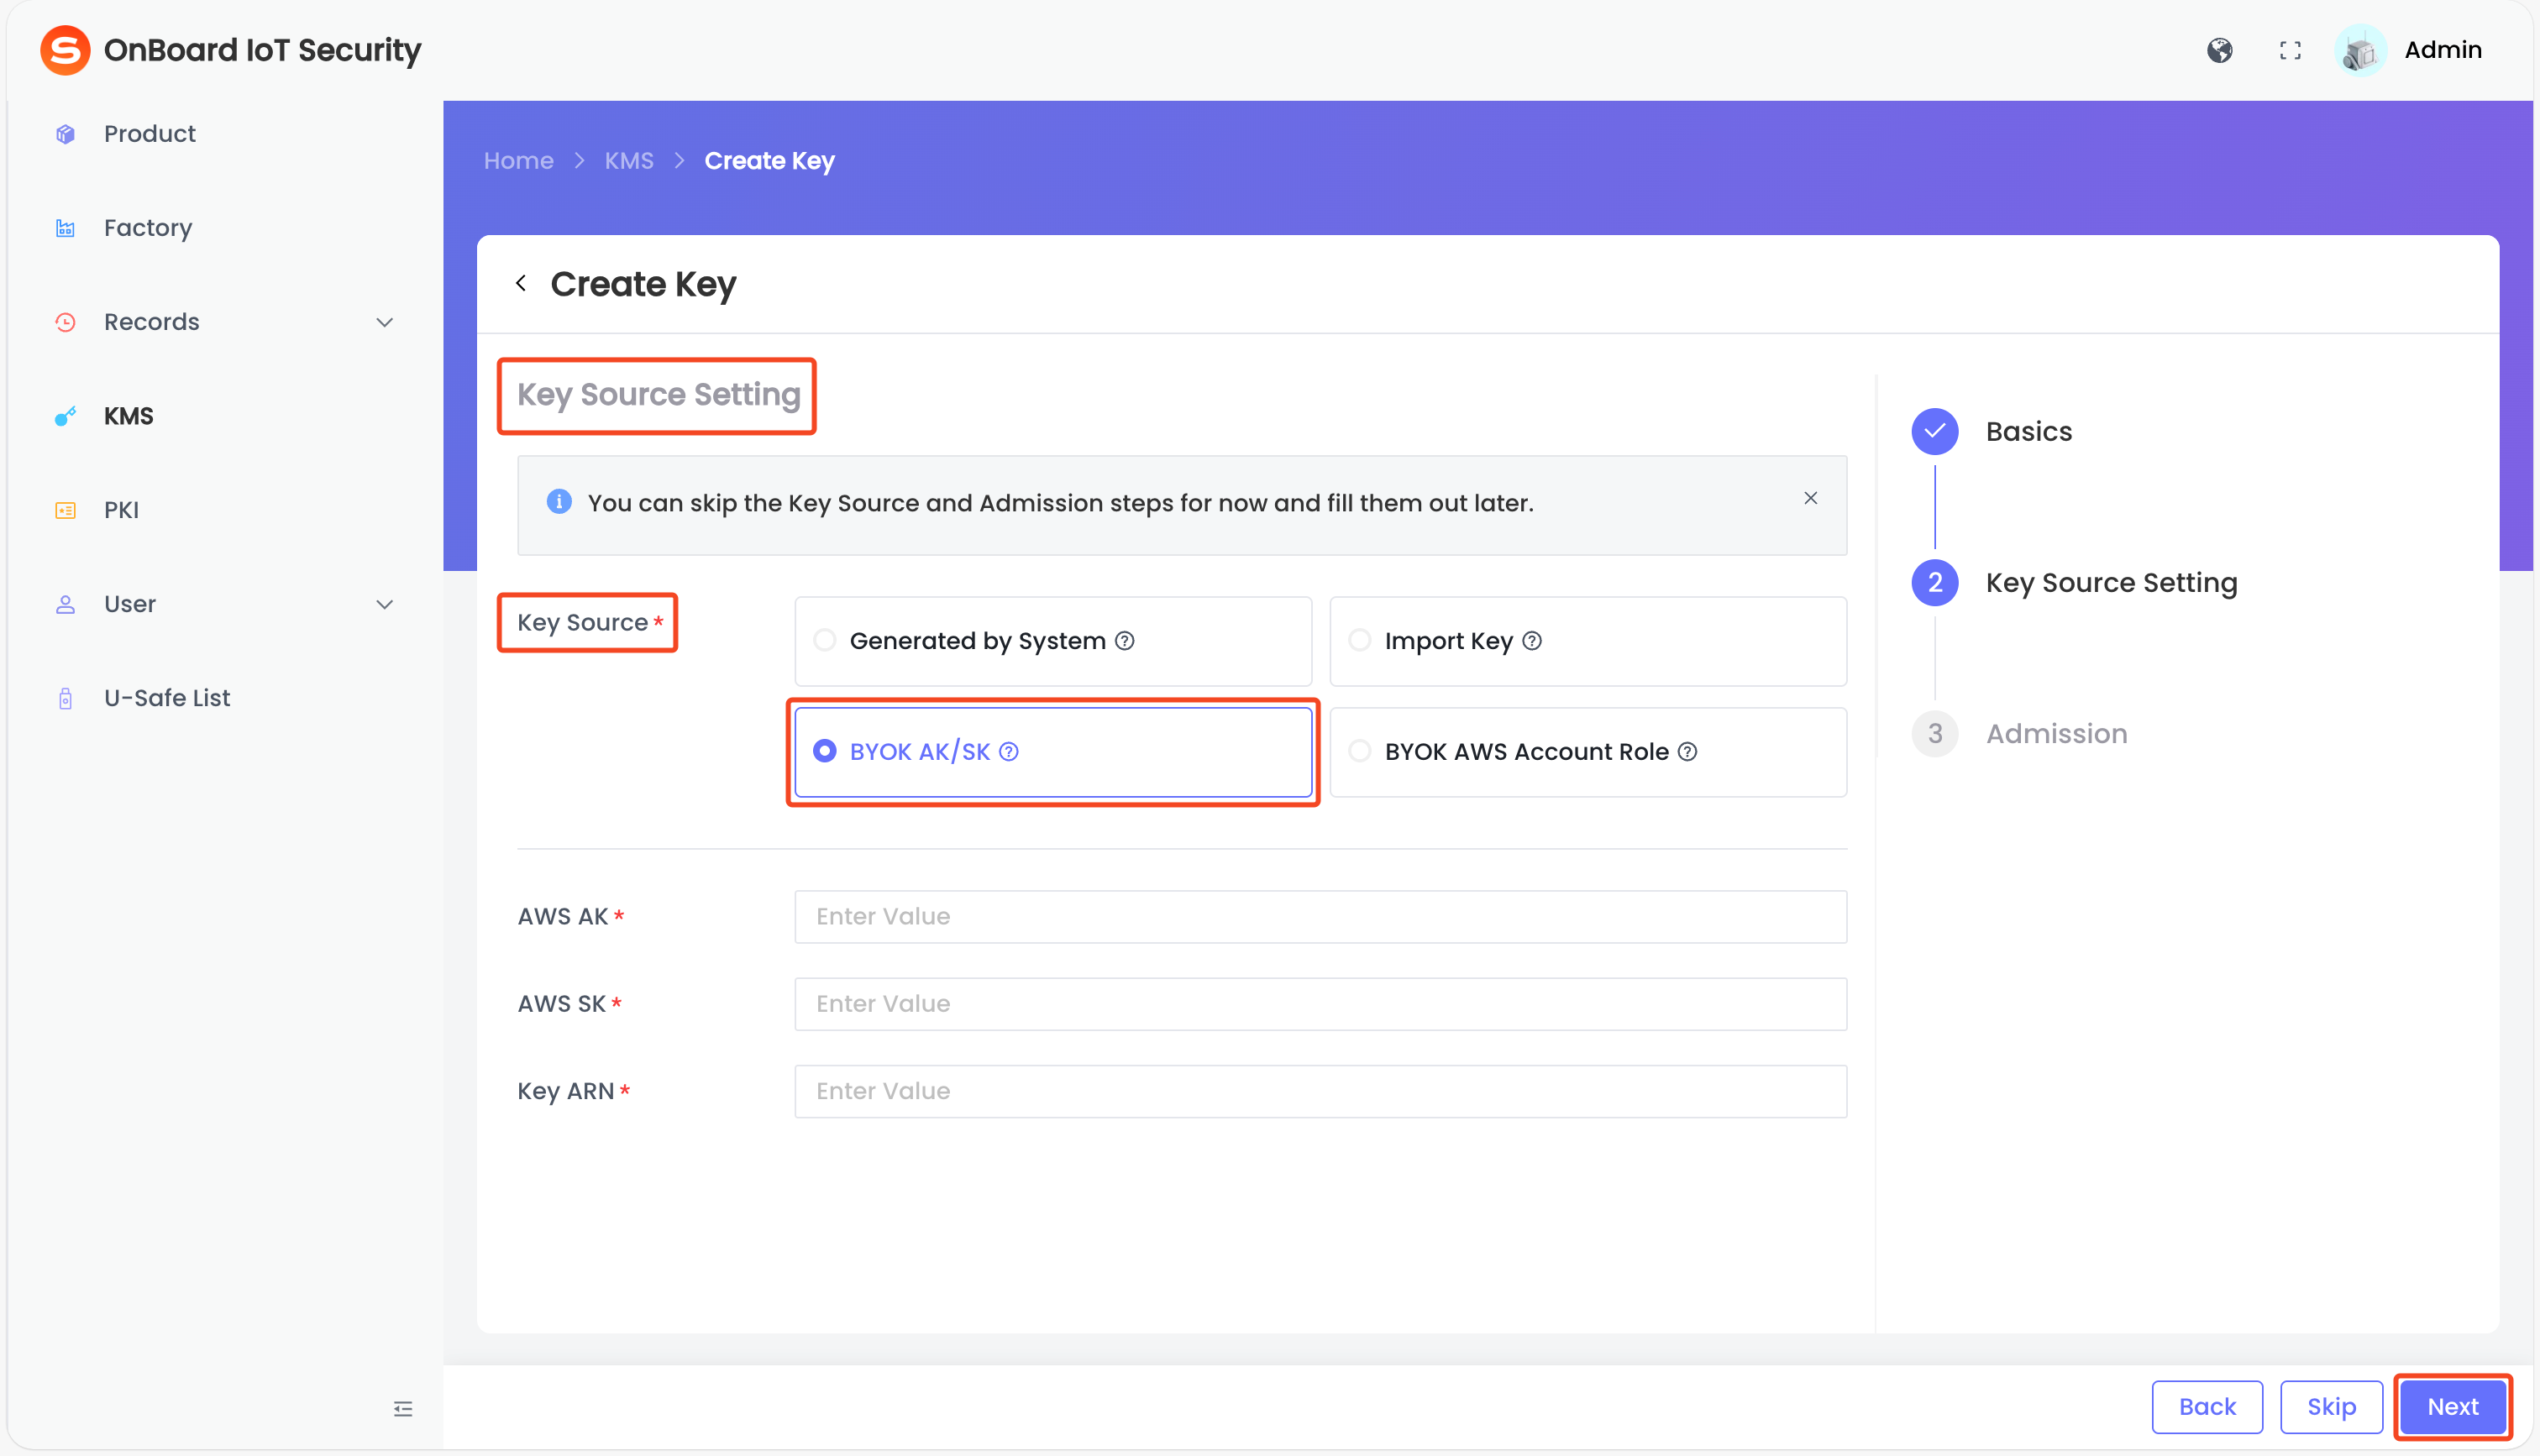
Description of AWS AK/SK information:
Information Mandatory Description AWS AK Yes AK (Access Key ID): - Identity identifier: Uniquely identifies a user in AWS IAM (Identity and Access Management), similar to a username.
- Public attribute: Can be safely shared (for example, configured in code or the CLI), but must be used together with the SK to complete authentication.
AWS SK Yes SK (Secret Access Key): - Confidential credential: Used to generate request signatures and verify identity, similar to a password.
- Strict confidentiality: Disclosure may result in full account compromise and should be protected with the same care as a password.
Key ARN Yes ARN (Amazon Resource Name):
uniquely identifies an encryption key in AWS KMS, used for data encryption and decryption. -
After verifying that the information is correct, click Next to navigate to the Admission page.
Connect to AWS KMS using IAM Role-based access—secure and ideal for cloud-native deployments.
-
On the Key Source Setting page, select BYOK AWS Account Role in the Key Source area, and then enter the key-related information.
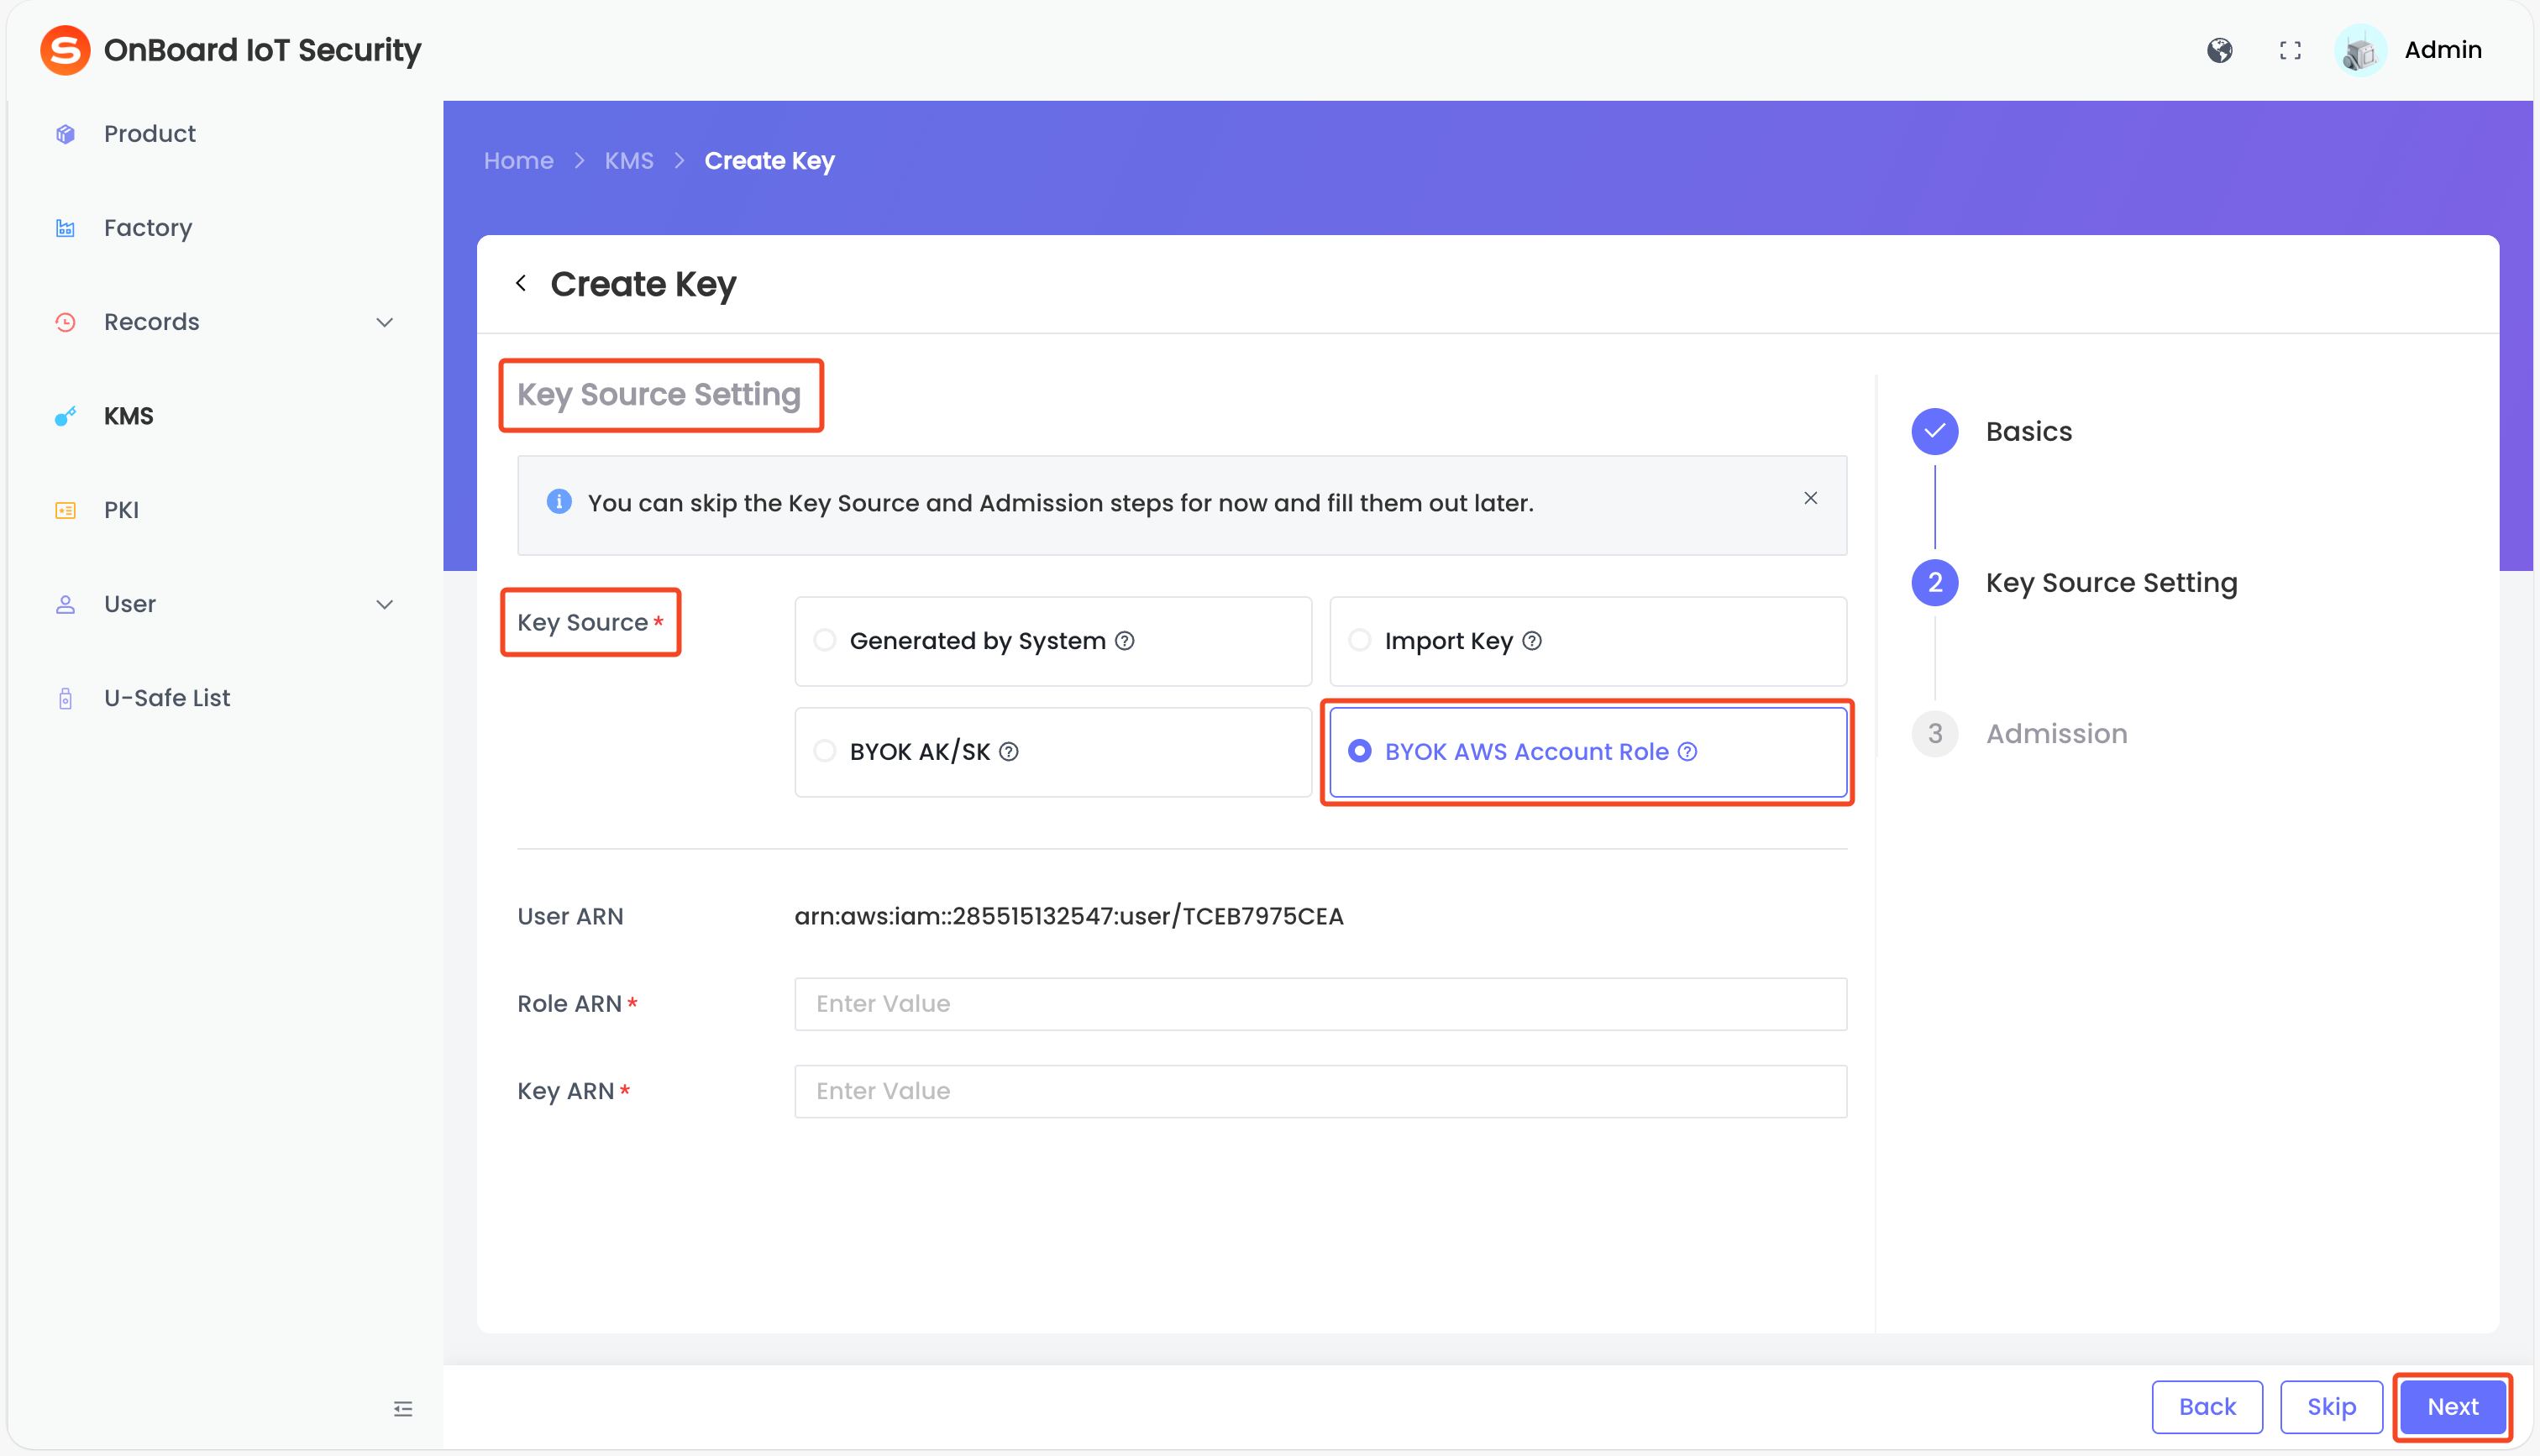
Description of AWS Account Role information:
Information Mandatory Description User ARN No Uniquely identifies a user in AWS IAM (such as an administrator or developer), used for permission assignment and resource access control. Role ARN Yes Uniquely identifies a role in AWS IAM, used for temporary permission assignment (such as cross-account access for EC2 instances or Lambda functions). Key ARN Yes Uniquely identifies an encryption key in AWS KMS, used for data encryption and decryption. -
After verifying that the information is correct, click Next to navigate to the Admission page.
Asymmetric key
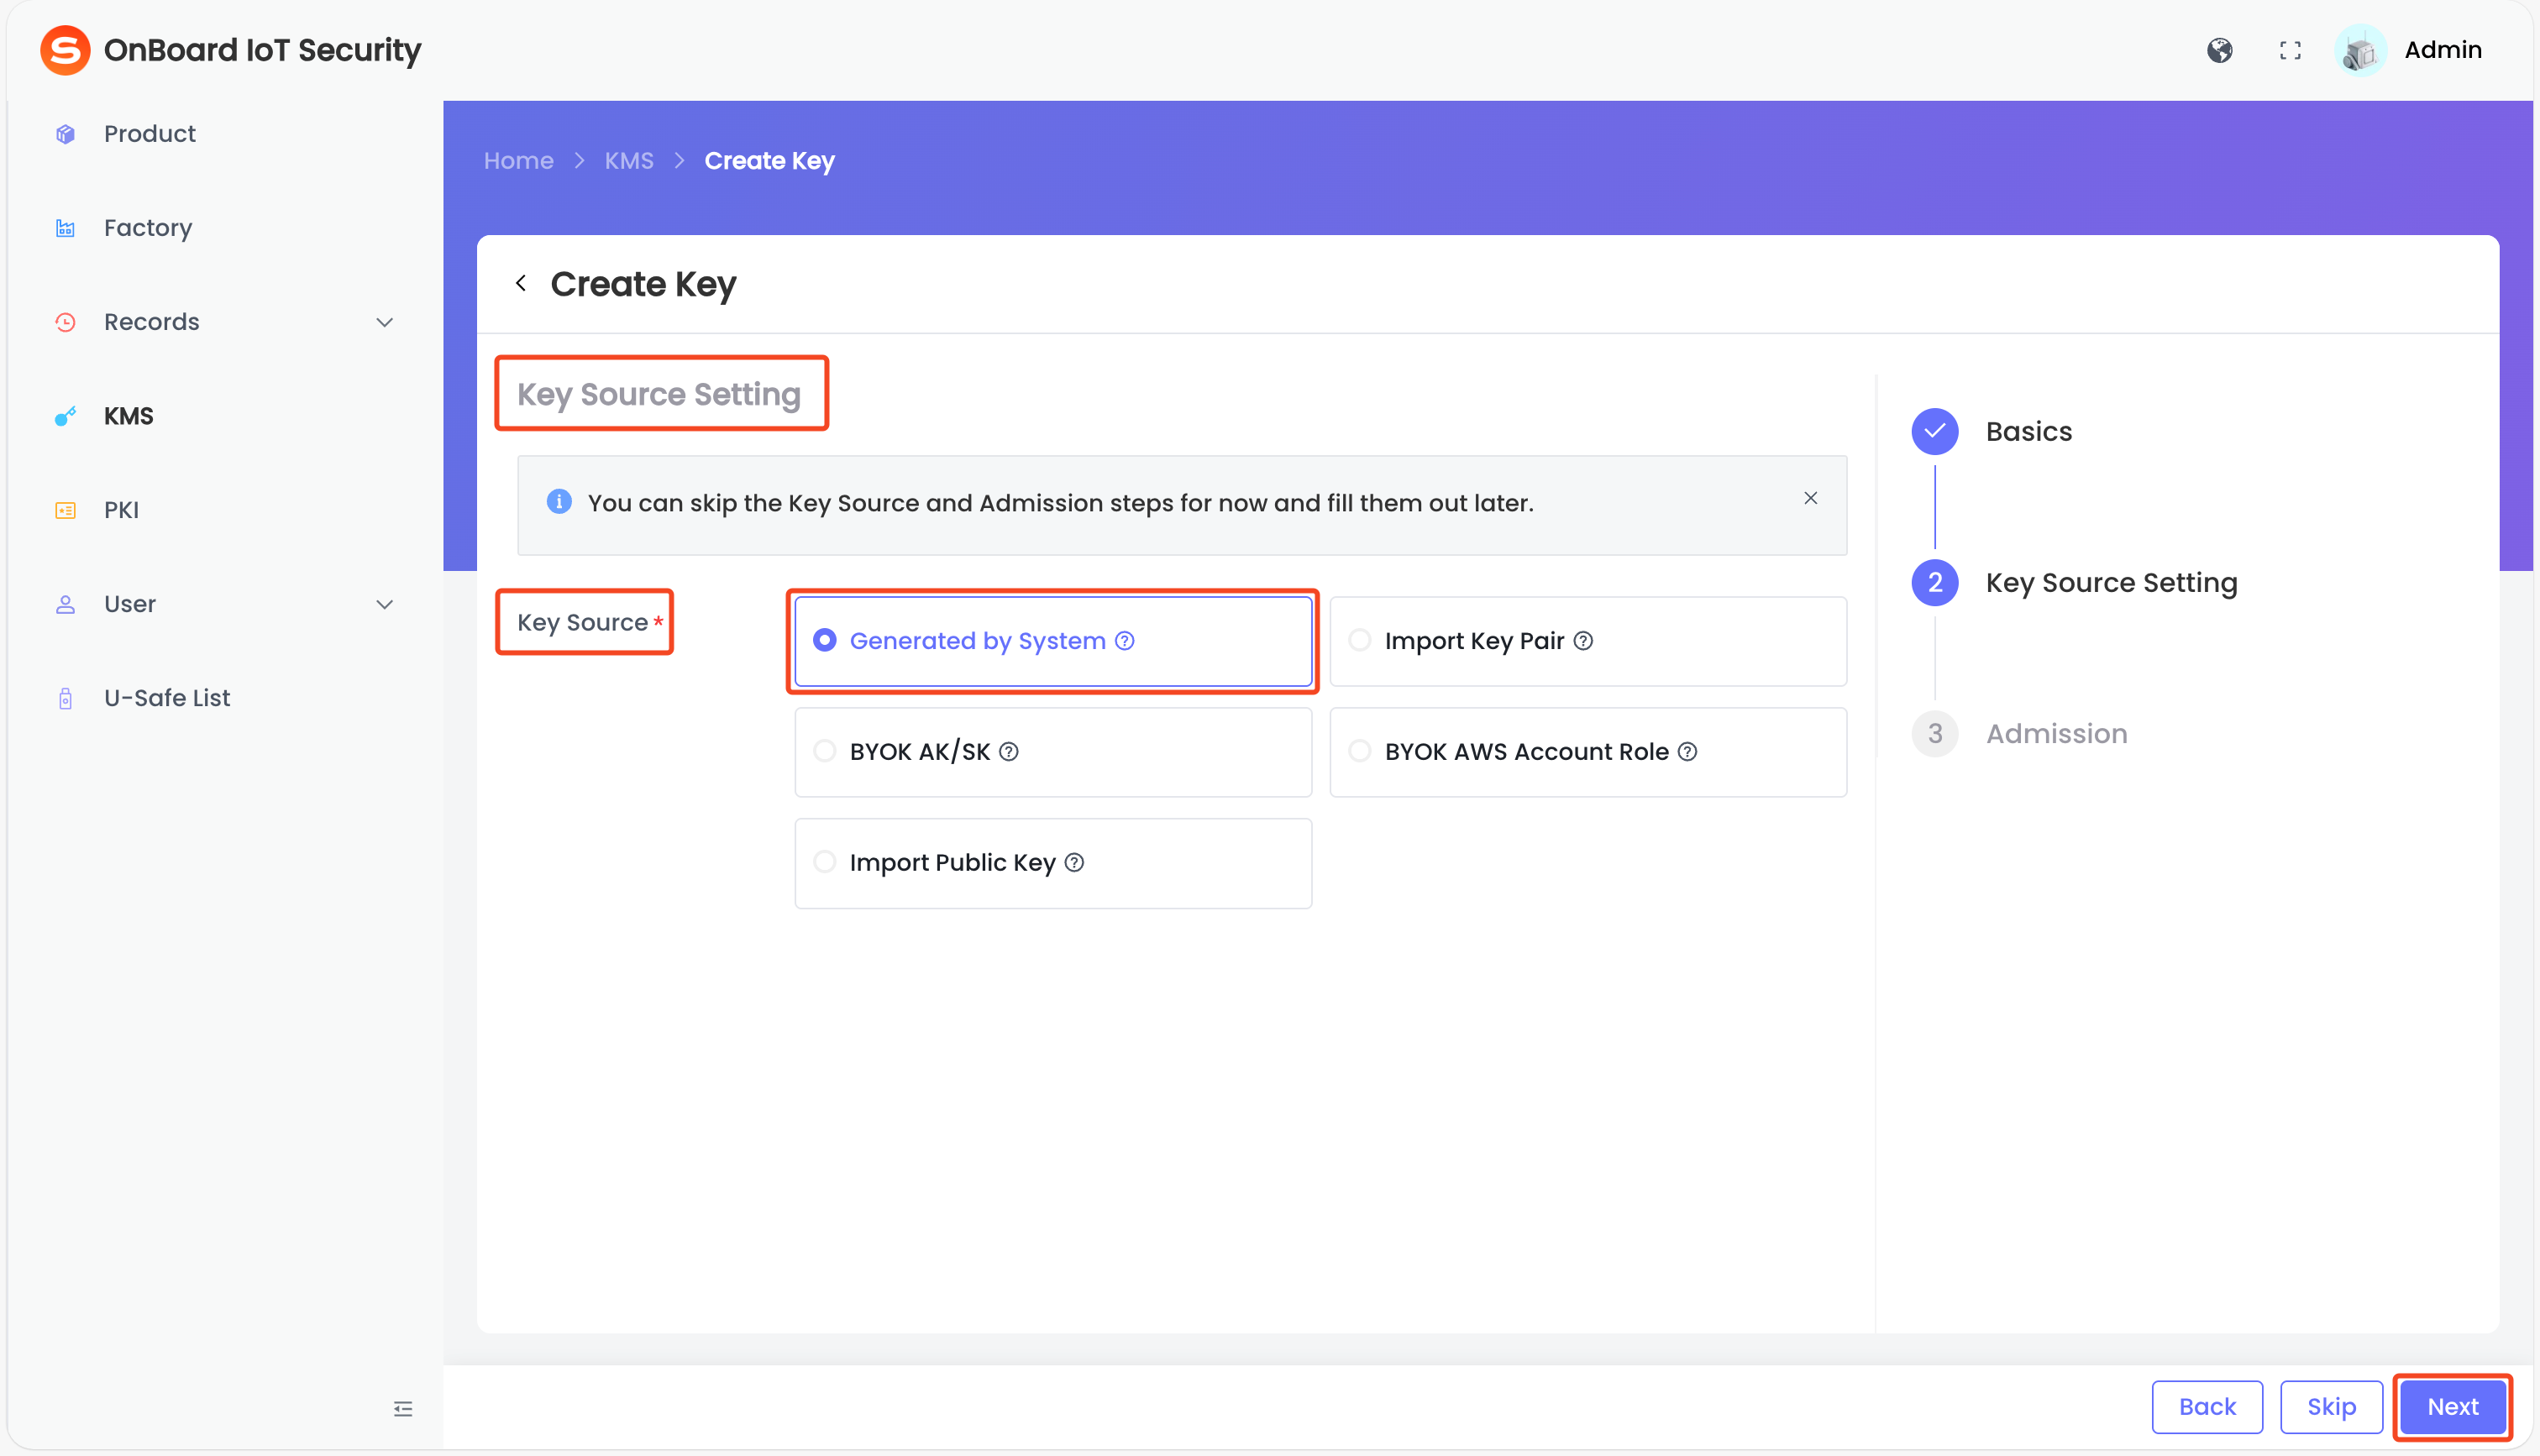
- Generated by System
- Import Key Pair
- BYOK AK/SK
- BYOK AWS Account Role
- Import Public Key
The system securely generates a random key pair inside a Hardware Security Module (HSM).
On the Key Source Setting page, select Generated by System in the Key Source area, and then click Next to navigate to the Admission page.
Manually upload an existing asymmetric key pair generated outside the system.
-
On the Key Source Setting page, select Import Key Pair in the Key Source area. Select the encryption method and key algorithm.
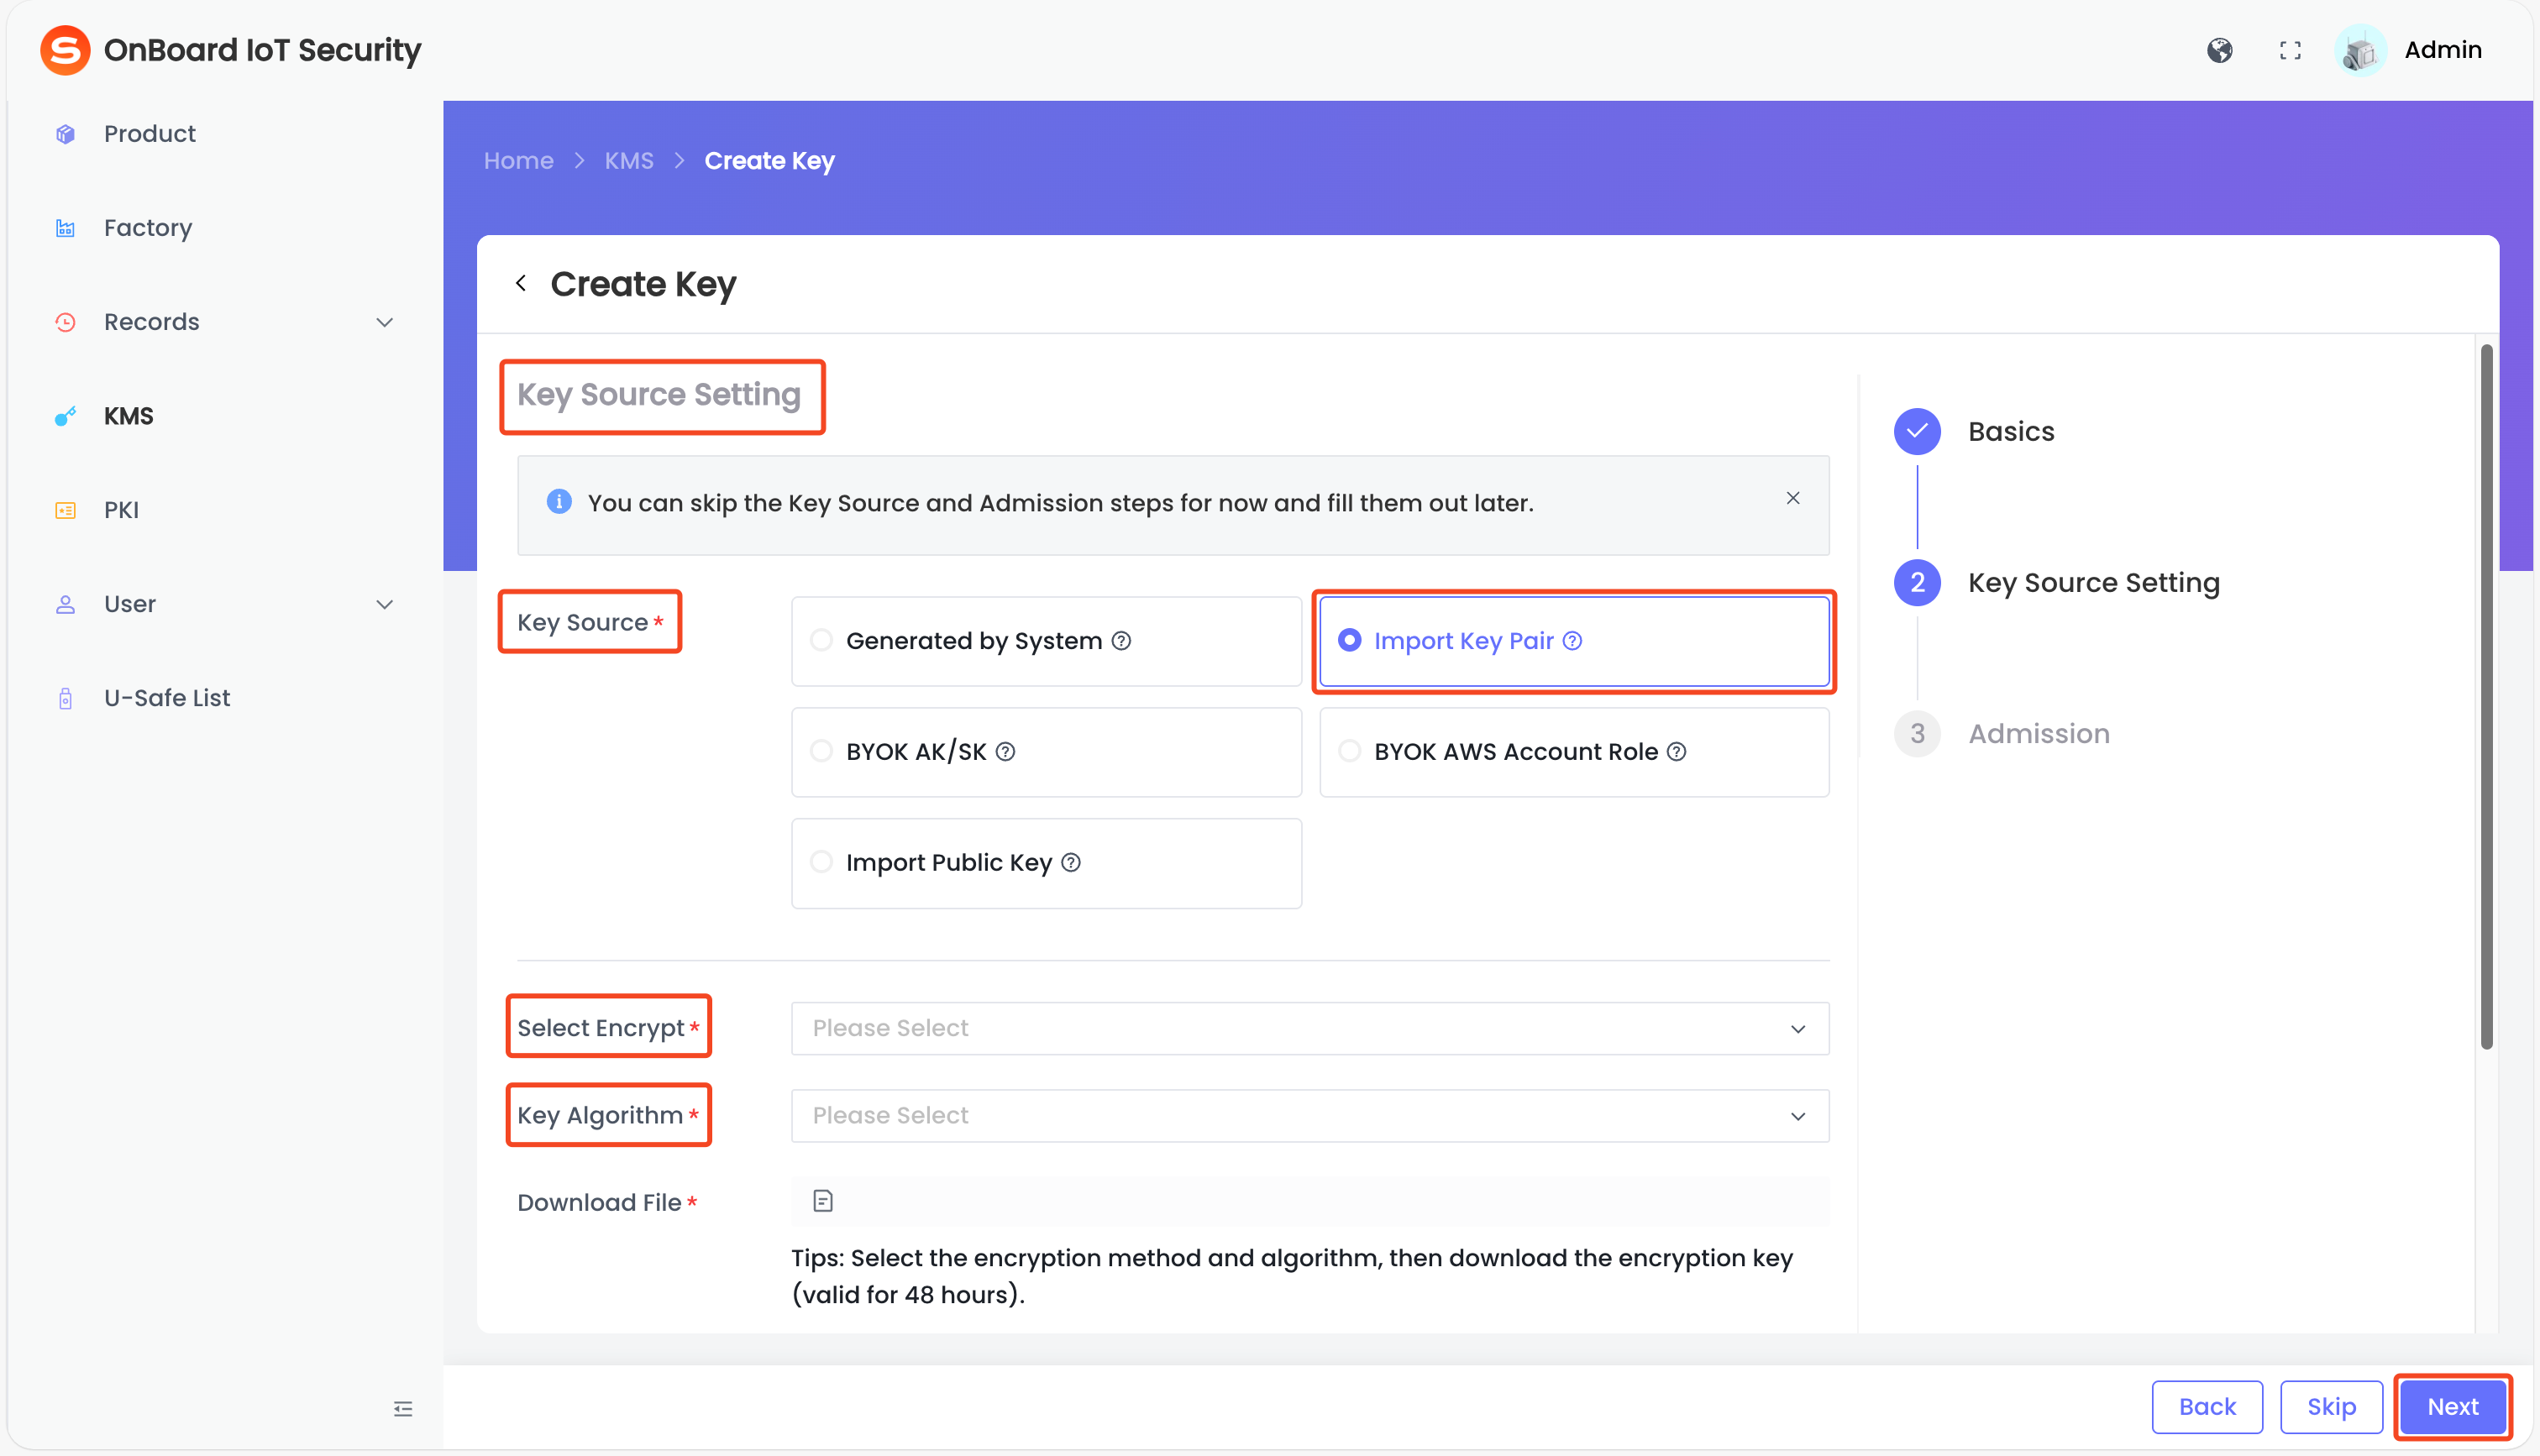
Description of Import Key Pair information:
Information Mandatory Description Select Encrypt Yes Select the encryption algorithm. Currently, only RSA_2048 is supported, which provides basic security strength and is suitable for scenarios such as key encryption and digital signatures. Key Algorithm Yes Select the key algorithm: - RSA_AES_KEY_WRAP_SHA_1
- RSA_AES_KEY_WRAP_SHA_256
-
Click the Download
icon to download the encryption key file.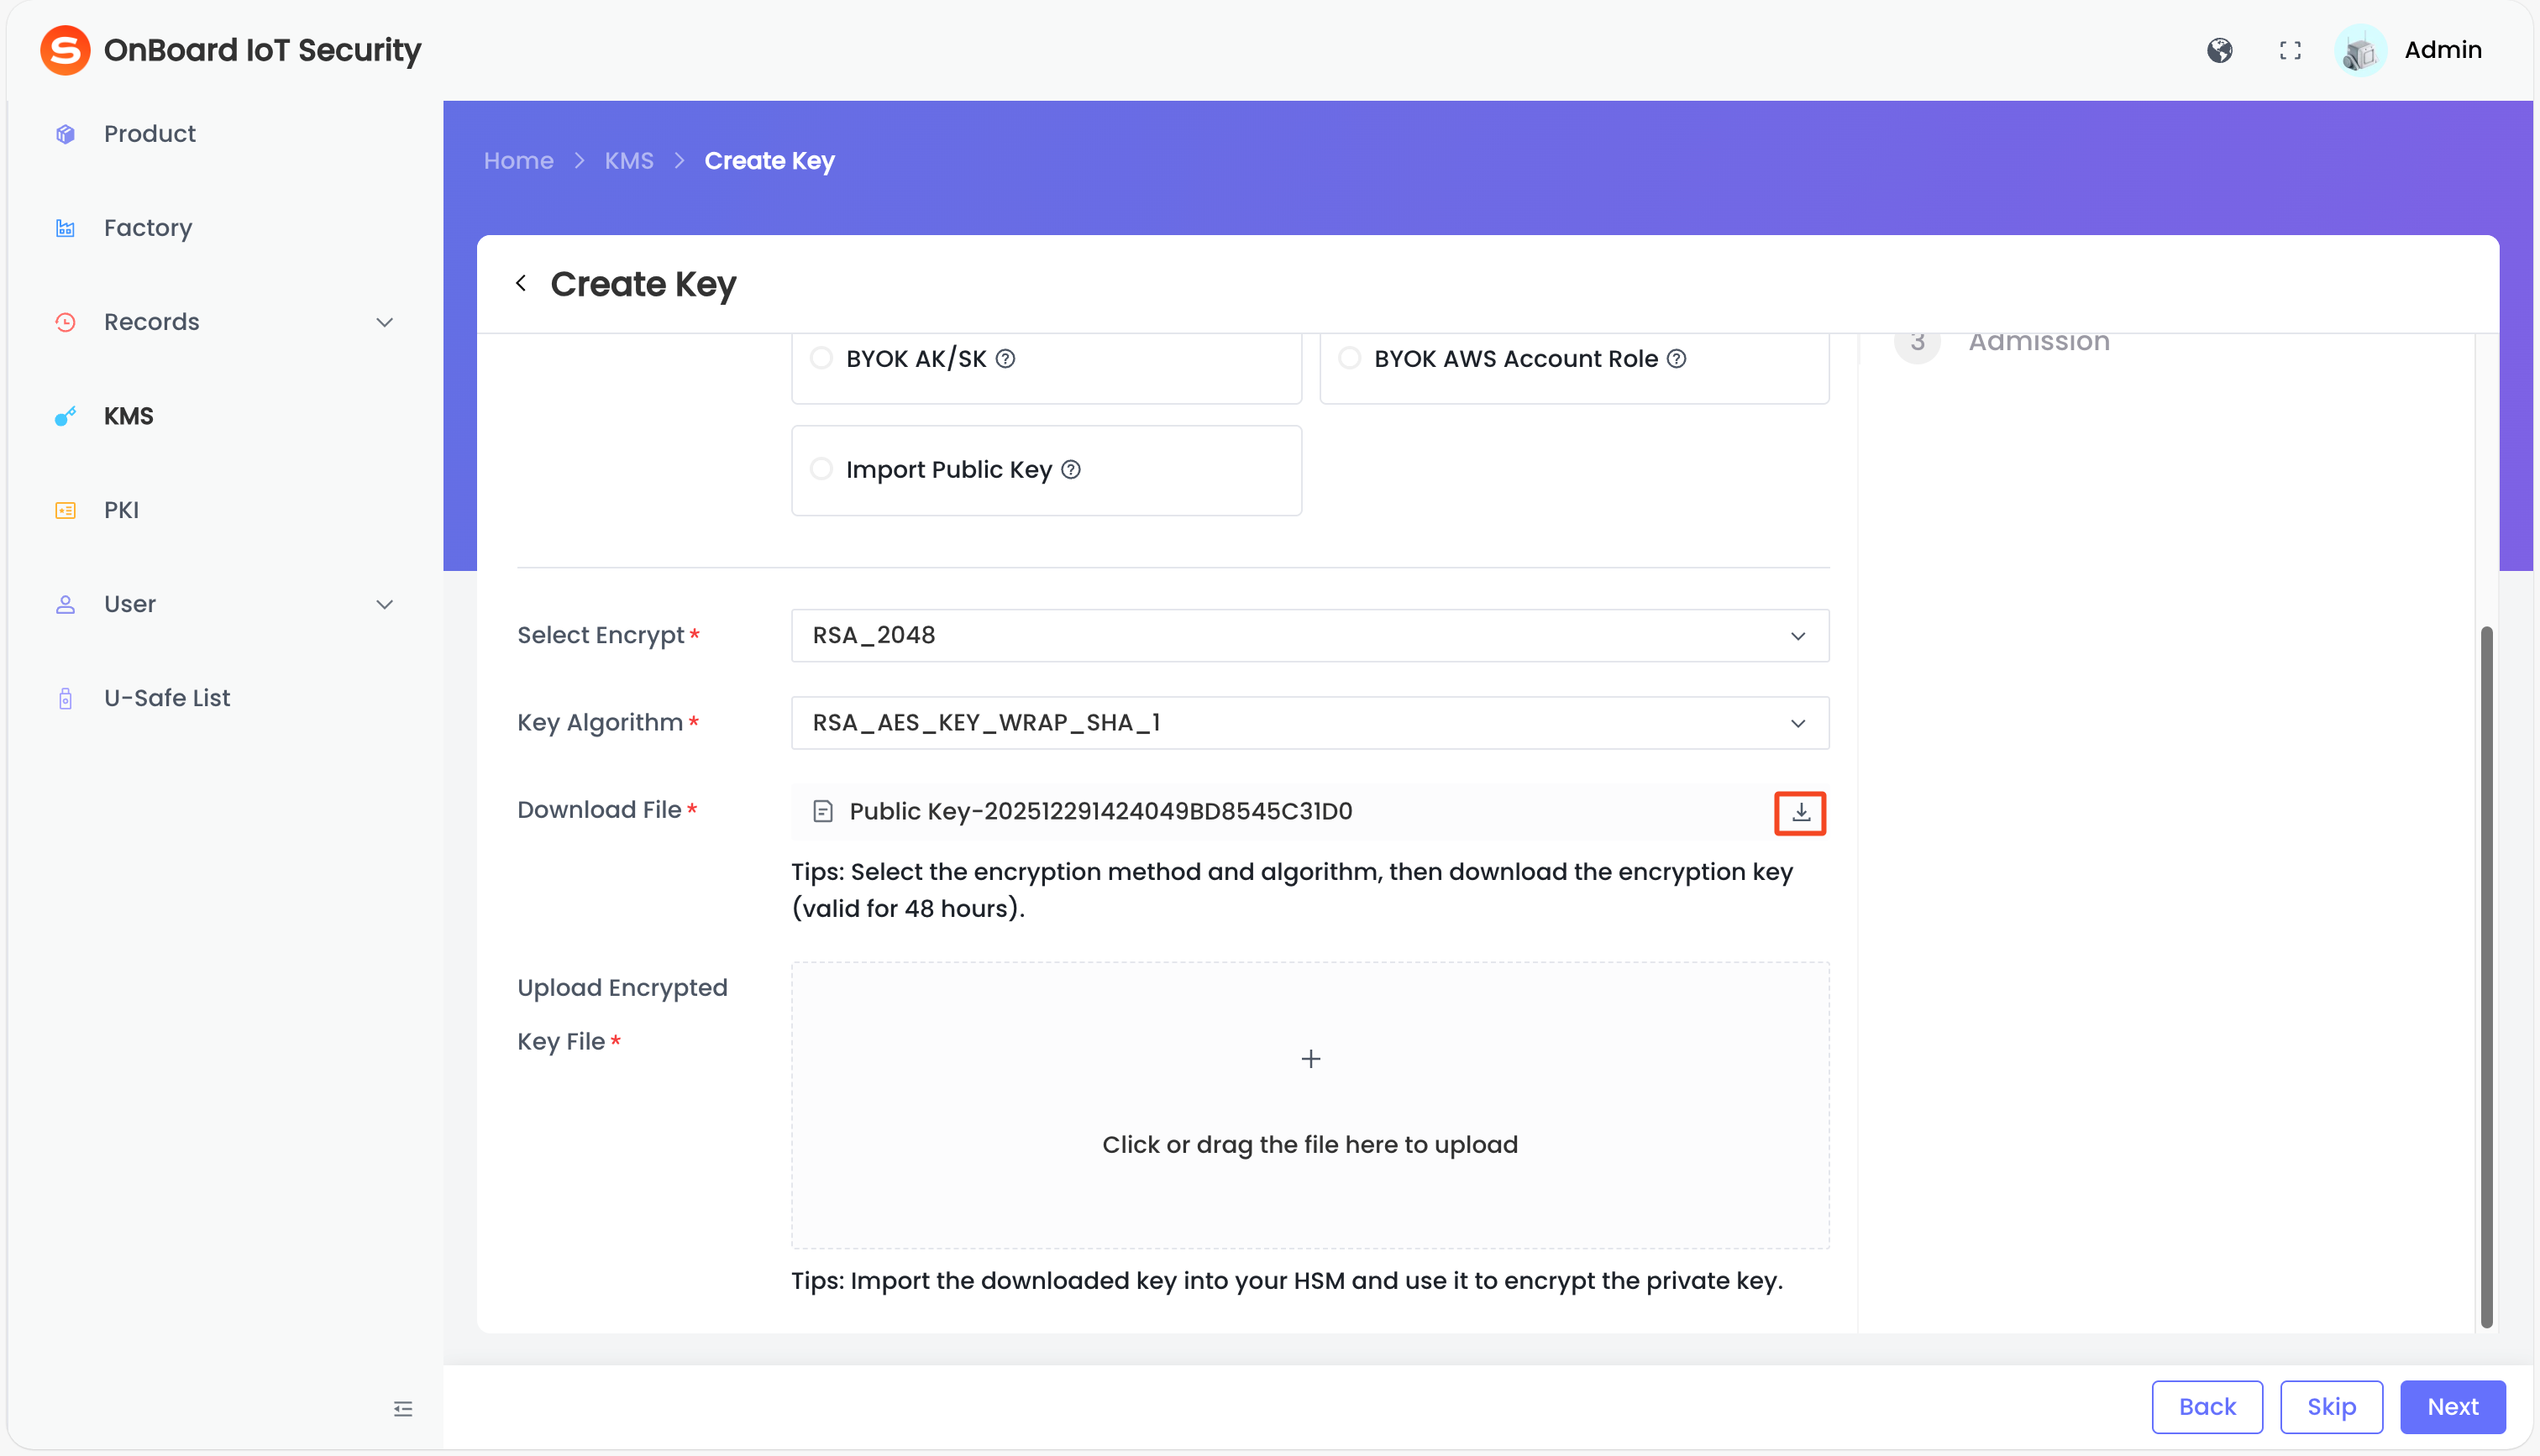
-
Import the downloaded encryption key into your HSM and use it to encrypt the private key.
-
After private key is encrypted, select and upload the encrypted key file in .json format in the Upload Encrypted Key File area.
-
After verifying that the information is correct, click Next to navigate to the Admission page.
Access external keys from third-party KMS using Access Key and Secret Key credentials.
-
On the Key Source Setting page, select BYOK AK/SK in the Key Source area, and then enter the key-related information.
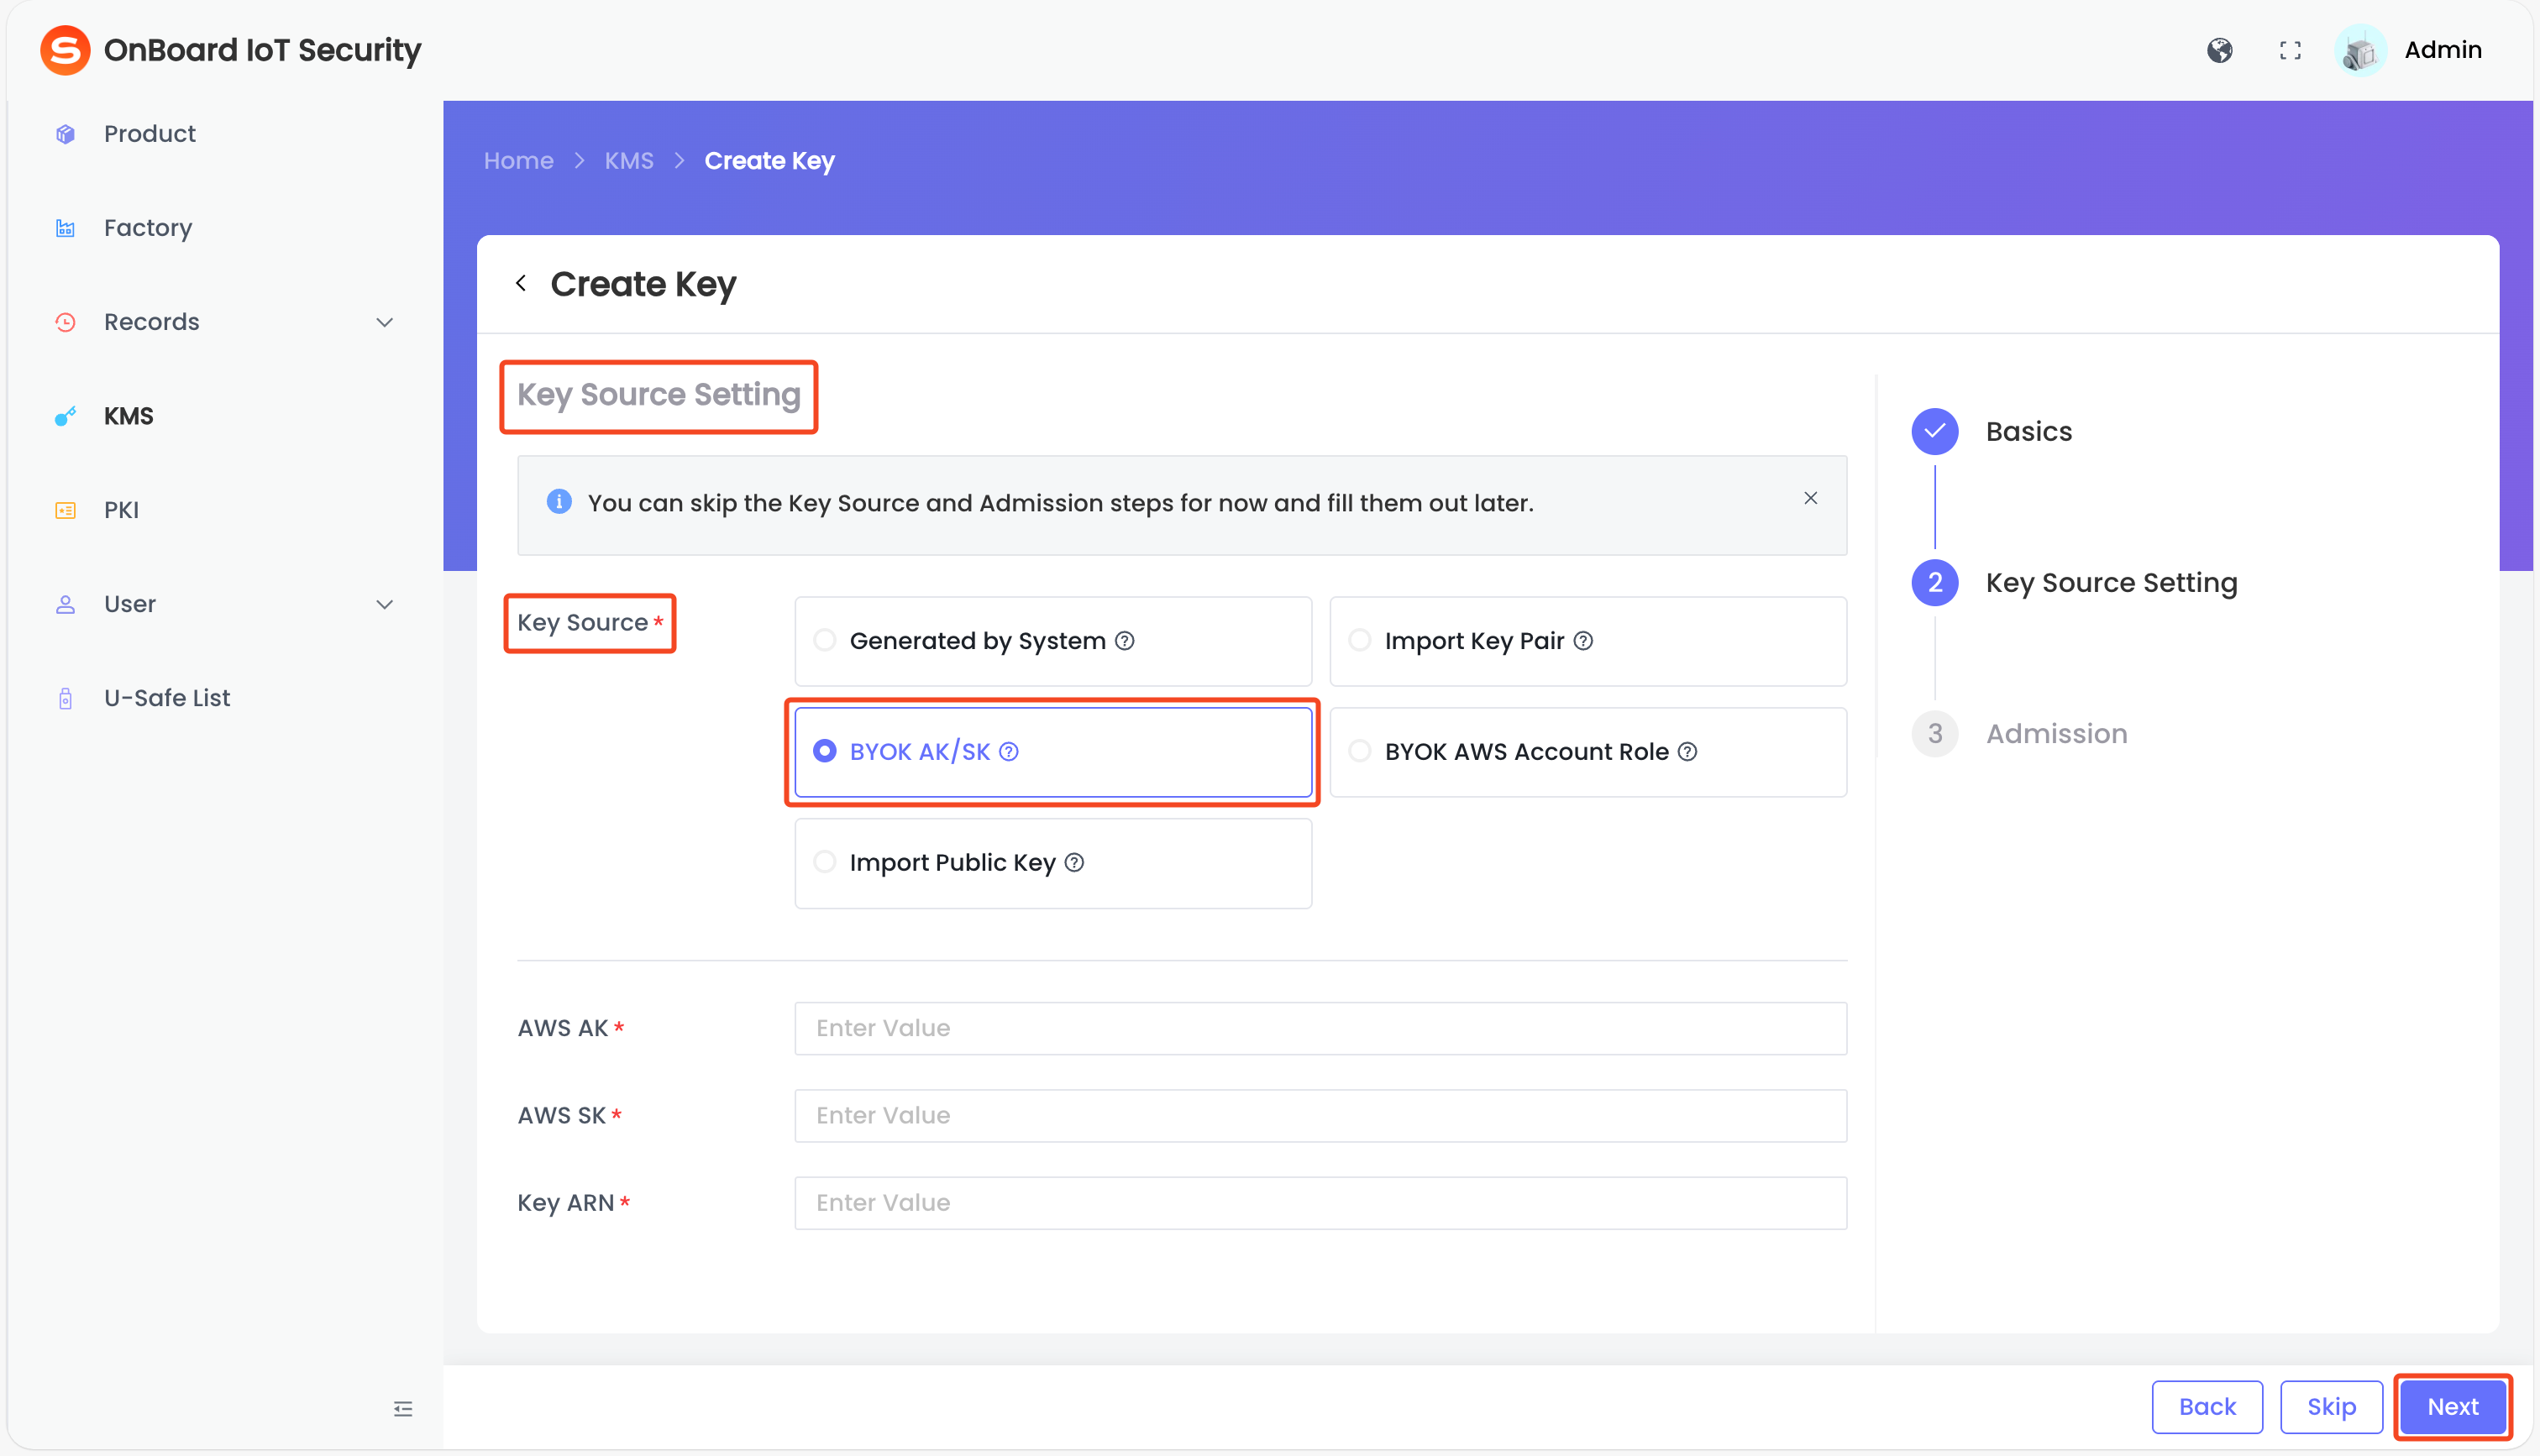
Description of AWS AK/SK information:
Information Mandatory Description AWS AK Yes AK (Access Key ID): - Identity identifier: Uniquely identifies a user in AWS IAM (Identity and Access Management), similar to a username.
- Public attribute: Can be safely shared (for example, configured in code or the CLI), but must be used together with the SK to complete authentication.
AWS SK Yes SK (Secret Access Key): - Confidential credential: Used to generate request signatures and verify identity, similar to a password.
- Strict confidentiality: Disclosure may result in full account compromise and should be protected with the same care as a password.
Key ARN Yes ARN (Amazon Resource Name):
uniquely identifies an encryption key in AWS KMS, used for data encryption and decryption. -
After verifying that the information is correct, click Next to navigate to the Admission page.
Connect to AWS KMS using IAM Role-based access—secure and ideal for cloud-native deployments.
-
On the Key Source Setting page, select BYOK AWS Account Role in the Key Source area, and then enter the key-related information.
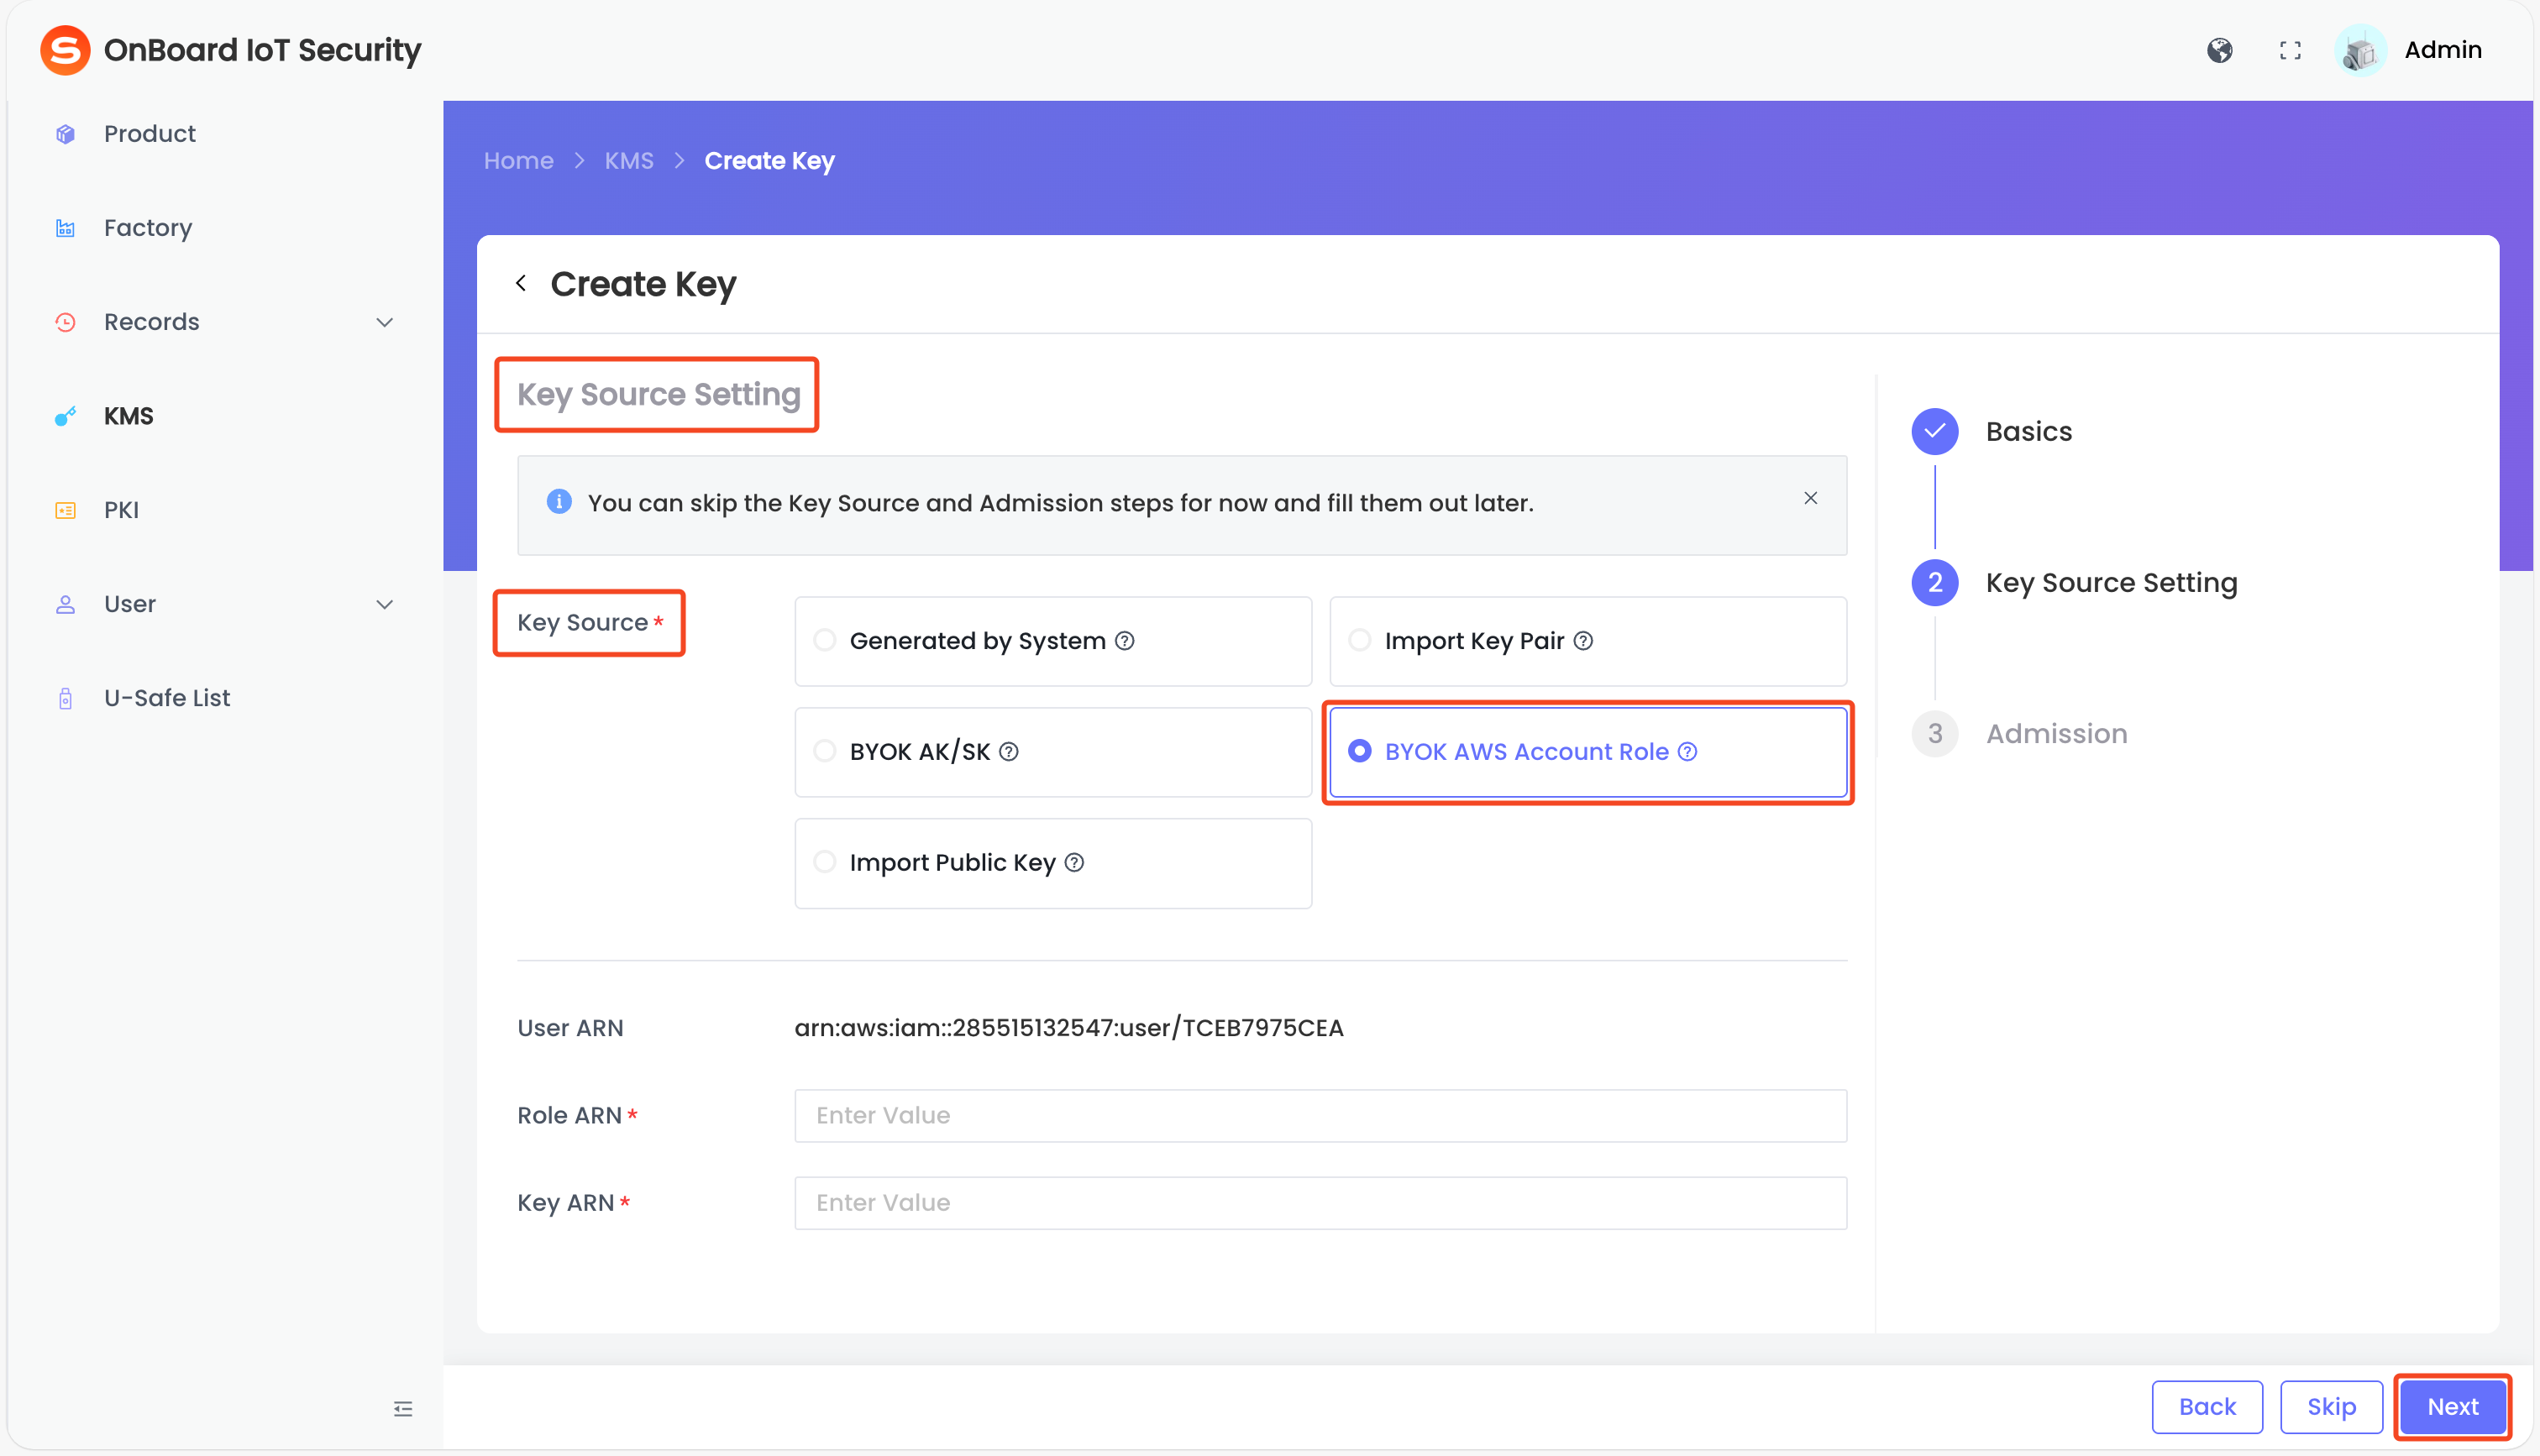
Description of AWS Account Role information:
Information Mandatory Description User ARN No Uniquely identifies a user in AWS IAM (such as an administrator or developer), used for permission assignment and resource access control. Role ARN Yes Uniquely identifies a role in AWS IAM, used for temporary permission assignment (such as cross-account access for EC2 instances or Lambda functions). Key ARN Yes Uniquely identifies an encryption key in AWS KMS, used for data encryption and decryption. -
After verifying that the information is correct, click Next to navigate to the Admission page.
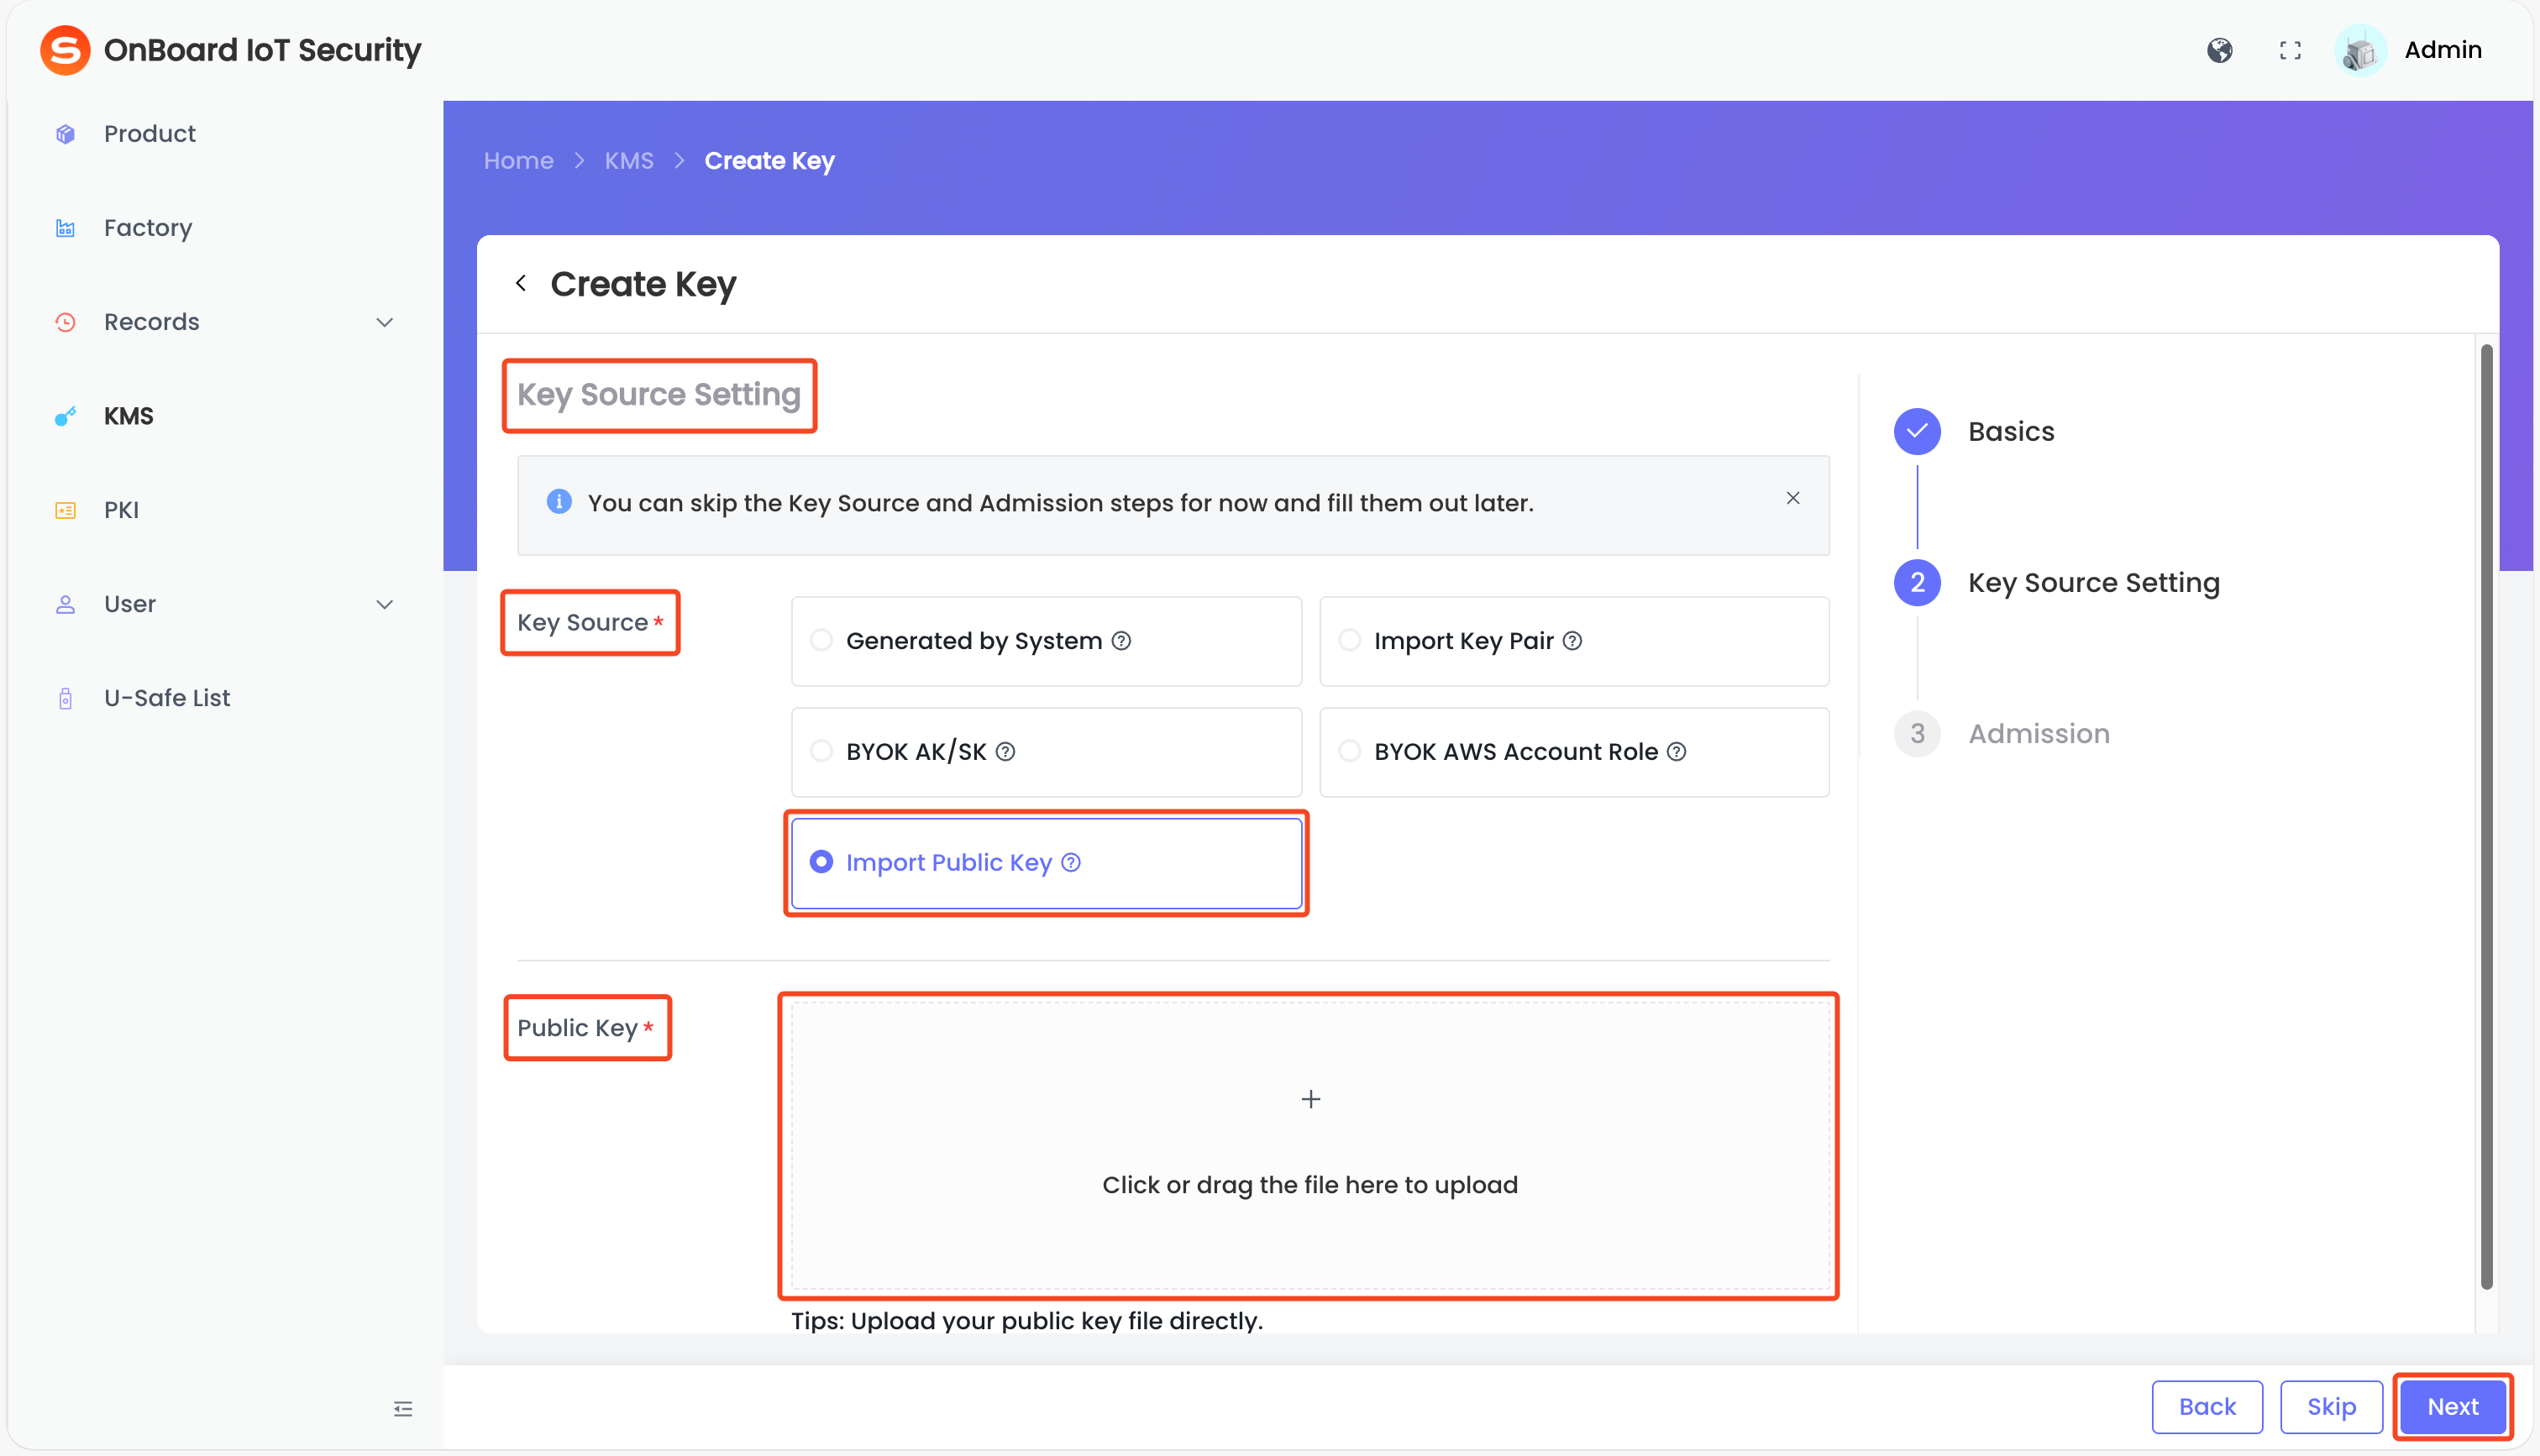
Import only a public key for verifying signatures or device identities—no private key required.
-
On the Key Source Setting page, select Import Public Key in the Key Source area. In the Public Key area, upload a public key file in .json format.
-
After verifying that the file is correct, click Next to navigate to the Admission page.
Step three: Configure the admission
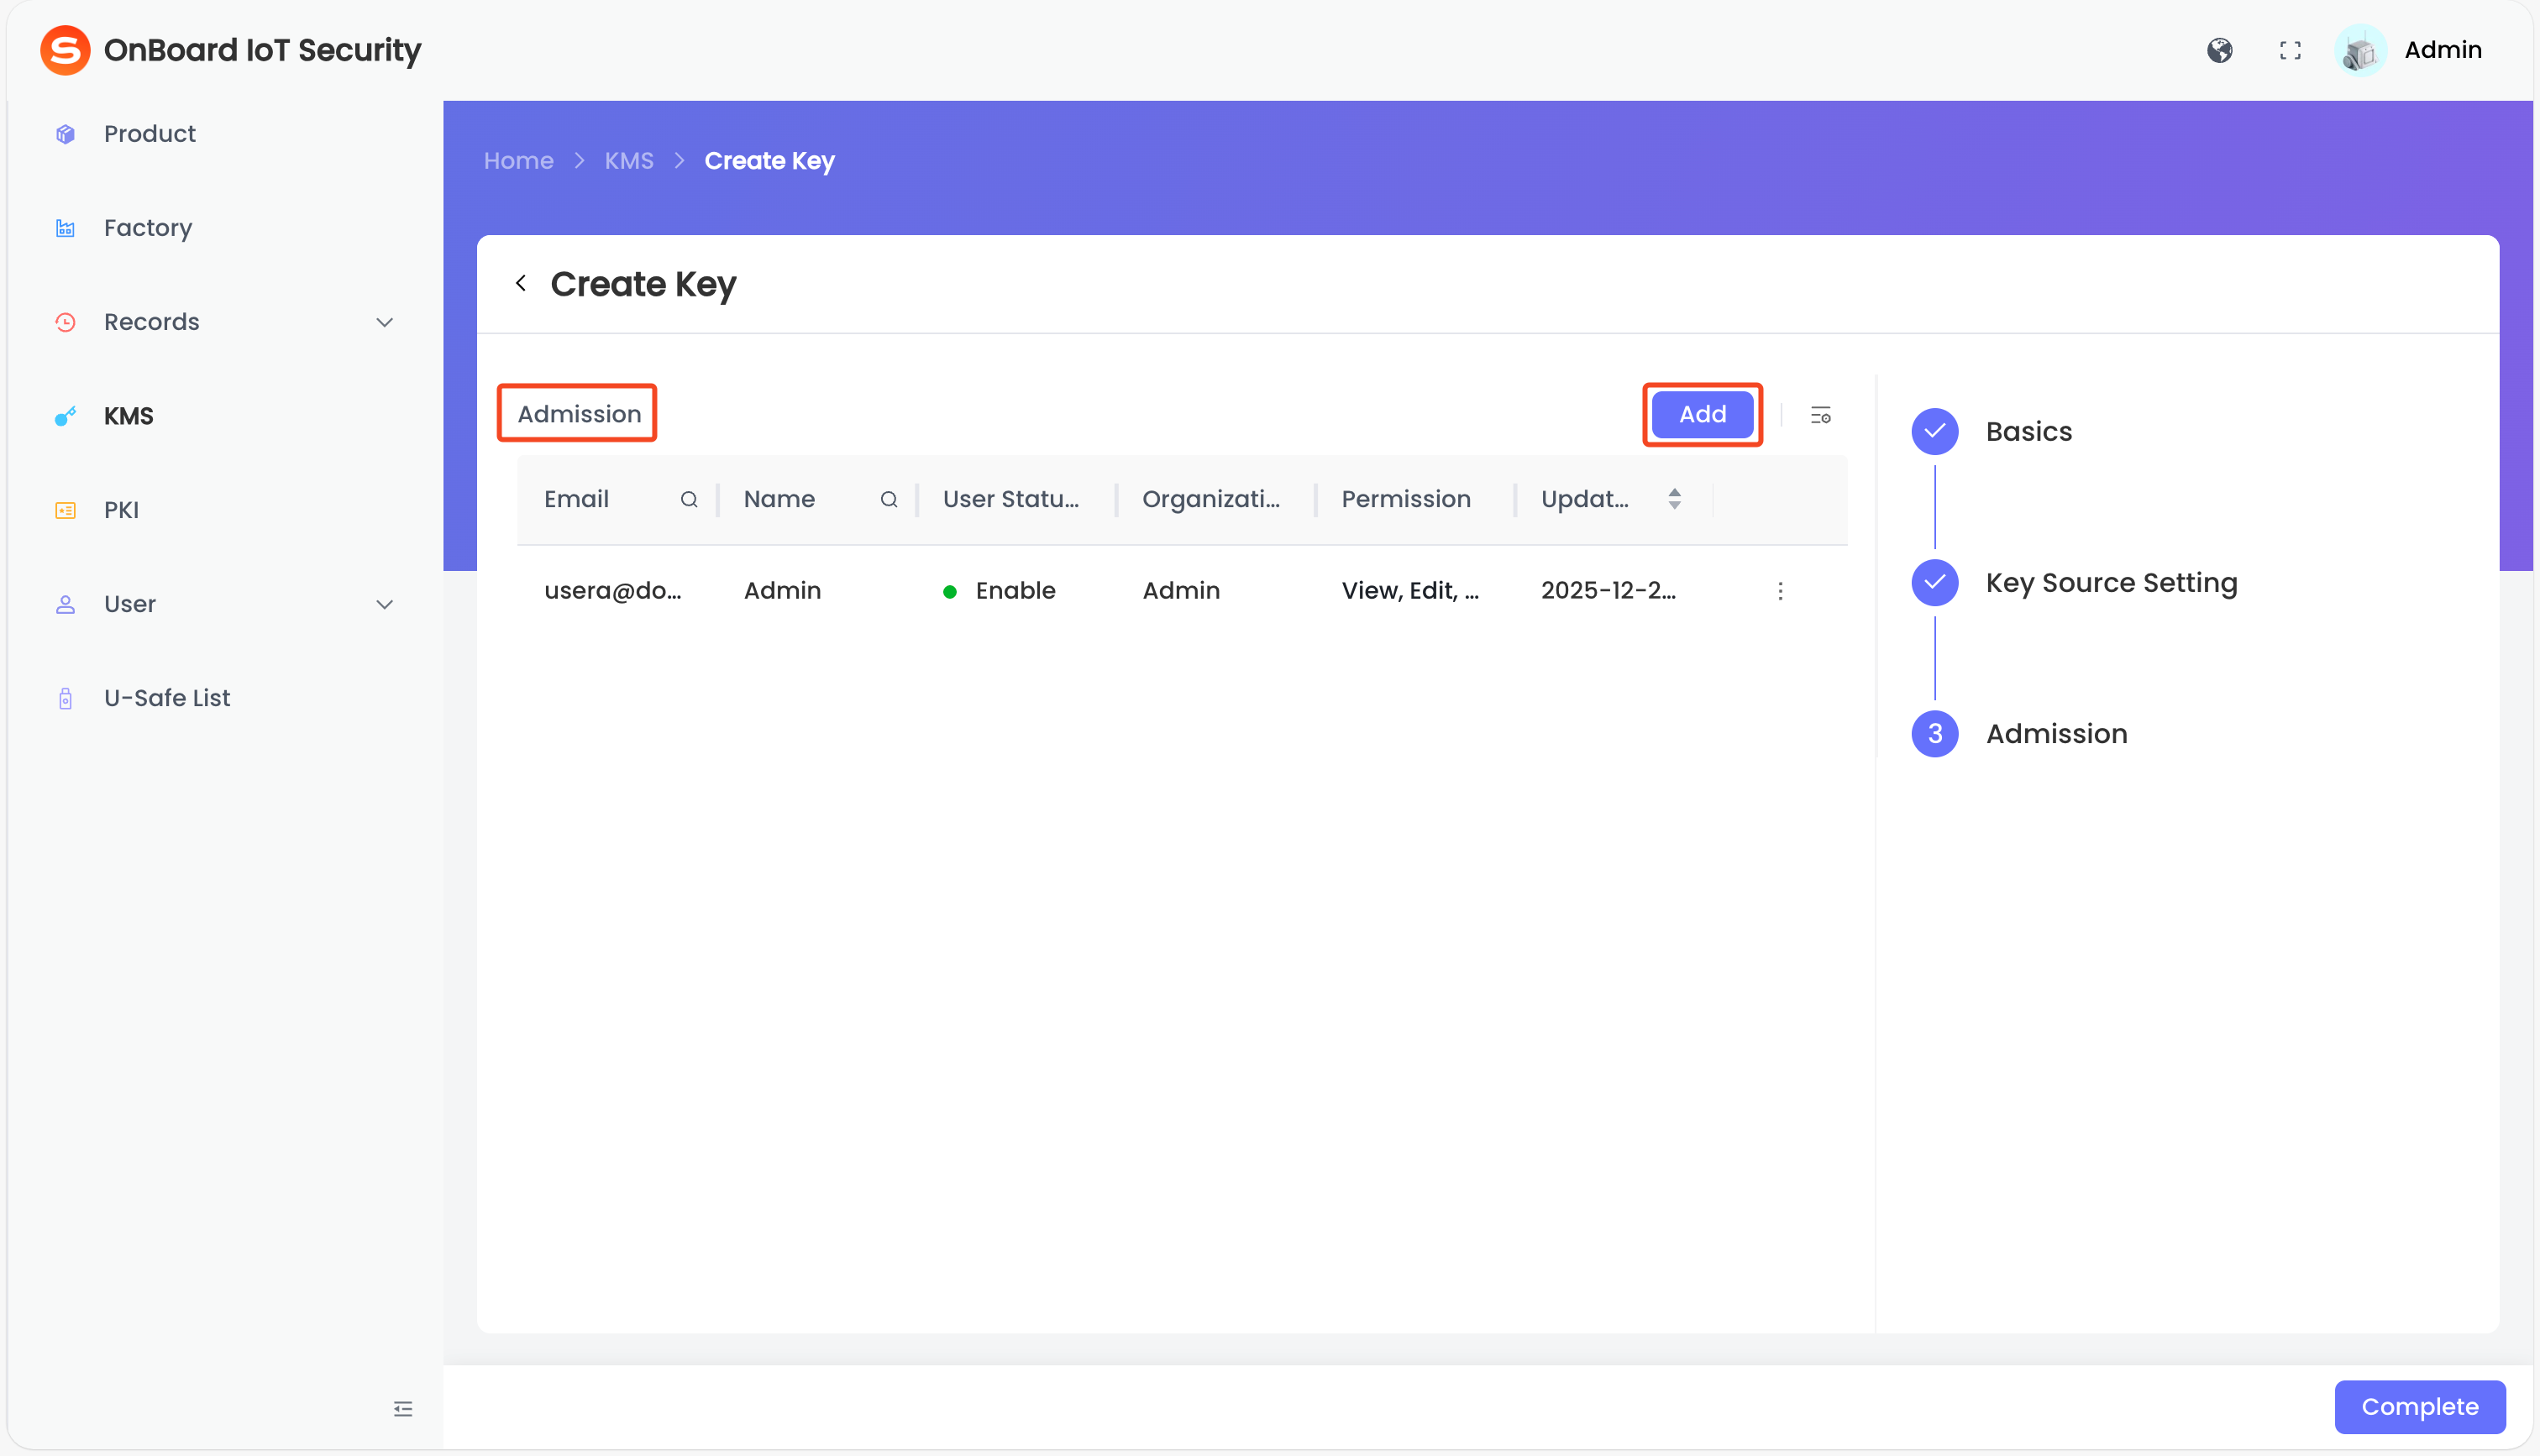
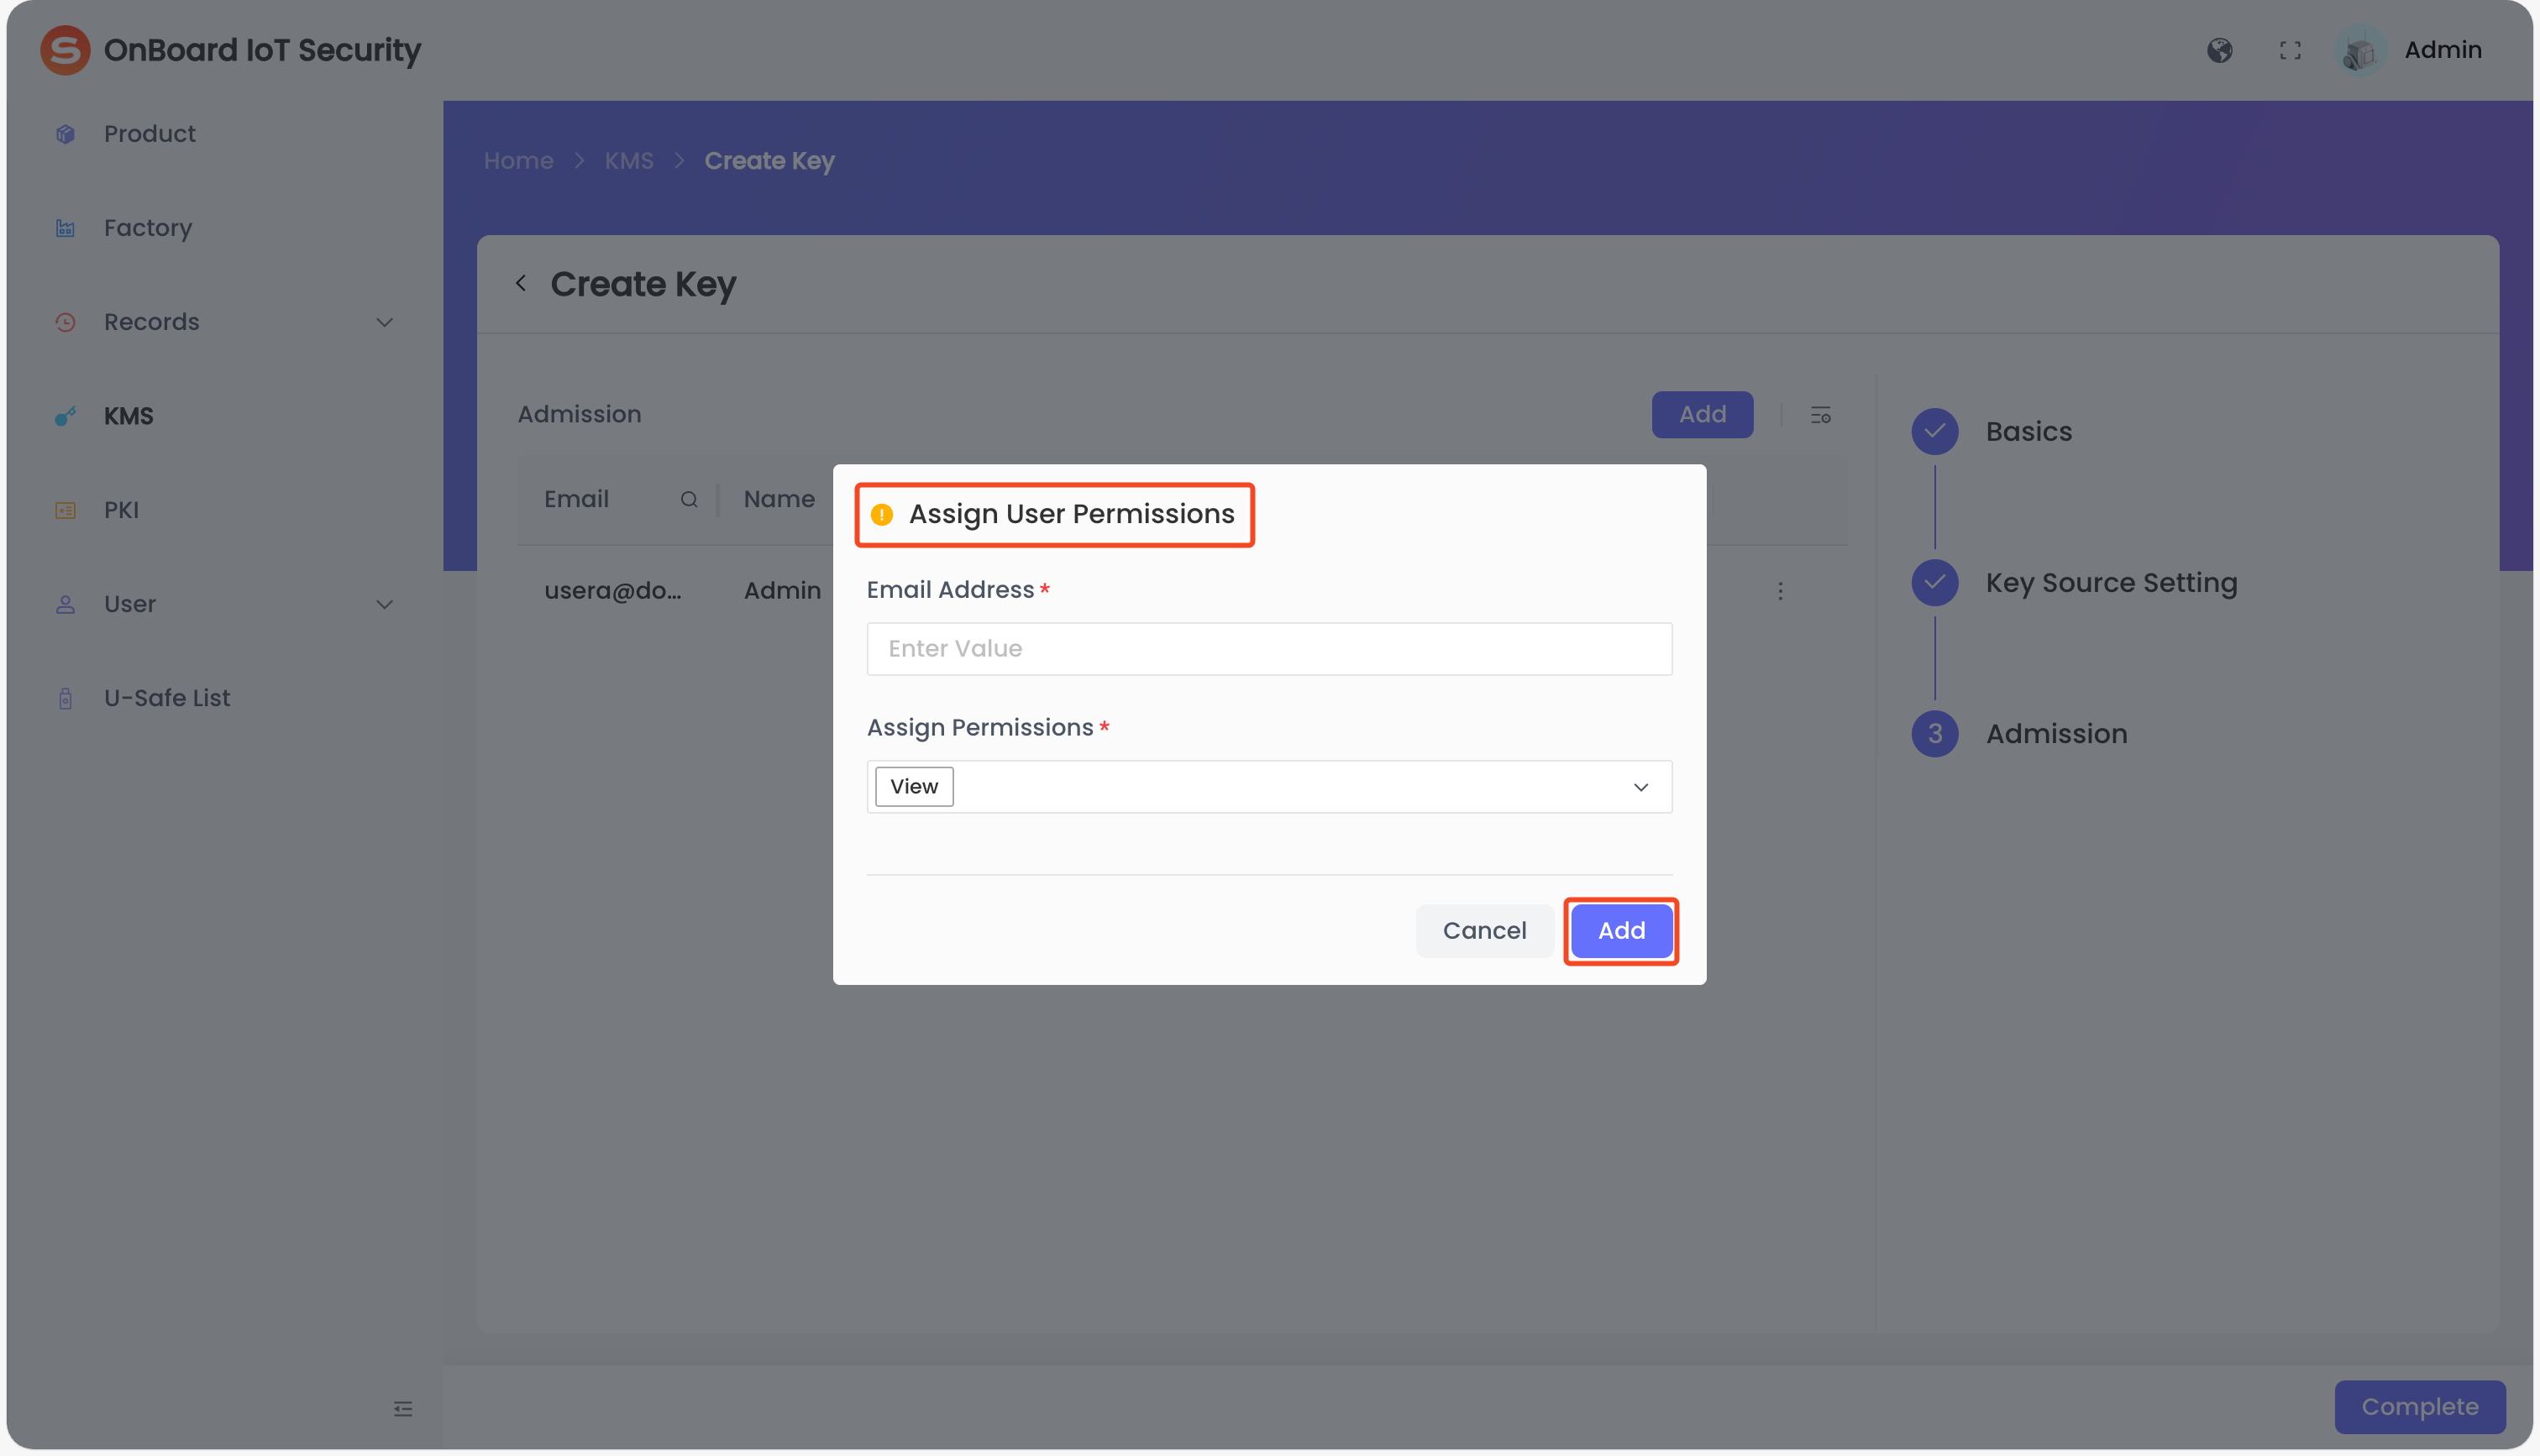
After the key source configuration is completed, you can adjust and set user permissions (View, Edit, Use, Archive, Lock, Grant, and Delete) for the key by following these steps:
-
On the Admission page, click Add.
-
In the Assign User Permissions window, enter the email address and assign the corresponding permissions, and then click Add.
-
Click Complete. Once the key is successfully created, it can be checked on the Key Management System page.

 Download User Manual