How to create a certificate based on the Custom specification in OnBoard™ IoT Security
This article will guide you on how to create a certificate based on the Custom specification in OnBoard™ IoT Security (OBIS).
Prerequisites
Before getting started, please ensure that you have OBIS role permissions as a System Manager or Resource Manager.
Instructions
After a custom certificate template is created, it can be selected when configuring Certificates for a product.
-
Sign in to OBIS.
-
In the Core section of the left menu, click PKI, and then click Create on the PKI page.
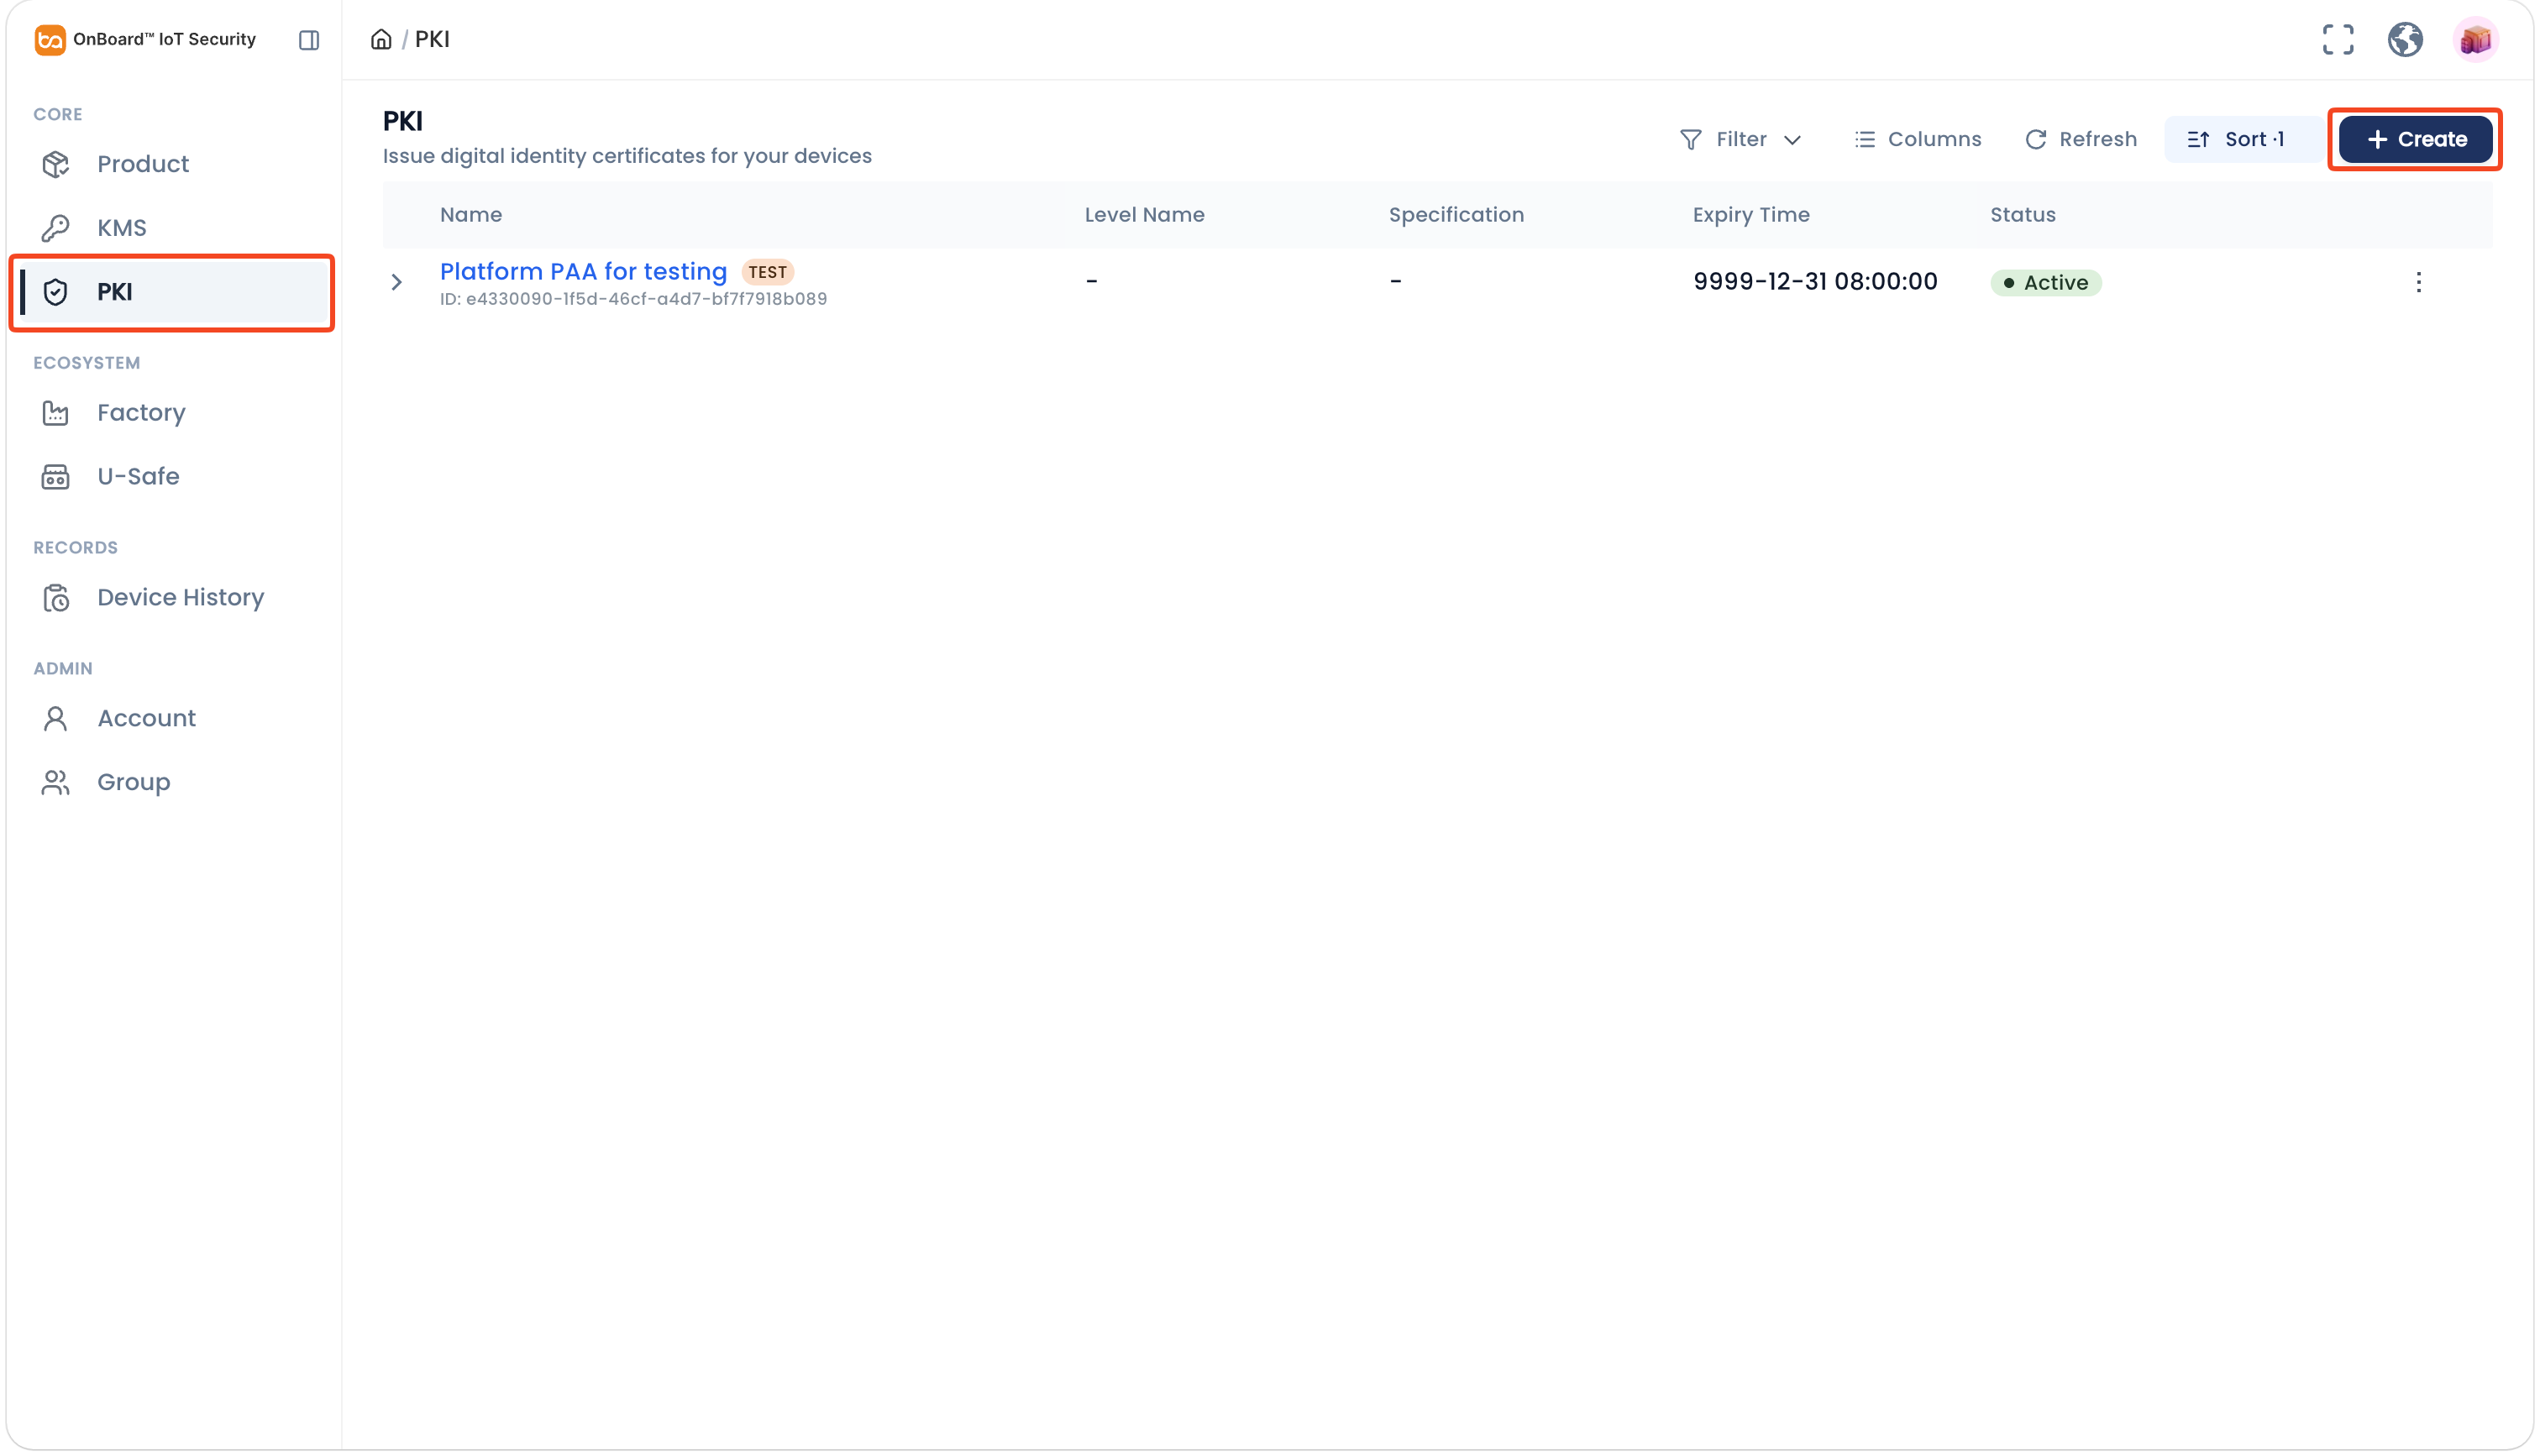
- Create a root certificate
- Create an intermediate certificate
- Create an end entity template
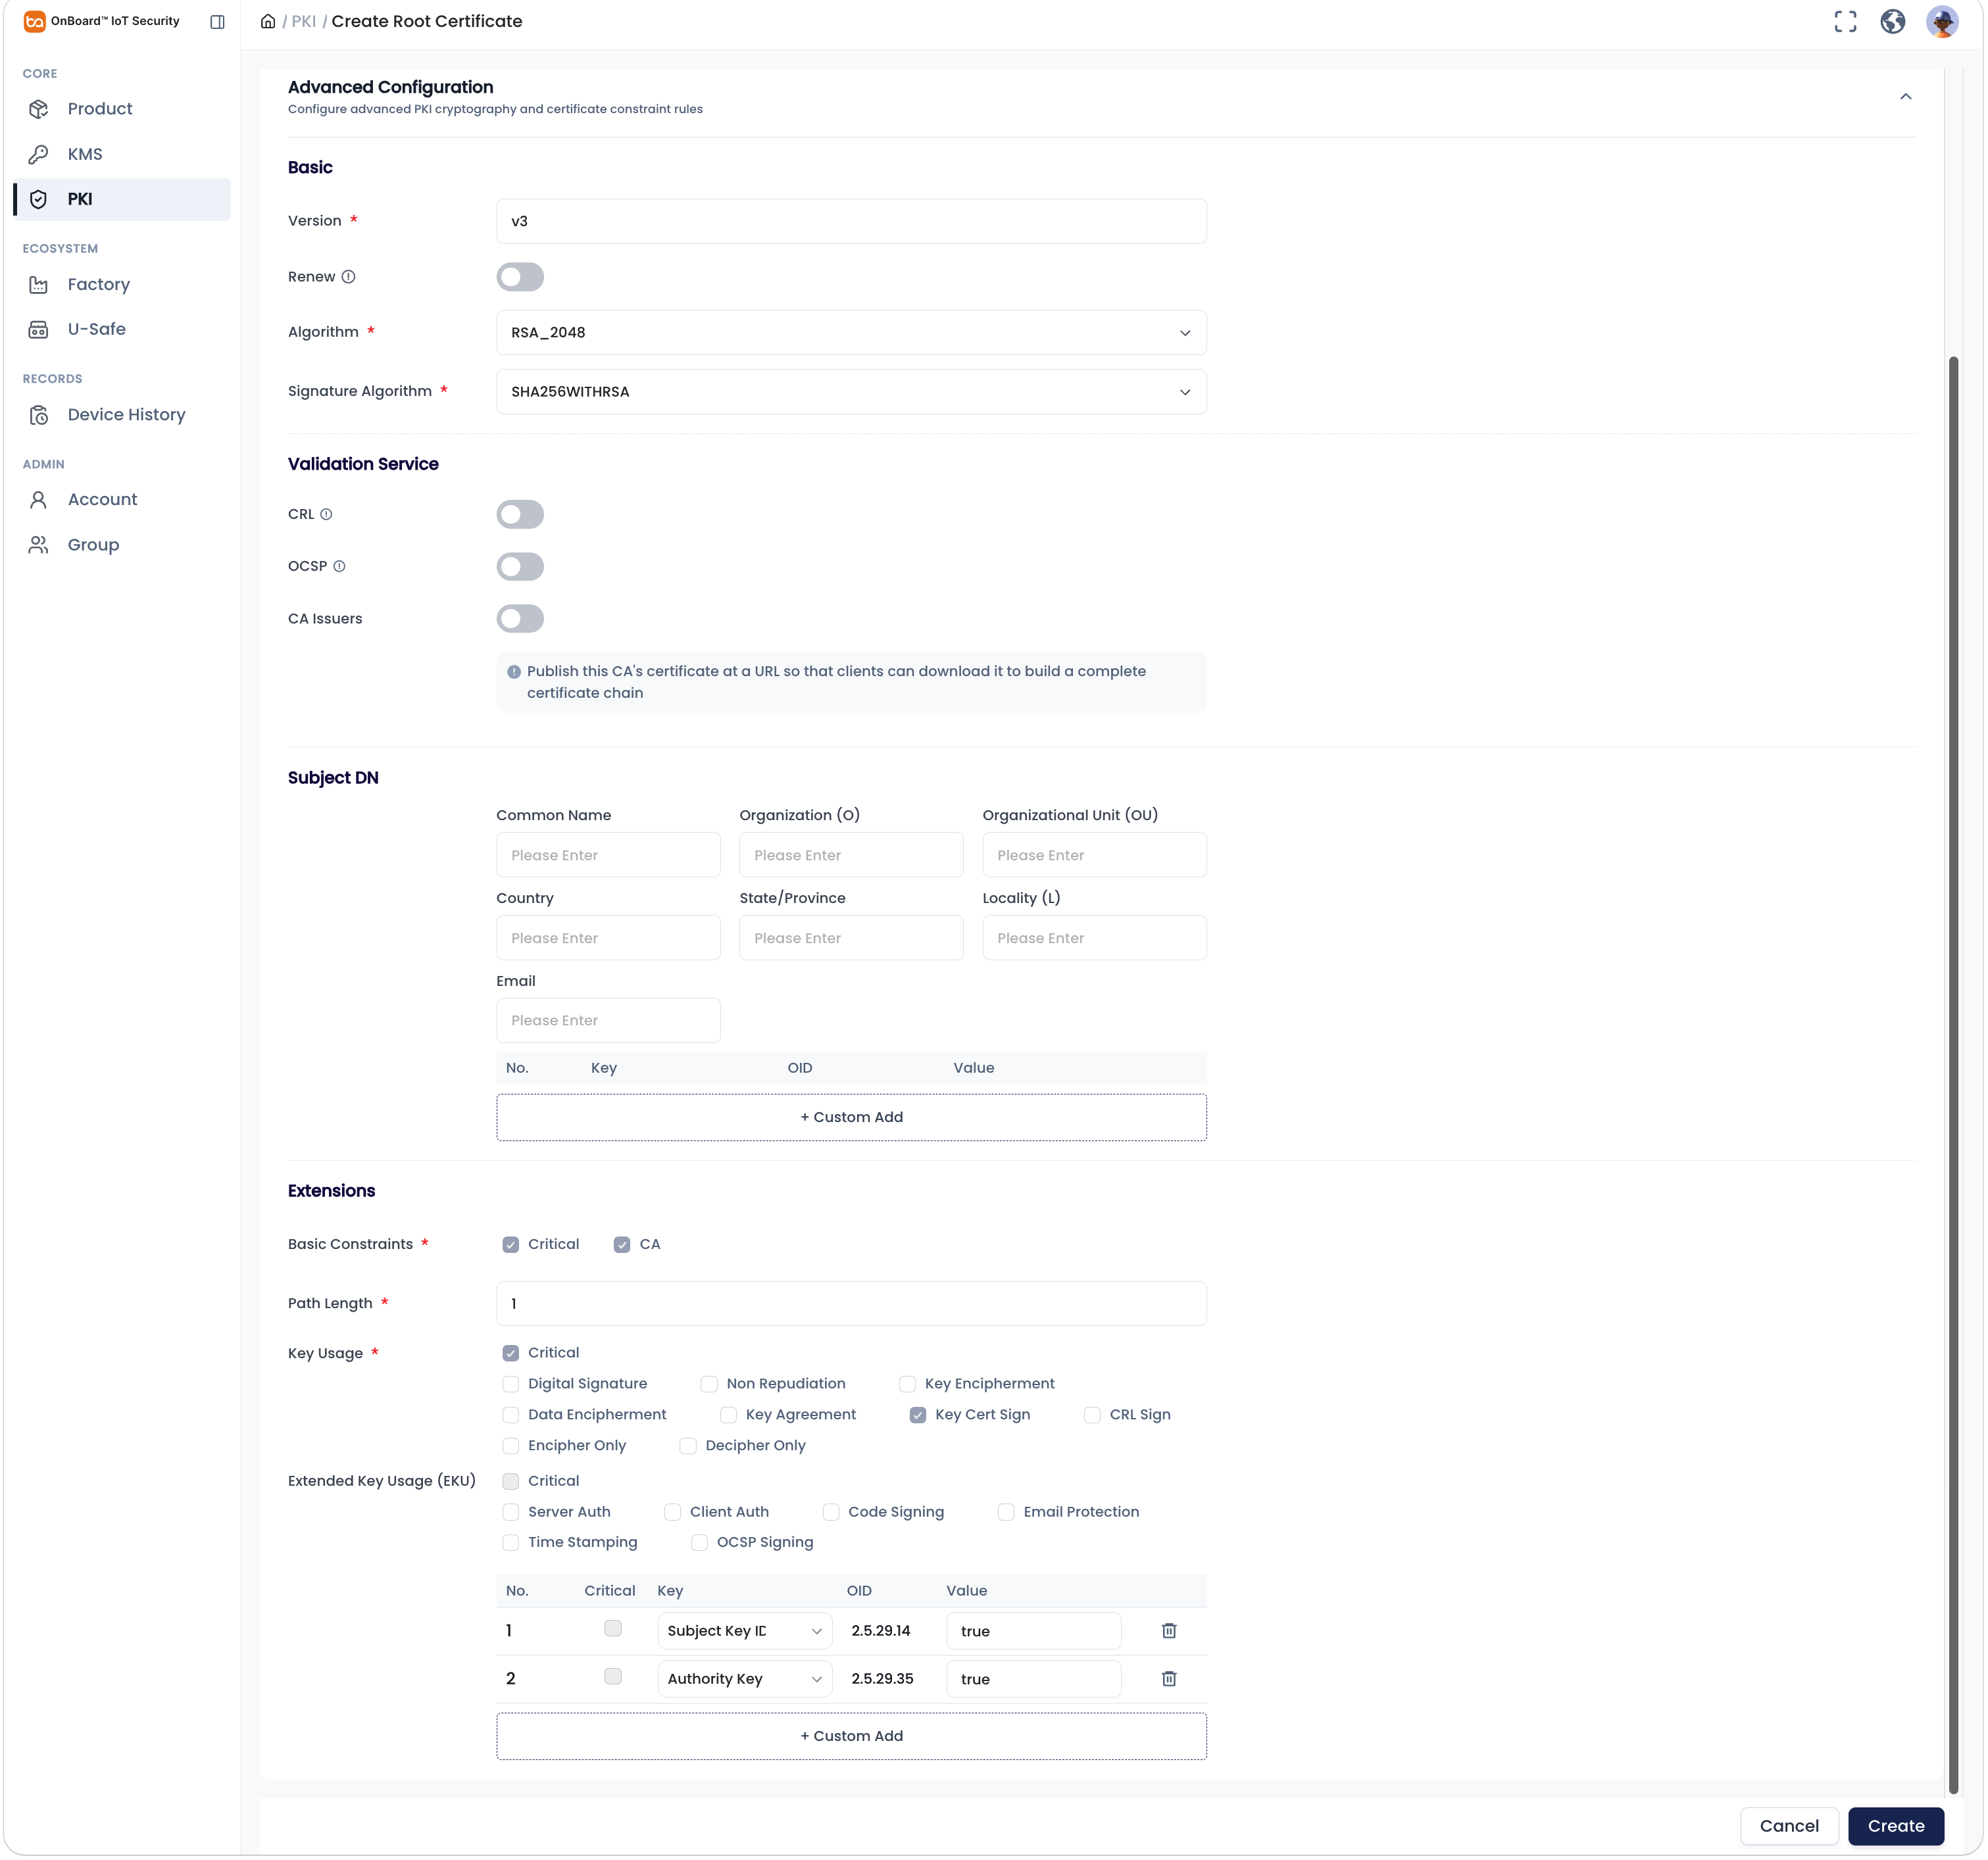
The default mode is simple mode, which requires only basic information. If you need to configure additional fields for the system-generated certificate, you can switch to advanced mode by clicking Advanced Mode in the top-right corner of the page.
-
On the Basic Info section, select Generate by System or Bring Your Own Certificate as needed.
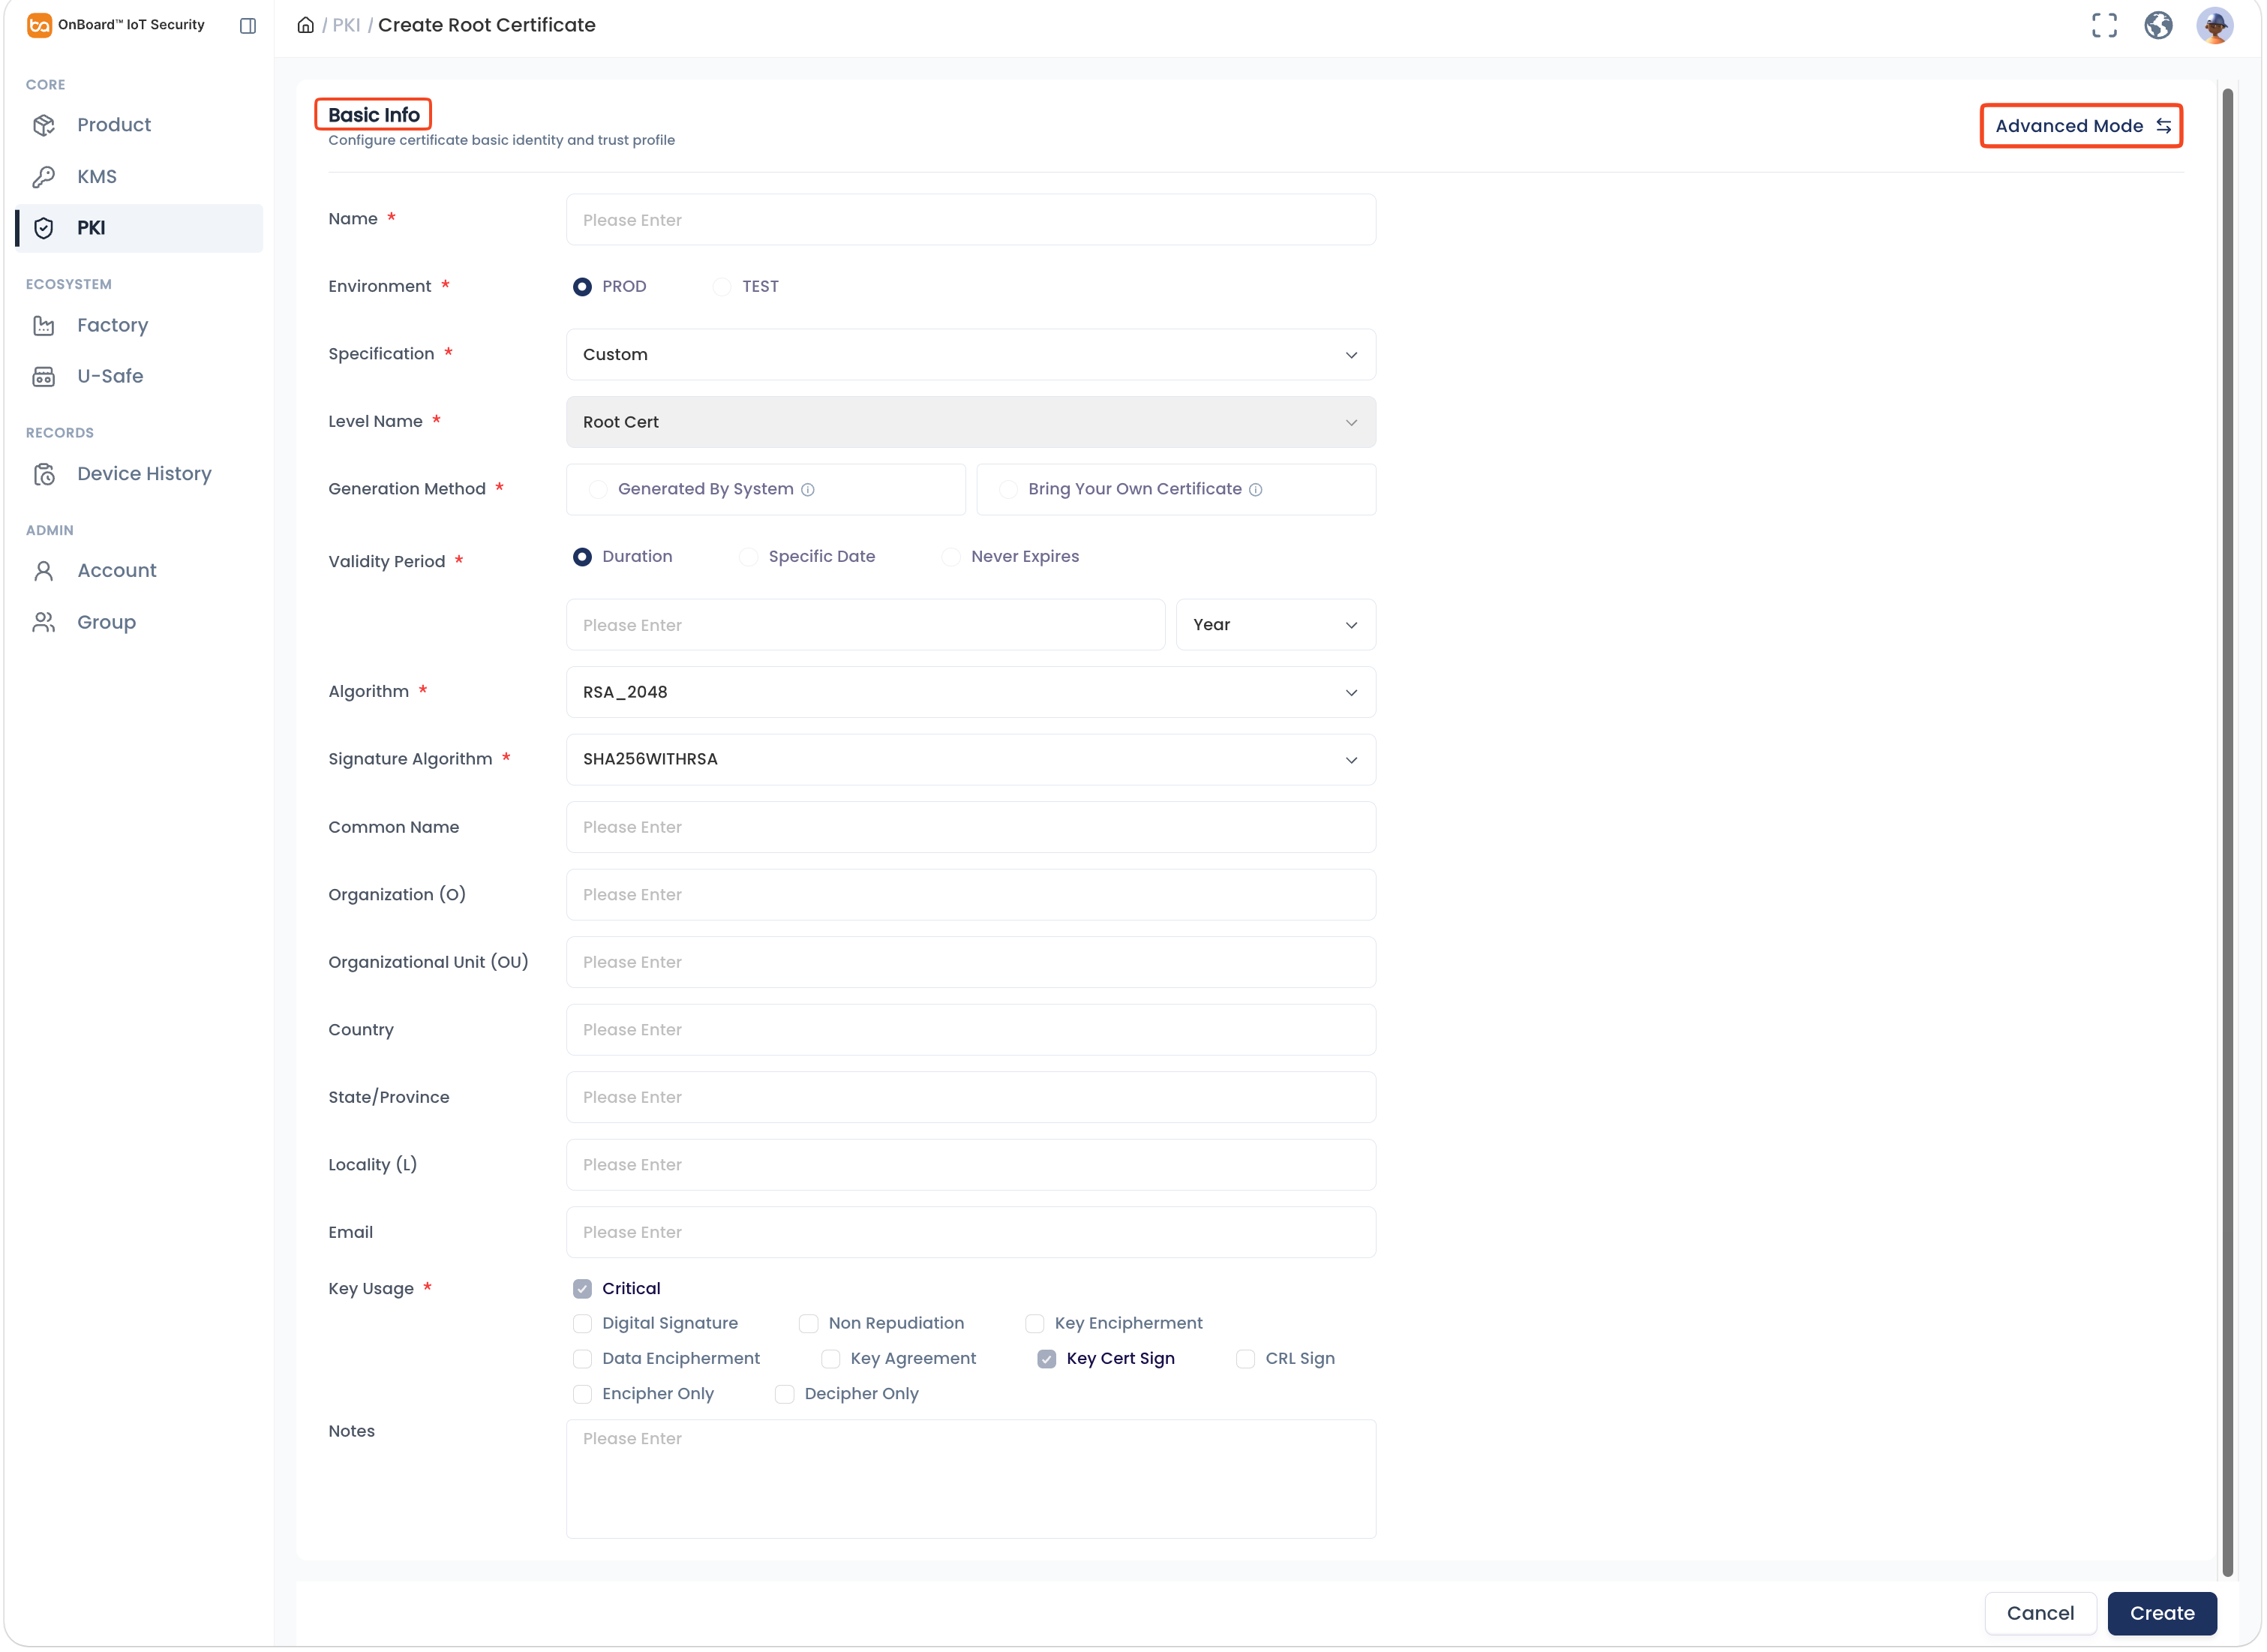
Description of root certificate basic information:
Information Generate by System Bring Your Own Certificate Name The root certificate name must be unique in the same environment. Environment Two environments can be selected: TEST and PROD. Specification Select the Custom specification. Level Name Default is Root Cert. Generation Method No file upload is required. Click the Add  icon to select and upload a root certificate in .pem format, or directly drag and drop your own root certificate into the upload area.
Validity Period You can choose Duration, Specific Date, or Never Expires to set the validity period as needed. Automatically parsed from the certificate content and can't be modified. Algorithm Available algorithms for the certificates. Options include: - RSA_2048
- RSA_3072
- RSA_4096
- ECC_P384
- ECC_P256
- ECC_P521
Automatically parsed from the certificate content and can't be modified. Signature Algorithm Signature algorithms for the certificates. Options include: - SHA256WITHRSA
- SHA384WITHRSA
- SHA512WITHRSA
- SHA256WITHECDSA
- SHA256WITHECDSA
Automatically parsed from the certificate content and can't be modified. Common Name Name of certificate holder. Automatically parsed from the certificate content and can't be modified. Organization (O) Organizational name. N/A Organizational Unit (OU) Organizational unit name. N/A Country Two ISO country codes. N/A State / Province State or province name. N/A Locality (L) City name. N/A Email User email. N/A Key Usage Optional key usages, such as Digital Signature, Non Repudiation, and Key Encipherment. Automatically parsed from the certificate content and can't be modified. Notes Provide additional information related to the root certificate, such as special requirements and important notes. The configuration of advanced mode
 The configuration of advanced mode
-
After verifying that the information is correct, click Create to complete the root certificate creation.
tipBy default, the certificate creator is set as the Admin. To change the Admin, click the Options
 icon for the Admin and select Transfer Admin on the Member tab, then choose the new Admin and click Confirm.
Before creating an intermediate certificate, please ensure that at least one root certificate has been created so that it can be selected and inherited during configuration.
The default mode is simple mode, which requires only basic information. If you need to configure additional fields for the system-generated certificate, you can switch to advanced mode by clicking Advanced Mode in the top-right corner of the page.
-
On the PKI page, click the Options
icon for the corresponding root certificate and select Add.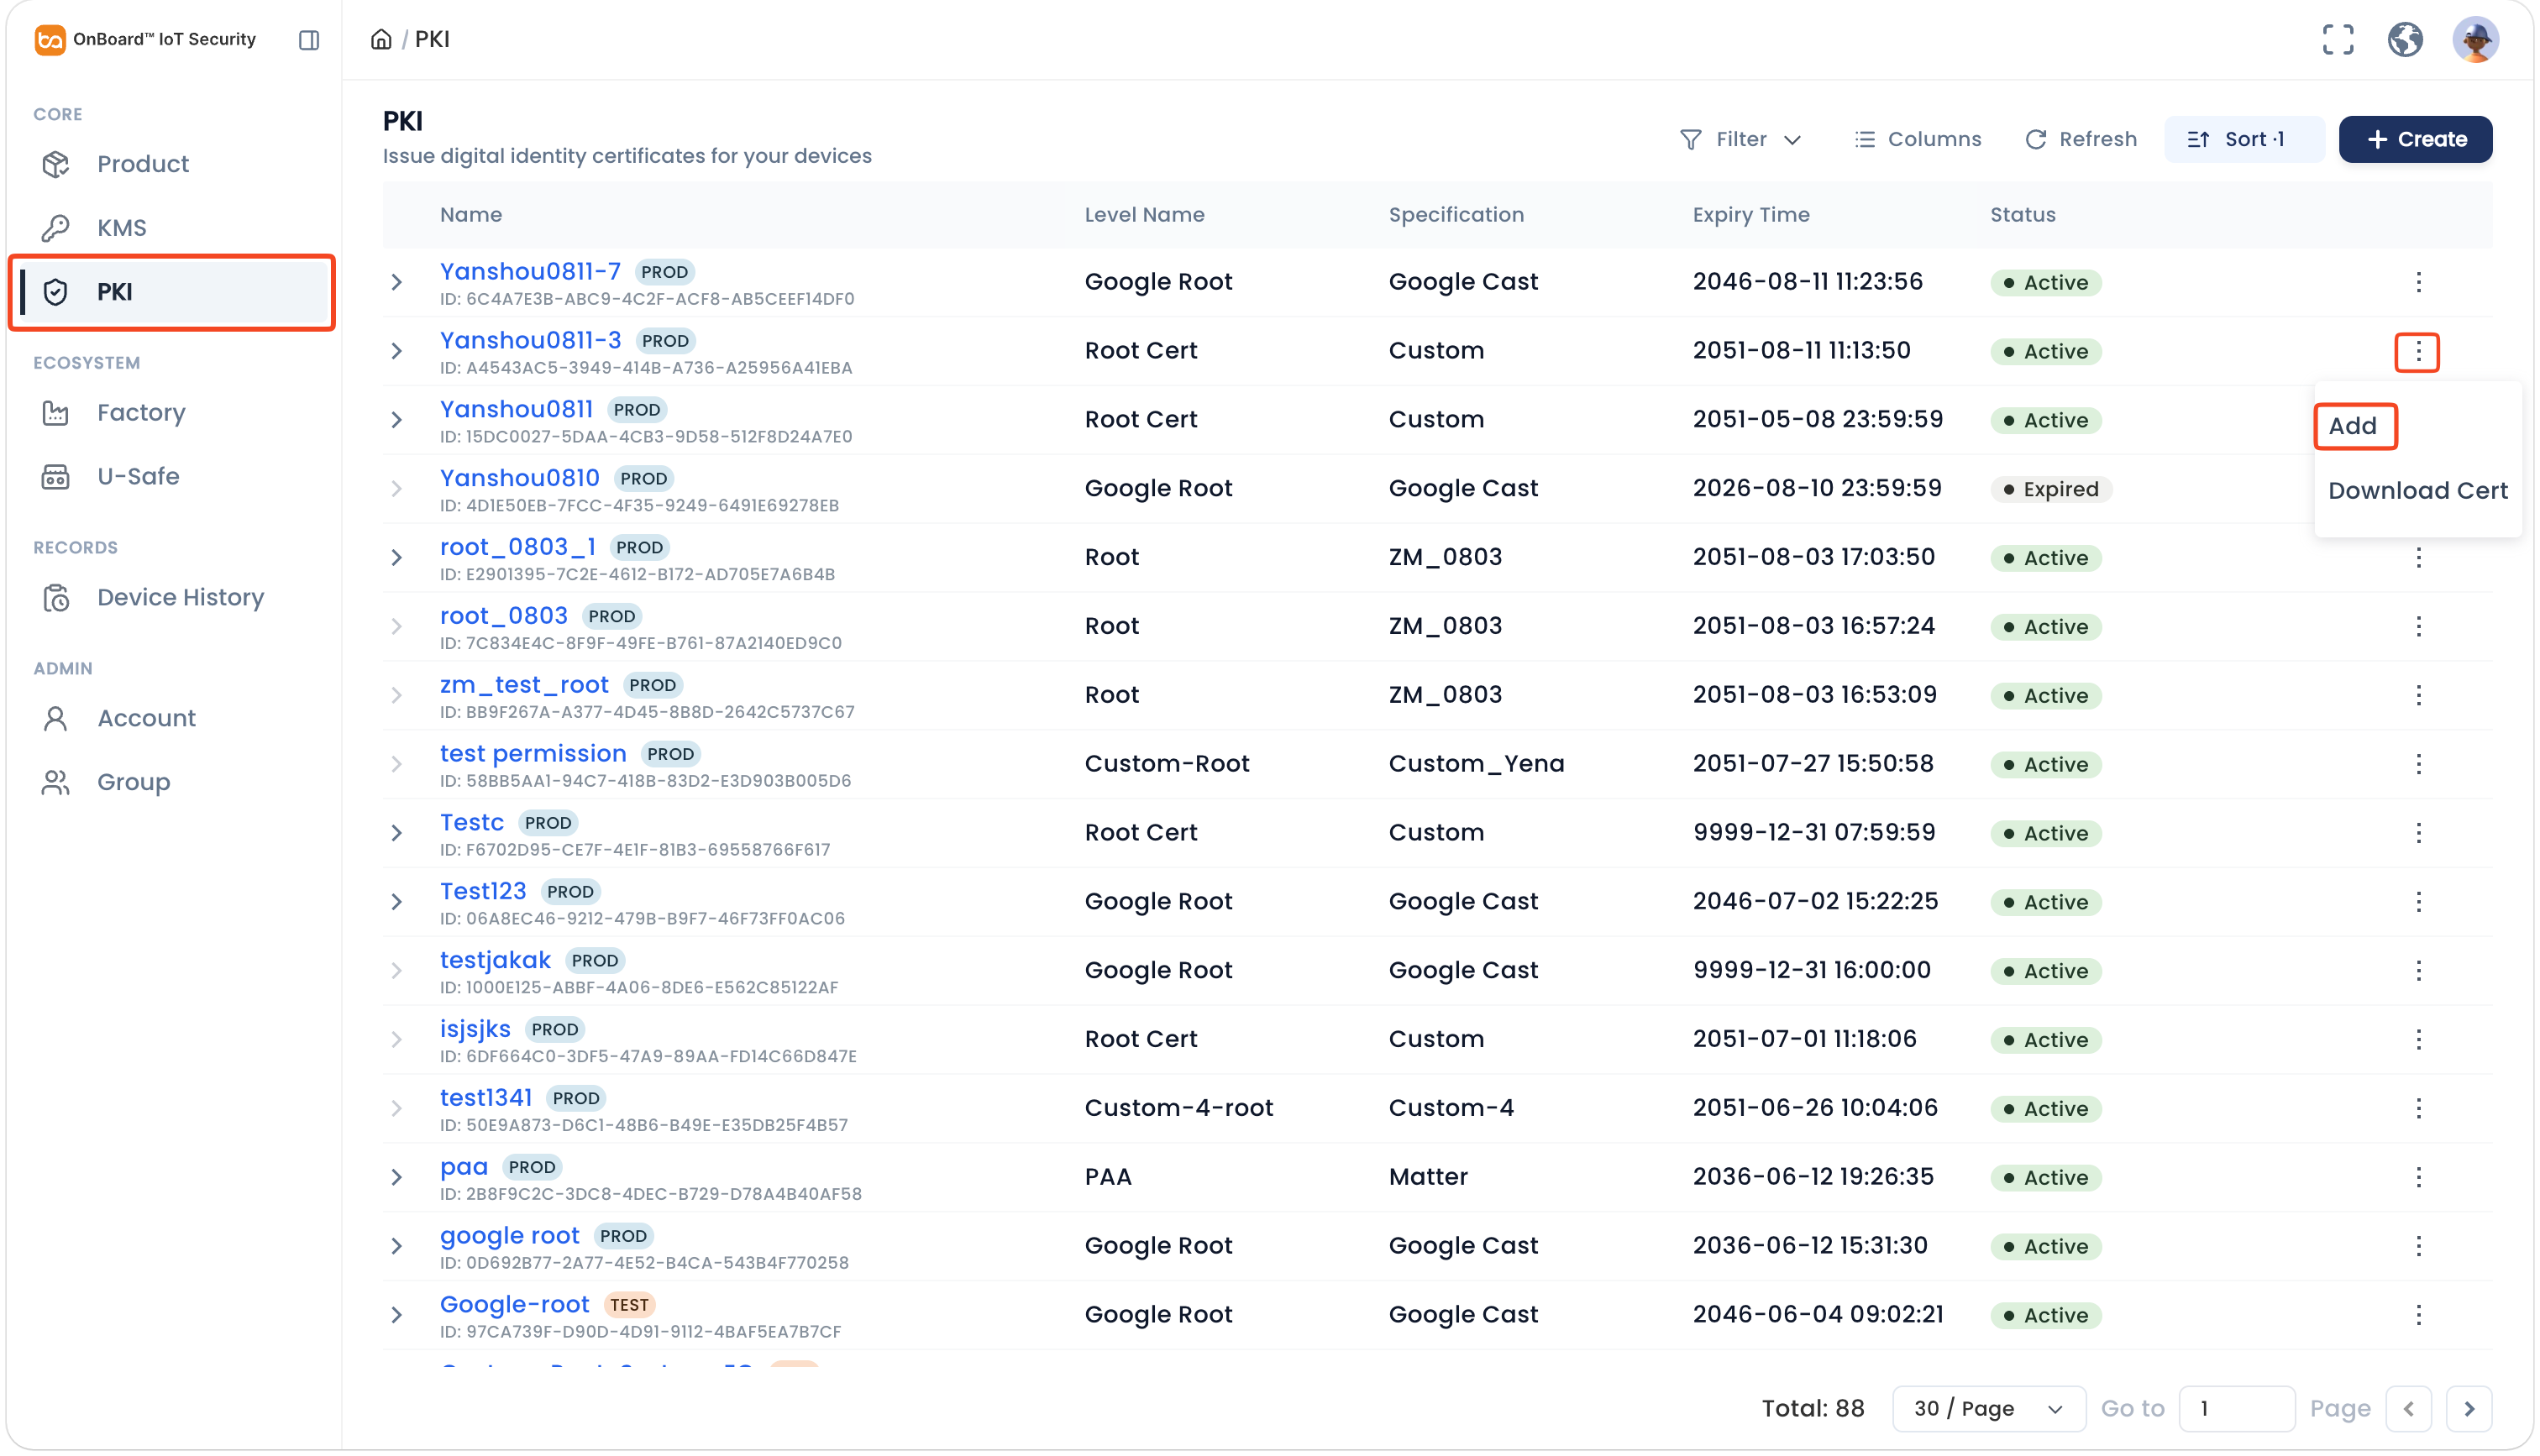
-
On the Basic Info section, select and enter the basic information.
-
If the intermediate certificate is inherited from your own root certificate, you can select Generate by System or Bring Your Own Certificate as needed
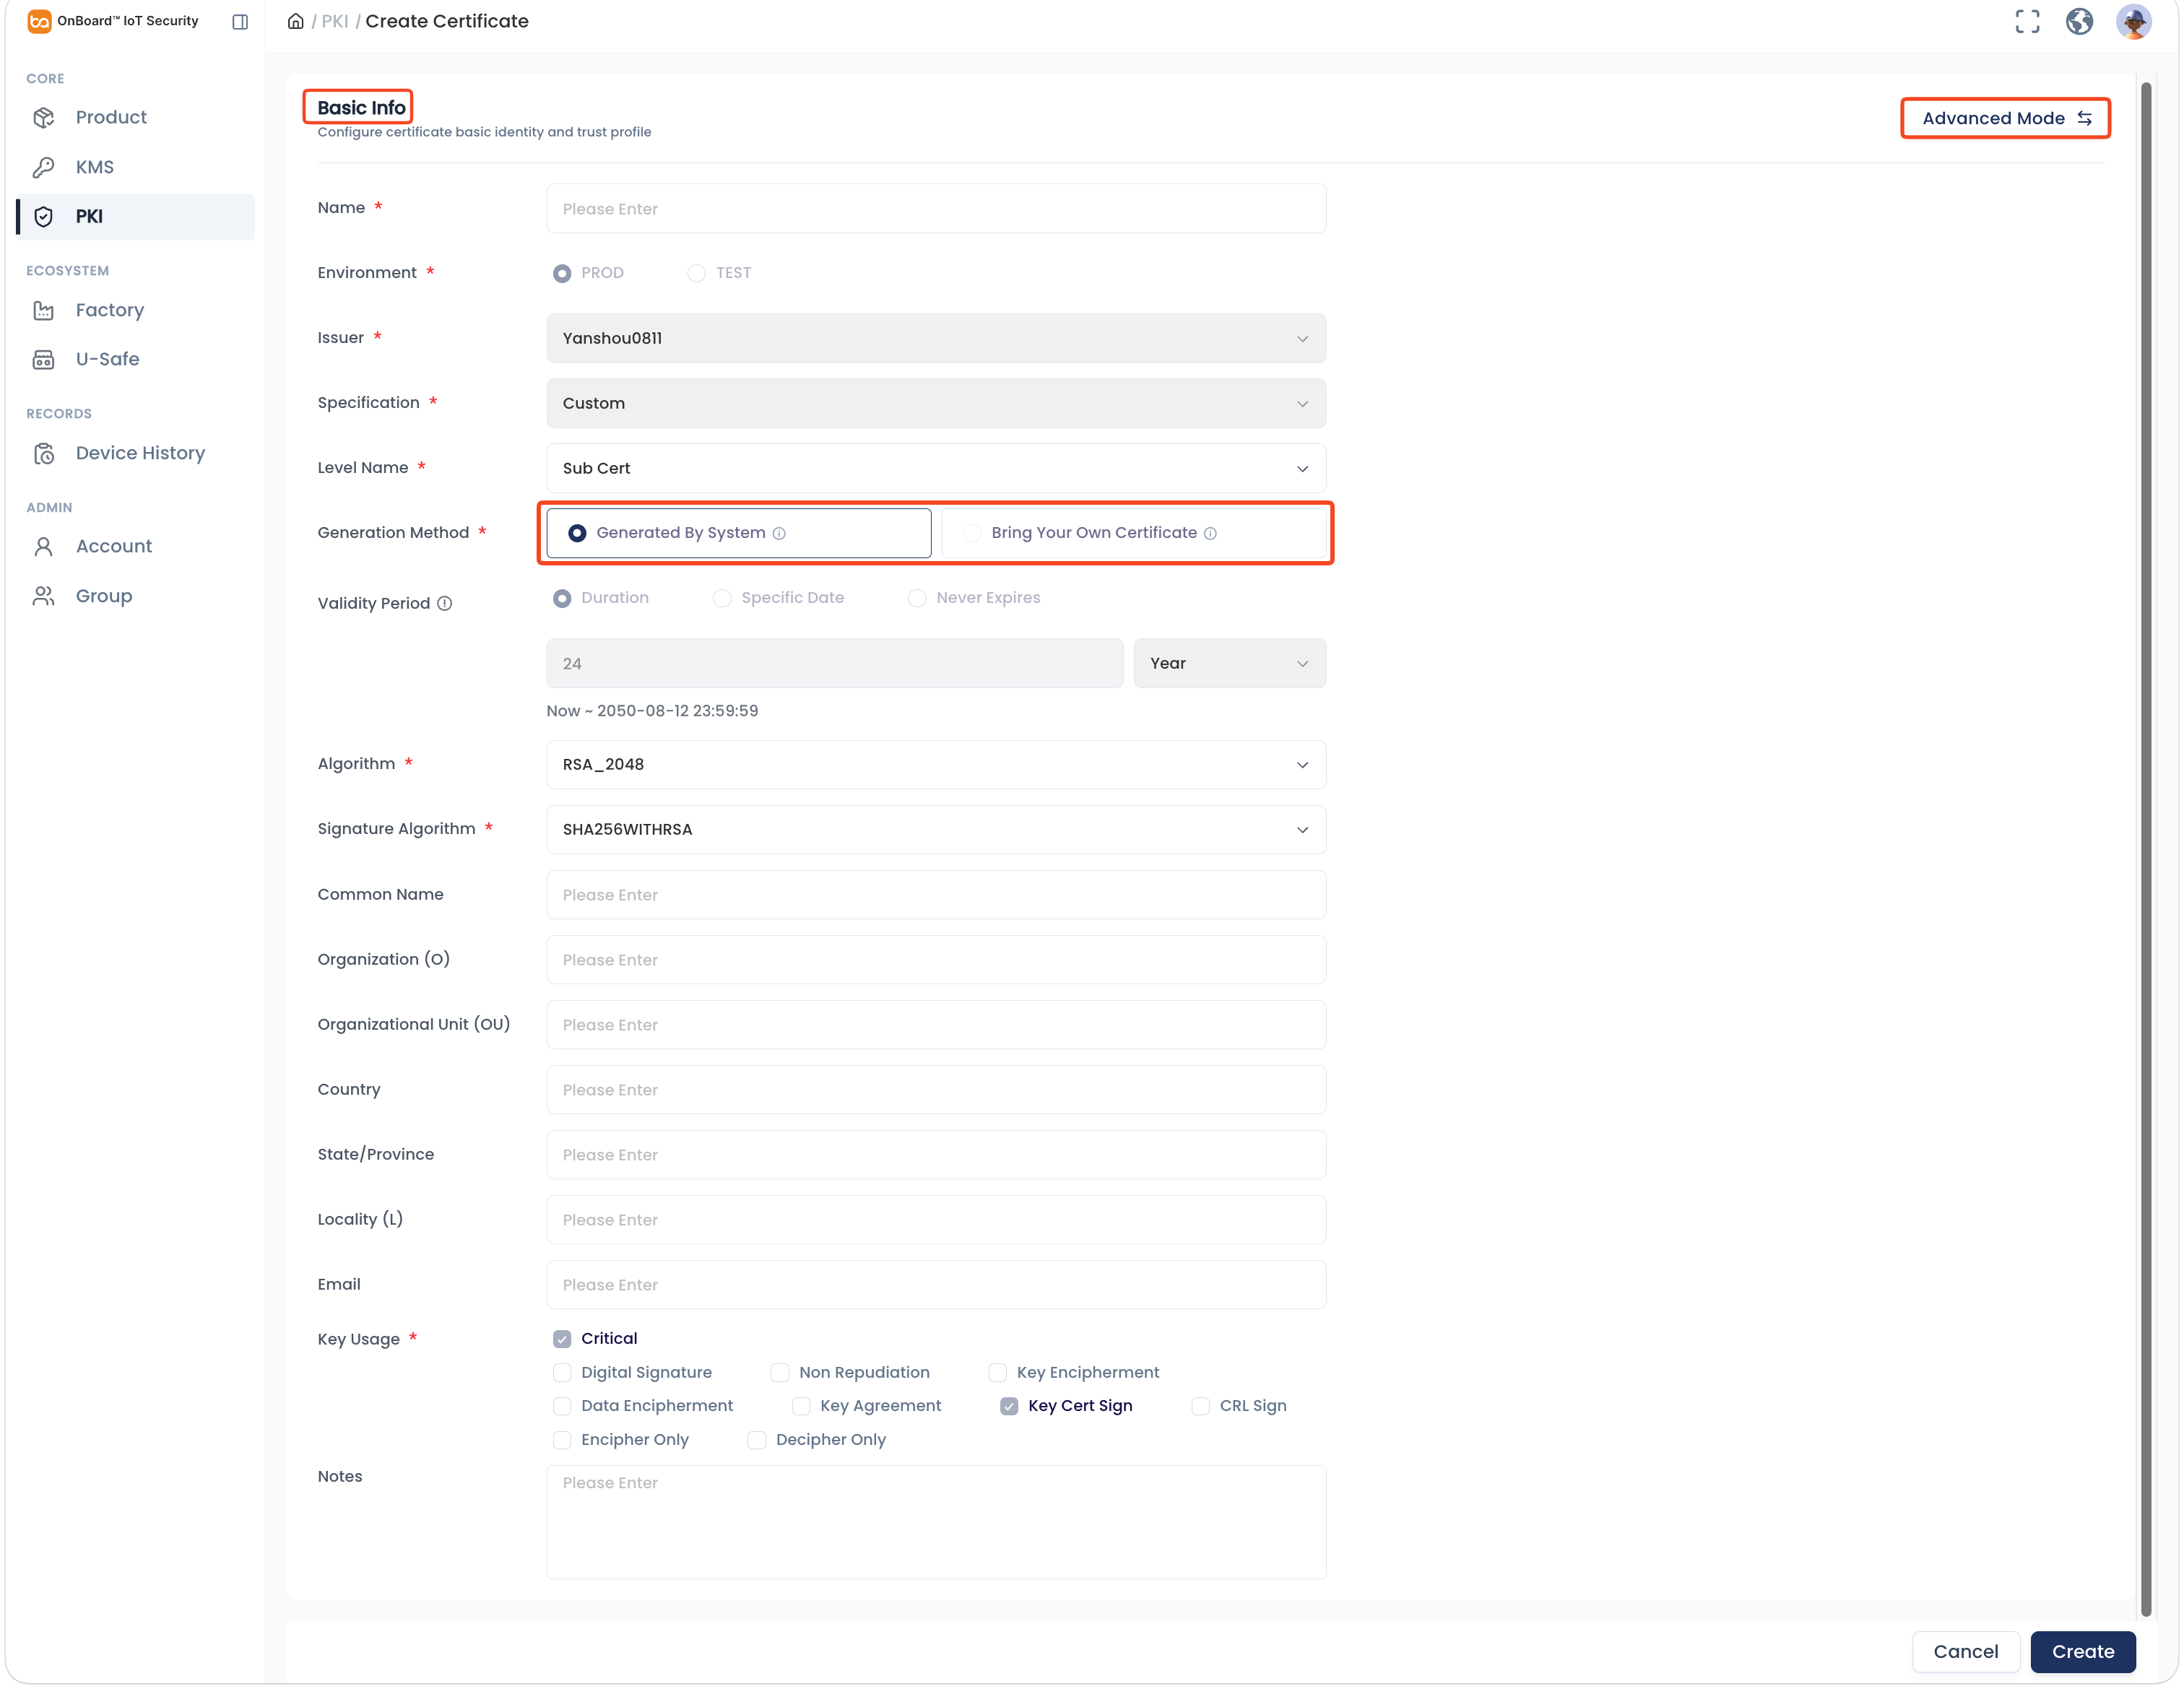
Information Generate by System Bring Your Own Certificate Name Within the same certificate chain, certificate names at the same hierarchy level must be unique. Environment The environment is inherited from the root certificate. Issuer The inherited root certificate. Specification Default is Custom. Level Name Default is Sub Cert. Generation Method No file upload is required. Click the Add icon to select and upload a intermediate certificate in .pem format, or directly drag your own intermediate certificate into the upload area.Validity Period The validity period will be inherited from the root certificate. Automatically parsed from the certificate content and can't be modified. Algorithm Available algorithms for the certificates. Options include: - RSA_2048
- RSA_3072
- RSA_4096
- ECC_P384
- ECC_P256
- ECC_P521
Automatically parsed from the certificate content and can't be modified. Signature Algorithm Signature algorithms for the certificates. Options include: - SHA256WITHRSA
- SHA384WITHRSA
- SHA512WITHRSA
- SHA256WITHECDSA
- SHA256WITHECDSA
Automatically parsed from the certificate content and can't be modified. Common Name Name of certificate holder. Automatically parsed from the certificate content and can't be modified. Organization (O) Organizational name. N/A Organizational Unit (OU) Organizational unit name. N/A Country Two ISO country codes. N/A State / Province State or province name. N/A Locality (L) City name. N/A Email User email. N/A Key Usage Optional key usages, such as Digital Signature, Non Repudiation, and Key Encipherment. Automatically parsed from the certificate content and can't be modified. Notes Provide additional information related to the intermediate certificate, such as special requirements and important notes. -
If the intermediate certificate is inherited from the system-generated root certificate
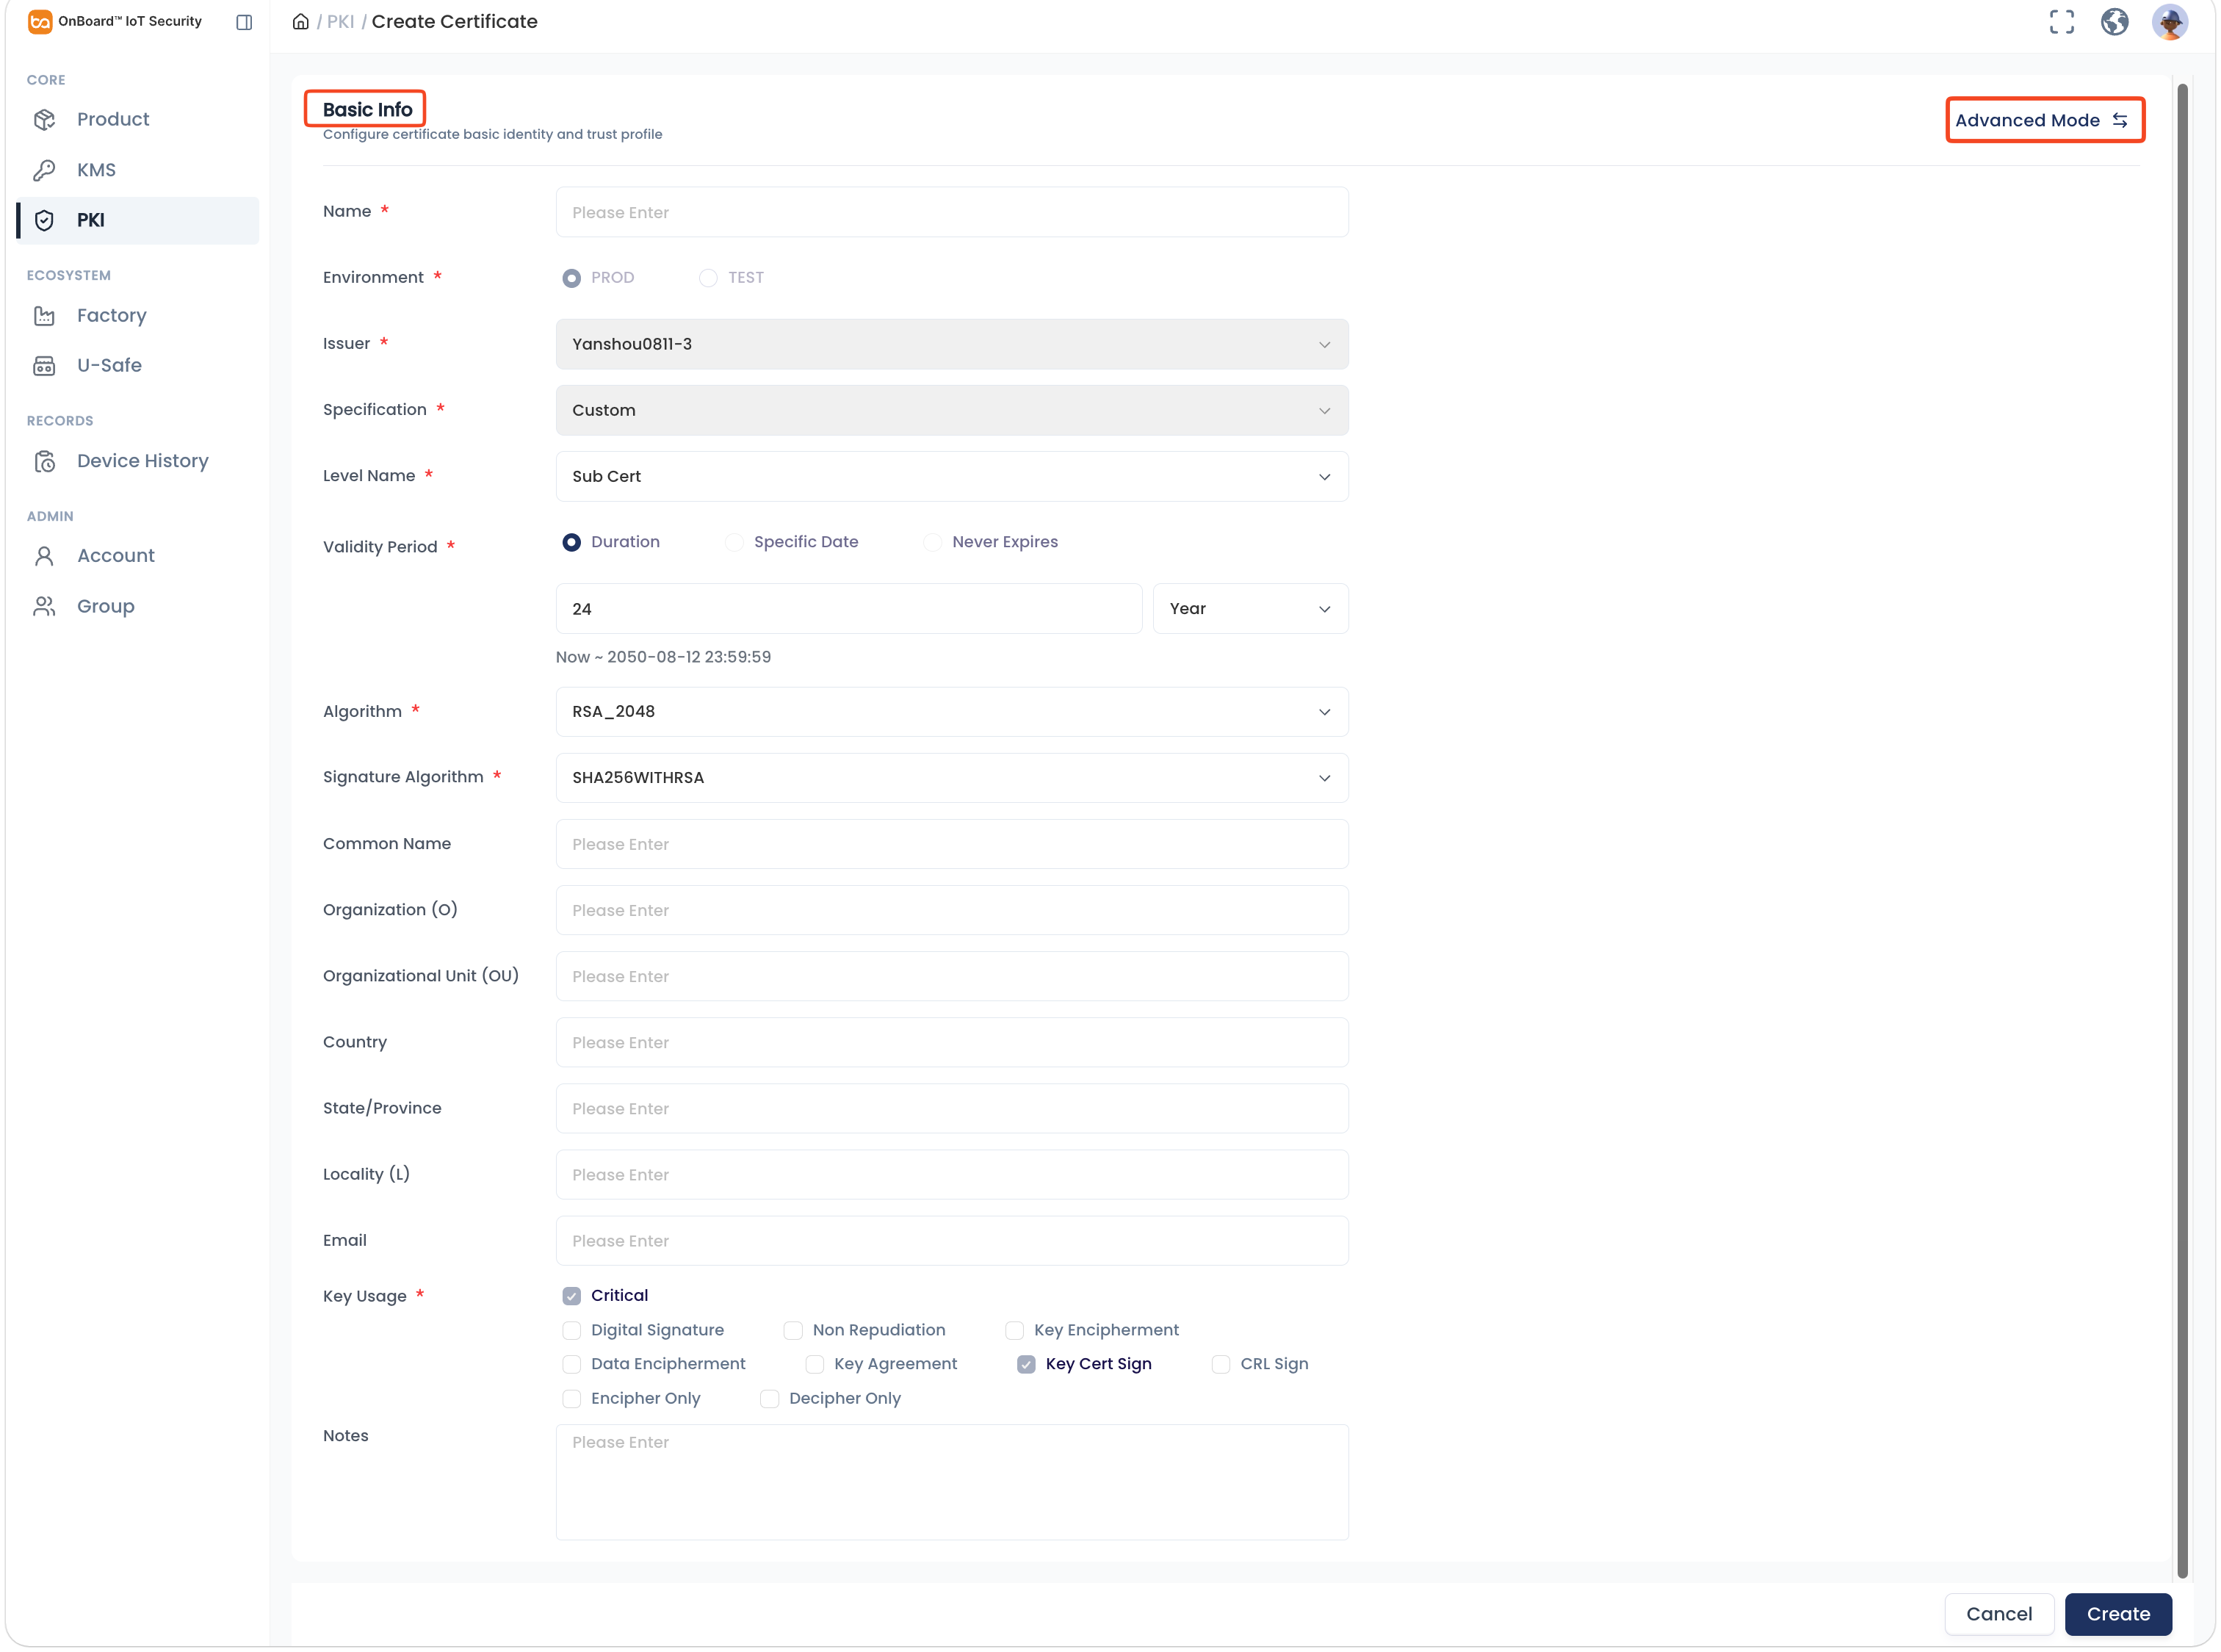
Information Description Name Within the same certificate chain, certificate names at the same hierarchy level must be unique. Environment The environment is inherited from the root certificate. Issuer The inherited root certificate. Specification Default is Custom. Level Name Default is Sub Cert. Validity Period You can choose Duration, Specific Date, or Never Expires to set the validity period as needed. Setting an expiration date beyond that of the inherited certificate may result in certificate chain validation failures, client trust issues, and audit risks. Algorithm Available algorithms for the certificates. Options include: - RSA_2048
- RSA_3072
- RSA_4096
- ECC_P384
- ECC_P256
- ECC_P521
Signature Algorithm Signature algorithms for the certificates. Options include: - SHA256WITHRSA
- SHA384WITHRSA
- SHA512WITHRSA
- SHA256WITHECDSA
- SHA256WITHECDSA
Common Name Name of certificate holder. Organization (O) Organizational name. Organizational Unit (OU) Organizational unit name. Country Two ISO country codes. State / Province State or province name. Locality (L) City name. Email User email. Key Usage Optional key usages, such as Digital Signature, Non Repudiation, and Key Encipherment. Notes Provide additional information related to the intermediate certificate, such as special requirements and important notes.
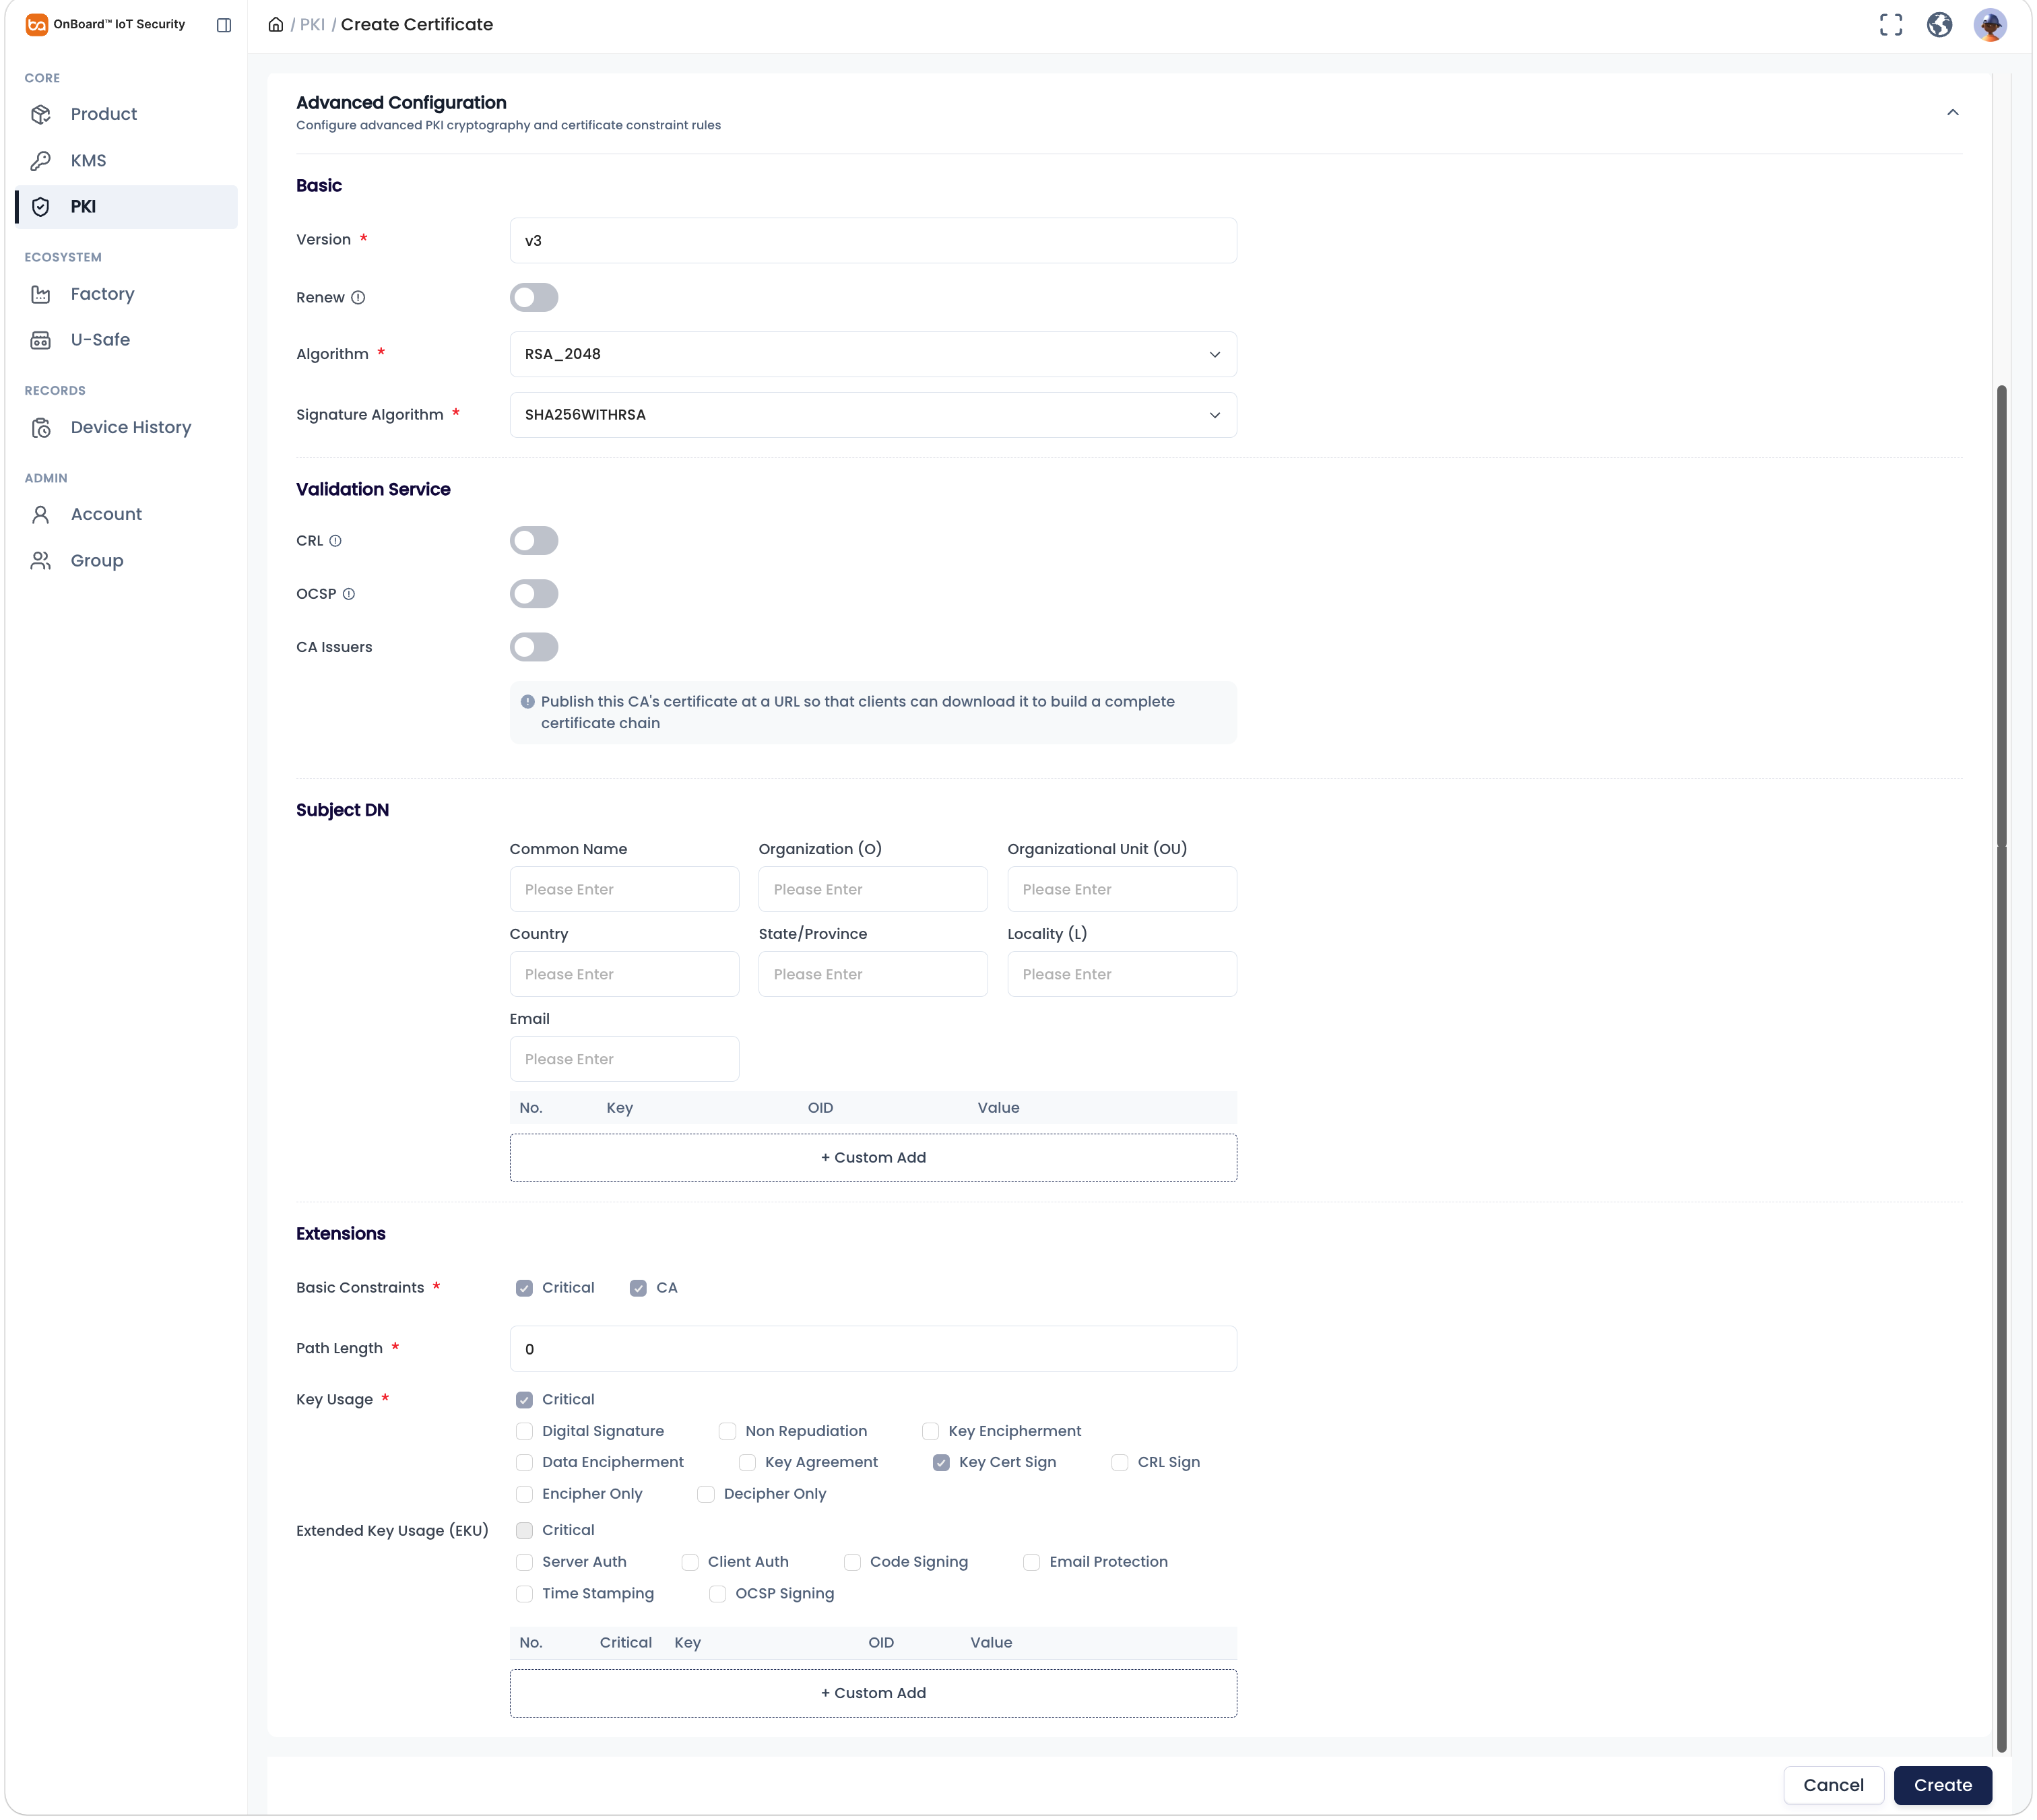
The configuration of advanced mode
The configuration of advanced mode -
-
After verifying that the information is correct, click Create to complete the intermediate certificate creation.
tipBy default, the certificate creator is set as the Admin. To change the Admin, click the Options
icon for the Admin and select Transfer Admin on the Member tab, then choose the new Admin and click Confirm.When creating an intermediate certificate, if the issuer is your own root certificate, you must complete the CSR (Certificate Signing Request) configuration for the intermediate certificate. Before the CSR configuration is completed, the certificate will remain in the Pending status and can't be used.
CSR configuration steps for the intermediate certificate
When creating an intermediate certificate, if the issuer is your own root certificate, refer to the following steps to complete the CSR configuration.
-
On the PKI page, expand the corresponding certificate chain, and then click the corresponding intermediate certificate.
-
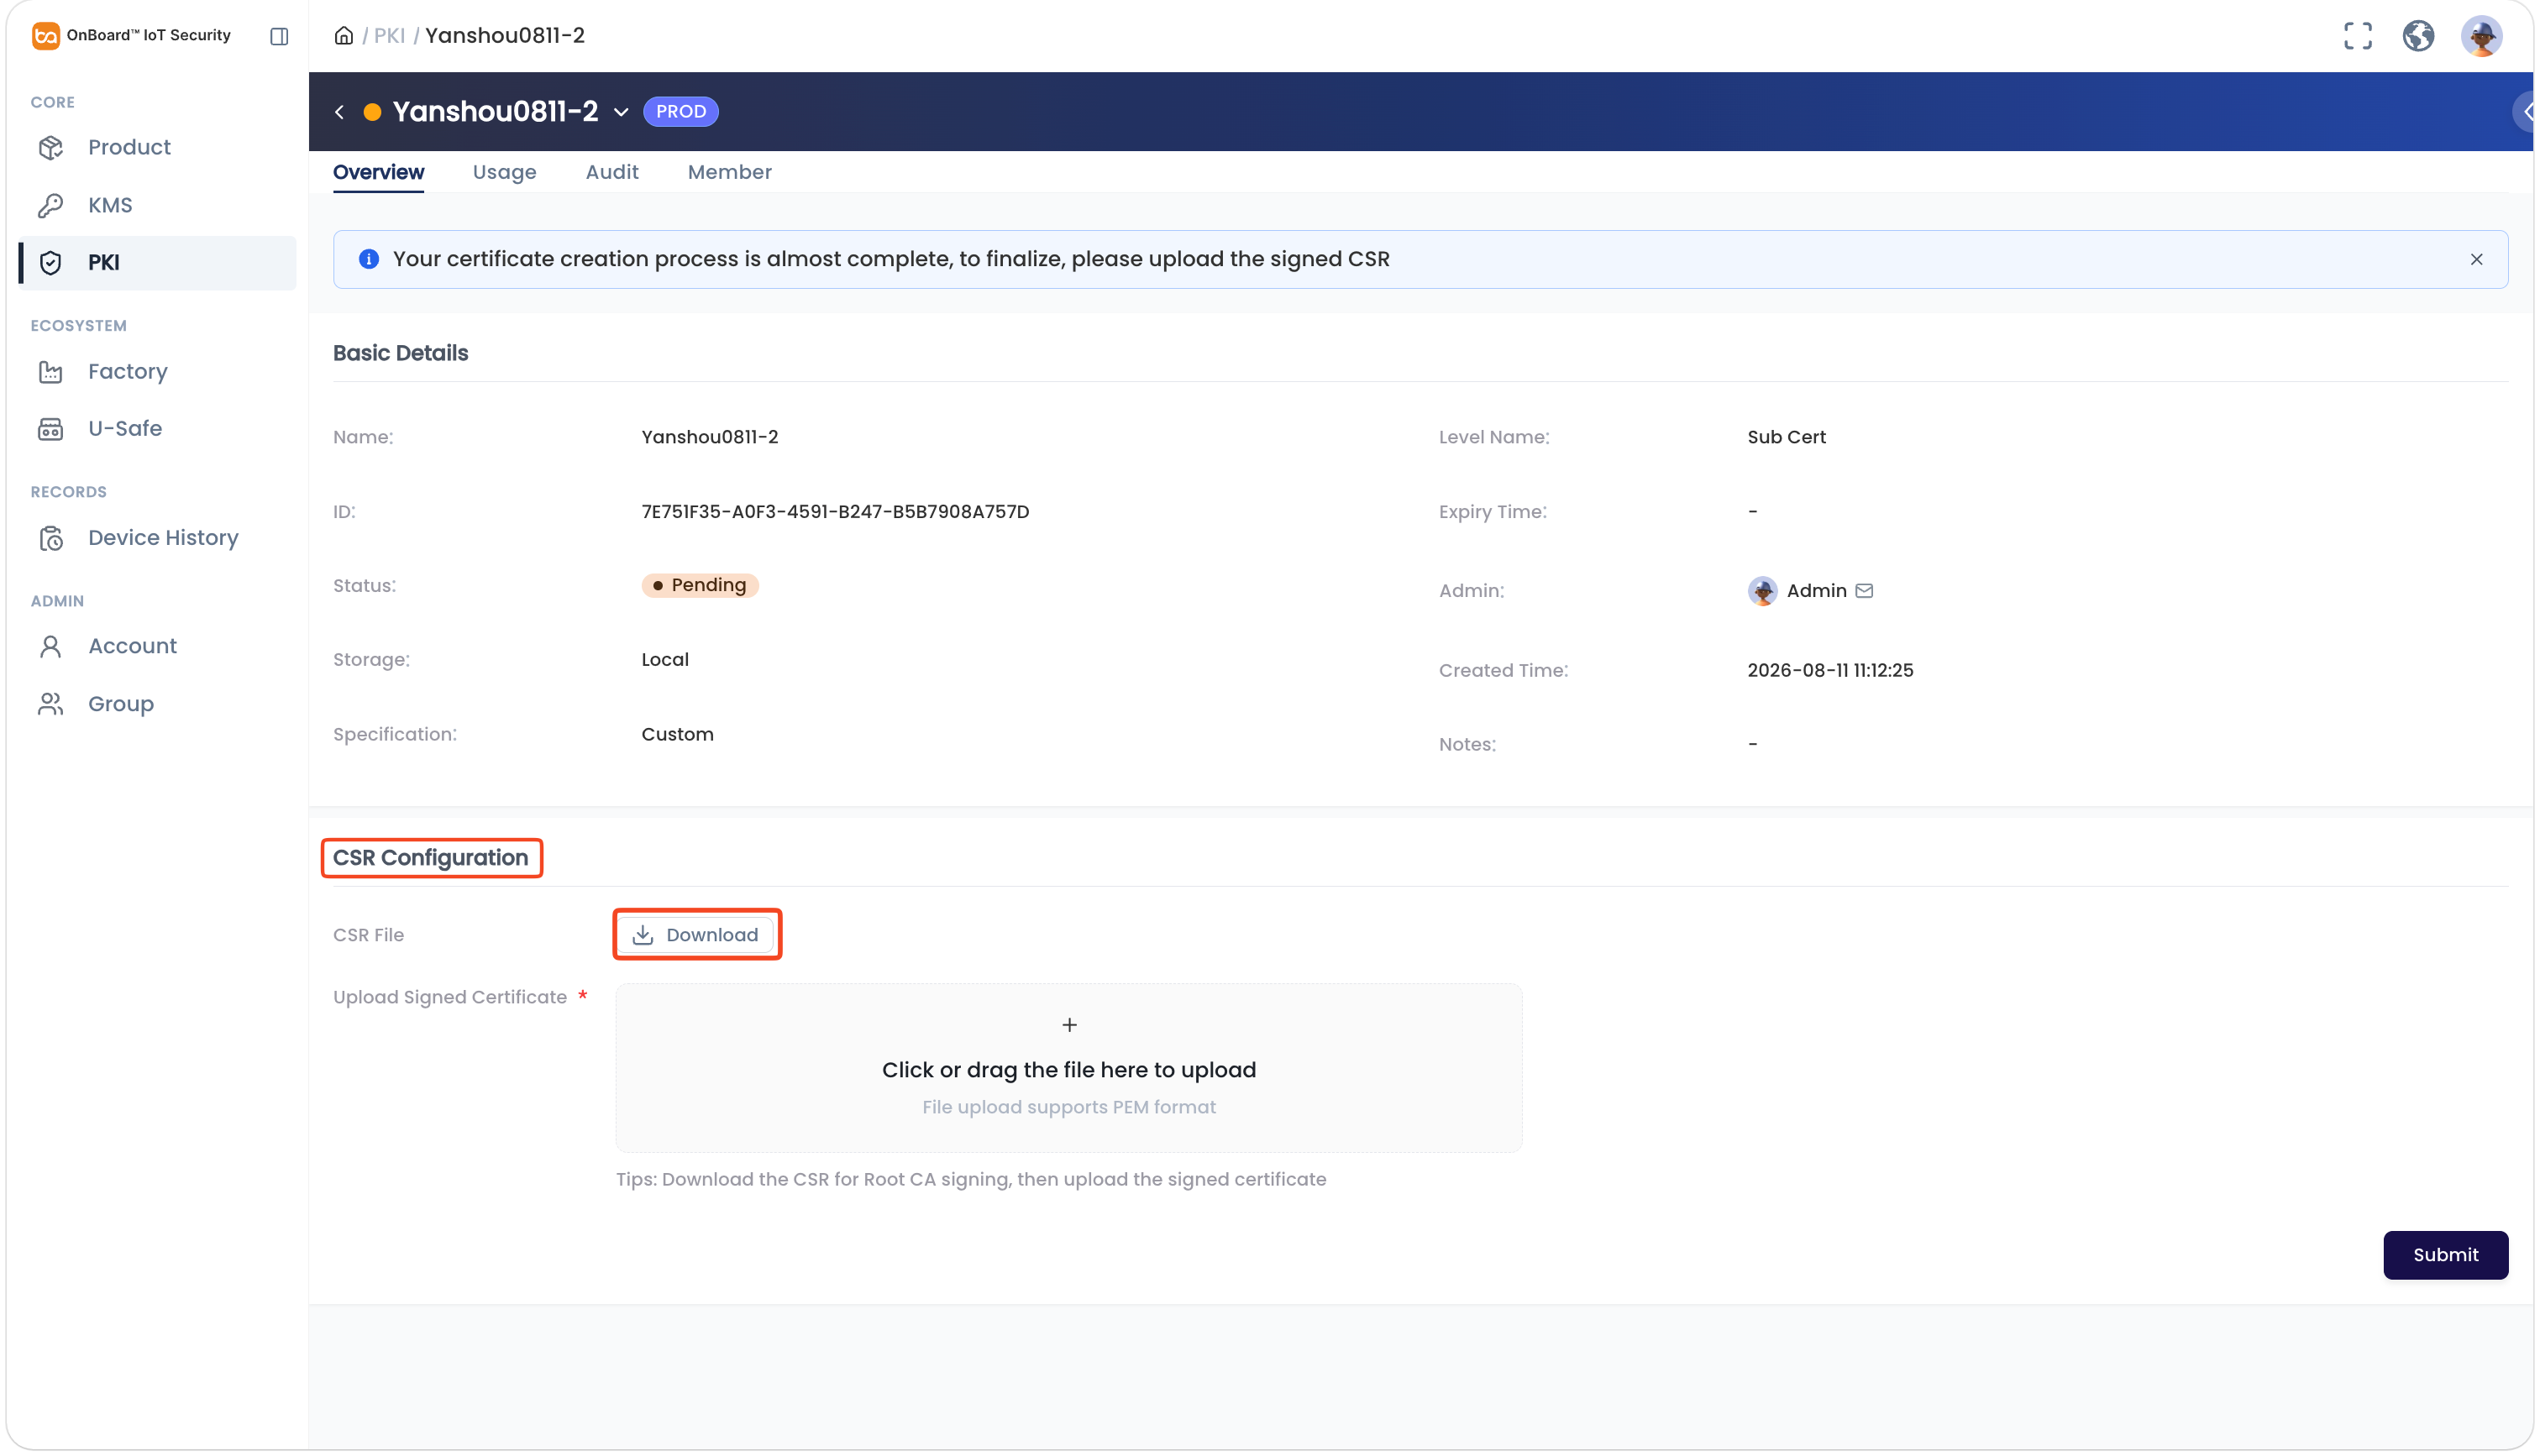
Locate the CSR Configuration section on the certificate page, click the Download
 icon to download the CSR file. Then, use your Root CA (Certificate Authority) to sign the file, thereby generating an intermediate certificate signed by the Root CA.
-
After an intermediate certificate is generated, click the Add
icon in the upload area, select and upload the intermediate certificate in .pem format, or directly drag and drop your intermediate certificate into the upload area. -
Click Submit. Once the configuration is completed, the intermediate certificate status will change to Normal.
Before creating an end entity template, please ensure that at least one root certificate or intermediate certificate has been created so that it can be selected and inherited during configuration.
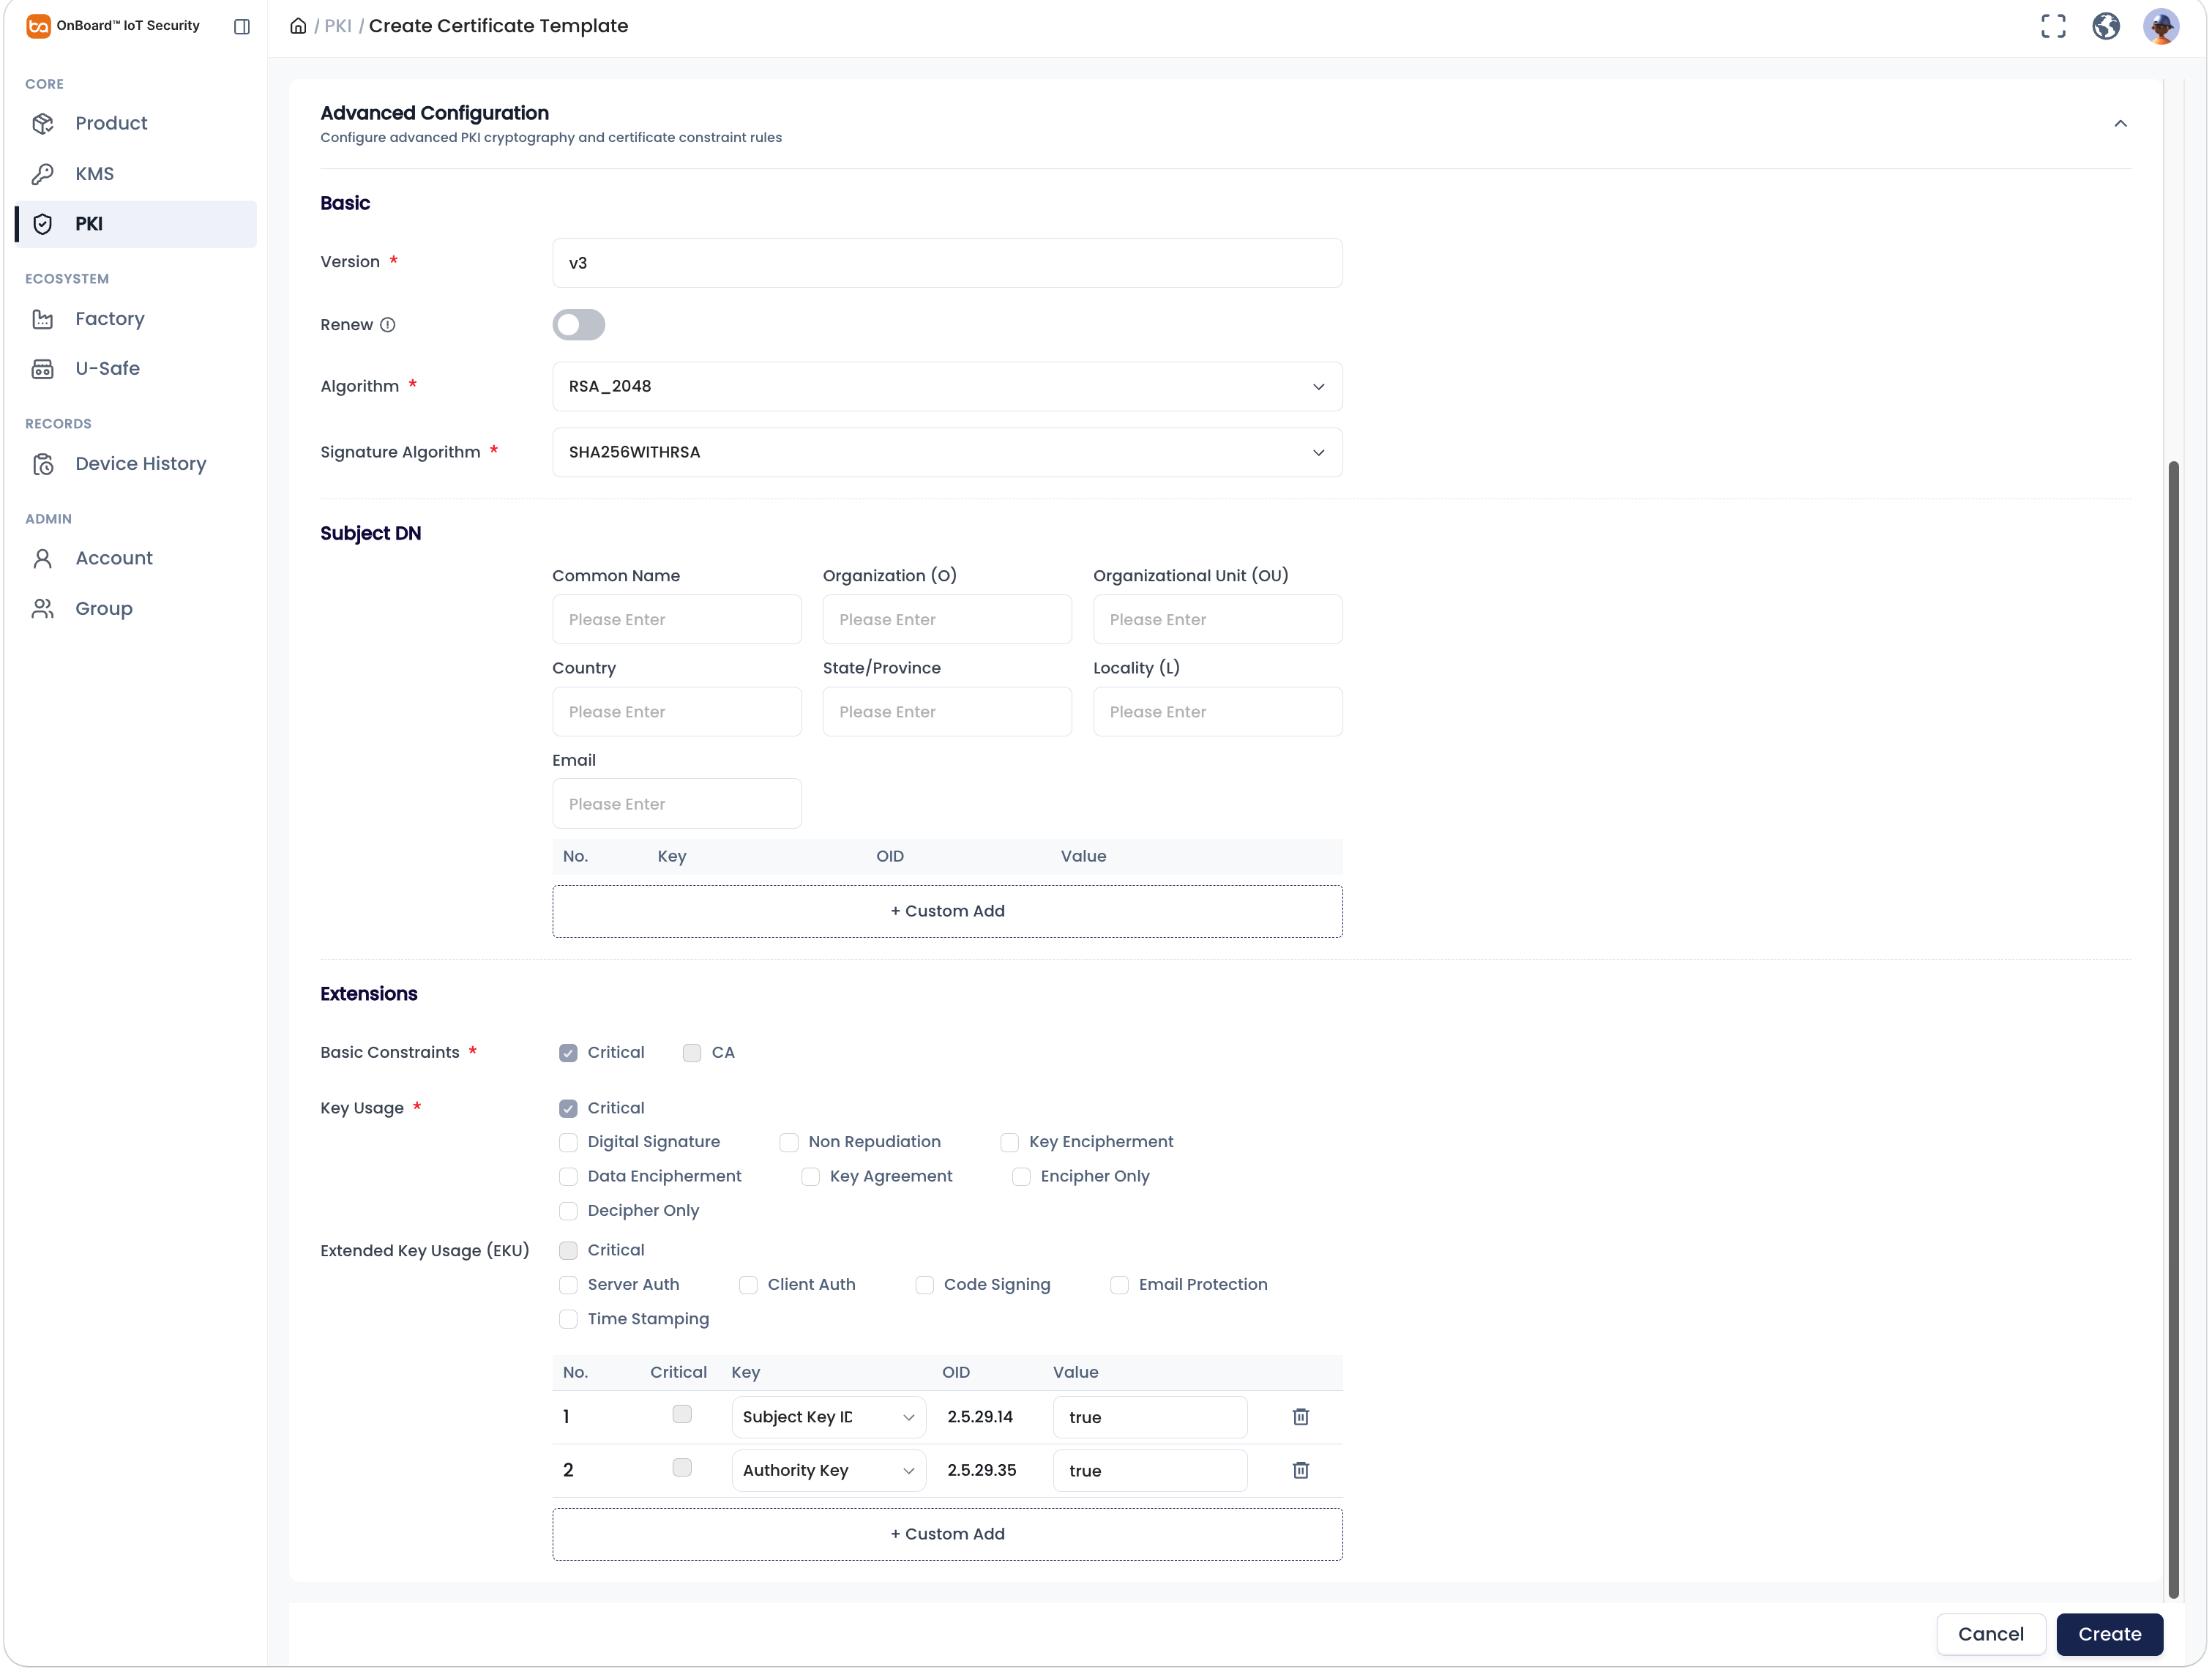
The default mode is simple mode, which requires only basic information. If you need to configure additional fields for the system-generated certificate, you can switch to advanced mode by clicking Advanced Mode in the top-right corner of the page.
-
On the PKI page, expand the corresponding certificate chain, click the Options
icon for the corresponding root or intermediate certificate and select Add.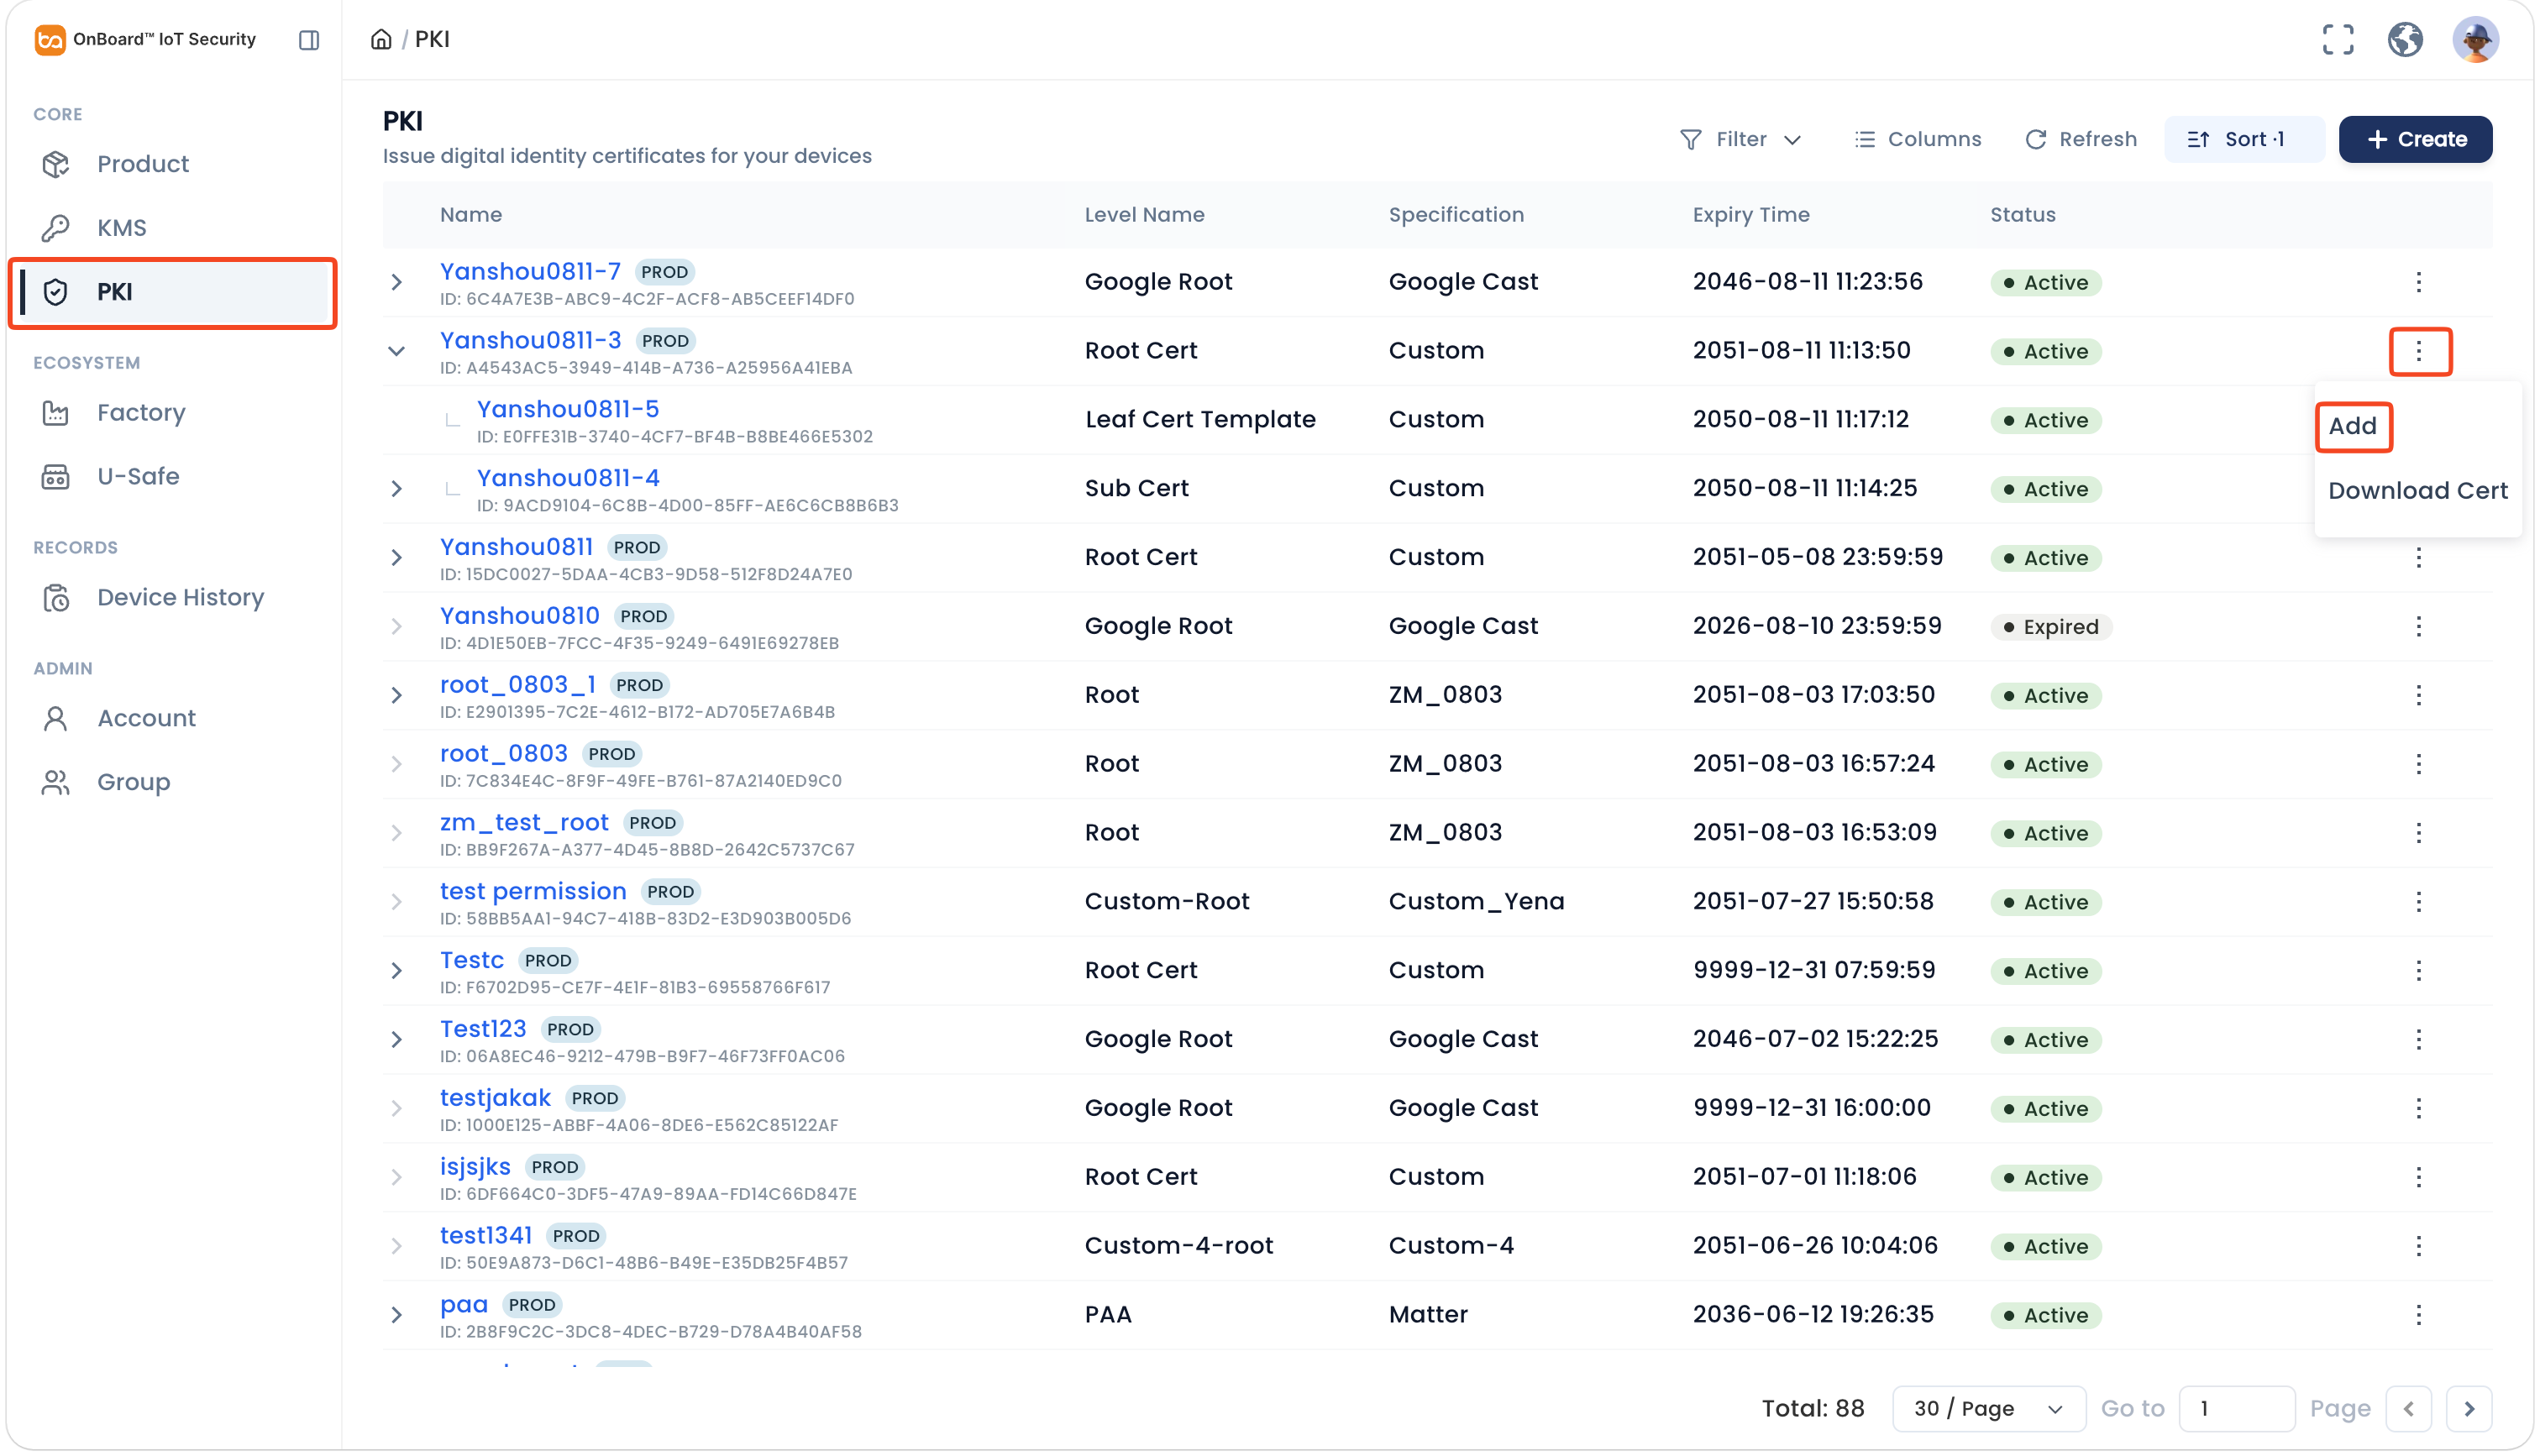
-
On the Basic Info section, select and enter the basic information.
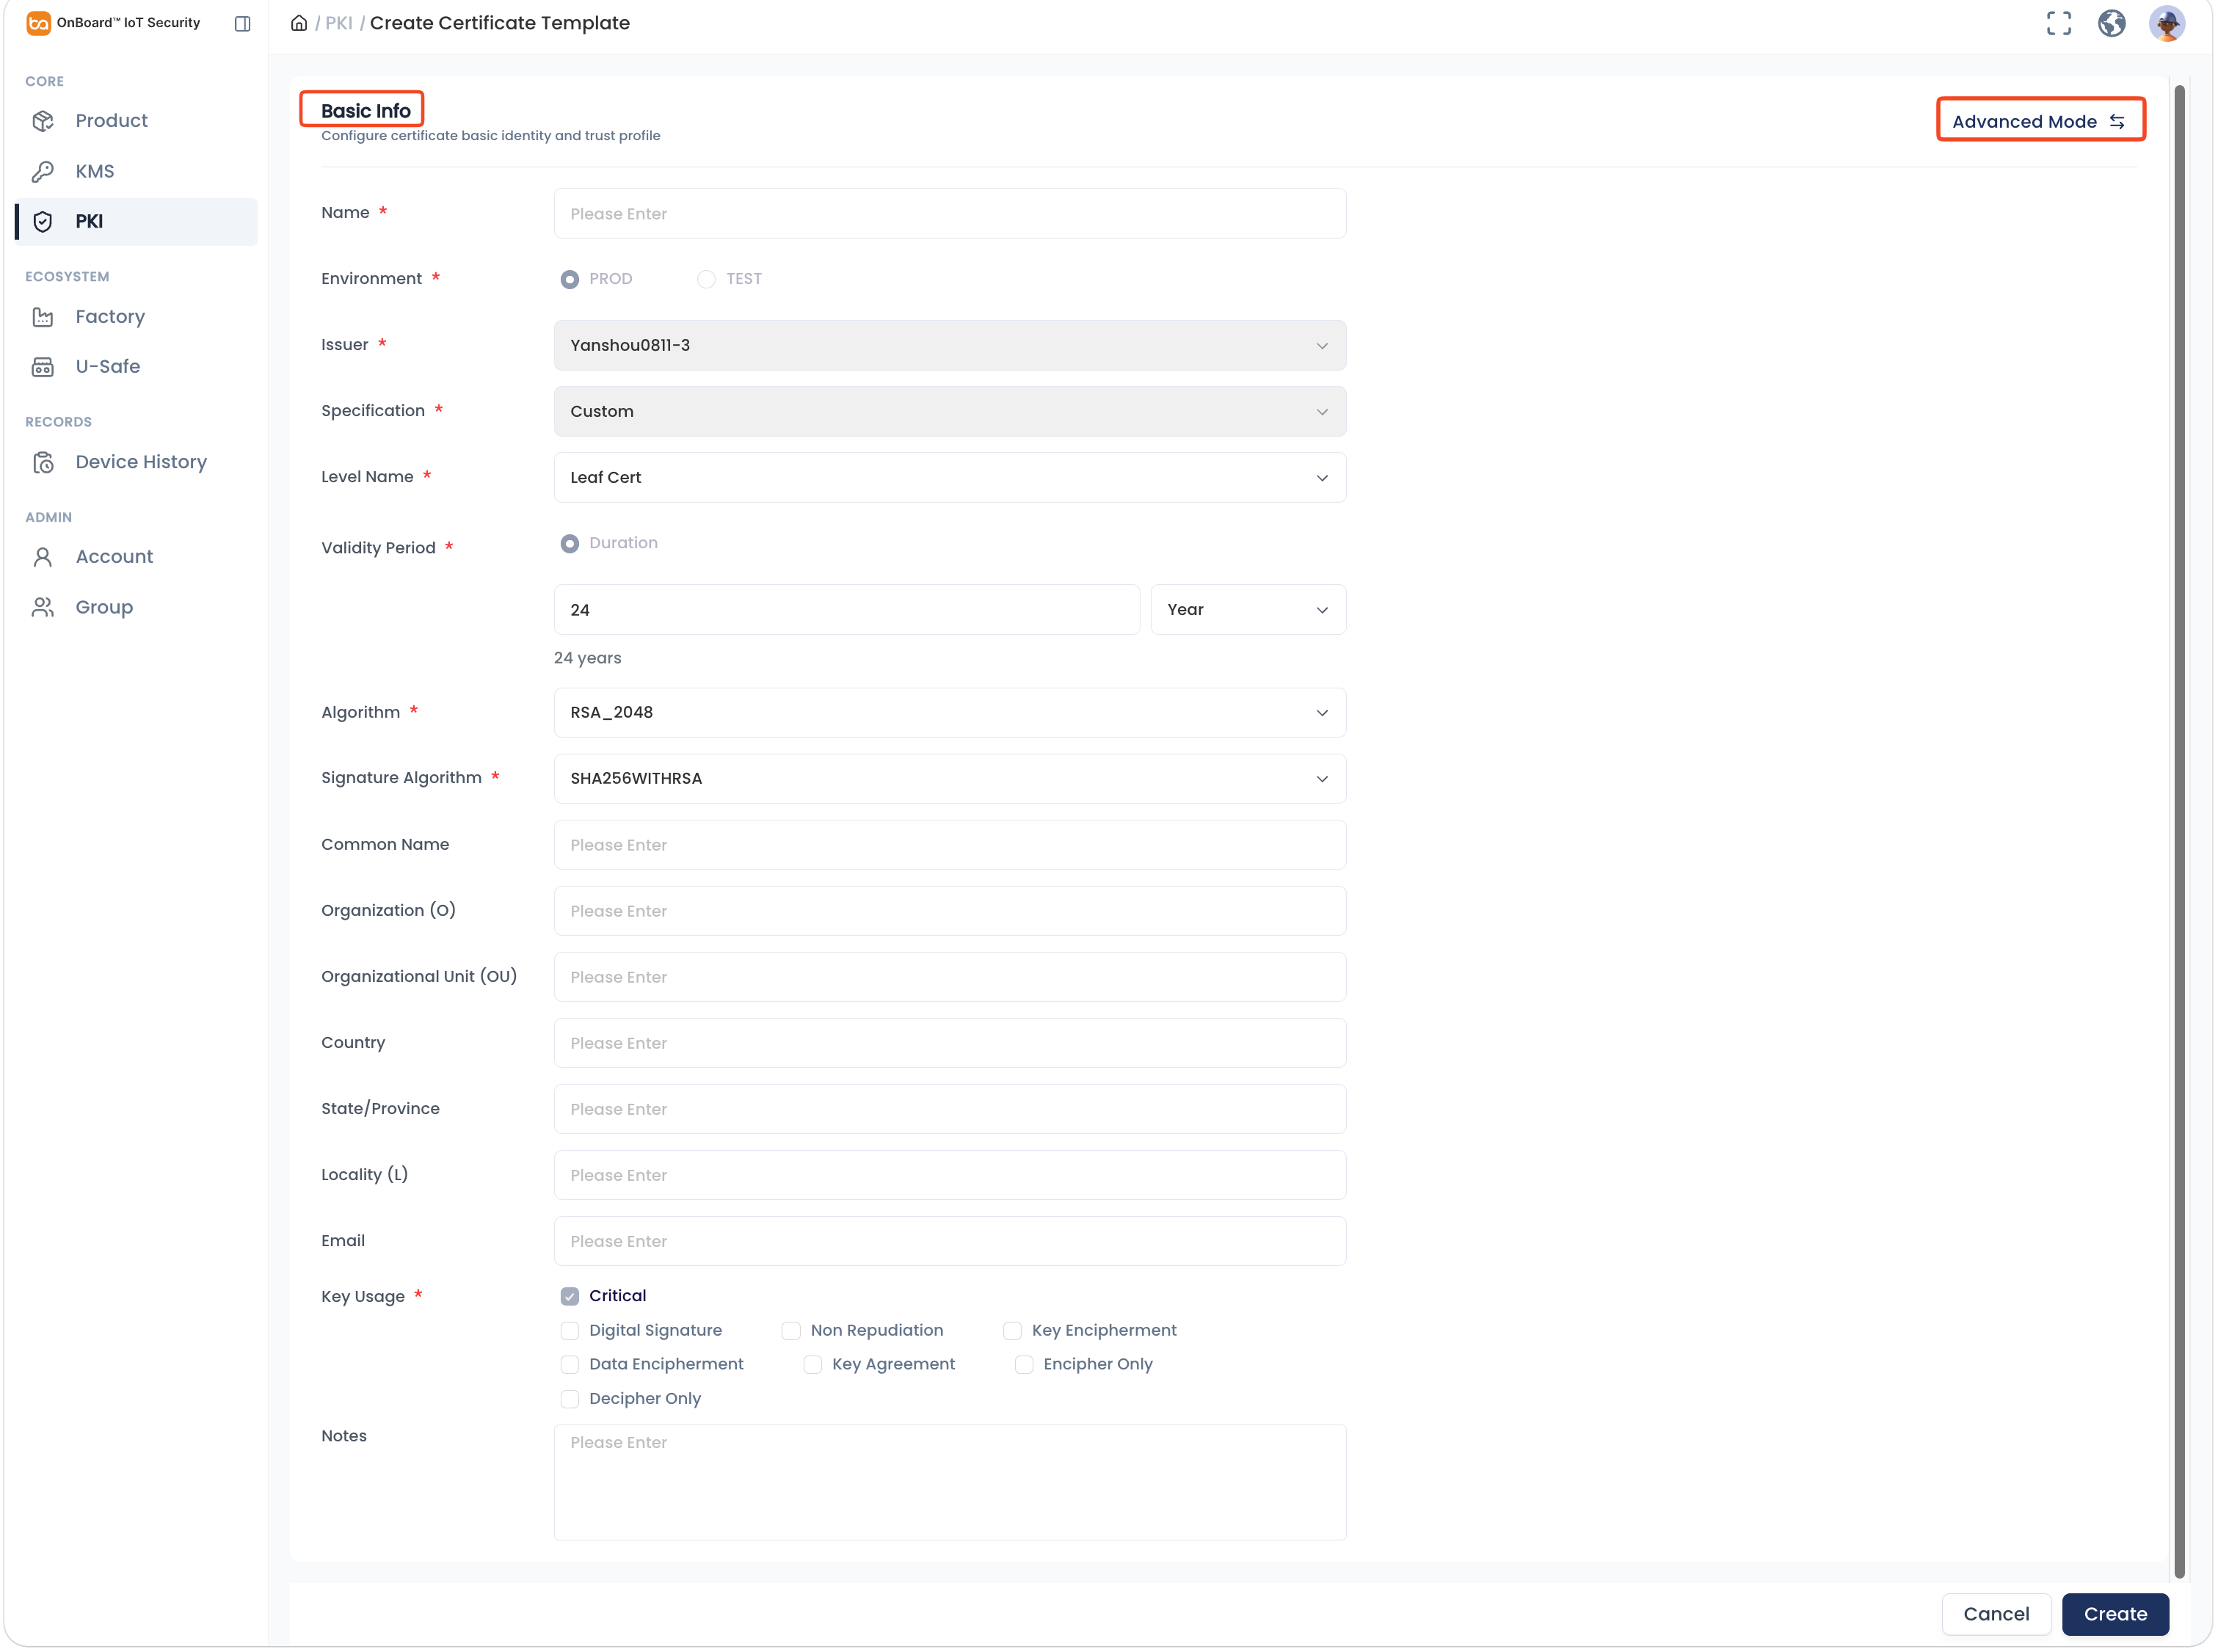
Description of end entity template basic information:
Information Description Name Within the same certificate chain, certificate names at the same hierarchy level must be unique. Environment The environment is inherited from the root or intermediate certificate. Issuer The inherited root or intermediate certificate. Specification Default is Custom. Level Name Default is Leaf Cert. Validity Period Set the validity period of the end entity template. Setting an expiration date beyond that of the inherited certificate may result in certificate chain validation failures, client trust issues, and audit risks.
Note: If the end entity template is inherited from your own root or intermediate certificate, the validity period will be inherited from the root or intermediate certificate.Algorithm Available algorithms for the certificates. Options include: - RSA_2048
- RSA_3072
- RSA_4096
- ECC_P384
- ECC_P256
- ECC_P521
Signature Algorithm Signature algorithms for the certificates. Options include: - SHA256WITHRSA
- SHA384WITHRSA
- SHA512WITHRSA
- SHA256WITHECDSA
- SHA256WITHECDSA
Common Name Name of certificate holder. Organization (O) Organizational name. Organizational Unit (OU) Organizational unit name. Country Two ISO country codes. State / Province State or province name. Locality (L) City name. Email User email. Key Usage Optional key usages, such as Digital Signature, Non Repudiation, and Key Encipherment. Notes Provide additional information related to the end entity certificate, such as special requirements and important notes. The configuration of advanced mode
The configuration of advanced mode -
After verifying that the information is correct, click Create to complete the end entity template creation.
tipBy default, the certificate creator is set as the Admin. To change the Admin, click the Options
icon for the Admin and select Transfer Admin on the Member tab, then choose the new Admin and click Confirm.When creating an end entity template, if the issuer is your own root or intermediate certificate, you must complete the CSR (Certificate Signing Request) configuration for the end entity template. Before the CSR configuration is completed, the template will remain in the Pending status and can't be used.
CSR configuration steps for the end entity template
When creating an end entity template, if the issuer is your own root or intermediate certificate, refer to the following steps to complete the CSR configuration.
-
On the PKI page, expand the corresponding certificate chain, and then click the corresponding end entity template.
-
Locate the CSR Configuration section on the certificate page, click the Download
icon to download the CSR file. Then, use your Root CA (Certificate Authority) to sign the file, thereby generating an end entity template signed by the Root CA.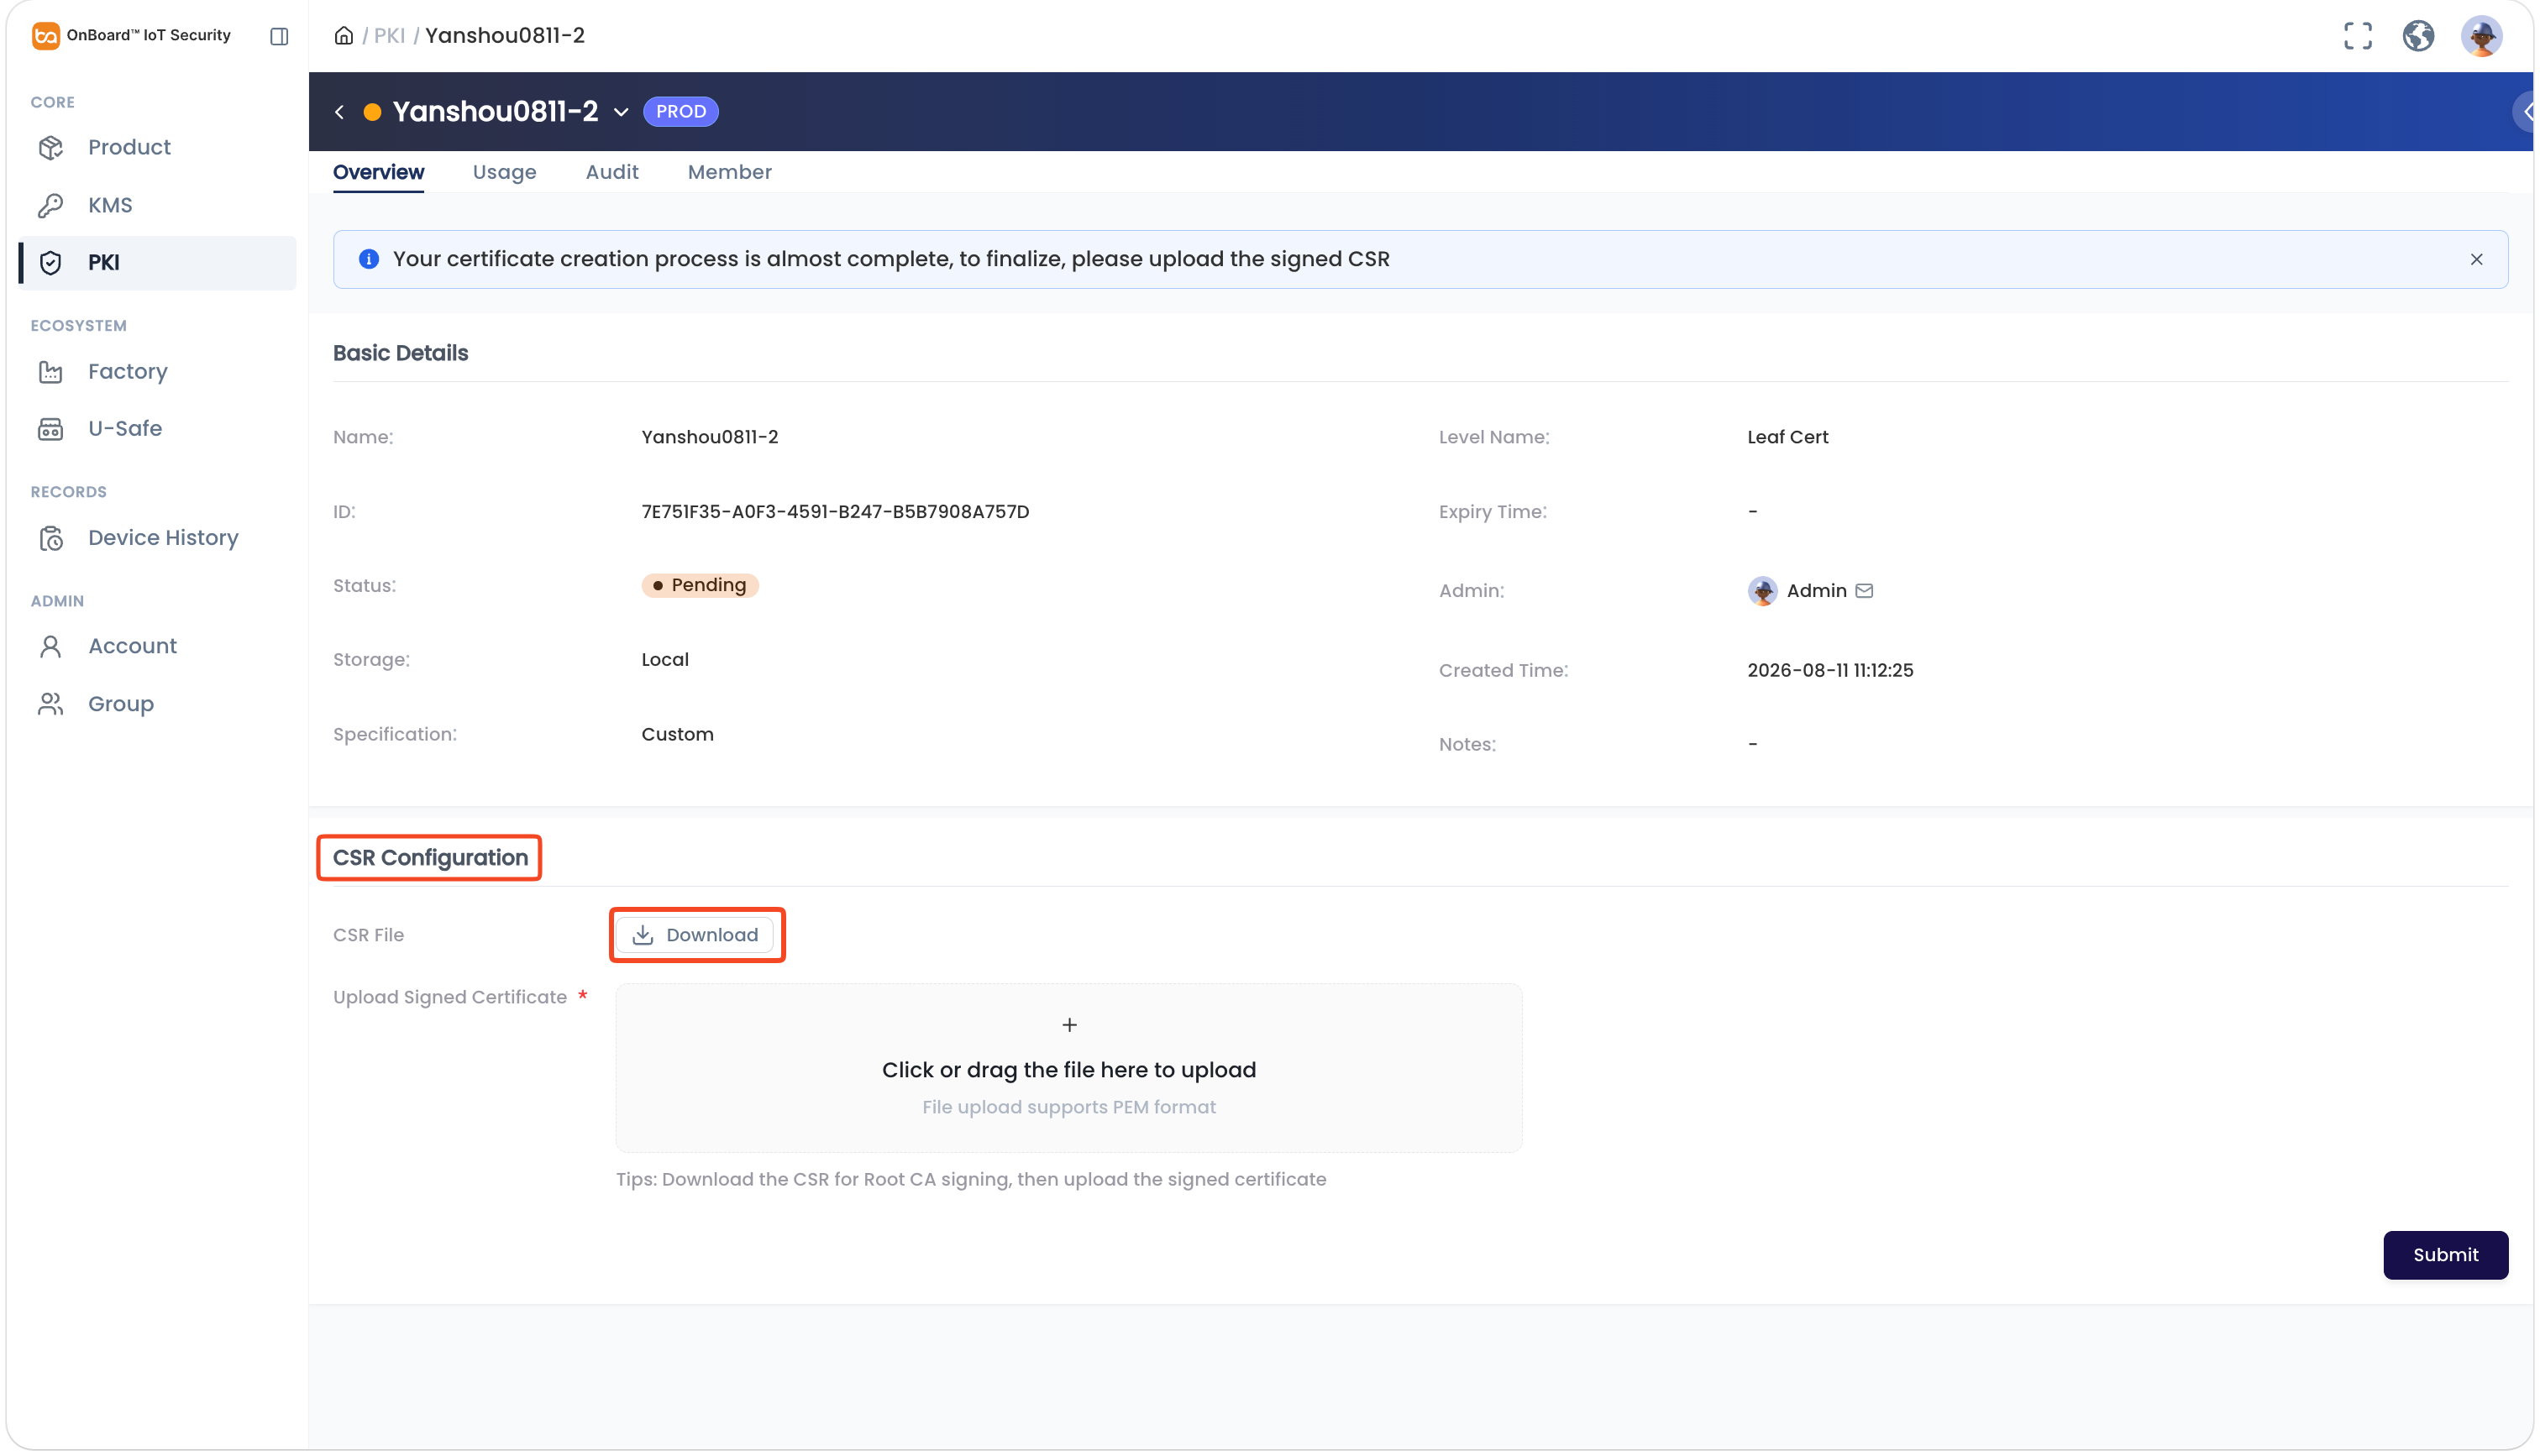
-
After an end entity template is generated, click the Add
icon in the upload area, select and upload the end entity template in .pem format, or directly drag and drop your end entity template into the upload area. -
Click Submit. Once the configuration is completed, the end entity template status will change to Normal.

 Download User Manual